background image

-9-

How to Fit and Remove a Router
Cutter

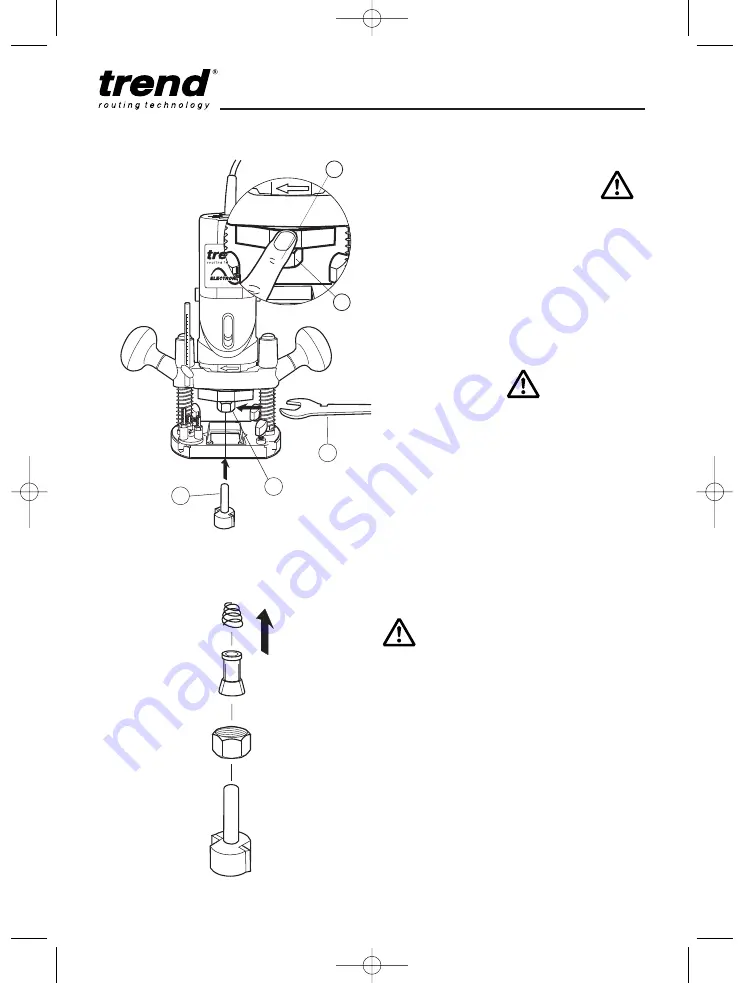
Fitting Cutters

Insert at least 

3

/

4

of the shank length of the

cutter (1) into the collet assembly (2).

Press the spindle lock (2) until the router
spindle is locked (you may need to turn the
spindle slightly to engage it).

Tighten the collet nut with the 17mm A/F
spanner (3). Do not use excessive force.

Removing Cutters

Press the spindle lock (2) until the router
spindle is locked (you may need to turn the
spindle slightly to engage it).

Undo the collet nut with the 17mm A/F
spanner. 

The cutter should now slide out. 

Each time you finish using a cutter, remove it
and store it in a safe place.

A collet spring is fitted into the spindle behind
the collet to allow for easy collet change.

Correct Sequence for Fitting Collet,
Nut, Collet Spring and Cutter

T4

Do not tighten the collet without a
cutter fitted.

Always use cutters with shanks which
match the diameter of the collet.

Do not use cutters larger than 30mm in
diameter.

.

1

3

2

.

1

2

MANU/T4 v2.0  30/8/07  1:08 pm  Page 9

Summary of Contents for T4

Page 1: ...T4 MANU T4 v2 0 30 8 07 1 08 pm Page 22 ...

Page 2: ...__2 3 ELECTRICAL SAFETY _________________4 MANUFACTURERS DECLARATION ______5 ITEMS ENCLOSED ____________________5 DESCRIPTION OF PARTS_______________6 ASSEMBLY ADJUSTMENT Dust Extractor Spout __________________7 Switching On Off____________________8 Depth of Cut_________________________8 Fitting Removing Cutters _____________9 Speed Control ______________________10 Fine Height Adjuster ___________...

Page 3: ...ool and attachment Keep both hands away from cutting area Always wait for the spindle and cutter to stop rotating before making any adjustments 10 Always keep guards in place and in good working order 11 Remove any nails staples and other metal parts from the workpiece 12 Maintain tools and cutters with care Keep cutters sharp and clean for better and safer performance Do not use damaged cutters F...

Page 4: ...can stall the router 15 In case of excessive vibrations whilst using the router stop immediately and have the eccentricity of the router router cutter and clamping system checked by competent personnel 15 All fastening screws and nuts should be tightened using the appropriate spanner or key and to the torque value provided by the manufacturer 16 Extension of the spanner or tightening using hammer ...

Page 5: ... cable is required use an approved triple core extension cable suitable for the power input of this tool see technical data When using a cable reel always unwind the cable completely Also refer to the table below Conductor size mm2 Cable rating Amperes 0 75 6 1 00 10 1 50 15 2 50 20 4 00 25 Cable length m 7 5 15 25 30 45 60 Voltage Amperes Cable rating Amperes 115 0 2 0 6 6 6 6 6 10 2 1 3 4 6 6 6 ...

Page 6: ...UFACTURERS DECLARATION We declare under our sole responsibility that this product is in conformity with the following standards of standardised documents EN 60745 EN 55014 EN 61000 in accordance with the directives 98 37 EC 73 23 EEC 89 336 EEC Level of sound pressure according to 86 188 EEC 98 37 EC measured according to EN 60745 Lpa sound pressure 91 1 dB A 1 Lwa acoustic power 104 1 dB A 2 Radi...

Page 7: ...uide bush dia 16mm N Collet O Removable fence cheek P Side fence rod fixing screw Q Hex key for side fence rods R Side fence body S Spanner 14mm A F for spindle when in grinder mode T 3 way turret stop U Spanner 17mm A F for collet nut V Thumb knob for depth stop W Fence guide rods dia 8mm x 300mm long X Dust spout fixing screw Y Template guide bush fixing screw Z Dust spout 34mm dia AA Spindle lo...

Page 8: ... through holes A from beneath and screw on into the captivated nuts in the spout Dismantle in reverse order The extractor spout is suitable for dust extractors with a hose diameter of 34mm T4 ASSEMBLY ADJUSTMENT 34mm 2 A A 1 Whenever possible use the dust extraction spout with a suitable extractor when routing MANU T4 v2 0 30 8 07 1 08 pm Page 7 ...

Page 9: ...s the depth of cut The rotating turret stop screws can be used for pre setting up to three depths of cut Their height can be adjusted using a screwdriver 6 and an 8mm A F spanner 7 Off On By turning the turret stop three depth settings can be quickly made T4 Switching On Off A slide switch on the front of the motor body is used to turn the router on and off When fitting the motor unit to the base ...

Page 10: ...ndle is locked you may need to turn the spindle slightly to engage it Undo the collet nut with the 17mm A F spanner The cutter should now slide out Each time you finish using a cutter remove it and store it in a safe place A collet spring is fitted into the spindle behind the collet to allow for easy collet change Correct Sequence for Fitting Collet Nut Collet Spring and Cutter T4 Do not tighten t...

Page 11: ...es is 18 000 rpm Using the Fine Height Adjuster The optional fine height adjuster Ref FHA 009 should be used when fine adjustment is required This is especially recommended when using our dovetail jig or router table Remove the depth stop and replace it with the fine height adjuster Leave the plunge locking grip knob and the thumb knob loose and thread the end of the fine height adjuster onto the ...

Page 12: ... to wander from the edge of the workpiece Feed Speed The speed at which the cutter is fed into the wood must not be too fast that the motor slows down or too slow that the cutter leaves burn marks on the face of the wood Practice judging the speed by listening to the sound of the motor when routing OPERATION Cutting Direction Moulding Natural Timbers When edge moulding natural timbers always mould...

Page 13: ...he cutter onto the workpiece and set the cutter height by raising the depth stop 5 the required distance Switch on the router and when the cutter reaches full speed gently lower the cutter into the workpiece and lock the plunge with the plunge locking lever 6 Feed along the timber keeping sideways pressure A to ensure the side fence does not wander away from the workpiece edge and downward pressur...

Page 14: ...calculating the shape of the template The template must be smaller by an amount equal to the difference between the outer edge of the guide ring and the outer edge of the cutter See below for the offset calculation The edge of the template must be free of imperfections as these will be replicated in the final workpiece Making a Router Stand Block When using a guide bush a useful aid is a router st...

Page 15: ...re used because the spindle lock will be disengage When re fitting the motor unit ensure that the switch is facing the front of the router so that it is accessible when plunge routing Ensure that the clamping nut is re tightened before using the router for normal plunge cutting operations Carving and Grinding Carving and grinding applications can be carried out with the router removed from its plu...

Page 16: ...eters of bearings are offered which will change the shape of the resulting mould With certain shapes such as the chamfer cutter below increasing the depth of cut will produce a larger chamfered edge Fit the bearing guided cutter into the router collet Place router onto the workpiece Set height of cutter using the depth stop 1 Switch on the machine After releasing the plunge locking lever 2 lower t...

Page 17: ... edge of the workpiece is not straight or is not very smooth or simply the guide rods of the side fence are too short for the job Use the straight edges of the router base and calculate the distance required from the edge of the batten to the cut required Always check that the clamps do not obstruct the path of the router before starting the cut Standard technique is used and side pressure applied...

Page 18: ...t at regular intervals Visually check the carbon brushes In the event of excessive sparking they may need changing After about 40 operating hours inspection by a authorised Trend service agent is recommended ENVIRONMENTAL PROTECTION Recycle raw materials instead of disposing as waste Accessories and packaging should be sorted for environmental friendly recycling Separate collection This product mu...

Page 19: ... T4 018 19 1 On Off Lever WP T4 019 20 21 1 2 Core Cable with Plug 230V UK T4 WP T4 021 1 2 Core Cable with Plug 230V Euro T4 EURO WP T4EURO 021 1 2 Core Cable with Plug 115V UK T4L WP T4L 021 22 1 Field 240V T4E WP T4E 022 1 Field 115V T4EL WP T4EL 022 23 1 Baffle WP T4 023 24 2 Machine Screw Pan M4 x 63mm Pozi WP T4 024 25 1 Top Bearing 7mm x 22mm x 7mm 608ZZ WP T4 025 26 1 Armature 230V with Fa...

Page 20: ...stic Base Slider WP T4 061 62 1 Spring Washer Revolving Guide WP T4 062 63 2 Machine Screw Csk M5 x 12mm Slot WP SCW 11 64 2 Machine Screw Csk M5 x 8mm Slot WP SCW 09 65 1 Guide Rod 8mm x 300mm pair WP T4 065 66 4 Machine Screw Csk M4 x 6mm Pozi WP SCW 66 67 1 Side Fence Cheeks pair WP T4 067 68 1 Parallel Side Fence Body WP T4 068 69 1 Spanner Special 17mm A F WP T4 069 70 1 Machine Screw Pan M4 ...

Page 21: ...18 19 21 22 23 24 15 25 26 28 30 59 32 27 33 34 35 36 37 86 39 31 74 75 40 41 43 42 44 46 47 48 49 50 53 52 51 54 55 56 57 60 85 61 87 64 66 65 66 67 68 69 71 72 88 38 60 4 5 4 5 12 39 70 5 4 13 14 45 77 78 63 81 80 76 79 73 84 T3 ROUTER 62 MANU T4 v2 0 30 8 07 1 08 pm Page 20 ...

Page 22: ...annot be held liable for any material rendered unusable or any form of consequential loss E OE All trademarks acknowledged Trend Machinery Cutting Tools Ltd Odhams Trading Estate St Albans Rd Watford WD24 7TR England Enquiries __________________0800 487363 Technical Support ____0044 0 1923 224681 Fax ________________0044 0 1923 236879 Email ______________enquiry trendm co uk Web __________________...

Reviews: