Traxxas 70054-1 Owner'S Manual Download Page 22

22 • 1/16 SLASH 4WD

TUNING ADJUSTMENTS

A camber gauge (available  
at your local hobby shop) 
can be a useful tool for 
alignment setting.

To achieve a good starting 
point for the slipper clutch, 
tighten the slipper clutch 
adjusting nut clockwise until 
the slipper clutch adjusting 
spring fully collapses (do not 
over tighten), and then turn 
the slipper clutch nut counter-
clockwise 

¾

 to 1 turn.

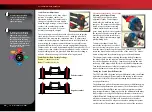
Static Camber Adjustment

The wheels can be set to have either  
positive or negative camber (see 
illustration below). The camber angle 
changes as the wheel moves up and 
down through its range of travel. Static 
camber is the camber angle at the 
wheel when the vehicle is set at its 
normal, stationary ride height. 

The suspension pivot balls located in the axle carriers adjust the 
static camber. Camber is factory-set at -1°, with the pivot balls 
threaded all the way into the suspension arms. To adjust static 
camber, insert the supplied 2mm hex wrench into the pivot ball 
(compressing the suspension until the arms are parallel to the 
ground will allow for easier hex wrench engagement). Negative 
camber can be increased by unthreading the lower pivot ball. Zero 
camber or positive camber (not recommended) can be achieved 
by unthreading the upper pivot ball. Note that camber changes 
will also effect the toe angle of the wheel being adjusted.  

Static Camber Base Factory Settings
Front: 

-1° camber each side

Rear: 

-1° camber each side 

TRANSMISSION TUNING

Adjusting the Slipper Clutch

Your model is equipped with an 

adjustable Torque Control slipper 
clutch, which is built into the large 
spur gear. The purpose of the slipper 
clutch is to prevent over-stressing 
of the drivetrain and transmission 
gears. It may also be used to regulate 
the amount of power sent to the rear 
wheels to prevent tire spin. When it 
slips, the slipper clutch makes a high-
pitch, whining noise. 


To adjust the slipper clutch, first 
remove the receiver box cover. Next, 
remove the single large hex screw 
from the motor plate using the supplied 2.5mm wrench.  Then 
rotate the motor and mount to the side of the model. The slipper 
clutch is integrated into the main spur gear on the transmission. 

The slipper clutch is adjusted using the spring-loaded locknut on 

the slipper shaft. Use the supplied universal wrench. To tighten or 
loosen the slipper nut, insert the 1.5mm hex wrench into the hole 
in the end of the slipper shaft. This locks the shaft for adjustments. 
Turn the adjustment nut clockwise to tighten (less slippage) and 
counterclockwise to loosen (more slippage).


Tuning the Sealed Gear Differentials

The 1/16 Slash 4WD’s front and rear gear differentials allow the left and 
right wheels to spin at different speeds while turning so that the tires 
do not scuff or skid. This decreases the turning radius and increases 
steering performance. 

The performance of the differentials can be tuned for different driving 
conditions and performance requirements. The differentials are filled 
with silicone differential fluid, and are sealed to maintain consistent 
long-term performance. Changing the oil in the differential with either 
lower or higher viscosity oil will vary the performance characteristics 
of the differentials. Changing to a higher viscosity oil in the differential 
will reduce the tendency for power to be transferred to the wheel 
with the least traction. You may notice this when making sharp turns 
on slick surfaces. The unloaded wheels on the inside of the turn have 

Positive camber

Negative camber

Summary of Contents for 70054-1

Page 1: ...owner s manual MODEL 70054 1 ...

Page 2: ...port options are Quick Start This manual is designed with a Quick Start path that outlines the necessary procedures to get your model up and running in the shortest time possible If you are an experienced R C enthusiast you will find it helpful and fast Be sure and read through the rest of the manual to learn about important safety maintenance and adjustment procedures Turn to page 7 to begin FCC ...

Page 3: ... conflict with or disrupt pedestrian or vehicular traffic Never under any circumstances operate the model in crowds of people Your model is very fast and could cause injury if allowed to collide with anyone Because your model is controlled by radio it is subject to radio interference from many sources that are beyond your control Since radio interference can cause momentary losses of radio control...

Page 4: ...rces and direct sunlight Nickel Metal Hydride NiMH batteries must be recycled or disposed of properly LiPo Batteries Lithium Polymer LiPo batteries are becoming popular for use in R C models due to their compact size high energy density and high current output however these types of batteries require special care and handling procedures for long life and safe operation Warning LiPo batteries are i...

Page 5: ...t Batteries on page 11 SUPPLIED TOOLS AND EQUIPMENT 2 0mm T wrench 4 way wrench 2 5mm ball driver wrench 1 5mm L wrench Body clips 6 cell 2 3A NiMH battery NiMH battery charger APPLYING THE DECALS The main decals for your model have been applied at the factory Additional decals are printed on self adhesive clear mylar and are die cut for easy removal Use a hobby knife to lift the corner of a decal...

Page 6: ...hock Damper Rear Body Mount Hex Hub Rear Suspension Arm Axle Carrier Pivot Ball Turnbuckle LED Light Pipe Receiver Box Steering Servo Front Body Mount Battery Compartment Door Battery Compartment Vent Electronic Speed Control XL 2 5 Motor Titan 12T Battery Door Release Tab Rocker Rocker Push Rod Push Rod Spring Pre load Adjuster Traxxas High Current Connector ...

Page 7: ...ly charge the battery pack included with your model Follow this procedure to make sure your radio system works properly at a distance and that there is no interference from outside sources 3 Install the antenna See page 12 9 Detail your model See page 5 The receiver antenna and antenna tube must be properly installed before operating your model Apply other decals if desired 4 Install batteries in ...

Page 8: ...o that the battery runs longer An electronic speed control also has circuitry that prevents loss of steering and throttle control as the battery loses its charge Frequency band The radio frequency used by the transmitter to send signals to your model This model operates on the 2 4GHz direct sequence spread spectrum LiPo Abbreviation for Lithium Polymer Rechargeable LiPo battery packs are known for...

Page 9: ... voltage corresponds to the pressure that is forcing the water through the hose IMPORTANT RADIO SYSTEM PRECAUTIONS For maximum range always point the front of the transmitter toward the model Do not kink the receiver s antenna wire Kinks in the antenna wire will reduce range DO NOT CUT any part of the receiver s antenna wire Cutting the antenna will reduce range You must extend the antenna wire in...

Page 10: ... 2 5 ELECTRONIC SPEED CONTROL High Current Battery Connector THE TRAXXAS TQ 2 4GHz RADIO SYSTEM Your model is equipped with the Traxxas TQ 2 4GHz transmitter The transmitter has two channels Channel one operates the steering and channel two operates the throttle The receiver inside the model has three output channels Your model is equipped with one servo and an electronic speed control TRANSMITTER...

Page 11: ...Red LED Ready for Charging Slowly Flashing Green LED Charging see Charge Progress chart Solid Green LED Battery Fully Charged Flashing Red LED Charger error Disconnected Connected Charged 1 2 3 CHARGING THE BATTERY PACK The Traxxas Battery Charger is a fully featured NiMH Nickle Metal Hydride charger It features 2 amp charge current for fast charging and advanced peak detection to optimize every c...

Page 12: ...ting and easy to grip the Traxxas connector is engineered to extract all the power your battery has to give Using LiPo Packs in Your Model The XL 2 5 is compatible with 2S and is equipped with Low Voltage Detection circuitry to prevent over discharging Make certain Low Voltage Detection is activated see page 16 for details when using LiPo packs in your model Using an Additional Battery for Increas...

Page 13: ...erses the direction of the corresponding servo For example if you turn the steering wheel to the right and the model turns left Channel 1 would need to be reversed to correct the servo direction Use the following procedures to reverse the steering and throttle channels if necessary Servo reversing should only be required if you accidentally reset the direction of a channel Do not reverse the steer...

Page 14: ... the model the front wheels should be pointing straight ahead If the wheels are turned slightly to the left or right slowly adjust the steering trim control on the transmitter until they are pointing straight ahead 7 Gently operate the throttle trigger to ensure that you have forward and reverse operation and that the motor stops when the throttle trigger is at neutral WARNING Do not apply full th...

Page 15: ...release the LINK button 5 When the LEDs on both the transmitter and the receiver turn solid green the system is bound and ready for use Confirm that the steering and throttle operate properly before driving your model TRANSMITTER LED CODES LED Color Pattern Name Notes Solid green Normal Driving Mode See page 13 for information on how to use the transmitter controls Slow red 0 5 sec on 0 5 sec off ...

Page 16: ...ect a fully charged battery pack to the XL 2 5 3 Turn on the transmitter with the throttle at neutral 4 Press and hold the EZ Set button A The LED will first turn green and then red Release the button 5 When the LED blinks RED ONCE pull the throttle trigger to the full throttle position and hold it there B 6 When the LED blinks RED TWICE push the throttle trigger to the full reverse and hold it th...

Page 17: ...turn solid green Low Voltage Detection ACTIVE or red Low Voltage Detection DISABLED The model is ready to drive Note If you missed the mode you wanted keep the EZ Set button pressed down and the blink cycle will repeat until the button is released and a Mode is selected LED Codes and Protection Modes Solid Green XL 2 5 power on light Low Voltage Detection is ACTIVATED LiPo setting Solid Red XL 2 5...

Page 18: ...he types of batteries that are available and the methods with which they can be charged it s impossible to give exact run times for the model Another major factor that affects run time is how the model is driven Run times may decrease when the model is driven repetitively from a stop to top speed and with repetitive hard acceleration Tips for Increasing Run Time Use batteries with the highest mAh ...

Page 19: ...uations that will restrict the tires and put much higher loads on the motor Motor Precautions Motor life can be greatly reduced in mud and water If the motor gets excessively wet or submerged use very light throttle run the motor slowly until the excess water can run out Applying full throttle to a motor full of water can cause rapid motor failure Your driving habits will determine motor life with...

Page 20: ...1 Remove the 2 5x8mm screws that secure the wire clamp 2 Remove the 2 5x8mm screws that secure the receiver box lid to the chassis Lift the lid up and toward you to disengage the lid s tab from its slot in the chassis 3 You can now access the receiver Unplug the servo cables from the receiver and remove the receiver Receiver Installation 1 Route the antenna wire out of the receiver box cover A Pla...

Page 21: ...pension damping effect Changing the oil to a higher viscosity oil will increase damping Lowering the viscosity of the oil will cause the suspension damping to be reduced Damping should be increased with higher viscosity oil if the model is bottoming easily over jumps Damping should be decreased with thinner viscosity oil if the model is hopping over small bumps and feels unstable The viscosity of ...

Page 22: ...sing of the drivetrain and transmission gears It may also be used to regulate the amount of power sent to the rear wheels to prevent tire spin When it slips the slipper clutch makes a high pitch whining noise To adjust the slipper clutch first remove the receiver box cover Next remove the single large hex screw from the motor plate using the supplied 2 5mm wrench Then rotate the motor and mount to...

Page 23: ...ar cover by removing the single screw on the top of the gear cover The motor uses an aluminum mount for quick easy motor access and gearing adjustment To remove the motor first open the right battery door and slide out the ESC Next remove the single large hex screw using the supplied 2 5mm wrench Then rotate the motor and mount to the side of the model and slide backward off the post Pinion Gear I...

Page 24: ...ferent specifications Experimentation with different types of tires is recommended to see which ones work the best on the terrain where the model is run Soft compound tires with many short spikes generally work better on hard dry surfaces In loose dirt a tire with large spikes should perform better Foam tires can be fitted for use on pavement or indoor carpet tracks See your parts list for accesso...

Page 25: ...sis Keep the chassis clean of accumulated dirt and grime Periodically inspect the chassis for damage Shocks Keep the oil level in the shocks full Use only 100 pure silicone shock oil to prolong the life of the seals If you are experiencing leakage around the top of the shock inspect the bladder in the top cap for signs of damage or distortion from overtightening If the bottom of the shock is leaki...

Page 26: ...6200 TRAXXAS WAY MCKINNEY TEXAS 75070 1 888 TRAXXAS 150123 70054 1 OM N EN R01 MODEL 70054 1 owner s manual ...

Reviews: