Transduction TR-9200 User Manual Download Page 17

CHAPTER 3 INSTALLATION

CHAPTER  3     INSTALLATION

3.1 Installing the Video Card and Video Driver

Before connecting the TR-9200 and TR-9300, make sure your computer has a
video card already installed for the monitor. After you connect the drawer, install the
video software driver. The video driver is supplied by the video card manufacturer and
may be found on the CDROM that came with your computer. If you need information
on installing a video card or video driver, refer to the manual that came with your video
card.

3.1.1 Configuring the Display Settings

After connecting the drawer and turning on your computer, you may need to configure
one or more of the following display settings:

² 

Display mode (also called desktop area or video resolution)

² 

Refresh rate (also called vertical scan rate or vertical sync)

² 

Color depth (also called color palette or number of colors)

Each video card has several controls that let you adjust the display settings. However,
the software and driver for each video card is unique. In most cases, you adjust these
settings by using a program or utility provided by the manufacturer of the video card.
Most video cards use the Windows Display Properties control panel to configure the
display. To open the Windows Display Properties, click the right mouse button in a
blank area of the Windows desktop and then select 

Properties

. The Settings tab

usually lets you change the Color Palette and the Desktop Area (

by 

pixel

resolution).
Some video cards integrate additional features into the Windows Display Properties
control panel to give you an exceptional setup that is flexible and easy to use. For
example, the control panel may include an Advanced Properties button, an
Adjustment tab, or a Refresh tab for changing other settings. Other video cards have
a separate utility for setting display properties.
Whenever you change the resolution, color, or refresh rate, the image size, position,
or shape may change. This behavior is normal. You can readjust the image using the
monitor on-screen controls. For more information on the monitor on-screen controls,
refer to Chapter 2. For more information on configuring the display settings, refer to
the manual that came with your video card.

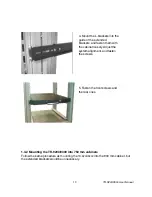
3.2 Connecting the Drawer

To connect an TR-9200 and TR-9300 monitor/keyboard drawer to a computer,
perform the following steps:

TR-9200/9300 User Manual

16

Summary of Contents for TR-9200

Page 1: ...sion 1 0 07 30 08 TR 9200 1U 19 RACK MOUNT KEYBOARD MOUSE MONITOR TR 9300 1U 19 RACK MOUNT KVM SWITCH 5155 23 Spectrum Way Mississauga ON Canada L4W 5A1 TEL 1 800 268 0427 905 625 1907 FAX 905 625 053...

Page 2: ...0 w Rear mounting kit 2 x short L shaped brackets 2 x long L shaped brackets 2 x expanding brackets 2 x supporting brackets w 1 x 1 8m KVM cable 3 in 1 cable PS 2 mouse PS 2 keyboard DB15 VGA w 1 x po...

Page 3: ...t step on it Do not place anything over power cord The power cord must rated fro the voltage and current marked on the product s electrical ratings labell The voltage and current ratings of the cord s...

Page 4: ...cator 15 CHAPTER 3 INSTALLATION 16 3 1 Installing the Video Card and Video Driver 16 3 1 1 Configuring the Display Settings 16 3 2 Connecting the Drawer 16 3 3 Turning On the Drawer 17 3 4 Testing the...

Page 5: ...onitors provide flicker free color images at optimal resolutions The monitors 0 264mm pixel pitch ensures crisp images with clear definition even at high resolutions The TR 9200 9300 monitors are inte...

Page 6: ...ix TFT LCD Anti reflection Glass for LCD 2 x 351 x 284 mm Maximum Resolution 1280 x 1024 pixels Input signal format DVI TR 9200 only or RGB Analog Video Display control All graphic user s interface on...

Page 7: ......

Page 8: ...Your PC compatible computer must have a 6 pin mini DIN PS 2 style mouse port w Your PC compatible computer must have a 6 pin mini DIN PS 2 Style keyboard port KVM Cables For optimum signal integrity...

Page 9: ...t in the carton Please use the following combination to fit in different cabinets For 750mm cabinets Short L bracket x 2 Extended bracket x 0 not necessary Supporting bracket x 2 For 900mm 850mm cabin...

Page 10: ...00 9300 into 900 850 mm cabinets 1 Fasten the supporting brackets with the chassis 2 Fasten the extended brackets with the supporting brackets 3 Screw the extended brackets with the system chassis TR...

Page 11: ...9300 into the 900 mm cabinet but the extended brackets would be unnecessary 10 TR 9200 9300 User Manual 4 Mount the L brackets into the guide of the extended brackets and fasten them with the cabinet...

Page 12: ...xel pitch H x W 0 264mm x 0 264mm Response Time 16 msec rising falling 12 4 msec Brightness 260cd m2 Panel Color 262 K LCD Back Light 4 Lamps Power Management VESA DPMS Plug Play DDC1 DDC2B Power Cons...

Page 13: ...p a q 1 0 2 4 7 6 8 6 6 H z T R 9 2 0 0 T R 9 3 0 0 A n a lo g V E S A 1 2 8 0 1 0 2 4 7 5 H z T R 9 2 0 0 T R 9 3 0 0 A n a lo g V E S A 1 2 8 0 1 0 2 4 7 0 H z T R 9 2 0 0 T R 9 3 0 0 D ig ita l D...

Page 14: ...1 Press the MENU button 2 Select input mode 3 Input 1 is analog while input 2 is DVI input 4 Select correct one and return to main menu 5 The TR 9300 together with its 3 in 1 KVM cable can accept anal...

Page 15: ...onfigure the colors 4 Select color temperature Then users can either select to adjust separate R G B values to obtain a satisfactory setting or choose anyone among 4200K 5000K 6500K 7500K and 9300K as...

Page 16: ...ools 3 Select OSD settings Users can adjust the following items about OSD OSD horizontal position OSD size OSD timeout VOSD vertical position 4 Press the can restore original factory settings 2 2 7 Po...

Page 17: ...ovided by the manufacturer of the video card Most video cards use the Windows Display Properties control panel to configure the display To open the Windows Display Properties click the right mouse but...

Page 18: ...re all cables and the power cord are connected properly Be sure to tighten all connector screws Using two hands grasp the rear of the drawer lift the tab and pull the panel up and forward This will di...

Page 19: ...tup w Console s PS 2 Mouse Controls All Connected Computers w PS 2 Compatible Mouse Support Microsoft Intellimouse Explorer and Logitech FirstMouse Support w SVGA VGA and Multisync Monitor Support w L...

Page 20: ...an cascade up to two or three levels For two or three stage installation please refer to the manuals in the KVM switch box The rear view of the TR 9300 Note We strongly recommend you directly contact...

Page 21: ...the station you originally shut down 4 After the TR 9300 is power On the computers starting with the ones attached to the last station in the chain and working back to the station you originally shut...

Page 22: ...g the Port ID of the CPU Port that the computer is connected to either with the Hotkey port selection method or from the OSD Main Menu 4 4 2 Port Key In Examples Access a computer attached to Port 3 k...

Page 23: ...the list one line at a time Use Pg Up and Pg Dn or click on the Up and Down Arrow symbols to move up or down through the list one screen at a time To activate a port move the Highlight Bar to it then...

Page 24: ...is a the list only displays those ports whose names begin with a If the next letter you type is b the list only displays the ports whose names begin with ab etc To return to the OSD Main Menu without...

Page 25: ...s powered Off the OSD will still switch to it and will not show an error F4 QV QV lets you select the ports you want to include for automatic scanning under the Quick View Scanning function see F2 abo...

Page 26: ...acters 0 9 w and Space Case does not matter OSD displays the Port Name in all capitals no matter how they were keyed in 4 When you have finished editing press Enter to have the change take effect To a...

Page 27: ...e OSD Security Features below for password setting details CLEAR THE NAME LIST To clear all Port Names from the Name List You are asked to confirm before the procedure goes on Key in Y then press Ente...

Page 28: ...Press F6 to bring up the Setup configuration menu 2 Move the highlight bar to Set Password then press Enter 3 Key in the new password then press Enter The password may be up to 8 characters long and...

Page 29: ...le Keyboard Port then plug it back in Improper Master View reset Turn off all Master View units and wait five seconds before turning them back on Note If the unit is operating under Self powered mode...

Page 30: ......

Page 31: ......

Reviews: