background image

2

2

2

2

     Revision E

>


.


.


.


.


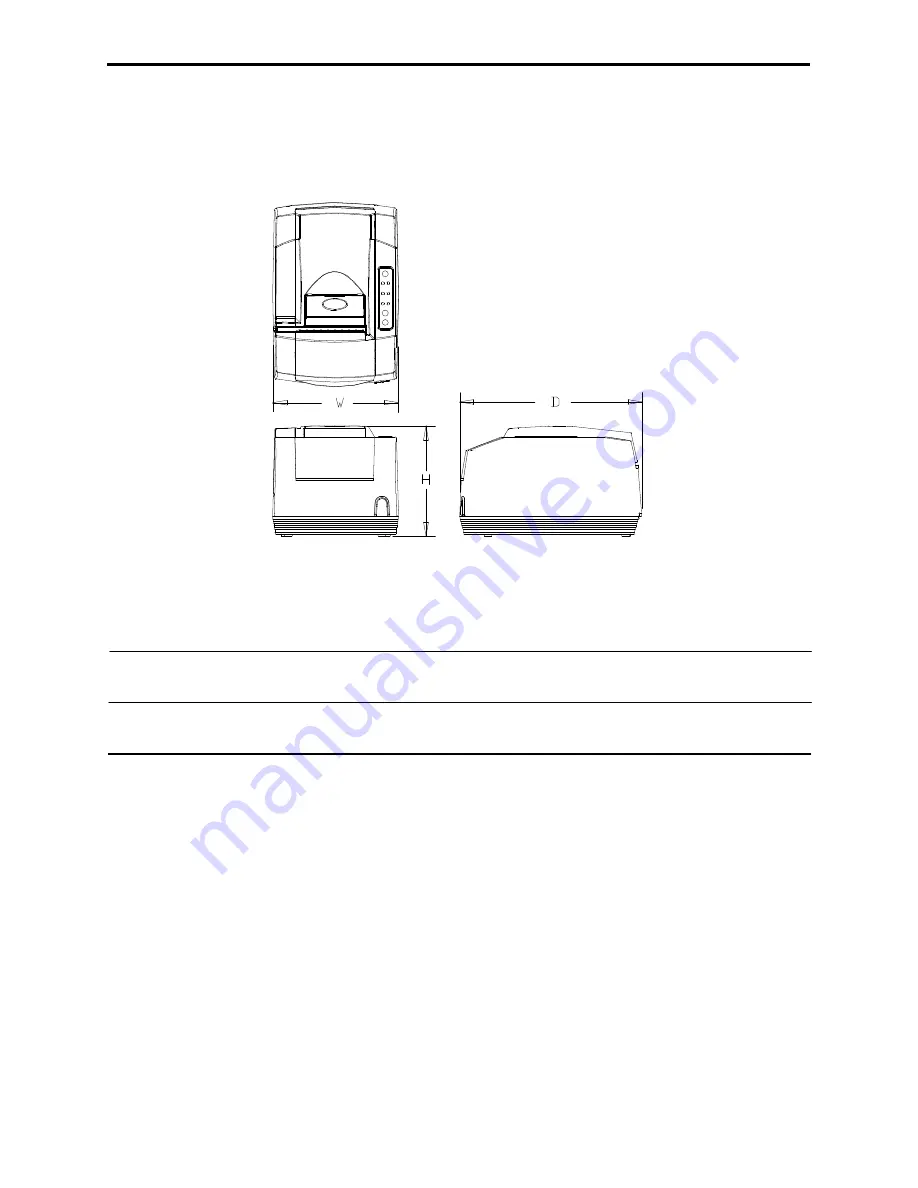
Figure 12 Printer Dimensions 


Width   

Depth   

Height 


Without Knife


6.75"   

9.75"   

5.92" 


(172 mm) 

(248 mm) 

(151 mm) 


With Knife


6.75"   

9.75"   

6.44" 


(172 mm) 

(248 mm) 

(164 mm) 


Weight:  


approx. 6 lbs. (2.7 kg) 

Shipping:


approx. 8 lbs. (3.6 kg) 


Interface 

Serial RS-232C   

Bi-directional- Ready/Busy or XON/XOFF (9-pin D-shell or 25-pin D-shell) 

Parallel IEEE1284 

Bi-directional-transmit/receive/ground (25-pin D-shell or 36-pin Centronics) 

USB 


Version 1.1 

Summary of Contents for BANKjet 1500

Page 1: ...BANKjet 1500 OPERATOR S GUIDE 20 03680 Rev E Nov 07...

Page 2: ...Rev A Initial Release Rev B Updated disclaimer Rev C updated paper case p n s descriptions qtys Rev D Pg 38 removed buzzer option Rev E Added RoHS part numbers for the power cords in Appendix F...

Page 3: ...s for a Class A computing device in accordance with the specifications in Part 15 of FCC rules These regulations are designed to minimize radio frequency interference during installation however there...

Page 4: ...the problem occurred 6 How you tried to solve the problem TransAct s BANKjet 1500 Printers come with a standard 24 month warranty that commences upon shipment from factory and covers parts and labor A...

Page 5: ...to Ithaca screen 3 Use the Product Info pulldown box to select the appropriate information for the printer model that you are using The Programmer s Guide is available by down loading it from our web...

Page 6: ...Technical Support Departments at the following address and telephone or fax numbers Receive technical support order documentation request additional information or send in a printer for service Order...

Page 7: ...one and two cartridge printing and provides information on how each printing option influences the configuration settings of the printer Section 3 BANKjet 1500 Features and Specifications Section 3 BA...

Page 8: ...9 33333333333333333333333333333333 33333333333333333333333333333333 33333333333333333333333333333333 3333333333333333333333333333333333333333333333333333333333333333 33333333333333333333333333333333...

Page 9: ...3333333 333333333333333 Verifying Printer Setup and Configuration Settings 48 Verifying the Communications Interface Card 48 Verifying the Cash Drawer Interface 48 Table 10 Cash Drawer Commands Verify...

Page 10: ...8 Connecting the AC Power Cord with power supply 16 Figure 9 Connecting the DC Power Cord no power supply 17 Figure 10 Paper Low Setup adjusting the sensor 18 Figure 11 Installing New Paper Roll 23 F...

Page 11: ...Troubleshooting Printer Does Not Turn ON 55 Table 16 Troubleshooting Printer Will Not Communicate prints illegible receipts 56 Table 17 Troubleshooting Ink Cartridge Status Indicator Flashing Printer...

Page 12: ...ept commands and successfully interface with your system in just a few minutes Follow the steps below when setting up your printer Overview of Printer Controls pg 6 Step by Step Installation Instructi...

Page 13: ...nter is removed Do not unplug the printer from it s power source Instead turn the printer to the STANDBY OFF mode by pressing and releasing the Button located on the front face of the printer Doing th...

Page 14: ...not distinguish between a new full cartridge and a used cartridge When a cartridge is replaced the printer will reset the ink status to full when the Button is pressed Used cartridges should be discar...

Page 15: ...tion slot If a form is already present in the printer pressing the button will move the form in a downward direction The Open Cover Button is used to access the rear paper roll compartment and is loca...

Page 16: ...s reloaded the indicator lights will be extinguished and the printer will resume operation If the BANKjet 1500 is equipped with the optional paper low feature the will flash when the paper roll diamet...

Page 17: ...if you have to return your printer for repair Figure 2 Unpacking Instructions 1 Open the box and remove the printer and all items Check to make sure that all items are present BANKjet 1500 Printer In...

Page 18: ...2 2 2 Revision E Step 2 Connect Power and Communications 0 0 0 0 Figure 3 Power and Communications Connections Three cables are required to be connected to the printer Power Communications Cash Drawe...

Page 19: ...estraints are developed to protect against accidental unplugging of the printer while it is in use Be sure to properly route the communications cable using the restraints provided on the back of the p...

Page 20: ...ollowing figures Cables are provided by your dealer the system installer or are available through TransAct If you are unsure of the interface installed in your printer refer to Verifying the Communica...

Page 21: ...cable connector 25 pin only Or engage the locking clips 36 pin only 4 Route the Communication Cable through the Cable Restraint and connect to your host system Figure 6 Connecting Parallel Cable 8 5...

Page 22: ...ns must be the same to ensure proper operation If the label is missing or does not match your cash drawer configuration refer to Verifying the Cash Drawer Interface on page 48 0 5 1 Disconnect all pow...

Page 23: ...he back of the printer and to an external power outlet The socket outlet shall be installed near the equipment and shall be easily accessible 3 Route the power cord through the cable restraints Refer...

Page 24: ...the Interface Card s power socket then route the cord through the cable restraint Failure to use the cable restraints may result in the printer becoming accidently unplugged during operation 3 Set th...

Page 25: ...n the paper roll is between 1 42 and 0 885 36 1mm and 22 5mm in diameter and to issue a paper low status to the application All printers are shipped with a mid position setting that can be adjusted up...

Page 26: ...on page 44 and Paper and Core Diameter on page 44 for paper measurements Paper Low Adjustment Settings Approximate Paper Remaining in feet Paper Roll Diameter UPPER LIMIT 3 turns counter clockwise 24...

Page 27: ...or surface with your fingers Doing so will contaminate the connector and produce sub standard print quality 1 Remove the new ink cartridge s from their sealed pouch and remove the Mylar tape from the...

Page 28: ...lean installation Install the cartridge so that the tab is facing the front of the printer Close blue latch latches 4 5 Close all of the printer s covers and press the Button Doing this initializes th...

Page 29: ...inter 4 9 0 4 9 0 4 9 0 4 9 0 3 3 3 3 1 Use the cover open button to release the rear paper cover from the console then swing it towards the back of the printer to reveal the paper compartment First t...

Page 30: ...s to your system requirements Specific attention should be given to ensure that the emulation and the communications link are properly configured If they do not match the settings of your system the p...

Page 31: ...ision E If you are experiencing inconsistent printing operation or if the printer appears to be nonresponsive several of the printer configuration settings need to be set to match the requirements of...

Page 32: ...n Carriage Return Options Serial Printer Emulation RS 232 Serial Interface baud rate Carriage Return Options 4 4 4 4 7 7 7 7 5 5 5 5 5 5 5 0 5 5 5 0 5 5 5 0 5 5 5 0 3 3 3 3 5 0 5 5 3 A 5 5 0 5 5 3 A 5...

Page 33: ...ion E 6 Section 2 Operational Information Using Validation Form Insertion and Orientation pg 27 Printer Analysis How to Use Self Test pg 30 Understanding Configuration Mode pg 32 Printer Color Configu...

Page 34: ...x 11 height 215 9 mm x 279 4 mm Maximum Print Area 2 5 width x 1 5 height Form size Min 2 75 width x 2 75 height 69 8 mm x 69 8 mm Form Size Max 2 75 width x 8 75 height 69 8 mm x 222 3 mm Maximum Pr...

Page 35: ...button to enter validation mode 2 When the starts blinking insert the validation paper into the validation paper inlet using the right edge of the validation paper inlet as a guide 3 When the validati...

Page 36: ...ion jam occurs and the top of the form is still visible in the form insertion area remove the form by simply pressing and holding the Button If the top of the form is not visible in the form insertion...

Page 37: ...leshooting to eliminate the possibility that the problem is occurring with the printer If the printer experiences a failure and the is activated call TransAct s Ithaca Facility s Technical Support Dep...

Page 38: ...ess and hold the Button 3 While holding the Button press and release the Button 4 When the red blinks release the Button 5 Follow the directions printed on the receipt to cycle through and select the...

Page 39: ...ration program runs on most standard PC computers in Windows 95 98 and NT 4 0 In many cases manual configuration is locked by the remote configuration If this is the case the only way to alter the con...

Page 40: ...he mode and unintentional configuration changes The mode that is used depends on how the printer is setup If you do not have access to the power connection use the second procedure Access Option 1 1 U...

Page 41: ...Button to select the specific setting of that category 1 Enter configuration mode 2 Press and release the Button This will display the current Baud Rate 3 Press and hold the Button When the printer pr...

Page 42: ...be operated with a Two Color Ready or a Two Color setup All three of these printing setup options require different printer configuration settings The following information highlights the different fu...

Page 43: ...2 2 2 2 Revision E 6 Table 5 Single Color Printer Color Configuration Details...

Page 44: ...D Two color operation setup allows the BANKjet to operate as a two color printer Unlike the two color ready setup the two color setup does not use the orange colored spacer in the right carriage Inste...

Page 45: ...Bold Italics Size Scaling and Rotated Emulations Ithaca IBM Epson ESC POS TM U325 and Star APA and Epson Bit Map Graphics Data Buffer 8K Adjustable 208K Non Volatile Flash for Multiple Character Sets...

Page 46: ...as logos and coupons on the printer It will read and convert images to a format suitable for printing on the BANKjet 1500 printer It will allow you to preview the image and adjust the colors prior to...

Page 47: ...1 mm With Knife 6 75 9 75 6 44 172 mm 248 mm 164 mm Weight approx 6 lbs 2 7 kg Shipping approx 8 lbs 3 6 kg Interface Serial RS 232C Bi directional Ready Busy or XON XOFF 9 pin D shell or 25 pin D she...

Page 48: ...its best when stored and operated in an environment that meets the following temperature and humidity conditions Figure 13 Environmental Conditions Typical Operating Range Typical Operating Range 10...

Page 49: ...0 Hz Supply Current 5 Amps maximum Printing method Thermal ink jet Cartridge arrangement 12 nozzle Printing directions Bi directional logic seeking Paper feed pitch Default 0 125 1 8 or 3 175 mm Valid...

Page 50: ...aper roll diameter Receipt paper out About 1 0 25 mm of paper remaining Paper feed method Friction feed A receipt paper out sensor is provided as a standard feature It senses when there is approximate...

Page 51: ...3 A 0 E A E 3 5 3 C C C C 7 7 7 7 D D D D Paper width 3 0 02 76mm 5mm Paper roll diameter 4 0 max 101 6mm max Paper thickness 003 004 07mm 1mm Roll paper core outside Dia 0 82 0 85 20 8 21 6 mm Dia Ro...

Page 52: ...ness single part 003 to 0047 076 mm to 119 mm Form Size Min 2 75 high x 2 75 long 69 8 mm x 69 8 mm Form Size Max 8 5 high x 11 long 215 9 mm x 279 4 mm Validation lines Max 9 lines 1 53 6 lines per i...

Page 53: ...2 2 2 2 Revision E 6 Figure 16 Form Print Zones...

Page 54: ...al Installation Procedures pg 48 Appendix B Interface Connection Specifics pg 51 Appendix C Common Operational Tasks pg 54 Appendix D Startup Troubleshooting pg 55 Appendix E Operational Troubleshooti...

Page 55: ...n page 31 to assist with printing the configuration summary receipt from self test E 0 E 0 E 0 E 0 7 7 7 7 3 3 3 3 E 0 3 9 3 E 0 3 9 3 E 0 3 9 3 E 0 3 9 3 0 0 0 0 The printer is shipped from the facto...

Page 56: ...drawer that it is trying to open Ithaca Epson Star If they do not match set the BANKjet s cash drawer shunt to the correct position as described previously 3 Using self test print the configuration s...

Page 57: ...in how the BANKjet has been configured Parallel Printer Emulation Carriage Return Options Serial Printer Emulation RS 232 Serial Interface baud rate Carriage Return Options TransAct recommends that O...

Page 58: ...ards provide a dual cash drawer interface The tables below lists interface signals and pin definitions for both types of parallel interfaces 7 7 7 7 7 7 7 7 7 7 7 7 6 6 6 67 7 7 7 7 7 7 7 7 7 7 7 6 6...

Page 59: ...B I Table 12 Serial Interface Pin Assignments The Serial Interface Meets EIA RS232 Interface Specifications Voltage Levels Max 15 Volts Min 3 Volts Mark Off 3 to 15 Volts Space On 3 to 15 Volts Becaus...

Page 60: ...e 24V pin 5 CD2 pin 6 CD1 Sense Direction Signal Name pin 1 No Connect pin 2 CD1 pin 3 CD1 Sense pin 4 CD Drive 24V pin 5 CD2 pin 6 Ground Direction 1 Drawer kick out Drive Signal 2 Output sink Drive...

Page 61: ...9 9 Press and release the Button Follow the directions that print on the configuration summary receipt after entering Configuration Mode Press and release the Button at any time A A A A 7 7 7 7 Press...

Page 62: ...Compare configuration settings with application requirements Use Self Test to print out the printer s configuration settings or compare to the configuration receipt that shipped with your printer Most...

Page 63: ...2 2 2 2 Revision E 6 Table 16 Troubleshooting Printer Will Not Communicate prints illegible receipts...

Page 64: ...closed properly If the printer is configured for two cartridges both must be present See Installing Ink Cartridges on page 20 Remove ink cartridge s and re install Make sure the blue latches are clos...

Page 65: ...cause of the error is corrected The amount of information lost is dependent on the type of error and the state of the information being processed 7 5 A non recoverable error likely produces informati...

Page 66: ...experiencing a specific type of serious problem by counting the number of times that the blinks Most serious problems should be addressed by a TransAct technical support specialist See Contacting Tran...

Page 67: ...2 2 2 2 Revision E 6 Table 19 Keypad Indicators Serious Problems...

Page 68: ...into wall outlet Check the power cord connection on back of the printer I 0 I 0 I 0 I 0 Check to see if printer is turned in OPERATIONAL ON mode Table 20 Troubleshooting Keypad Lights Will Not Work C...

Page 69: ...artridge Button Works Resume printing and remember to use the Button to place the printer into STANDBY OFF mode while not in use If New Cartridge Button Does Not Work Replace with a new ink cartridge...

Page 70: ...dering Information 9 9 9 9 3 Pack Cartridges Supplier Stock Number 3 Pack Black Transact s Ithaca Facility 100 02347 3 Pack Red Transact s Ithaca Facility 100 02349 6 Pack Cartridges Supplier Stock Nu...

Page 71: ...ommuniation Cables 12 Connecting Power 15 Connecting Power and Communications 10 Connecting the Parallel Cable 13 Connecting the Power Cord no power supply 16 Connecting the Power Cord with power supp...

Page 72: ...Policies ii Service ii Shipping Printers ii Warranty Information ii R Removing a Paper Jam 27 Restraints 11 S Self Test Entering Self Test Mode 22 29 Exiting Self Test Mode 22 29 Hints and Suggestions...

Page 73: ...2 2 2 Revision E 66 V Validation Check Insertion Portrait verticle 28 Printer Settings 25 Validation Orientation 25 W What is covered in this Operator s Guide v Where Can You Find More Information ii...

Page 74: ...2 2 2 2 Revision E 6...

Reviews: