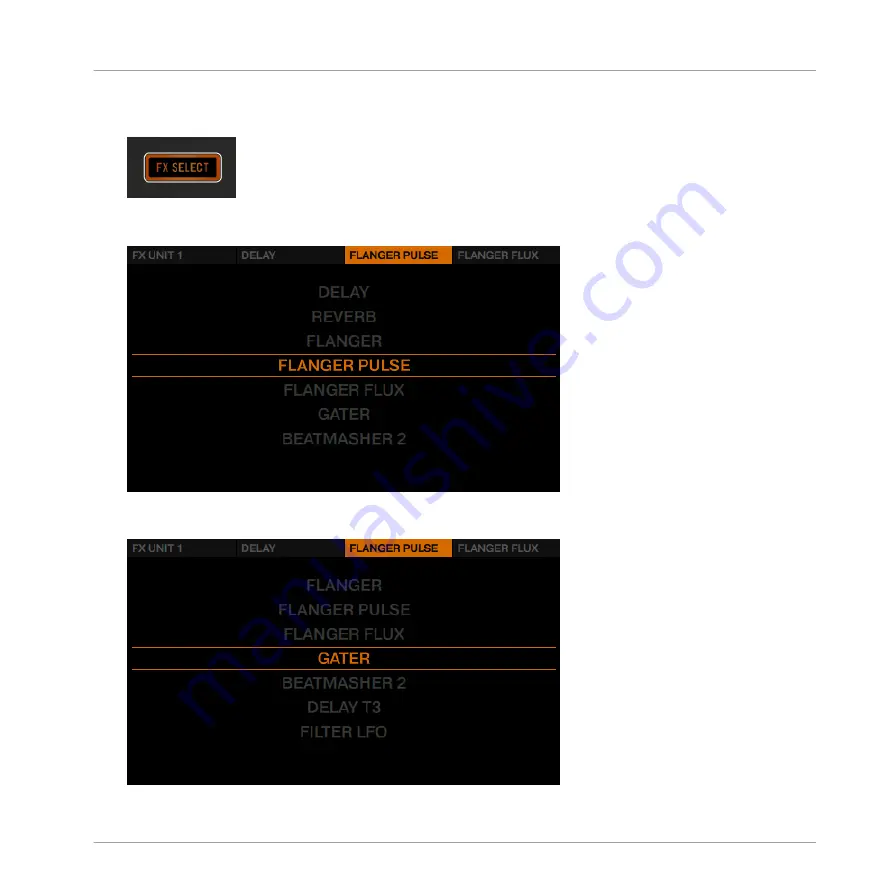
Traktor KONTROL D2 Manual Download Page 95

1.

Press the 

FX SELECT

 button of FX Unit at the top left corner of the D2 to open the FX

Unit menu.

2.

In the FX Unit menu, press FX Button 3 to exchange the effect in effects slot 2. An over-

view of available FX will be displayed.

3.

Turn the 

BROWSE

 encoder to select the 

Gater

 effect and press the 

BROWSE

 encoder to

load it.

Using Your D2—Getting Advanced

Adding FX


TRAKTOR KONTROL D2 - Manual - 95

Summary of Contents for KONTROL D2

Page 1: ...Manual...

Page 2: ...NI and associated logos are registered trademarks of Native Instru ments GmbH Mac Mac OS GarageBand Logic iTunes and iPod are registered trademarks of Apple Inc registered in the U S and other countri...

Page 3: ...set Boulevard 5th Floor Los Angeles CA 90028 USA www native instruments com NATIVE INSTRUMENTS K K YO Building 3F Jingumae 6 7 15 Shibuya ku Tokyo 150 0001 Japan www native instruments co jp NATIVE IN...

Page 4: ...tching Deck Focus 23 2 4 Switching Deck View and Zooming 26 2 5 Using Cue Points 30 2 5 1 Setting and Deleting Cue Points HotCues 31 2 5 2 Aligning Tracks using HotCues 33 2 6 Adjusting Deck specific...

Page 5: ...using Filters of Remix Slots 82 3 6 5 Using the Touch Strip on a Remix Deck 82 3 7 Capturing Samples from Track Decks Using Remix Mode 83 3 8 Adding FX 90 3 8 1 Assigning Decks to the FX Units 90 3 8...

Page 6: ...UE Button 122 4 2 3 2 LOOP Button 123 4 2 3 3 FREEZE Button 124 4 2 3 4 REMIX Button 126 4 2 4 Loop Encoder 126 4 2 5 EDIT Button 127 4 2 6 CAPTURE Button 128 4 2 7 Display Area and Controls 128 4 2 7...

Page 7: ...nces Pane in TRAKTOR 152 5 1 Restore Default 153 5 2 Touch Controls 153 5 3 Touchstrip 153 5 4 Calibrate 154 5 5 LEDs 154 5 6 Loop Mode Sizes 155 5 7 Enable MIDI Controls 155 6 Troubleshooting Getting...

Page 8: ...6 2 4 User Forum 164 7 Technical Specification 165 Table of Contents TRAKTOR KONTROL D2 Manual 8...

Page 9: ...art TRAKTOR KONTROL D2 installation provides you with many information sources These are intended to be read in the following sequence to ensure easy access for users of all skill levels TRAKTOR Getti...

Page 10: ...2 controller The later chapters of this manual provide additional information on solving common issues and the device s full technical specification CONTROLLER EDITOR Manual Besides using D2 with the...

Page 11: ...hermore the following formatting is used Text appearing in drop down menus such as Open Save as etc and paths to loca tions on your hard drive or other storage devices is printed in italics Text appea...

Page 12: ...rting with the button indicated first E g an instruction such as Press SHIFT PLAY means 1 Press and hold SHIFT 2 While holding SHIFT press PLAY and release it 3 Release SHIFT FX Knobs and Buttons Abov...

Page 13: ...splay Buttons On each side of a display there are two buttons marked by a square icon To differentiate them from each other we ll refer to them as depicted here Welcome to the World of TRAKTOR KONTROL...

Page 14: ...ads Each Deck comes with eight multi color pads Where necessary we ll refer to them in this or der Numbering of the Pads in the PERFORMANCE section Welcome to the World of TRAKTOR KONTROL D2 Manual Co...

Page 15: ...We assume here that your TRAKTOR KONTROL D2 system is already up and running If that s not the case please follow the instructions in the separate Setup Guide and return to this chapter when you are r...

Page 16: ...y You wiill learn how to sort and preview your tracks in the Browser and how to load tracks into Decks 2 1 1 Opening the Browser To open the Browser Push the BROWSE encoder The Browser will be display...

Page 17: ...ur current location in the folder structure at the top of the display e g BROWSER PLAYLIST DEMO TRACKS To open folders and load tracks Press the BROWSE encoder to open a folder Press the BROWSE encode...

Page 18: ...actions can be performed To open the Browser Touch the BROWSE encoder The Browser will be displayed in the respective display To exit the Browser Release the BROWSE encoder or stop interacting in the...

Page 19: ...2 1 4 Sorting Tracks To speed up scrolling through folders including a very large number of tracks you can sort the tracks by categories TITLE ARTIST BPM IMPORT DATE and KEY The selected category is...

Page 20: ...tracks will then be resorted Additionally you can display the tracks in ascending or descending order Press the ON button 1 to switch between ascending and descending order The Browser displaying trac...

Page 21: ...t s load the track Techno 1 from the included demo tracks on to Deck A You can check this by looking at the display you should see a blue indicator reading A The Deck Display with DECK A indicator Usi...

Page 22: ...oaded Push Browse Knob do the following 1 Press the BROWSE encoder to open the Browser 2 Navigate to the folder FAVORITES Demo Tracks 3 Scroll to track Techno 1 Using Your D2 Getting Started Loading a...

Page 23: ...don t hear the track check the cable connections and read the manual of your mixer 2 3 Switching Deck Focus Although you can control four TRAKTOR Decks with the D2 it is only possible to have the fo c...

Page 24: ...Deck A or B is focused the DECK button the Mode Select Button and the LED ring around the LOOP encoder will be lit in blue Using Your D2 Getting Started Switching Deck Focus TRAKTOR KONTROL D2 Manual...

Page 25: ...tton the Mode Select Button and the LED ring around the LOOP encoder will be lit in white Switch the D2 s Deck Control In order to access the other Deck side Using Your D2 Getting Started Switching De...

Page 26: ...ng Deck View and Zooming By default the display shows only the focused Deck This is called Single View Additionally you can switch to Spilt View to show both Decks together in the display Decks A and...

Page 27: ...the display area to toggle Deck View between Single View and Split View The display now shows both Decks in Split View The focused Deck always acquires the majority of space in the display Using Your...

Page 28: ...hanging Deck View does not change the Deck s focus Zooming To get a more precise view of the waveform at the current Playhead position you can zoom in or out of the waveform Using Your D2 Getting Star...

Page 29: ...nto the waveform Press Display button 3 repeatedly until you reach the desired zoom level To zoom out of the waveform Using Your D2 Getting Started Switching Deck View and Zooming TRAKTOR KONTROL D2 M...

Page 30: ...n a track HotCues can be assigned to the pads when the Track Deck is in HOTCUE mode On a Track Deck in HOTCUE mode pad 1 always represents the Start Cue Point that will be assigned automatically as so...

Page 31: ...utorials see Ena bling Decks TRAKTOR KONTROL D2 is in the following state The track Techno 1 is loaded on Deck A The Deck A is set to HOTCUE mode default state 2 5 1 Setting and Deleting Cue Points Ho...

Page 32: ...to by pressing the same pad again In the display a CuePoint will be highlighted by a blue indicator and the pad number You can store up to eight CuePoints per track including the first which is autom...

Page 33: ...k will snap to the closest beat thus ensur ing that recalling a CuePoint will always trigger a downbeat 2 5 2 Aligning Tracks using HotCues Aligning two tracks is straightforward 1 Make sure that Deck...

Page 34: ...Adjusting the Deck specific Tempo 1 Press the Display Button 1 The BPM pop up becomes visible on the display Using Your D2 Getting Started Adjusting Deck specific tempo TRAKTOR KONTROL D2 Manual 34...

Page 35: ...E encoder counterclockwise to decrease the tempo in whole steps 4 Press the Display Button 1 again or press the View Button to close the BMP pop up The Deck specific tempo has changed If the Deck is a...

Page 36: ...ld sound unrealistic har monic instruments would become dissonant when mixed etc To avoid issues like these TRAKTOR provides the Keylock feature which uncouples the pitch and the tempo of a track This...

Page 37: ...press the Display Button 2 The KEY pop up opens on the display For tracks which have been analyzed by TRAKTOR their key is displayed here Using Your D2 Getting Started Using Keylock TRAKTOR KONTROL D...

Page 38: ...lay Button 2 again to exit the KEY pop up in the display 4 Now press Display Button 1 to open the BPM pop up and adjust the track s tempo by turn ing the BROWSE encoder You can hear the tempo change b...

Page 39: ...ey of a track without affecting its tempo proceed as follows 1 On a Deck press the Display Button 2 The KEY pop up opens on the display If the track has been analyzed by TRAKTOR its key will be displa...

Page 40: ...3 Now turn the Deck s BROWSE encoder to adjust the key of the track 4 Press the Display Button 2 again to exit the KEY window in the display You will hear that the track s key has changed while the te...

Page 41: ...r the following actions Seek navigate through the entire track Tempo bend nudge Scratching backspinning and holding Prerequisites We assume here that the D2 is in the following state The track Techno...

Page 42: ...egments represent the entire length of the track The three orange segments represent the current playhead position within the track Using Your D2 Getting Advanced Using Touch Strip TRAKTOR KONTROL D2...

Page 43: ...ing SHIFT place your finger on the Touch Strip beneath the orange LEDs and swipe to the right to move forwards in the track s waveform Using Your D2 Getting Advanced Using Touch Strip TRAKTOR KONTROL...

Page 44: ...The three orange LEDs will follow your finger movement to the right as does the playhead in the waveform Using Your D2 Getting Advanced Using Touch Strip TRAKTOR KONTROL D2 Manual 44...

Page 45: ...eft to move backwards in the track s waveform The three orange LEDs will follow your finger movement to the left just as the playhead in the waveform Using Your D2 Getting Advanced Using Touch Strip T...

Page 46: ...Strip provide visual information about a Deck s phase alignment They help you make the necessary tempo bend adjustments to get your tracks aligned The following tutorial will demonstrate how to manua...

Page 47: ...rrecting phase alignment To correct the phase alignment of both tracks proceed as follows If blue LEDs are shown above the right side of the Touch Strip on the Deck not assigned to MASTER Swipe your f...

Page 48: ...side of the Touch Strip until the blue LEDs disappear and a single orange LED is shown The phase alignment is corrected and both tracks are perfectly synched Using Your D2 Getting Advanced Using Touch...

Page 49: ...ws you to create a scratch effect on a Track Deck or Remix Deck This feature is not enabled by default and requires some configuration as follows To enable the preference Touch to Scratch for the D2 1...

Page 50: ...2 Navigate to the Traktor Kontrol D2 window check the Shift Touch to Scratch preference in the Touchstrip section Using Your D2 Getting Advanced Using Touch Strip TRAKTOR KONTROL D2 Manual 50...

Page 51: ...On the Deck 1 Hold the SHIFT button 2 On the Touch Strip swipe to the left This will move the playhead slightly forwards in the track s waveform and you will hear the typical scratch effect Using You...

Page 52: ...rip swipe to the right This will move the playhead slightly backwards in the track s waveform and you will hear the typical scratch effect Using Your D2 Getting Advanced Using Touch Strip TRAKTOR KONT...

Page 53: ...r a beat As soon as you cease moving your finger on the Touch Strip the playhead remains at that position A scratch effect can only be created when the track is stopped Performing a Backspin On the De...

Page 54: ...rip the playhead remains at that posi tion Backspins are enhanced by the fact that TRAKTOR will stop the spin as soon as you re lease the SHIFT button 3 2 Playing with Loops in HOTCUE Mode Now that we...

Page 55: ...k A and stopped 3 2 1 Engaging and Disengaging a Loop Let s add a loop to the track on Deck A To engage a loop on a Deck 1 Press the PLAY button to start playback 2 Press the HOTCUE button to enable H...

Page 56: ...You can choose a loop size of 32 beats down to a loop size of 1 32 of a beat Note that you can adjust the loop size either before or after you ve set the Loop If you ad just the loop size beforehand...

Page 57: ...thin your track To move the Loop Press the SHIFT button and turn the LOOP encoder The loop selection will be moved through the track on the fly and looping continues at the respective position The ste...

Page 58: ...t pad Storing Loops works in a similar way Let s say you have stored two HotCues in the track currently playing 1 Press the LOOP encoder to engage a Loop 2 To store the active Loop press an unlit pad...

Page 59: ...you want to delete 3 3 Playing with Loops in LOOP Mode LOOP mode offers a different set of control options for using loops on track Decks and Remix Decks which you will learn in the following tutorial...

Page 60: ...engage loops with pre defined values By default these are from left to right 1 8 1 4 1 2 or 1 beat To engage a loop 1 Press the PLAY button to start playback 2 Press the LOOP button to enable LOOP mo...

Page 61: ...sizes can be changed in TRAKTOR s software preferences Preferences TRAK TOR KONTROL D2 Loop Mode Sizes Loop 3 3 2 Beatjumping With the orange pads you can jump forward or backward in the track by the...

Page 62: ...pad 5 to jump the playback position backward by the loop size value displayed on the display If doing so causes the Playhead to jump into an active Loop area it continues to loop again 3 Press pad 8 t...

Page 63: ...currently illuminated brightest represents the current playback position in the Freeze area see the image above Deck A in Freeze Mode Prerequisites We assume here that the D2 s in the following state...

Page 64: ...3 4 1 Engaging Freeze mode on a track On Deck A 1 Press PLAY to trigger playback Using Your D2 Getting Advanced Using FREEZE Mode TRAKTOR KONTROL D2 Manual 64...

Page 65: ...ight slices 3 Press any of the eight pads to trigger playback and get a feel for the slices 4 Press the HOTCUE button to exit Freeze mode If no further slice is triggered the Playhead position will le...

Page 66: ...E window pops up in the display 2 While holding the FREEZE button turn the Loop encoder to increase or decrease the slice size from a 1 4 of a beat to a range of 4 beats 3 Release the FREEZE button Us...

Page 67: ...e Loop button while in Freeze mode and the playback behavior of the pads changes Instead of playing from the slice start to the end of the entire track pressing and holding a pad in Slicer Mode will p...

Page 68: ...nable Slicer Mode on a Deck 1 Turn the Loop encoder to define the desired Loop size 2 Press the Loop encoder to engage a loop Using Your D2 Getting Advanced Using FREEZE Mode TRAKTOR KONTROL D2 Manual...

Page 69: ...ode to the active loop The Slices appear in green While Slicer mode is engaged you can perform the following actions Press any of the pads to jump between the Slices Using Your D2 Getting Advanced Usi...

Page 70: ...d a pad to retrigger its slice Hold two pads simultaneously to loop the entire area between the first and last selected slice Using Your D2 Getting Advanced Using FREEZE Mode TRAKTOR KONTROL D2 Manual...

Page 71: ...way the beat of a track keeps flowing no matter what you do These are the changes in FLUX mode compared to regular operation HOTCUE mode press and hold a pad to play back from a cue point When you le...

Page 72: ...eserve the musical phrasing 4 Press the FLUX button again to exit FLUX mode Note that when the FLUX button is engaged you cannot make use of Slicer mode on the pads If the option Touch to Scratch is e...

Page 73: ...d Remix Sets as well as create your own Remix Sets by capturing samples of tracks Prerequisites Deck C is enabled All Remix Slot Volume Faders are raised 3 6 1 Loading a Remix Set 1 Press the DECK but...

Page 74: ...3 Select the Remix Set Remix Deck Tutorial and press the BROWSE encoder to load it Using Your D2 Getting Advanced Remixing with Remix Decks TRAKTOR KONTROL D2 Manual 74...

Page 75: ...te orange and green corresponding to the Remix Deck page shown in the display 3 6 2 Triggering Samples For a demonstration of how a Remix Deck works please perform the actions listed below in the foll...

Page 76: ...ordingly The Sample is highlighted the Playhead of its waveform moves and the Sample will loop 2 Press SHIFT pad 1 to stop playback 3 Now press pad 1 pad 2 pad 3 and pad 4 to trigger their samples Usi...

Page 77: ...mples play back Select another Sample of a Remix Slot While the Samples are playing you can switch to other Samples within the Remix Slots For example Using Your D2 Getting Advanced Remixing with Remi...

Page 78: ...hted in the display Note that only one Sample per Remix Slot column in the display can play at a time Select other Pages of a Remix Set A Remix Set can include up to 64 samples On the D2 controller th...

Page 79: ...x Set Press Display Button 4 or 3 to scroll a page downwards or upwards Alternatively hold the REMIX button while turning the Deck s LOOP encoder Using Your D2 Getting Advanced Remixing with Remix Dec...

Page 80: ...3 Triggering Samples using Different Quantize Sizes 1 Press Display Button 2 The QUANTIZE window opens in the display Using Your D2 Getting Advanced Remixing with Remix Decks TRAKTOR KONTROL D2 Manual...

Page 81: ...les After you press a pad TRAKTOR will play out the currently playing sample to the end of the 16 beats segment and then start playing back the sample assigned to the pad you pressed If you selected a...

Page 82: ...othly 3 6 5 Using the Touch Strip on a Remix Deck In this brief tutorial we ll learn how the Touch Strip can be used with the Remix Deck On a Remix Deck which isn t playing a track Swipe on the Touch...

Page 83: ...Using Remix Mode You can create your own Remix Sets by capturing or sampling parts of a track playing back on a Track Deck Note in Remix Mode you can only capture Samples to the current Remix Set pag...

Page 84: ...CAPTURE touch the Loop encoder to let the CAPTURE window pop up and turn the Loop encoder to select the capture Source DECK A 4 Release the Loop encoder to close the CAPTURE window and release the CAP...

Page 85: ...IX button to enable REMIX Mode The pads should now be unlit because nothing is loaded into Remix Deck C Using Your D2 Getting Advanced Capturing Samples from Track Decks Using Remix Mode TRAKTOR KONTR...

Page 86: ...rn the Loop encoder to define the capture size 8 On Deck A press the PLAY button to start playback 9 Press one of the unlit pads to capture a Sample from the current playback position Using Your D2 Ge...

Page 87: ...r and the captured Sample is shown in the display Playback of Captured Samples from a Track Deck As soon a Sample is captured you can perform the following actions Using Your D2 Getting Advanced Captu...

Page 88: ...ce and or using another Capture size The pads now illuminate with new colors and the first four captured samples are shown in the display Using Your D2 Getting Advanced Capturing Samples from Track De...

Page 89: ...the SHIFT button and press the illuminated pad to stop playing You can save a new Remix Set by clicking on the corresponding Deck letter in the TRAK TOR software and selecting Save Remix Set Rename t...

Page 90: ...8 1 Assigning Decks to the FX Units The FX Unit at the top of the D2 controls either FX Unit 1 or FX Unit 2 of the TRAKTOR soft ware This depends on the current Deck control When the Deck control is...

Page 91: ...how to control its three effects via the FX knobs and FX buttons Prerequisites The track Techno 1 is loaded on Deck A The track is playing and audible All FX knobs of the FX Unit are set to center pos...

Page 92: ...cts are loaded into the Group FX and the FX Unit is set up as Insert 4 Press the FX SELECT button again to exit the FX Unit menu Apply the Group FX to the Track As soon you set up your Group FX activa...

Page 93: ...The FX Knobs and FX buttons As soon you touch any FX knob the FX panel will drop down in the display Using Your D2 Getting Advanced Adding FX TRAKTOR KONTROL D2 Manual 93...

Page 94: ...o visible in the FX panel You can activate deactivate each effect slot individually by pressing the corresponding FX buttons 2 to 4 below 3 8 3 Exchanging effects in the Group FX To exchange any of th...

Page 95: ...enu 2 In the FX Unit menu press FX Button 3 to exchange the effect in effects slot 2 An over view of available FX will be displayed 3 Turn the BROWSE encoder to select the Gater effect and press the B...

Page 96: ...tting an FX unit to Single mode provides access to three parameters of a single effect We will set up FX Unit 2 in Single FX mode and load a Delay effect Prerequisites The D2 controls the right Decks...

Page 97: ...s setup menu opens in the display 2 Press FX Button 1 to display the FX Unit 2 options 3 Ensure the options Single and Insert are selected 4 Press FX Button 2 to display the list with available FX Usi...

Page 98: ...ssign the FX The FX Unit 2 menu closes 6 Press FX button 1 to activate the Delay You will hear a delayed signal being added to the playing track With the Delay enabled you can perform the following ac...

Page 99: ...mix value in the FX drop down panel in the display increases Turn FX Knob 1 counter clockwise The Delay effect gets quieter The mix value in the FX drop down panel in the display decreases Using Your...

Page 100: ...effect Press FX button 3 to use the freeze feature FRZ of the Delay effect Your track is muted and the Delay effect starts to decay Press FX button 3 again to re engage the track going into the Delay...

Page 101: ...ameters in the software independently from the FX knobs position on the hardware 3 8 5 Storing a Snapshot You can save a default state for any of the effects by doing the following 1 Adjust the FX kno...

Page 102: ...ts or as send effects To change FX Routing either select Insert Post Fader or Send in the FX Unit s options 3 9 Using Performance Modes on Remix Decks The D2 s Remix Deck provide you with Performance...

Page 103: ...electing and applying a Performance Mode To select the FX SEND Performance Mode on Deck C 1 Set the Deck focus to Deck C 2 Press pads 2 3 and 4 to trigger samples 3 Press the left Performance Mode but...

Page 104: ...e all Performance Modes enabled simultaneously Skip through the Perform ance Modes to check which modes are active 3 9 2 Using Performance Mode Pitch When Performance Mode Pitch is enabled 1 Touch a P...

Page 105: ...in the audio and see the values change in the PITCH parameters overview 3 9 3 Using Performance Mode Filter When Performance Mode Filter is enabled 1 Touch a Performance knob to enlarge the FILTER par...

Page 106: ...overview 3 9 4 Using Performance Mode FX SEND The Performance Mode FX SEND allows you to send signal from each Remix slot to the as signed FX Unit s In this case Deck C is assigned to FX Unit 2 which...

Page 107: ...e to increase or counterclockwise to decrease the FX SEND amount You can hear a Reverb effect being added to the Remix Slots Slot 1 s value of 25 means that you re listening to a mix of 75 unprocessed...

Page 108: ...g coming from a tape machine or warped vinyl and the D2 provides you with the controls to do this 3 10 1 Checking a Beatgrid To guarantee that all Tempo Loop and Move controls work as expected you wil...

Page 109: ...the track In this example you can see the Beatmarker isn t aligned with the very beginning of the waveform As a result the track will not sync with others In the following section you will learn how...

Page 110: ...displayed 2 Press the Deck s PLAY button to trigger playback of the track On the display you ll see a four beat loop based on the detected BPM value which serves as a reference for manual Beatgrid ad...

Page 111: ...irst Beatmarker with the first peak in the loop s waveform Rotate Performance knob 2 BPM to correct the detected BPM value in coarse steps Try to align the second third and fourth beat in most cases i...

Page 112: ...result in abrupt changes to the waveform position For example if you are near the Beatmarker at the start of a track and change the tempo of the Beatgrid you will see the waveform move under the Beatg...

Page 113: ...adjust the Beatgrid 3 Press the ON button 1 again to exit Beatgrid Edit Zoom Mode 3 10 3 Additional Help Actions Tap the Tempo Tap allows you to manually set the tempo by tapping along the playing tra...

Page 114: ...tempo Tick Audible Beatgrid The Tick works like a metronome giving you an audible pulse for every beat Align the Tick and the beats in your track for perfect sync You can only hear the Tick on the CU...

Page 115: ...ur headphones when cued Reset your edits If your edits do not produce the desired result you can undo your edits Press Display Button 4 RST This will reset your edits to the auto detected values Using...

Page 116: ...1 LOCK All buttons in the Beatgrid panel are deactivated The stored tempo BPM is locked and cannot be changed until you unlock it by clicking LOCK again All tracks with a locked Beatgrid will show a...

Page 117: ...cludes an overview of the main areas of the user interface as well as a full reference for every button knob fader and the color display 4 1 Overview of the Controller This section provides you with a...

Page 118: ...d in the table below The table also provides the links referring to the section with more information Callout Description Links leading to section with further information 1 The Deck 4 2 The Deck 2 Th...

Page 119: ...R software Active TRAKTOR Decks always work in one of the Deck modes as either Track Deck Remix Deck or Live Input The following image and table give a detailed overview of the Deck s Elements and lin...

Page 120: ...on providing further information 1 DECK button 4 2 1 DECK Button 2 FLUX button 4 2 2 FLUX Button 3 Mode Select buttons 4 2 3 Mode Select Buttons 4 Loop Encoder 4 2 4 Loop Encoder 5 EDIT button 4 2 5 E...

Page 121: ...trip 4 2 11 Touch Strip 12 TRANSPORT controls 4 2 12 Transport Controls 4 2 1 DECK Button The DECK Button allows you to switch the focus and controls between the primary and sec ondary Decks in a Deck...

Page 122: ...ers depending on which of the four modes you select via the Mode Select buttons Mode Select Buttons General Behavior of Mode Select Buttons The default mode for a Track Deck is Hotcue The default mode...

Page 123: ...p Mode Looping The first row of pads green allow you to loop part of a track By default the pads are as signed common loop sizes1 8 of a beat 1 4 of a beat 1 2 of a beat 1 beat You can change the loop...

Page 124: ...forward 1 loop size set per Deck Beatjump sizes can be changed in TRAKTOR s software preferences Preferences TRAK TOR KONTROL D2 Loop Mode Sizes Beatjump If Quantize is activated TRAKTOR waits for the...

Page 125: ...econd row triggers slices 5 8 Freeze Mode Overlay Adjust the size of the Freeze slices by pressing and holding the FREEZE button and then turning the Loop encoder The waveform in the display adjusts i...

Page 126: ...pture portions of a track from the capture source and assign them to one of the pads REMIX Button Remix mode is the default for Remix Decks and isn t available for Track Decks If a Track Deck is in fo...

Page 127: ...just a track s Beat Grid The TRAKTOR software can ana lyze your music and apply a Beat Grid which allows automatic beat matching and synchroniza tion EDIT Button In most cases through its Analyze func...

Page 128: ...source to the corresponding Remix Cell The capture size is determined by the source Deck s loop size setting 4 2 7 Display Area and Controls On the D2 s graphic color display some functionality is dy...

Page 129: ...2 7 4 Display Buttons 5 Display 4 2 7 5 Display 6 View Button 4 2 7 6 View Button 7 Perform ance Mode Buttons 4 2 7 7 Performance Mode Button 4 2 7 1 BACK Button When the Browser is opened pressing th...

Page 130: ...and again loads an item Besides browsing you can use the BROWSE encoder to adjust the BPM and KEY parameters in the respective pop ups and to select effects in the FX Unit configuration screen You ca...

Page 131: ...splay to adjust the parameters Display Settings View Touch Sensitivity Settings TOUCH 1 When in the Settings press Display Button 2 twice to switch to the TOUCH settings 2 Turn the Performance knobs u...

Page 132: ...ity depending on the view you re working in Display Buttons Press any of these buttons to open the pop up and see each button s functionality This is an overview of what these buttons do depending on...

Page 133: ...pop up 3 Display Button 3 Scrolls up in the Sample Grid in steps of two 4 Display Button 4 Scrolls down in the Sample Grid in steps of two Please note that you can leave any pop up by pressing the sam...

Page 134: ...Track Deck Track Deck View Hardware Reference The Deck TRAKTOR KONTROL D2 Manual 134...

Page 135: ...aining 4 Deck tempo in BPM 5 Deck Focus Deck A D 6 Sync state If a Deck is assigned Tempo Master MASTER is displayed underneath the BPM value SYNC indicates that the Deck is synchronized to a Tempo Ma...

Page 136: ...Remix Deck Remix Deck View Hardware Reference The Deck TRAKTOR KONTROL D2 Manual 136...

Page 137: ...tempo in BPM 5 Deck Focus Deck A D 6 Sync state If a Deck is assigned Tempo Master MASTER is displayed underneath the BPM value SYNC indicates that the Deck is synchronized to a Tempo Master If a Dec...

Page 138: ...view e g FX Selection Menu Browser BPM or KEY the View button starts flashing Press the View button to close the pop up 4 2 7 7 Performance Mode Button The Performance Mode buttons are at the bottom...

Page 139: ...lot The FX SEND amount is displayed right above the corresponding knob In case you increase FX SEND and still don t hear any effect please make sure the Remix Deck is actually assigned to an FX Unit i...

Page 140: ...configured as Remix Decks the Slot Volume faders control the focused Deck s slots Slot Volume Faders 4 2 10 Pads The Deck of the D2 comes with a set of 8 pads Depending on the mode selected via the Mo...

Page 141: ...track in sync If Quantize is deactivated looping starts precisely when you press the pad FREEZE and Slicer Mode In Freeze mode TRAKTOR takes the playhead position adds the number of bars set as loop...

Page 142: ...the track or Samples Backspinning the track or the Samples Above the Touch Strip a number of LEDs provide visual feedback for the actions taken on the touch strip Phase Meter For Track and Remix Decks...

Page 143: ...to the right to move the playhead ahead Swipe to the left to move the playhead back To achieve this uncheck the Invert option in Preferences Traktor Kontrol D2 Touch strip Bend Sensitivity Sensitivit...

Page 144: ...after releasing the buttons Press SHIFT CUE to skip back to the beginning of the track SYNC Button The SYNC button activates deactivates the synchronization of the currently focused Deck to the Tempo...

Page 145: ...snap back into SYNC with the Tempo Master SHIFT Button The SHIFT button is a modifier for other control elements on the D2 It allows you to access secondary functions just like the Cmd key on your co...

Page 146: ...further information Name Function in Single Mode Function in Group mode FX Button 1 Activate deactivate the entire FX Unit FX Button 2 Reset all FX parameters to their de fault value Activate deactiva...

Page 147: ...ressed again When disengaged the FX SELECT button is dim FX Settings of FX Unit 1 The options in these FX Settings determine how you will use the FX Unit 4 3 2 FX Unit Assignment In order to route a D...

Page 148: ...need to get the D2 running and to connect additional USB equipment such as TRAKTOR controllers Connections on D2 s Rear Panel Callout Description Link to section providing further information 1 USB H...

Page 149: ...t D2 to your computer here using the included USB cable The connection is USB 2 but is compatible to USB 3 equipped computers Due to the large amounts of data transmitted to the TRAKTOR KONTROL D2 it...

Page 150: ...ply ap proved by Native Instruments for use with the D2 Before you use the power supply and connect to the D2 please refer to the TRAKTOR KONTROL D2 IMPORTANT SAFETY INSTRUCTIONS leaflet included in t...

Page 151: ...USB Hub Hardware Reference The Rear Panel TRAKTOR KONTROL D2 Manual 151...

Page 152: ...RAKTOR s Prefer ences window which lets you configure the behavior of the touch controls as well as overall LED brightness for the back lit buttons and the Loop and Beatjump Sizes assigned to each Dec...

Page 153: ...If deactivated you can still control the parameters but no panel is opened Auto Open Performance Control on Touch If activated touching the Performance knobs below the display overlays a Performance...

Page 154: ...over their full range and with maxi mum precision These settings are precisely calibrated during production although they might need to be recalibrated over the lifetime of your D2 unit Recalibration...

Page 155: ...2 4 8 16 32 LOOP 5 7 Enable MIDI Controls The TRAKTOR KONTROL D2 allows you to use the Performance Knobs Performance Buttons and the Performance Faders below the Display as MIDI output controls You ca...

Page 156: ...tion in the Preferences To assign the MIDI message and MIDI channel to the various MIDI controls 1 Select Controller Manager tab in the Preferences Preferences Pane in TRAKTOR Enable MIDI Controls TRA...

Page 157: ...eric MIDI from the list to create a new Generic MIDI Device 3 In the upper right corner select the MIDI port to use as the output for this Generic MIDI device Preferences Pane in TRAKTOR Enable MIDI C...

Page 158: ...ontrols You will find a list of Knobs Faders and Buttons The first four entries in each category correspond to the left Deck side assigned to Decks A and C while the last 4 knobs fad ers and buttons c...

Page 159: ...message types CC Note and Pitch Bend will open You can select Pitch Bend to map the MIDI Pitch Bend message to this control or you can hover your mouse over one of the other two menus to show a list o...

Page 160: ...ch the Performance Controls into MIDI Mode on the D2 Press the Performance Mode buttons next to the display until the MIDI page appears Touch a Performance knob to enlarge the MIDI pane displaying cur...

Page 161: ...e MIDI messages that you assigned in the Controller Manager If you intend to assign the Slot Volume Faders to output MIDI messages make sure neither of the Decks control led by the D2 is a REMIX Deck...

Page 162: ...sure that you haven t double clicked an outdated application alias shortcut Try to restart your computer Disconnect any other audio interfaces and computer periph erals like printers scanners and the...

Page 163: ...ible from the Service Center application Open the Service Center application and click on the Support button in the upper right corner 6 2 1 Knowledge Base The Online Knowledge Base gathers useful inf...

Page 164: ...ht corner of the user interface When installing new software or software updates a Readme file is included that contains last minute information that was not yet included in the documentation Please o...

Page 165: ...A Output 15VDC 2660mA Dimensions and Weight Depth 37 8cm Height 6 6cm Width 19 6cm Weight 1 5kg Environmental Specifications Operating temperature 5 to 35 C 41 to 95 F max 85 non condensing humidity S...

Reviews: