After positioning the CORSO trolley on
the beam, it is essential to check, WITH
NO LOAD on the trolley, that it moves
smoothly and freely along the whole
length of the beam.
b) Trolleys 10 et 20 t
IMPORTANT :
Before a CORSO trolley is mounted on a
traversing beam, the strength of the
materials used in the beam must be
calculated by a qualified person.
If the CORSO trolley is to be fitted in a loca-
tion which is dangerous for the operator, the
safety precautions laid down in the labour
regulations must be implemented to remo-
ve all risks not covered in this operation.
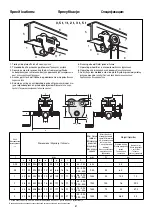
Cross bar with adjusting washers and loc-
king nuts to fit a large range of beam size :
• W.L.L. 10 t : beam width adjustment from
125 to 320 mm.
• W.L.L. 20 t : beam width adjustment from
136 to 320 mm.
CORSO push trolley.
1. Dismantle the trolley by removing the
safety pins and the fixing nuts at each
end of the fixing bar.
2. Separate the two side plates taking care
to ensure that the spacer washers and
the anchor point are kept together.
3. Position a side plate on each side of the
beam and pass the fixing bar through the
housing of each side plate with the
anchor point in the middle.
4. Begining with the thickest, the spacer
washers should be fitted onto the fixing
bar. Remove the side plates in turn and
replace them with appropriate spacer
washers to achieve the best adjustment
on the beam, so that the load bearing
point is in the centre of the contact area.
The person assembling the trolley should
take great care to ensure that the sides
of the wheels do not touch the central
section of the beam.
5. Distribute the remaining spacer washers
equally on the fixing bar on the outside of
each side plate and then fit the fixing
nuts.
6. Tighten the fixing nuts and fit the safety
pins.
7. Push the trolley along the beam without
any load. Traversing should be smooth.
CORSO geared trolley with chain-opera-
ted travel.
1. Dismantle the trolley by removing the
safety pins and the fixing nuts at each
end of the fixing bar.
2. Separate the two side plates taking care
to ensure that the spacer washers and
anchor point are kept together.
3. Position a side plate on each side of the
beam and ensure that the operating
wheel and hand chain are on the requi-
red side. Pass the fixing bar through the
housing of each side plate with the
anchor point in the middle.
4. Begining with the thickest, the spacer
washers should be fitted onto the fixing
bar. remove the side plates in turn and
replace them with appropriate spacer
washers to achieve the best adjustment
on the beam, so that the load bearing
point is in the centre of the contact area.
The person assembling the trolley
should take great care to ensure that the
sides of the wheels do not touch the cen-
tral section of the beam.
5. Fit the remaining spacer washers on the
fixing bar on the outside of the side plate
opposite the operating wheel and hand
chain. Fit the fixing nuts.
6. Tighten the fixing nuts and fit the safety
pins.
7. Using the hand chain, traverse the trolley
along the beam without any load. traver-
sing should be smooth.
8. Adjust the anti-tilt bar as near as possible
to the under surface of the beam, but not
touching. Check that this bar does not
touch any point of the beam along which
the trolley is to travel.
7
GB


