background image

Traqmate User Manual V1.0 


June 14, 2005 


Copyright © 2005 Track Systems Technologies, LLC 

Page 16 

Traqmate Complete 

System Description 

Traqmate Complete builds on the Traqmate Basic simplicity to add immediate feedback to the 
driver in the form of lap times on a Display Unit (DU). It also provides more visibility and control of 
the collected data and useful tools for vehicle performance tuning. Data is stored inside the 
Display Unit and can be extracted using the mini-USB port on the end of the unit. 

Controls 

Mini USB

Port

Connection to

Sensor Unit

Main Menu

Record Data

View Sessions

Setup

Menu

Title

Indicates Top

of Menu List

Indicates More

Choices Below

Screen

Menu Choices

Backlight


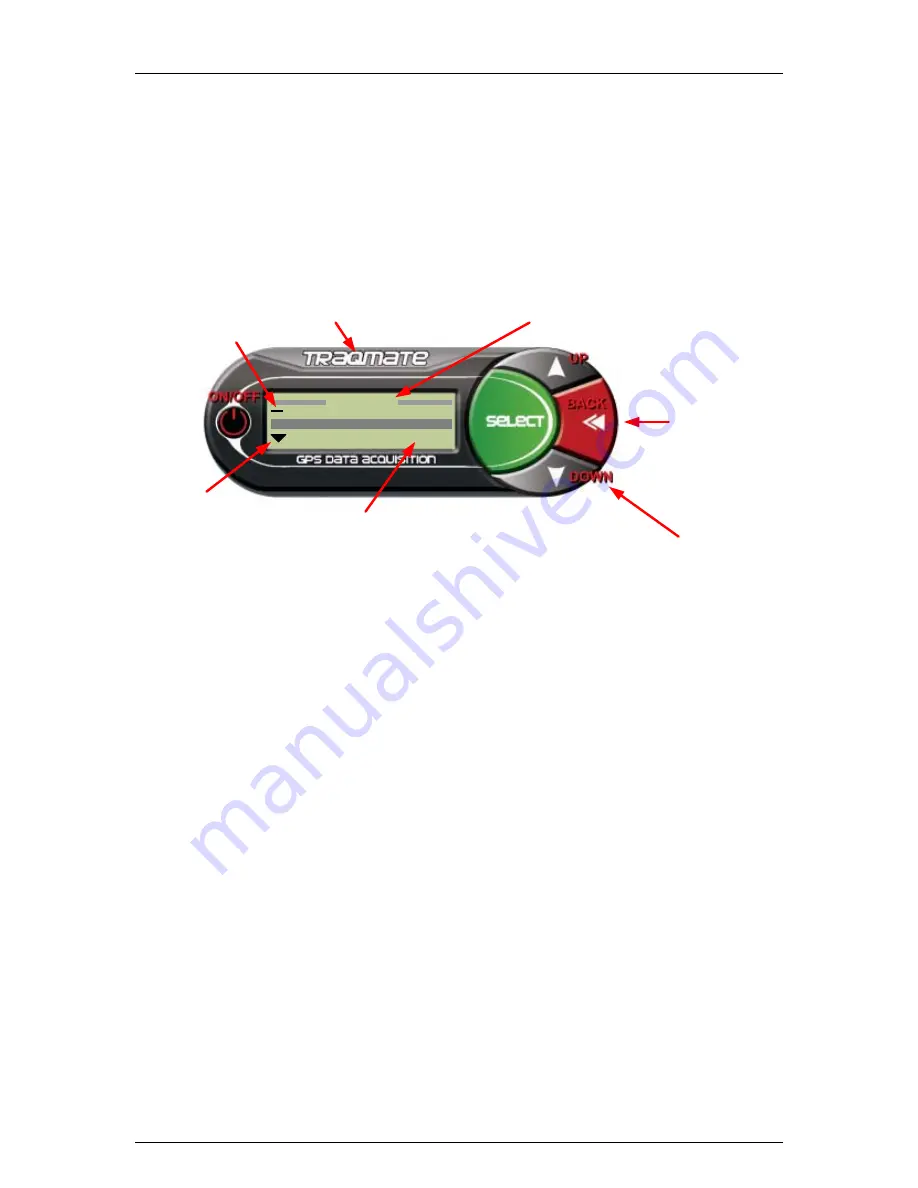
Figure 8 - Display Unit Controls 

The DU contains six buttons, a graphical LCD screen, a DIN cable to connect to the Sensor Unit, 
and a mini-USB port for connection to a computer. 

ON/OFF – Power Switch Button 

• 

Turns unit on - push button once, startup screen appears and “PWR” LED goes on in the 
Sensor Unit 

• 

Turns unit off - hold button down until signoff screen appears on LCD display and “PWR” 
LED goes off in the Sensor Unit 

Traqmate Logo – Backlight Button 

• 

Turns LCD backlight on/off – toggles LCD backlight on/off 

Select Button – Executes Menu Functions 

• 

Selects highlighted items on the LCD display screen 

Back Button – Exits Menu Functions 

• 

Goes up one level in menus 

• 

Exits a mode such as lap timing and returns to menu 

Up Button 

• 

Press to go up one item in a list 

Down Button 

• 

Press to go down one item in a list 

Summary of Contents for Traqmate

Page 1: ...02 June 14 2005 Copyright 2005 Track Systems Technologies LLC Traqmate Traqview and the track systems logo are trademarks of track systems technologies llc Microsoft and windows are trademarks of Mic...

Page 2: ...Traqmate User Manual V1 02 June 14 2005 Copyright 2005 Track Systems Technologies LLC Page 2 This page intentionally left blank...

Page 3: ...A DISPLAY UNIT 11 POWER CONNECTION 12 TRAQMATE DISPLAY UNIT INSTALLATION 13 TRAQMATE BASIC 15 SYSTEM DESCRIPTION 15 CONTROLS 15 TRAQMATE COMPLETE 16 SYSTEM DESCRIPTION 16 CONTROLS 16 MENU SYSTEM 17 F...

Page 4: ...of their car and do a little bench racing with their friends With the addition of this small device to your track bag you will be able to better tune car and driver for maximum performance While it is...

Page 5: ...ith yourself from different sessions Trade laps with your friends Learn from them Easy to Use No engineering degree required The Traqmate Sensor Unit has one button What could be easier The Traqmate D...

Page 6: ...stomize the unit with your name and contact information in case it is lost or stolen Display Unit The Display Unit DU is a major leap in low cost data acquisition providing in car lap timing without a...

Page 7: ...heir speed G loads braking and acceleration for every car on the virtual dashboard Traqview has all the tools you need to optimize the performance of both car and driver For example you can display gr...

Page 8: ...taining the Traqview Analysis software and manual Traqmate Complete The Traqmate Complete package consists of a Sensor Unit SU a Display Unit DU GPS antenna USB cable SU DU DIN connection cable cigare...

Page 9: ...rack Systems folder If you have a Display Unit you should install USB Pre Installer You may de select this option if you are installing a Traqview Basic system When finished you should get an indicati...

Page 10: ...ehicle and such that the arrow on the top label points in the direction of travel CHOOSE A LOCATION WHERE THE UNIT WILL NOT BE SUBJECTED TO WATER EXCESSIVE MOISTURE EXPOSURE WILL DAMAGE THE UNIT This...

Page 11: ...aligned manner GPS Antenna Placement The supplied GPS antenna has a magnetic mount which allows a variety of mounting options to the metal chassis of the vehicle In the case where the desired location...

Page 12: ...he vehicle power and operation is still required or in vehicles in which no installation has been performed It is ideal for moving the SU from vehicle to vehicle The TraqPaq Battery Pack is capable of...

Page 13: ...connector applied not included The lug on the black conductor should then be connected to the negative battery terminal or chassis ground TraqAC Power Supply The TraqAC can be utilized to power the S...

Page 14: ...splay the Firmware revision number of the SU and the DU If instead SU NOT CONNECTED is displayed there is no communication between the SU and DU and the system will not work for data collection You ca...

Page 15: ...a second push and the REC LED goes off Turns unit off hold button down until PWR LED goes off LED Light Displays PWR LED lights green when power is on REC LED lights red when Record is turned on COM L...

Page 16: ...re Choices Below Screen Menu Choices Backlight Figure 8 Display Unit Controls The DU contains six buttons a graphical LCD screen a DIN cable to connect to the Sensor Unit and a mini USB port for conne...

Page 17: ...le enters hi res recording mode 1 8 Mile enters hi res recording mode View Sessions List of Recorded Sessions View Laps Steps through recorded lap times Erase Data Erases selected session Session Deta...

Page 18: ...ap for the timing to work Start Finish Line Valid positions for lap timing Initial position Bad heading Too far away Figure 9 Lap Timing The Start Finish Location is stored on the Display Unit for eac...

Page 19: ...this time the Timing Screen will appear If you have already recorded a Start Finish location for the chosen track the following screen will appear Figure 12 Searching for Start Finish Line This will s...

Page 20: ...opies currently highlighted window to Windows clipboard View Toolbar toggles toolbar on off Auto Pan a mode that causes a selected driver to always stay within the track map and graph windows Driver L...

Page 21: ...your data at one time You can watch the cars go around the track see the G forces in action on the Friction Circle and track the speed on the Velocity vs Distance Graph There are several tools availab...

Page 22: ...s for the system that you have Traqmate Basic SU Only Supply power to the unit This can be done by leaving the unit in the car using the TraqPaq battery pack accessory or using the Traqmate AC adapter...

Page 23: ...US Pacific Time 8 US Mountain Time 7 US Central Time 6 Central America 6 US Eastern Standard Time 5 London 0 Paris 1 Athens 2 Moscow 3 For Daylight Savings use above values 1 Owner Name Enter your nam...

Page 24: ...efault track for the next recorded session NOTE Removing a track will erase any Start Finish line that might be recorded for that track Drivers Enter your vehicle names and press Add to include them i...

Page 25: ...date that the session was recorded and length of time of the session Rate is the Sampling Rate Note that Track Driver and Car can actually change from those recorded if you erase a driver track or car...

Page 26: ...d You can compare multiple laps for a single driver Best vs Worst Lap for example by adding the same driver twice Oftentimes the laps will be listed as one very long lap until a Start Finish Line loca...

Page 27: ...n into a checkered flag and dragging it to the new location Alternatively you can use the Playback Controls to position the Reference Vehicle and press the Set Start Finish Button The Track Map is als...

Page 28: ...ces left right turns Figure 24 G vs Distance Graph Velocity vs Time The Velocity vs Time Graph is just like the Velocity vs Distance only it plots over time instead of distance Therefore it is most us...

Page 29: ...e transitions from braking to turning to acceleration By watching the cursor move around the graph during playback you can see the transitions It is useful to picture the car from overhead as in the d...

Page 30: ...Start or End Segment Icon off the track Add drivers to the Segment Analysis Table using the Setup button on the dashboard Note that every lap selected for each driver is included in the table Figure 2...

Page 31: ...ile is self contained and includes all the functions required to confirm unit identity check the code image for accuracy copy the code image into permanent memory and reset the unit ALL INFORMATION AB...

Page 32: ...ntly from the other Then concentrate on those areas using the other Traqview tools Best vs Worst Playback Sometimes you can see differences most readily by taking the best and worst laps of a session...

Page 33: ...e speed vs exit speed If you are entering a long complex of curves it may be smart to be Fast In Slow Out The best way to determine this is to create two segments on consecutive sections of the track...

Page 34: ...the brakes and gets back on the gas This graph is also good for comparing braking curves for the drivers Optimally you want to see a good crisp initial brake pressure even pressure during braking and...

Page 35: ...n Circle will be much more triangular and follow the perimeter of a triangle This happens because the driver is transitioning from braking to turn in in a coordinated fashion A very experienced driver...

Page 36: ...city vs Distance Graph since the rate of gain of velocity is acceleration Similarly by looking at the negative slope one can determine the strength of the brakes and of course the adhesion of the tire...

Page 37: ...do so That said occasionally accidents happen The unpredictability of high performance driving is one of the things that makes it so thrilling When the unpredictable happens to you Traqmate can help...

Page 38: ...y when you are replaying your day with your track buddies Traqmate makes a great storyteller During the extensive testing of the Traqmate System we had our share of bumps along the way We thought we w...

Page 39: ...from around the world Laps are indexed by vehicle and track so you can easily find the laps you want The files you download are tqm files so you can open them with Traqview or use Add Driver to add t...

Page 40: ...Screen 19 Figure 14 Menu Bar Buttons 20 Figure 15 DIN Serial Adapter Cable 22 Figure 16 Traqmate Comm Settings 22 Figure 17 Unit Info Screen 23 Figure 18 User Data Screen 24 Figure 19 Session Upload S...

Page 41: ...a Acquisition System that it is free from defects in materials and workmanship for a period of 180 days from the original date of consumer purchase This warranty does not cover damage to the product a...

Page 42: ...ition Measuring and recording of information Display Unit Lap Timer component of the Traqmate Complete System DU Display Unit Firmware Software that is embedded into the SU and DU that controls their...

Page 43: ...stems are Easy Installation Using just the GPS positioning and accelerometers you can collect an incredible amount of information enough to compare drivers and cars This makes the system accessible to...

Page 44: ...on data each satellite continuously broadcasts the time and its position A GPS receiver receives these signals listening to three or more satellites at once to determine the users position on earth Ho...

Reviews: