background image

TPG BizPhone Standard T42S IP Phone User Guide


P a g e

12


Editing Groups 


To edit group in the local directory: 

1.


Press the 

Directory 

soft key. 

The IP Phone enters the local directory directly as there is only Local Directory enabled in the directory 

by default.  


If the Local Directory is removed from the directory, press 

Menu 

-> 

Directory 

-> 

Local Directory 

to 

enter the Local Directory. 

2.


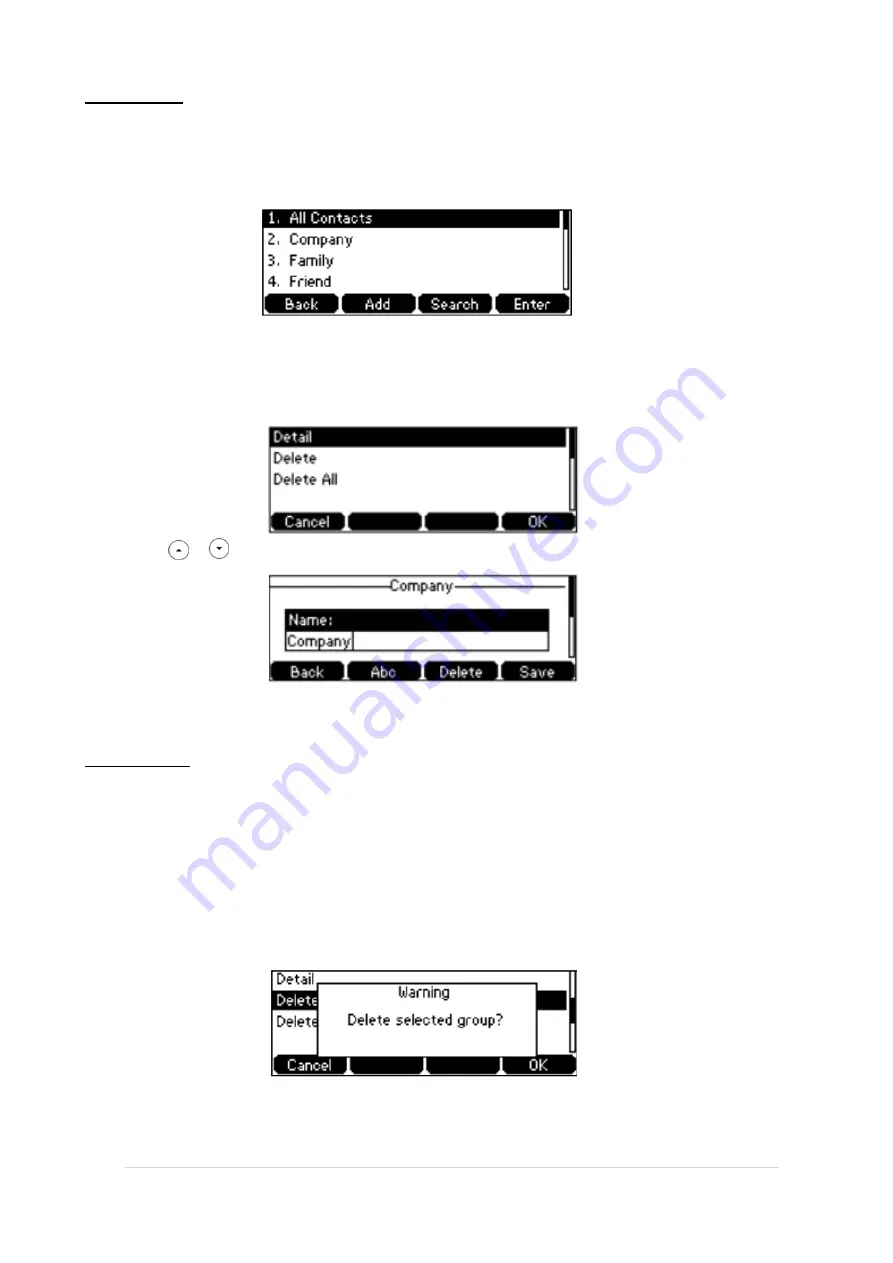
Select the desired contact group. 

3.


Press the 

Option 

soft key and then select 

Detail

 from the prompt list. 


4.


Press 

 or 

  to highlight the group information and then edit. 


5.


Press the 

Save 

soft key to accept the change or the 

Back 

soft key to cancel. 


Deleting Groups 


To delete a group from the local directory: 

1.


Press the 

Directory 

soft key. 

The IP Phone enters the local directory directly as there is only Local Directory enabled in the directory 

by default.  
If the Local Directory is removed from the directory, press 

Menu 

-> 

Directory 

-> 

Local Directory 

to 

enter the Local Directory. 

2.


Select the desired contact group. 

3.


Press the 

Option 

soft key and then select 

Delete 

from the prompt list. The LCD screen prompts the 

following warning. 


4.


Press the 

OK 

soft key to confirm the deletion or the 

Cancel 

soft key to cancel. 

You can also delete all groups from the local directory by pressing the 

Option 

soft key and then select 

Delete All


Summary of Contents for BizPhone Standard T42S

Page 1: ...TPG BizPhone Standard T42S IP Phone User Guide...

Page 2: ...11 Local Directory 11 Blacklist 15 Call History Management 16 Basic Call Features 18 Placing Calls 18 Placing Calls from Local Directory 19 Placing Calls from Call History 19 Answering Calls 20 Answe...

Page 3: ...TPG BizPhone Standard T42S IP Phone User Guide P a g e 3 Advanced Phone Features 28 Voice Mail 28 Greetings 28 Busy Greetings 28 No Answer Greetings 29 Extended Away Greetings 29...

Page 4: ...hone T42S Quick Startup Guide to assemble and start up your handset The BizPhone Quick Startup Guide is available on the BizPhone User Guides page at www tpg com au small business bizphone user guides...

Page 5: ...Prompt text for example Saving config file Time and date Power Indicator LED Indicates phone power and some feature statuses Line Keys Use these keys to activate up to three accounts and assign variou...

Page 6: ...n Icon Description Network is unavailable Registered successfully Register failed Registering Hands free speakerphone mode Handset mode Headset mode Voice Mail Auto Answer Do Not Disturb Call Hold Cal...

Page 7: ...The line is in conversation Fast Flashing Green The line receives an incoming call Slow Flashing Green The call is placed on hold Off The line is inactive Line Key LED configured as BLF key LED Statu...

Page 8: ...nated time in seconds To configure the backlight on your phone 1 Press Menu Settings Basic Settings Display Backlight 2 Press or or the Switch soft key to select the desired value from the Backlight T...

Page 9: ...and date 3 Press the Save soft key to accept the change The time and date displayed on the LCD screen will change accordingly To configure the time and date format on your phone 1 Press Menu Settings...

Page 10: ...one is idle Press to adjust the ringer volume To adjust the volume when the phone is during a call Press to adjust the volume of currently engaged audio device handset speakerphone or headset Ring Ton...

Page 11: ...Directory 1 Press the Directory soft key The IP Phone enters the local directory directly as there is only Local Directory enabled in the directory by default If the Local Directory is removed from th...

Page 12: ...ess the Save soft key to accept the change or the Back soft key to cancel Deleting Groups To delete a group from the local directory 1 Press the Directory soft key The IP Phone enters the local direct...

Page 13: ...tact group and press the Enter soft key 3 Press the Add soft key 4 Enter the name and the office mobile or other numbers in the corresponding fields 5 5 Press Add soft key to accept the change or the...

Page 14: ...then edit 6 Press the Save soft key to accept the change or the Back soft key to cancel Deleting Contacts To delete a contact from the local directory 1 Press the Directory soft key The IP Phone enter...

Page 15: ...ding fields 4 Press the Add soft key to accept the change or the Back soft key to cancel To add a contact to the blacklist directory from the local directory 1 Press the Directory soft key The IP Phon...

Page 16: ...Option soft key and then select Detail from the prompt list The detailed information of the entry appears on the LCD screen To add a contact to the Local Directory or Blacklist from the Call History l...

Page 17: ...the Call History list 1 Press the History soft key 2 Press or to switch between all placed received missed and forwarded call lists 3 Press the Option soft key and then select Delete All from the pro...

Page 18: ...dset key To place call using the handset 1 Pick up the handset 2 Enter the desired number using the keypad 3 Press or the SEND softkey To place call using the speakerphone 1 With the handset on hook p...

Page 19: ...nter soft key 3 Press or to highlight the desired contact 4 Do one of the following If only one number for the contact is stored in the local directory press the Send soft key to dial out the number I...

Page 20: ...y the line key LED flashes green To answer call using the headset Do one of the following Press to activate the headset mode With the headset mode activated press the Answer soft key With the headset...

Page 21: ...mber from your phone Press twice A call to your last dialled number is attempted To redial a previously dialled number from your phone 1 Press when the phone is idle 2 Press or to select the desired e...

Page 22: ...f multiple calls are placed on hold do one of the following Press or to switch between the calls and then press the Resume soft key to retrieve the desired call Press the corresponding line key to ret...

Page 23: ...red forwarding type 3 Press the Enter soft key 4 Depending on your selection a If you select Always Forward 1 Press or or the Switch soft key to select Enabled from the Always Forward field 2 Enter th...

Page 24: ...he idle screen indicates that the call forward is enabled To disable Call Forward on your phone 1 Press Menu Features Call Forward 2 Press or to select the desired forwarding type 3 Press Enter soft k...

Page 25: ...to complete transfer when receiving ring back To perform an attended transfer 1 Press the Transfer soft key during a call 2 Do one of the following Enter the number you want to transfer the call to Pr...

Page 26: ...one to play a warning tone when receiving another call To configure call waiting on your phone 1 Press Menu Features Call Waiting 2 Press or or the Switch soft key to select Enabled from the Call Wait...

Page 27: ...ies in the conference During the conference calls you can do the following actions Press the Hold soft key to place the conference on hold Press the Split soft key to split the conference call into tw...

Page 28: ...izPhone Service Completion Advice If you do not receive a voice mail access code please contact your system administrator 3 Press 1 to enter your Voice Mail box and then press 1 again to listen to you...

Page 29: ...d to activate and deactivate this greetings manually To record your Extended Away Greetings 1 Press to dial the Voice Portal and enter your voice portal passcode Note Your voice portal passcode is ema...

Reviews: