background image

TD-W8970N

  Wireless N ADSL2+ Modem Router User Guide


4.4.7.2  URL Filter 

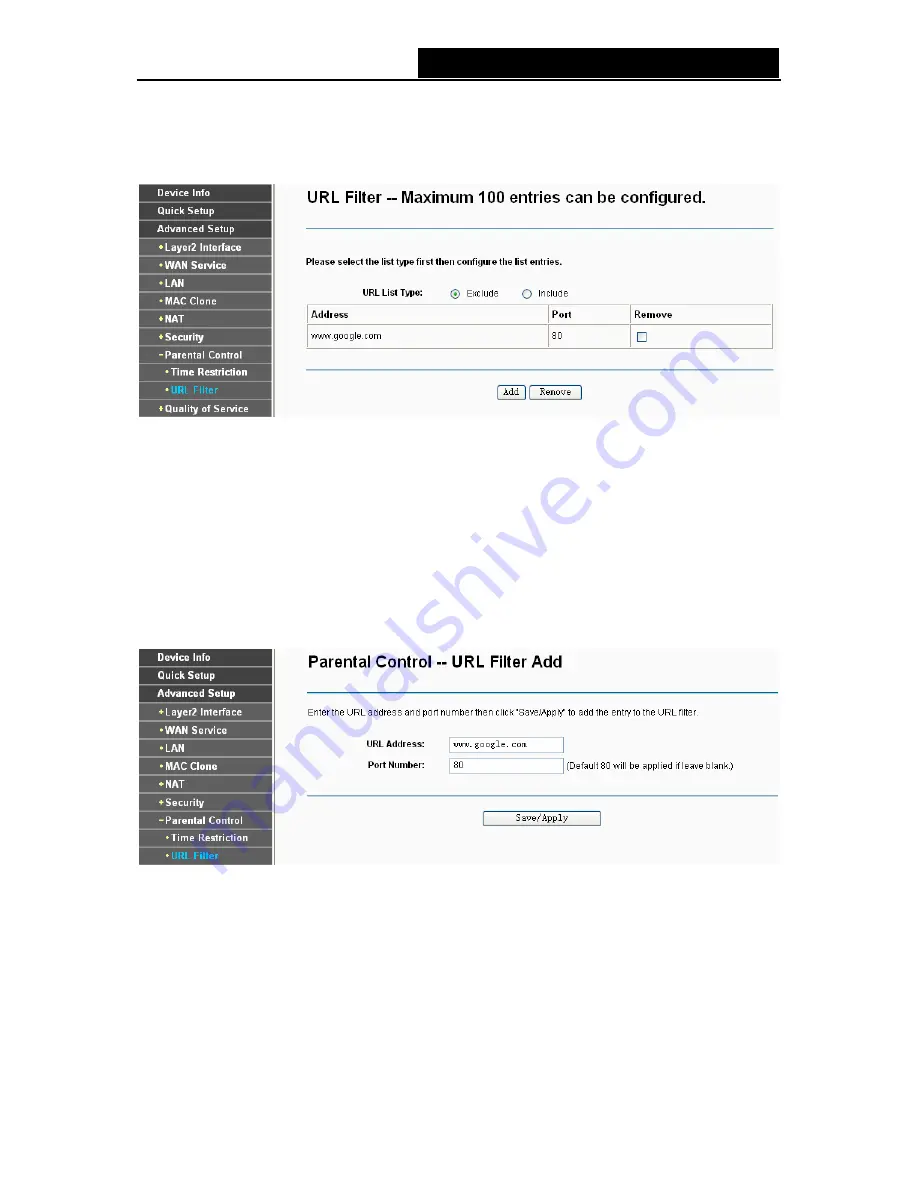
This section allows you to configure the filter rules based on URL to control the computers in the 
LAN to access the specified port. 


Figure 4-40 

There are two policies for the URL Filter. 

¾


Exclude

: Block the PCs to access the specified URL. 

¾


Include

: Only allow the PCs to access the specified URL. 

To add a URL Filter entry for Parental Control rule: 

1. Check 

the 

Exclude 

or 

Include

 radio button. Here we take 

Exclude

 for example. 

2. Click 

the 

Add

 button in Figure 4-40 and then you will see the next screen as shown in Figure 

4-41. Enter the URL Address and Port Number. 


Figure 4-41 

3. Click 

Save/Apply

 to save this entry and then you will see your settings as shown in Figure 

4-40. 

4.4.8  Quality of Service 

Choose “

Advanced Setup

Æ

Quality of Service

”, you can enable QoS (Quality of Service) on 

the screen shown in Figure 4-42. QoS helps to prioritize data as it enters your router. By attaching 
special identification marks or headers to incoming packets, QoS determines which queue the 
packets enter, based priority. This is useful when there are certain types of data you want to give 

46 

Summary of Contents for TD-W8970N

Page 1: ...TD W8970N Wireless N ADSL2 Modem Router Rev 1 0 0 1910010221...

Page 2: ...are trademarks or registered trademarks of their respective holders No part of the specifications may be reproduced in any form or by any means or used to make any derivative such as translation tran...

Page 3: ...n a circuit different from that to which the receiver is connected Consult the dealer or an experienced radio TV technician for help This device complies with part 15 of the FCC Rules Operation is sub...

Page 4: ...tdoor use and public service France Outdoor use limited to 10 mW e i r p within the band 2454 2483 5 MHz Military Radiolocation use Refarming of the 2 4 GHz band has been ongoing in recent years to al...

Page 5: ...y with the following standards or other normative documents ETSI EN 300 328 V1 7 1 2006 ETSI EN 301 489 1 V1 8 1 2008 ETSI EN 301 489 17 V1 3 2 2008 EN 61000 3 2 2006 EN 61000 3 3 1995 A1 2001 A2 2005...

Page 6: ...Chapter 3 Quick Installation Guide 8 3 1 TCP IP Configuration 8 3 2 Quick Installation Guide 10 Chapter 4 Configuring the Router 14 4 1 Login 14 4 2 Device Info 14 4 3 Quick Setup 15 4 4 Advanced Setu...

Page 7: ...e 82 4 5 5 Advanced 84 4 5 6 Station info 85 4 6 Diagnostics 85 4 7 Management 86 4 7 1 Settings 86 4 7 2 System Log 89 4 7 3 SNMP Agent 90 4 7 4 TR 069 client 91 4 7 5 Internet Time 92 4 7 6 Access C...

Page 8: ...apter for TD W8970N Wireless N ADSL2 Modem Router Quick Installation Guide One RJ45 cable Two RJ11 cables One ADSL splitter One Resource CD for TD W8970N Wireless N ADSL2 Modem Router including This U...

Page 9: ...same time which ensures your network stable and smooth The performance of this 802 11n wireless Router will give you the unexpected networking experience at speed 650 faster than 802 11g It is also c...

Page 10: ...2 WPA PSK WPA2 PSK data security TKIP AES encryption security Provides 64 128 bit WEP encryption security and wireless LAN ACL Access Control List Adopts Advanced DMT modulation and demodulation techn...

Page 11: ...ADSL Off The LINE port is disconnected On The Wireless function is enabled Flashing Sending or receiving data over wireless network WLAN Off The Wireless function is disabled On There is a device lin...

Page 12: ...the Router s factory defaults 1 Use the Restore Default function on Management settings Restore Default page in the router s Web based Utility 2 Use the Factory Default RESET button With the Router p...

Page 13: ...owing steps Don t forget to pull out the power plug and keep your hands dry 1 Locate an optimum location for the Router The best place is usually at the center of your wireless network 2 Adjust the di...

Page 14: ...TD W8970N Wireless N ADSL2 Modem Router User Guide 6 Turn on the ON OFF switch to power the device It will start to work automatically Figure 2 1 7...

Page 15: ...is please refer to Appendix B Configuring the PC 2 Configure the network parameters The IP address is 192 168 1 xxx xxx is any number from 2 to 254 Subnet Mask is 255 255 255 0 and Gateway is 192 168...

Page 16: ...ailure result of Ping command Please check the connection following these steps 1 Is the connection between your PC and the Router correct Note The 1 2 3 4 LEDs of LAN ports which you link to on the R...

Page 17: ...a moment a login window will appear similar to the Figure 3 4 Enter admin for the User Name and Password both in lower case letters Then click the OK button or press the Enter key Figure 3 4 Note Do...

Page 18: ...are used to define a unique path for your connection If you have been given specific settings for this to configuration type in the correct values assigned by your ISP Here we select PPPoE WAN Link Ty...

Page 19: ...ect Network Authentication take WPA PSK WPA2 PSK for example set a Pre Shared Key and then click Save to continue Figure 3 7 Note All the existed ATM WAN service will be cleared after clicking the Sav...

Page 20: ...u will see the current configuration has been added to Layer2 Interface list 4 4 1 Layer2 Interface shown in Figure 3 10 and WAN Service list 4 4 2 WAN Service shown in Figure 3 11 Figure 3 10 Figure...

Page 21: ...Info menu there are six submenus under the main menu Summary WAN Statistics Route ARP and DHCP This Device Info section mainly introduces the elementary information about the Router and its current s...

Page 22: ...etup Please refer to Section 3 2 Quick Installation Guide 4 4 Advanced Setup Choose Advanced Setup there are many submenus under the main menu Among the submenus Layer2 Interface WAN Service LAN etc a...

Page 23: ...4 4 1 Layer2 Interface Choose Advanced Setup Layer2 Interface and you can select WAN Service Interface layer2 interface over ATM interfaces or ETH interface ATM Interface Configure the Router to acce...

Page 24: ...then click the Remove button the corresponding interface will be deleted in the table Note If the interface is used by the configuration of the 4 4 2 WAN Service you need to remove the corresponding W...

Page 25: ...er the Link Type you have selected Uses the default setting if you are not sure Service Category Select the type of the service assigned by your ISP in the drop down list The default type is UBR Witho...

Page 26: ...ation will be described in 4 4 8 Quality of Service 4 4 1 2 ETH interface Choose Advanced Setup Layer2 Interface ETH Interface you can configure ETH WAN interfaces on the screen below Figure 4 4 Note...

Page 27: ...vanced Setup WAN Service and you will see the WAN Port Information Table in the screen similar to Figure 4 7 which describes the WAN port settings and the relevant manipulation to each interface After...

Page 28: ...e ATM Interface until the ETH Interface is deleted 4 4 2 1 ATM EoA PPPoE If your ISP provides a PPPoE connection and you need to use an ATM Interface follow the steps below to add a WAN service over a...

Page 29: ...provided by your ISP These fields are case sensitive PPPoE Service Name Enter the Service Name if it was provided by your ISP If you leave it blank the default name will be the same as the Service Des...

Page 30: ...r PC and the NAT and SPI Firewall will be closed Sometimes you can think it as bridge while PPP dialing in the router It s a special feature deployed by some ISP Unless your ISP specifically requires...

Page 31: ...rface Use the following Static DNS IP Address You can select this option to manually enter the primary and or optional secondary DNS server IP addresses provided by your ISP Note If only single PVC wi...

Page 32: ...de Figure 4 13 8 On the next screen you will see the WAN Port Information Table with the new configuration Figure 4 14 Remove Select the check box in the table above and then click Remove the correspo...

Page 33: ...Router will be able to obtain IP network information dynamically from a DHCP server provided by your ISP Note 1 The response message from a DHCP server typically contains a number of configuration par...

Page 34: ...gateway Address please select this option and then enter the WAN IP Address WAN Subnet Mask and WAN gateway IP Address manually 5 You will see the next screen as below You can enable the NAT SPI Firew...

Page 35: ...Figure 4 17 7 Configure the DNS Server Addresses on the screen as follows Figure 4 18 Note If only single PVC with IPoA is configured you must enter static DNS server IP addresses 9 On the next scree...

Page 36: ...Figure 4 9 and click Next button to continue 4 On the screen as shown Figure 4 13 you will see the detailed settings you ve made Please click the Apply Save button to save these settings 4 4 2 4 ATM...

Page 37: ...een of 4 4 1 2 ETH interface 2 Click the Add button on the screen Figure 4 7 and the following configuration is similar to PPPoE over ATM interface see section 4 4 2 1 ATM EoA PPPoE 4 4 2 7 ETH IPoE I...

Page 38: ...ireless N ADSL2 Modem Router User Guide Figure 4 20 4 4 3 LAN Choose Advanced Setup LAN and you will see the LAN screen shown in Figure 4 21 the section allows you to configure the Router s LAN ports...

Page 39: ...255 255 255 0 Enable IGMP Snooping If you select the option please choose the IGMP Mode Standard Mode or Blocking Mode DHCP Server These settings allow you to configure the Router s Dynamic Host Conf...

Page 40: ...amic IP address After the dynamic IP address has expired the user will be automatically assigned a new dynamic IP address The default is 24 hours Static IP Lease List The function allows you to specif...

Page 41: ...AN Interface who s MAC Address you want to change and click Save Apply You can select corresponding WAN Interface from the drop down list and click Clone button to clone your current PC MAC and then c...

Page 42: ...was used for a virtual server must have a static or reserved IP Address because its IP Address may change when using the DHCP function Figure 4 25 Virtual Server Table The table indicates the informa...

Page 43: ...Figure 4 25 and then you will see the new Virtual Server in the next screen as shown in Figure 4 26 Figure 4 26 2 Select the Interface which you want to use from the drop down list 3 Select the servic...

Page 44: ...firewall when an application on the LAN initiates a TCP UDP connection to a remote device using the triggering ports The Router allows the remote party from the WAN side to establish new connections b...

Page 45: ...Open Port Start and Open Port End in the table and then select the Trigger protocol and Open protocol TCP UDP or All 4 Click Save Apply to enable the settings and then you will see you settings as sh...

Page 46: ...hile using the DHCP function 4 4 6 Security Choose Advanced Setup Security and you will see the security screen including IP Filtering and MAC Filtering only effective in Bridging mode submenus Figure...

Page 47: ...gure 4 32 Figure 4 32 2 Enter the Filter name for the rule it is exclusive and must be filled 3 Select the protocol TCP UDP TCP UDP or ICMP in the drop down list for the connection between the Source...

Page 48: ...the Source Port and or Destination Port blank it suggests that all Source Ports and or Destination Ports are controlled by the rule IP Filtering Incoming Choose Advanced Setup Security IP Filtering In...

Page 49: ...Filter name If you leave Protocol blank it means that the rule is effective to all protocols if you leave the Source IP address and or Destination IP address blank it suggests that all Source IP addr...

Page 50: ...ules in the table shown in Figure 4 35 While BLOCKED means that all MAC layer frames will be blocked except those matching with any of the specified rules in the preceding table Add Click the Add butt...

Page 51: ...Apply to save this entry and then you will see your settings as shown in Figure 4 35 4 4 7 Parental Control Choose Advanced Setup Parental Control You can configure the Parental Control rules on the...

Page 52: ...been automatically displayed in the text box To restrict other LAN devices click Other MAC Address radio button and enter the MAC address of the other LAN device 4 Select the day to allow the rule to...

Page 53: ...e Exclude for example 2 Click the Add button in Figure 4 40 and then you will see the next screen as shown in Figure 4 41 Enter the URL Address and Port Number Figure 4 41 3 Click Save Apply to save t...

Page 54: ...CP make from drop down list to automatically mark incoming traffic without reference to a particular classifier Click Save Apply to save the current configuration Note The default DSCP mark is used to...

Page 55: ...Note 1 Lower integer values for precedence imply higher priority for this queue relative to others 2 The queue entry configured here will be used by the classifier to place ingress packets appropriat...

Page 56: ...4 46 After you specify the condition click Save Apply to save the entry 4 4 9 Routing Choose Advanced Setup Routing it includes three menus Default Gateway Static Route and RIP shown in Figure 4 47 Th...

Page 57: ...to selected you have to reboot the Router to get the automatically assigned default gateway Default Gateway IP address should be specified since MER Interface is selected when you select the Enable a...

Page 58: ...for the Static Route Use Gateway IP Address If you select the IPoE or IPoA mode for Use Interface the screen above will display this item you should type the Gateway address correctly and the other op...

Page 59: ...configure an individual interface select the desired RIP version and operation and select Enabled checkbox for the interface Click Save Apply to save the configuration 4 4 10 DNS When you select the...

Page 60: ...ill accept automatically the first received DNS assignment from the selected configured WAN interface during the connection establishment For single PVC with IPoA static IPoE protocol please select th...

Page 61: ...more easily accessed from various locations on the Internet Figure 4 54 To add a DDNS entry 1 Click the Add button pop up Figure 4 54 and then you will set the DDNS in the next screen shown in Figure...

Page 62: ...ions 4 4 12 UPnP Choose Advanced Setup Upnp you can Enable or Disable the UPnP Universal Plug and Play protocol on the screen UPnP Universal Plug and Play is a distributed open networking standard tha...

Page 63: ...le the UPnP function 4 4 13 DNS Proxy Choose Advanced Setup DNS Proxy you can Enable or Disable DNS proxy application on the screen Figure 4 58 4 4 14 Interface Grouping Choose Advanced Setup Interfac...

Page 64: ...oups with appropriate LAN and WAN interfaces using the Add button The Remove button will remove the grouping and add the ungrouped interfaces to the Default group Only the default group has IP interfa...

Page 65: ...N clients to a WAN Interface in the new group add the DHCP vendor ID string By configuring a DHCP vendor ID string any DHCP client request with the specified vendor ID DHCP option 60 will be denied an...

Page 66: ...nt device please REBOOT the client device attached to the modem to allow it to obtain an appropriate IP address 4 4 15 LAN Ports Choose Advanced Setup LAN Ports you can Enable Disable the Virtual LAN...

Page 67: ...tion will guide you to configure a VPN tunnel between two TD W8970Ns The topology is as follows Note You could also use other VPN routers to set VPN tunnels with TD W8970N Click Add New Connection in...

Page 68: ...ou want single IP to join the VPN network IP Address for VPN Enter the IP address of your LAN For example Input 192 168 1 1 in Device1 Input 192 168 2 1 in Device2 IP Subnetmask Enter the Subnet mask...

Page 69: ...hich is 192 168 2 100 in PC1 Note The VPN Servers Endpoint from both ends must use the same pre shared keys and Perfect Forward Secrecy settings Click Show Advanced Settings and then you can configure...

Page 70: ...want to change the default settings of Advanced Settings please make sure that both VPN server endpoints use the same Encryption Algorithm Integrity Algorithm Diffie Hellman Group and Key Life time in...

Page 71: ...this option to enable AP isolation function so that stations associated to the AP will not be able to communicate with each other SSID Wireless network name shared among all points in a wireless netw...

Page 72: ...PA PSK WPA2 PSK or Mixed WPA2 WPA PSK mode is configured Note 1 To build a successful connection by QSS you should also do the corresponding configuration of the new device for QSS function meanwhile...

Page 73: ...ardware push button Step 1 Press the QSS button on the front panel of the Router Step 2 Press and hold the QSS button of the adapter directly for 2 or 3 seconds Step 3 Wait for a while until the next...

Page 74: ...4 67 Method Two Step 1 Press the QSS button on the front panel of the Router Step 2 For the configuration of the wireless adapter please choose Push the button on my access point in the configuration...

Page 75: ...gure 4 69 II By PIN If the new device supports Wi Fi Protected Setup and the PIN method you can add it to the network by PIN with the following two methods Method One Enter the PIN of wireless adapter...

Page 76: ...te The PIN code of the adapter is always displayed on the QSS configuration screen Step 2 For the configuration of the wireless adapter please choose Enter a PIN into my access point or a registrar in...

Page 77: ...ple the default PIN code of this adapter is 16952898 as the preceding figure shown Method Two Enter the PIN of my Router into the wireless adapter Step 1 Get the Current PIN code generated by the Rout...

Page 78: ...gure 4 72 Step 2 For the configuration of the wireless adapter please choose Enter a PIN from my access point in the configuration utility of the QSS as below and enter the PIN code of the Router into...

Page 79: ...llow the instructions below to configure security features of the wireless LAN interface manually You can set the network authentication method select data encryption specify whether a network key is...

Page 80: ...ed to use the default Wireless LAN Performance settings Any changes made to these settings may adversely affect your wireless network Under certain circumstances changes may benefit performance Carefu...

Page 81: ...point y Select Shared to only allow stations using a shared key encryption to associate with it Shared key requires additional configuration of the keys to be used Follow the instructions below to co...

Page 82: ...urrent Network Key selected 1 and enter 10 hexadecimal digits 1234567890 in the Network Key 1 for example Configure the settings as Figure 4 76 shown above 2 WPA WPA security for wireless communicatio...

Page 83: ...n Select the encryption you want to use TKIP or AES AES is an encryption method stronger than TKIP Configure WPA settings 1 Select the WPA option from the Network Authentication drop down list The men...

Page 84: ...W8970N Wireless N ADSL2 Modem Router User Guide Figure 4 78 3 WPA PSK WPA PSK requires a shared key and does not use a separate server for authentication PSK keys can be ASCII or Hex type Figure 4 79...

Page 85: ...ngs 1 Select the WPA PSK option The menu will change to offer the appropriate settings as the picture show above 2 WPA PSK requires a shared key Type the key in the space provided PSK keys can be ASCI...

Page 86: ...uring the scanning process and once association is required the station has been already authenticated Network Re auth Interval Enter a value in seconds as the frequency interval to enable periodic Ne...

Page 87: ...6 Mixed WPA2 WPA To configure Mixed WPA2 WPA settings select the Mixed WPA2 WPA option from the drop down list The menu will change to offer the appropriate settings The steps to these settings are si...

Page 88: ...ow Figure 4 86 Wireless access can be filtered by using the MAC addresses of the wireless devices transmitting within your network s RADIUS To filter wireless users by MAC Address either permitting or...

Page 89: ...be xx xx xx xx xx xx like 00 13 0A 55 FF 09 Figure 4 87 When you finished making changes to the MAC Filter List screen click Save Apply to save the changes 4 5 4 Wireless Bridge Choose Wireless Wirele...

Page 90: ...d Select this option as shown below to enables wireless bridge restriction please enter the MAC address of the Remote Bridges that you want to connect with and only these Remote Bridges are granted ac...

Page 91: ...specifies the maximum size for a packet before data is fragmented into multiple packets If you experience a high packet error rate you may slightly increase the Fragmentation Threshold Setting the Fra...

Page 92: ...gnal range that will decrease the probability of interrupt by other Wi Fi device WMM Wi Fi Multimedia This function can guarantee the packets with high priority messages being transmitted preferential...

Page 93: ...ystem Log TR 069 Client Internet Time Access Control Update Software and Reboot Click any of them and you will be able to configure the corresponding function 4 7 1 Settings This section provides thre...

Page 94: ...4 95 allows you to save the current configuration of the Router as a backup file Figure 4 95 To back up the Router s current settings 1 Click the Backup Settings button on the preceding screen pop up...

Page 95: ...u can also enter the exact path to the Setting file in the text box 2 After you have selected the file for updating the settings click the Update Settings button Note The Router will reboot upon compl...

Page 96: ...in The default IP Address 192 168 1 1 The default Subnet Mask 255 255 255 0 4 7 2 System Log Choose Management System Log you can see the System Log screen this screen shown in Figure 4 100 allows you...

Page 97: ...tem log server If the selected mode is Both events will be sent to the local memory and the remote system log server Server IP Address Type the address of the server you want to record the events Serv...

Page 98: ...o the Router that the community is only permitted to read the device configuration The default value is public Set Community This field allows you to specify the SNMP Community string which provides r...

Page 99: ...this User Name information from your ISP ACS Password Please accept the Password information from your ISP Note If you want to log on the ACS you must own the ACS User Name and ACS Password WAN Inter...

Page 100: ...local time zone 4 Click the Save Apply button Note 1 This setting will be used for some time based functions such as firewall You must specify your time zone once you login to the Router successfully...

Page 101: ...ser The user name admin has unrestricted access to change and view configuration of your DSL Modem Router The user name support is used to allow an ISP technician to access your DSL Modem Router for m...

Page 102: ...the Update Firmware button Note 1 There is no need to upgrade the firmware unless the new firmware has a new feature you want to use However when experiencing problems caused by the Router itself you...

Page 103: ...te 1 After you clicked the Reboot button please wait for a while before reopening your web browser 2 Do not turn off the Router or press the Reset button while the Router is rebooting 3 If necessary r...

Page 104: ...0 Note If you are a Cable user please configure the Router following the above steps 2 How do I configure the Router to access Internet by Ethernet users Log in to the Router and configure the WAN con...

Page 105: ...ow to enable DMZ Host Log in to the Router click the Advanced Setup NAT menu on the left of your browser and click DMZ Host submenu On the DMZ page type your IP address into the DMZ Host IP Address fi...

Page 106: ...your IP address next to the Server IP Address assuming 192 168 1 188 for an example and remember to click the Save Apply button Note Because the WEB Server port 80 will interfere with the WEB managem...

Page 107: ...Router User Guide 3 Make sure the wireless stations have right KEY for encryption when the Router is encrypted 4 If the wireless connection is ready but you can t access the Router check the IP Addre...

Page 108: ...he adapter s manual if necessary 1 Configure TCP IP component 1 On the Windows taskbar click the Start button and then click Control Panel 2 Click the Network and Internet Connections icon and then cl...

Page 109: ...rties window will display and the IP Address tab is open on this window by default Now you have two ways to configure the TCP IP protocol below Setting IP address automatically Select Obtain an IP add...

Page 110: ...g items available 2 If the Router s LAN IP address is 192 168 1 1 specify the IP address as 192 168 1 x x is from 2 to 254 and the Subnet mask as 255 255 255 0 3 Type the Router s LAN IP address the d...

Page 111: ...TD W8970N Wireless N ADSL2 Modem Router User Guide Figure 0 4 Now Click OK to keep your settings 104...

Page 112: ...ble maximum 100m EIA TIA 568 100 STP maximum 100m 1 2 3 4 LAN WLAN ADSL LED Power Internet QSS Safety Emissions FCC CE Wireless Frequency Band 2 4 2 4835GHz Radio Data Rate 11n up to 300Mbps Automatic...

Page 113: ...n a connection at as much as three times the transmission distance of traditional 802 11b and 802 11g products for a coverage area that is up to nine times greater A traditional 802 11b and 802 11g pr...

Page 114: ...ources of a network from users from other networks Gateway A device that interconnects networks with different incompatible communications protocols IEEE 802 11b The IEEE 802 11b standard specifies a...

Page 115: ...User Service A protocol that uses an authentication server to control network access RJ45 Registered Jack 45 An Ethernet connector that holds up to eight wires Router A networking device that connects...

Page 116: ...with a newer version VLAN Virtual Local Air Network Logical subgroups that constitute a Local Area Network LAN This is done in software rather than defining a hardware solution VLAN ID 0 4095 Indicate...

Reviews: