background image

72

Chapter 11


Manage Your Router

11. 2.  Test Internet Connectivity

Diagnostics function is used to test the connectivity between the router and the host 
or other network devices.

1. 

Visit 

http://tplinkwifi.net

, and log in with the password you set for the router.

2. 

Go to 

Advanced

 > 

System Tools

 > 

Diagnostics

 page.


¾

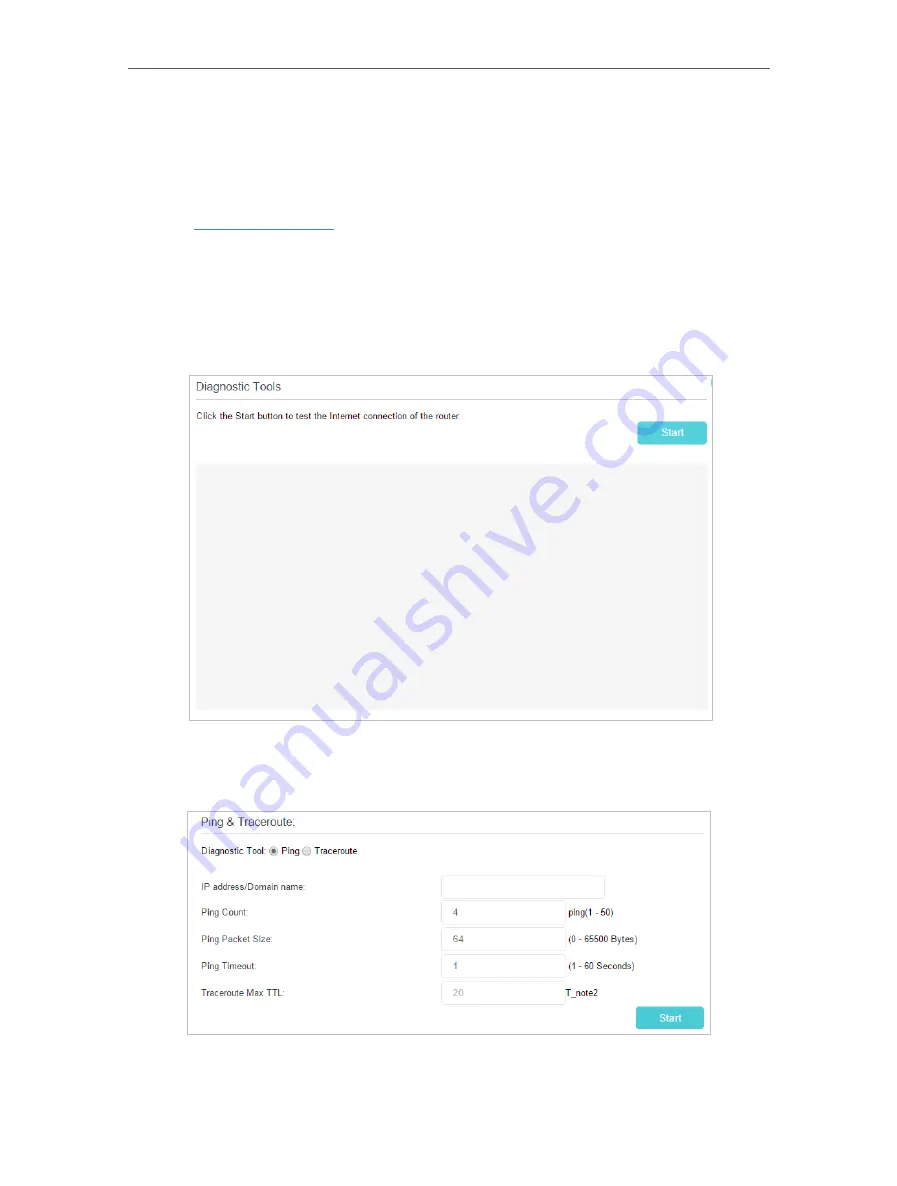
To test the internet connection of the router:

Locate the 

Diagnostic Tools

 section, and click the 

Start

 to test the internet connectivity 

and you will find the test results in the gray box.


¾

To run ping and traceroute tools:

1 )  Locate the 

Diagnostic Tools

 section.

2 )  Select 

Ping

 or 

Traceroute

 as the diagnostic tool to test the connectivity.

Summary of Contents for EC120-F5

Page 1: ...1910020868 REV1 0 0 User Guide AC750 Wireless Dual Band Router EC120 F5 ...

Page 2: ...ly Set Up Your Internet Connection 13 4 3 Set Up an IPv6 Internet Connection 15 4 4 More Operation Modes 16 4 4 1 Configure the Router in Access Point Mode 16 4 4 2 Configure the Router in Range Extender Mode 17 Chapter 5 Parental Controls 21 Chapter 6 Bandwidth Control 25 6 1 Configure the Bandwidth Control 26 6 2 Create Controlling Rules 26 Chapter 7 Network Security 28 7 1 Firewall DoS Protecti...

Page 3: ...onfigure the DHCPv6 Server Address Type 53 10 3 Set Up a Dynamic DNS Service Account 54 10 4 Create Interface Groups 55 10 5 Create Static Routes 56 10 6 Set Up the IPv6 Tunnel 59 10 6 1 Use the Public IPv6 Tunnel Service 6to4 59 10 6 2 Specify the 6rd Tunnel with Parameters Provided by Your ISP 60 10 7 Specify Wireless Settings 61 10 7 1 Change Basic Wireless Settings 61 10 7 2 Advanced Wireless ...

Page 4: ...11 6 3 Remote Management 77 11 6 4 HTTP Referer Head Check 78 11 6 5 ICMP Ping 79 11 7 System Log 79 11 8 CWMP Settings 81 11 9 SNMP Settings 82 11 10 Monitor the Internet Traffic Statistics 83 FAQ 85 ...

Page 5: ...to load the corresponding page For example Advanced Wireless Wireless Settings means the Wireless Settings function page is under the Wireless menu that is located in the Advanced tab Note Ignoring this type of note might result in a malfunction or damage to the device Tips Indicates important information that helps you make better use of your device Symbols on the web page click to edit the corre...

Page 6: ...Chapter 1 Get to Know Your Router This chapter introduces what the router can do and shows its appearance This chapter contains the following sections Product Overview Appearance ...

Page 7: ...us Wi Fi signal to all your devices while boosting widespread coverage throughout your home and the built in Ethernet ports supply high speed connection to your wired devices Moreover it is simple and convenient to set up and use the TP Link router due to its intuitive web interface 1 2 Appearance 1 2 1 Top Panel The router s LEDs are located on the top panel You can check the router s working sta...

Page 8: ... 5GHz wireless band is enabled Off The 5GHz wireless band is disabled WPS On Off Turns on when a WPS connection is established and turns off about 5 minutes later Flashing A wireless device is trying to connect to the network via WPS This process may take up to 2 minutes Ethernet On At least one of router s Ethernet ports is connected Off No Ethernet port is connected Internet Green On Internet se...

Page 9: ...set Button Press and hold this button for at least 5 seconds to reset the router to its factory default settings Wi Fi WPS Button Press this button to establish a WPS connection Press and hold this button for at least 5 seconds to turn on or off the wireless function of your router Internet Port For connecting the router to a DSL Cable modem or an Ethernet port Ethernet Ports 1 2 3 4 For connectin...

Page 10: ...Chapter 2 Connect the Hardware This chapter contains the following sections Position Your Router Connect Your Router ...

Page 11: ...erference such as Bluetooth devices cordless phones and microwaves 2 2 Connect Your Router Follow the steps below to connect your router If your internet connection is through an Ethernet cable from the wall instead of through a DSL Cable Satellite modem connect the Ethernet cable directly to the router s Internet port as step 2 and then follow step 4 and 5 to complete the hardware connection Mode...

Page 12: ...available Wireless Network Connection Connect automatically Connect TP Link_XXXX TP Link_XXXX_5G Wi Fi Wi Fi TP Link_XXXX TP Link_XXXX_5G CHOOSE A NETWORK Other Settings Smart Device Computer Method 3 Use the WPS button Wireless devices that support WPS including Android phones tablets most USB network cards can be connected to your router through this method Note WPS is not supported by iOS devic...

Page 13: ...9 Chapter 2 Connect the Hardware 2 Immediately press the Wi Fi WPS button on your router WLAN On TP Link_5G TP Link Home Office TP Link_123 TP Link_abc MyHome Test Close to ...

Page 14: ...Chapter 3 Log In to Your Router ...

Page 15: ...uch as Microsoft the Internet Explorer Mozilla Firefox or Apple Safari Follow the steps below to log in to your router 1 Set up the TCP IP Protocol in Obtain an IP address automatically mode on your computer 2 Visit http tplinkwifi net and create a login password for secure management Then click Let s Get Started to log in Note If the login window does not appear please refer to the FAQ section ...

Page 16: ...as necessary ISP information built in automates many of the steps and verifies that those steps have been successfully completed Furthermore you can also set up an IPv6 connection if your ISP provides IPv6 service It contains the following sections Use Quick Setup Wizard Manually Set Up Your Internet Connection Set Up an IPv6 Internet Connection More Operation Modes ...

Page 17: ... Connection In this part you can check your current internet connection settings You can also modify the settings according to the service information provided by your ISP Follow the steps below to check or modify your internet connection settings 1 Visit http tplinkwifi net and log in with the password you set for the router 2 Go to Basic Internet 3 Select your internet connection type from the d...

Page 18: ...dPasswordandchooseSecondary Connection provided by your ISP Different parameters are needed according to the Secondary Connection type you have chosen PPPoE users usually have DSL cable modems 4 If you choose L2TP enter the Username and Password and select the IP Address Type provided by your ISP Different parameters are needed according to the IP address type you selected ...

Page 19: ...ing Network Map on the left of the page 2 If you use Dynamic IP and PPPoE and you are provided with any other parameters that are not required on the page please go to Advanced Network Internet to complete the configuration 3 If you still cannot access the internet refer to the FAQ section for further instructions 4 3 Set Up an IPv6 Internet Connection If your ISP provides information about one of...

Page 20: ... more settings You can check the detailed settings of IPv6 and enter the parameters provided by your ISP 5 Click Save to make the settings effective Now IPv6 service is available for your network 4 4 More Operation Modes The router supports two more operation modes Access Point mode and Range Extender mode You can change the operation mode according to your needs 4 4 1 Configure the Router in Acce...

Page 21: ...k Setup or Settings Wireless Wireless Settings and set the network name SSID and passwords for the wireless network Now you can connect to the SSID and enjoy your existing network 4 4 2 Configure the Router in Range Extender Mode In Range Extender mode the device can copy and reinforce the existing wireless signal to extend the coverage of the signal especially for a large space to eliminate signa...

Page 22: ...to Network select the wireless band 2 4GHz or 5GHz you want to connect to 2 Make sure the Enable check box of Wireless Network is selected and then click Scan to detect all available wireless networks Tips 1 You can also enter the SSID and MAC address of the host network in the corresponding fields and select the security settings of the host network 2 You can connect to both 2 4GHz and 5GHz wirel...

Page 23: ...Enter the Password of the host network you selected if it has one and click Save to make the settings effective To specify the extended network 1 Go to Settings Wireless Extended Network and configure the basic settings of the extended network ...

Page 24: ... disables the wireless security WPA WPA2 Reconmmended Selectthisoptiontoenablethewirelesssecurity This is highly recommended to protect the wireless network from unauthorized access And then you can select a security version and encryption type WEP This option is the most basic form of wireless security that can be used if your client devices can only access wireless using WEP Wired Equivalent Pri...

Page 25: ...Chapter 5 Parental Controls This function allows you to block inappropriate explicit and malicious websites and control access to specified websites at specified time ...

Page 26: ...0 6 PM to 22 00 10 PM on the weekdays and not other time 1 Visit http tplinkwifi net and log in with the password you set for the router 2 Go to Basic Parental Controls or Advanced Parental Controls Parental Controls and enable Parental Controls 3 Click Add and then click Scan to select the connected device to be controlled Or enter the Device Name and MAC Address manually 4 Click the icon to set ...

Page 27: ...ction policy Tips With Blacklist selected the controlled devices cannot access any websites containing the specified keywords during the Effective Time period With Whitelist selected the controlled devices can only access websites containing the specified keywords during the Effective Time period 7 Click Add a New Keyword and enter www tp link com and Wikipedia org as the keywords and click Save ...

Page 28: ...llow access only to its related websites If you wish to block all Internet browsing access do not add any keyword to the Whitelist For Blacklist Specify a web address e g wikipedia org a web address keyword e g wikipedia or a domain suffix e g edu or org to block access only to the websites containing that keyword or suffix Now you can control your children s internet access as needed Done ...

Page 29: ...dwidth Control function to control the bandwidth by configuring rules for limiting various data flows In this way the network bandwidth can be reasonably distributed and utilized It contains the following sections Configure the Bandwidth Control Create Controlling Rules ...

Page 30: ...password you set for the router 2 Go to Advanced Bandwidth Control and enable Bandwidth Control 3 Input the total upload and download speed through the WAN port in the Total Upstream Bandwidth and Total Downstream Bandwidth field For optimal bandwidth control please consult your ISP for the total allowed bandwidth for upstream and downstream 4 Click Save to make the settings effective 6 2 Create C...

Page 31: ...l computers in the range will share the given bandwidth Port Range Enter a range of port numbers to be controlled 3 Select the protocol type for this rule 4 Select a priority level for this rule 1 is the highest priority level and 8 is the lowest priority level The total upload and download bandwidth will be allocated to guarantee the minimal rate of all bandwidth control rules 5 Enter the minimum...

Page 32: ...tions You can block or allow specific client devices to access your wireless network using MAC Filtering or using Access Control for wired and wireless networks or you can prevent ARP spoofing and ARP attacks by using IP MAC Binding This chapter contains the following sections Firewall DoS Protection Service Filtering Access Control IP MAC Binding ...

Page 33: ...DoS Protection 1 Visit http tplinkwifi net and log in with the password you set for the router 2 Go to Advanced Security Firewall DoS Protection 3 Enable DoS Protection 4 Set the protection level Low Middle or High for ICMP Flood Attack Filtering UDP Flood Attack Filtering and TCP Flood Attack Filtering ICMP Flood Attack Filtering Enable to prevent the ICMP Internet Control Message Protocol flood ...

Page 34: ...ll be displayed in the Blocked DoS Host List 7 2 Service Filtering With Service Filtering you can prevent certain users from accessing the specified service and even block internet access completely 1 Visit http tplinkwifi net and log in with the password you set for the router 2 Go to Advanced Security Service Filtering and enable Service Filtering 3 Click Add ...

Page 35: ...gs effective Note If you want to disable an entry click the icon 7 3 Access Control Access Control is used to block or allow specific client devices to access your network via wired or wireless based on a list of blocked devices Blacklist or a list of allowed devices Whitelist Block or allow specific client devices to access my network via wired or wireless 1 Visit http tplinkwifi net and log in w...

Page 36: ...Save 2 Select the device s to be blocked in the Online Devices table or click the Add under the Devices in Blacklist and enter the Device Name and MAC Address manually 3 Click Block above the Online Devices table The selected deviceswillbeaddedtoDevicesinBlacklistautomatically To allow specific device s 1 Select Whitelist and click Save 2 Click Add in the Devices in Whitelist section ...

Page 37: ...C Binding IP MAC Binding namely ARP Address Resolution Protocol Binding is used to bind a network device s IP address to its MAC address This will prevent ARP spoofing and other ARP attacks by denying network access to a device with a matching IP address in the Binding list but an unrecognized MAC address Prevent ARP spoofing and ARP attacks 1 Visit http tplinkwifi net and log in with the password...

Page 38: ... in the ARP List 2 Click Bind to add to the Binding List To bind the unconnected device 1 Click Add in the Binding List section 2 Enter the MAC address and IP address that you want to bind 3 Select the Enable This Entry check box to enable the entry and click Save Enjoy the internet without worrying about ARP spoofing and ARP attacks Done ...

Page 39: ...e to remove the isolation of NAT and allow external internet hosts to initiatively communicate with the devices in the local network thus enabling some special features TP Link router includes four forwarding rules If two or more rules are set the priority of implementation from high to low is Virtual Servers Port Triggering UPnP and DMZ This chapter contains the following sections Translate Addre...

Page 40: ...o Point sessions to be tunneled through an IP network and passed through the router IPSec Pass through If enabled it allows IPSec Internet Protocol Security to be tunneled through an IP network and passed through the router IPSec uses cryptographic security services to ensure private and secure communications over IP networks FTP ALG If enabled it allows FTP File Transfer Protocol clients and serv...

Page 41: ...t Port 80 is used in HTTP service port 21 in FTP service port 25 in SMTP service and port 110 in POP3 service Please verify the service port number before configuration Share my personal website I ve built in a local network with my friends through the internet For example the personal website has been built on my home PC 192 168 0 100 I hope that my friends can visit my website The PC is connecte...

Page 42: ...ase note that the External Port cannot be overlapped Internet users can enter http WAN IP in this example http 218 18 232 154 to visit your personal website Tips 1 For a WAN IP that is assigned dynamically by ISP it is recommended to apply and register a domain name for the WAN by DDNS go to Set Up a Dynamic DNS Service Account for more information Then you can use http domain name to visit the we...

Page 43: ...be automatically filled in Here we take MSN Gaming Zone as an example 4 Click Save to make the settings effective Tips 1 You can add multiple port triggering rules according to your network needs 2 If the application you need is not listed in the Existing Applications list you can enter the parameters manually You should verify the external ports the application uses first and enter them into Exte...

Page 44: ...00 2 Visit http tplinkwifi net and log in with the password you set for your router 3 Go to Advanced NAT Forwarding DMZ and select the Enable check box to enable DMZ 4 Enter the IP address 192 168 0 100 in the DMZ Host IP Address filed 5 Click Save to save the settings The configuration is completed You ve set your PC to a DMZ host and now you can join a team to game with other players 8 5 Make Xb...

Page 45: ... install the UPnP components For example when you connect your Xbox to the router which has connected to the internet to play online games UPnP will send request to the router to open the corresponding ports allowing the following data penetrating the NAT to transmit Therefore you can play Xbox online games without a hitch Router Xbox LAN WAN You can follow the steps to change the status of UPnP 1...

Page 46: ... stable It is suitable for restricted environment such as campus network and company intranet PPTP VPN is more easily used and its speed is faster it s compatible with most operating systems and also supports mobile devices Its security is poor and your packets may be cracked easily and PPTP VPN connection may be prevented by some ISP This chapter contains the following sections you can choose the...

Page 47: ...1 Before you enable VPN Server we recommend you configure Dynamic DNS Service recommended or assign a static IP address for router s WAN port and synchronize your System Time with internet 2 The first time you configure the OpenVPN Server you may need to Generate a certificate before you enable the VPN Server 3 Select the Service Type communication protocol for OpenVPN Server UDP TCP 4 Enter a VPN...

Page 48: ...ay or Apple App Store 2 After the installation copy the file exported from your router to the OpenVPN client utility s config folder for example C Program Files OpenVPN config on Windows The path depends on where the OpenVPN client utility is installed 3 Run the OpenVPN client utility and connect it to OpenVPN Server Tips You can go to Advanced VPN VPN Connections to view the clients that are curr...

Page 49: ...PN server 4 Enter the Username and Password to authenticate clients to the PPTP VPN server 5 Click Save to make the settings effective Step 2 Configure PPTP VPN Connection on Your Remote Device The remote device can use the Windows built in PPTP software or a third party PPTP software to connect to PPTP Server Here we use the Windows built in PPTP software as an example 1 Go to Start Control Panel...

Page 50: ...46 Chapter 9 VPN Server 4 Select Use my Internet connection VPN 5 Enter the internet IP address of the router for example 218 18 1 73 in the Internet address field Click Next ...

Page 51: ...47 Chapter 9 VPN Server 6 Enter the User name and Password you have set for the PPTP VPN server on your router and click Connect 7 The PPTP VPN connection is created and ready to use ...

Page 52: ...48 Chapter 9 VPN Server Tips You can go to Advanced VPN VPN Connections to view the clients that are currently connected to the PPTP VPN servers ...

Page 53: ...ration of the router using the web management page It contains the following sections Configure LAN Settings Configure IPv6 LAN Settings Set Up a Dynamic DNS Service Account Create Interface Groups Create Static Routes Set Up the IPv6 Tunnel Specify Wireless Settings Schedule Your Wireless Function Use WPS for Wireless Connection ...

Page 54: ...assword you set for the router 2 Go to Advanced Network LAN Settings page and select IPv4 3 Enter a new IP Address appropriate to your needs 4 Select the Subnet Mask from the drop down list The subnet mask together with the IP address identifies the local IP subnet 5 Keep IGMP Snooping enabled by default IGMP snooping is the process of listening to IGMP Internet Group Management Protocol network t...

Page 55: ...e Time is the amount of time in which a DHCP client can lease its current dynamic IP address assigned by the router After the dynamic IP address expires the user will be automatically assigned a new dynamic IP address 6 Keep the rest settings as the default settings and click Save Note 1 The router can be configured to work as a DHCP Relay A DHCP relay is a computer that forwards DHCP data between...

Page 56: ... set for the router 2 Go to Advanced Network LAN Settings page and select IPv4 3 Scroll down to the Address Reservation section and click Add to add an address reservation entry for your device 4 Enter the MAC Address of the device for which you want to reserve IP address 5 Specify the IP address which will be reserved by the router 6 SelecttheEnableThisEntrycheckboxandclickSavetomakethesettingsef...

Page 57: ... to access the IPv6 network For more information about RDNSS and ULA Prefix contact our technical support 2 Keep Site Prefix Type as the default setting Delegated If your ISP has provided a specific IPv6 site prefix select Static and enter the prefix 3 Keep WAN Connection as the default setting 4 Click Save to make the settings effective 10 2 2 Configure the DHCPv6 Server Address Type 1 Visit http...

Page 58: ... Account Most ISPs Internet service providers assign a dynamic IP address to the router and you can use this IP address to access your router remotely However the IP address can change any time and you don t know when it changes In this case you might need the DDNS Dynamic Domain Name Server feature on the router to allow you and your friends to access your router and local servers FTP HTTP etc us...

Page 59: ...ace Groups Divide my devices connected to the router into different groups and disallow devices cross group communication For example in my house devices connected to LAN1 and LAN3 are for work while others for entertainment I want to isolate working devices from others while keep all devices access to the internet 1 Visit http tplinkwifi net and log in with the password you set for the router 2 G...

Page 60: ...eEnableGroupIsolationcheckboxtoisolateworking devices and disallow other devices from communicating with them 7 Click Save to make the settings effective Now your working devices connected to LAN1 and LAN3 are in an isolated group 10 5 Create Static Routes A static route is a pre determined path that network information must travel to reach a specific host or network Data from one point to another...

Page 61: ...nd my company s server is established To surf the internet and visit my company s network at the same time I need to configure the static routing Company s Server My PC Switch LAN 192 168 0 1 192 168 0 100 LAN 192 168 0 2 WAN 172 30 30 100 172 30 30 1 Router A Router B 1 Make sure the routers use different LAN IP addresses on the same subnet Disable Router B s DHCP function 2 Visit http tplinkwifi...

Page 62: ...tination network is a single IP so here we enter 255 255 255 255 Gateway The IP address of the gateway device to which the data packets will be sent This IP address must be on the same subnet with the router s IP which sends out the data In the example the data packets will be sent to the LAN port of Router B and then to the Server so the default gateway should be 192 168 0 2 Interface Determined ...

Page 63: ...If there are any 6to4 servers on your network you can use this mechanism to access IPv6 service If your ISP provides you with an IPv4 only connection but you want to visit IPv6 websites you can try to set up a 6to4 tunnel Set up the IPv6 tunnel though my ISP doesn t provide me with the tunnel service 1 Visit http tplinkwifi net and log in with the password you set for the router 2 Go to Advanced N...

Page 64: ...op down list 4 According to the parameters provided by your ISP choose Auto or Manual More parameters are needed if you choose Manual 5 Click Save Note If there is no available WAN connection to choose make sure you have connected to the internet and the connection type is not Bridge Now you can visit the IPv6 websites with the 6rd tunnel Tips The way to set up DS Lite tunnel is similar to that of...

Page 65: ...reless settings will be invalid To change the wireless network name SSID and wireless password 1 Go to Basic Wireless 2 Enter a new SSID 32 characters at most in the Network Name SSID field and a new password in the Password field and click Save The SSID and password are case sensitive Note If you use a wireless device to change the wireless settings you will be disconnected after the new settings...

Page 66: ... 11ac devices 802 11ac n mixed 5GHz Select if you are using both 802 11ac and 802 11n wireless clients 802 11a n ac mixed 5GHz Select if you are using a mix of 802 11a 802 11n and 802 11ac wireless clients It is strongly recommended that you select 11a n ac mixed Channel Select the channel you want to use from the drop down list This field determines which operating frequency will be used It is no...

Page 67: ...vanced settings Locate the Advanced Settings section and configure the advanced settings according to the explanation below and then click Save Beacon Interval Enter a value between 25 and 1000 in milliseconds to determine the duration between which beacon packets are broadcast by the router to synchronize the wireless network The default is 100 milliseconds RTS Threshold Enter a value between 1 a...

Page 68: ...ble WDS bridging function Locate the WDS section and select the Enable WDS Bridging check box And then set the information of the router to be bridged Refer to FAQ for detailed instructions To enable or disable WPS function WPS Wi Fi Protected Setup provides you with an easier approach to set up a security protected Wi Fi connection This function is enabled by default but if you do not need this f...

Page 69: ...P select the Allow Guests to Access Each Other check box If you want to allow the wireless devices on the multi SSID network to communicate with the devices connected to the router s LAN ports or main network via methods such as network neighbors Samba Ping and FTP select the Allow Guests to Access My Local Network check box 5 Repeat step 1 to step 4 to set other wireless networks if needed and cl...

Page 70: ...canviewthedetailedinformationofthewirelessclients includingitsconnection type and security option as well as the packets transmitted Tips You can also see the wireless details by clicking the wireless clients icon on Basic Network Map 10 8 Schedule Your Wireless Function You can automatically turn off your wireless networks when you do not need the wireless connection 1 Visit http tplinkwifi net a...

Page 71: ...u can use WPS Wi Fi Protected Setup to add a new wireless device to your existing network quickly and easily Method 1 Use the WPS button Use this method if your client device has a WPS button 1 Press the Wi Fi WPS button of the router 2 Press the WPS button of the client device directly 3 The WPS LED flashes for about 2 minutes during the WPS process 4 When the WPS LED is on the client device has ...

Page 72: ...an also click the Generate button to get a new PIN 4 Enter the router s PIN on the client device The default PIN is also printed on the label of the router 5 The WPS LED flashes for about 2 minutes during the WPS process 6 When the WPS LED is on the client device has successfully connected to the router Note 1 The WPS LED on the router will light on for five minutes if the device has been successf...

Page 73: ...rk Settings 4 Enter the client device s PIN Then click the Connect button 5 Device has been added successfully or the similar information will appear on the web page which means the client device has successfully connected to the router ...

Page 74: ...trate your router s network This chapter contains the following sections Set System Time Test Internet Connectivity Update the Firmware Back Up and Restore Configuration Settings Reboot the Router Administration Management System Log CWMP Settings SNMP Settings Monitor the Internet Traffic Statistics ...

Page 75: ...anced System Tools Time Settings page 3 Configure the system time using the following methods Manually Select your time zone enter the date and select the local time Get from PC Click this button if you want to use the current time of your PC Get from the Internet Click this button if you want to get time from the internet Make sure your router can access the internet before you select this way to...

Page 76: ...th the password you set for the router 2 Go to Advanced System Tools Diagnostics page To test the internet connection of the router Locate the Diagnostic Tools section and click the Start to test the internet connectivity and you will find the test results in the gray box To run ping and traceroute tools 1 Locate the Diagnostic Tools section 2 Select Ping or Traceroute as the diagnostic tool to te...

Page 77: ...outer The latest firmware can also be downloaded from the Support page of our website www tp link com for free Note 1 Make sure that you have a stable connection between the router and your computer It is NOT recommended to upgrade the firmware wirelessly 2 Back up your router configuration before upgrading the firmware 3 DO NOT turn off the router during the firmware upgrade You can follow the st...

Page 78: ...m Tools Backup Restore To back up configuration settings Click Backup to save a copy of the current settings to your local computer A conf bin file will be stored to your computer To restore configuration settings 1 Click Browse to locate the backup configuration file stored on your computer and click Restore 2 Wait a few seconds for the restoring and rebooting To reset the router to factory defau...

Page 79: ...To schedule the router to reboot at a specific time 1 Enable Auto Reboot 2 Specify the Time when the router reboots and the Auto Reboot Interval to decide how often it reboots 3 Click Save to make the settings effective Some settings of the router may take effect only after rebooting including Change the LAN IP Address system will reboot automatically Change the DHCP Settings Change the Operation ...

Page 80: ...ation and locate the Account Management section 3 Enter the old password and a new password twice both case sensitive 4 Click Save to make the settings effective 11 6 2 Local Management You can control the local devices authority to manage the router via Local Management feature By default all local connected devices are allowed to manage the router You can also specify one device to manage the ro...

Page 81: ... Management By default the remote devices are not allowed to manage the router from the internet You can enable remote management over HTTP and or HTTPS if needed HTTPS is a more secure way to access the router Note If your ISP assigns a private WAN IP address such as 192 168 x x or 10 x x x you cannot use the remote management feature because private addresses are not routed on the internet Follo...

Page 82: ...e router Tips 1 If you were warned about the certificate when visiting the web management page remotely click Trust or a similar option to continue To avoid this warning you can download and install the certificate on the router s web management page at Advanced System Tools Administration 2 The router s WAN IP is usually a dynamic IP Please refer to Set Up a Dynamic DNS Service Account if you wan...

Page 83: ...cate the ICMP Ping section 3 Specify the ICMP Ping reply options Remote Select it if you want the computers on a public network to ping the router s WAN IP address Local Enabled by default if enabled the computers on a private network can ping the router s LAN IP address 4 Click Save to make the settings effective 11 7 System Log System Log can help you know what happened to your router facilitati...

Page 84: ...s Save Locally Select this option to cache the system log to the router s local memory select the minimum level of system log to be saved from the drop down list The logs will be shown in the table in descending order on the System Log page Save Remotely Select this option to send the system log to a remote server select the minimum level of system log to be saved from the drop down list and enter...

Page 85: ...tem Tools CWMP Settings page CWMP Enable or disable the CWMP CPE WAN Management Protocol function Inform Enable or disable the function of sending an inform message to the ACS Auto Configuration Server periodically Inform Interval Set the time interval in seconds when the Inform message will be sent to the ACS ACS URL Enter the web address of the ACS which is provided by your ISP ACS Username Pass...

Page 86: ...e the settings effective 11 9 SNMP Settings SNMP Simple Network Management Protocol is widely used in network management for network monitoring It allows management applications to retrieve status updates andstatisticsfromtheSNMPagentwithinthisdevice Inthisway networkadministrators can easily search and modify the information on any node on the network Meanwhile they can locate faults promptly and...

Page 87: ... device This value should include the full name and version identification of the system s hardware type software operating system and networking software System Location Displays the physical location of this device for example the telephone closet 3rd floor System Contact Displays the textual identification of the contact person for this managed device together with information on how to contact...

Page 88: ... enable traffic statistics function you can view the total number of packets and bytes received and transmitted by the router within the selected Statistics Interval This function is disabled by default 4 You can refer to Traffic Statistics List for the detailed information about the traffic usage of all devices ...

Page 89: ...t to create a new login password Note You ll need to reconfigure the router to surf the internet once the router is reset and please mark down your new password for future use Q3 What should I do if I cannot log in to the router s web management page This can happen for a variety of reasons Please try the methods below to log in again Make sure your computer is connected to the router correctly an...

Page 90: ...86 4 Click LAN settings and clear the following three options and click OK 5 Go to Advanced Restore advanced settings click OK to save the settings ...

Page 91: ... wireless network of the root router Note 1 WDS bridging only requires configuration on the extended router 2 WDS bridging function can be enabled either in 2 4GHz frequency or 5GHz frequency for a dual band router We use the WDS bridging function in 2 4GHz frequency as example 1 Visit http tplinkwifi net and log in with the password you set for the router 2 Configure the IP address of the router ...

Page 92: ... the router is altered 3 Select the wireless network to be bridged 1 Go to Advanced Wireless Advanced Settings page Locate the WDS section and select the Enable WDS Bridging check box to enable the WDS Bridging function 2 Click Scan to detect all available AP devices and locate the network you want to bridge with ...

Page 93: ...cally filled in select the security options of the wireless network you selected and enter the password if it has one 4 Click Save to make the settings effective 4 Disable DHCP 1 Go to Advanced Network LAN Settings page 2 Clear the Enable check box of DHCP and click Save ...

Page 94: ...ameters which should be the same as the network to be bridged Q5 What should I do if I cannot access the internet even though the configuration is finished 1 Visit http tplinkwifi net and log in with the password you set for the router 2 Go to Advanced Status to check internet status As the following image shows if IP Address is a valid one please try the methods below and try again Your computer ...

Page 95: ...er 1 or 2 minutes and check the internet access Reset the router to factory default settings and reconfigure the router Upgrade the firmware of the router Check the TCP IP settings on the particular device if all other devices can get internet from the router As the following image shows if the IP Address is 0 0 0 0 please try the methods below and try again Make sure the physical connection betwe...

Page 96: ...outer The MAC addresses of a computer in wired connection and wireless connection are different Modify the LAN IP address of the router Note Most TP Link routers use 192 168 0 1 192 168 1 1 as their default LAN IP address which may conflict with the IP range of your existing ADSL modem router If so the router is not able to communicate with your modem and you can t access the internet To resolve t...

Page 97: ...upgrade the firmware of the router If you ve tried every method above but still cannot access the internet please contact the technical support Q6 What should I do if I cannot find my wireless network or I cannot connect the wireless network If you fail to find any wireless network please follow the steps below Make sure the wireless function of your device is enabled if you re using a laptop with...

Page 98: ...uration in the Services list on the right side 5 Right click Wireless Zero Configuration and then select Properties 6 Change Startup type to Automatic click on Start button and make sure the Service status is Started And then click OK If you can find other wireless network except your own please follow the steps below Check the WLAN LED indicator on your wireless router modem Make sure your comput...

Page 99: ... Key 3 If it continues to show note of Network Security Key Mismatch it is suggested to confirm the wireless password of your wireless router Note Wireless Password Network Security Key is case sensitive Windows unable to connect to XXXX Can not join this network Taking longer than usual to connect to this network Check the wireless signal strength of your network If it is weak 1 3 bars please mov...

Page 100: ...product names are trademarks or registered trademarks of their respective holders No part of the specifications may be reproduced in any form or by any means or used to make any derivative such as translation transformation or adaptation without permission from TP Link Technologies Co Ltd Copyright 2019 TP Link Technologies Co Ltd All rights reserved ...

Page 101: ...However there is no guarantee that interference will not occur in a particular installation If this equipment does cause harmful interference to radio or television reception which can be determined by turning the equipment off and on the user is encouraged to try to correct the interference by one or more of the following measures Reorient or relocate the receiving antenna Increase the separation...

Page 102: ...n shown to comply with the applicable technical standards FCC part 15 There is no unauthorized change is made in the equipment and the equipment is properly maintained and operated Issue Date 2019 04 02 FCC compliance information statement Product Name I T E POWER SUPPLY Model Number AMS195 0900600FU Responsible party TP Link USA Corporation d b a TP Link North America Inc Address 145 South State ...

Page 103: ... with part 15 of the FCC Rules Operation is subject to the following two conditions 1 This device may not cause harmful interference 2 This device must accept any interference received including interference that may cause undesired operation Any changes or modifications not expressly approved by the party responsible for compliance could void the user s authority to operate the equipment We TP Li...

Page 104: ...mplies with RF specifications when the device used at 20 cm from your body Restricted to indoor use Canadian Compliance Statement This device complies with Industry Canada license exempt RSS standard s Operation is subject to the following two conditions 1 This device may not cause interference and 2 This device must accept any interference including interference that may cause undesired operation...

Page 105: ...l exploitation point à point et non point à point selon le cas En outre les utilisateurs devraient aussi être avisés que les utilisateurs de radars de haute puissance sont désignés utilisateurs principaux c à d qu ils ont la priorité pour les bandes 5250 5350 MHz et 5650 5850 MHz et que ces radars pourraient causer du brouillage et ou des dommages aux dispositifs LAN EL Radiation Exposure Statemen...

Page 106: ...品的操作可靠並防止過熱 請勿堵塞或覆蓋 開口 請勿將本產品置放於靠近熱源的地方 除非有正常的通風 否則不可放在密閉位 置中 請不要私自打開機殼 不要嘗試自行維修本產品 請由授權的專業人士進行此項 工作 限用物質含有情況標示聲明書 產品元件名稱 限用物質及其化學符號 鉛 Pb 鎘 Cd 汞 Hg 六價鉻 CrVI 多溴聯苯 PBB 多溴二苯醚 PBDE PCB 外殼 電源適配器 備考1 超出0 1 wt 及 超出0 01 wt 系指限用物質之百分比含量超 出百分比含量基準值 備考2 系指該項限用物質之百分比含量未超出百分比含量基準值 備考3 系指該項限用物質為排除項目 Продукт сертифіковано згідно с правилами системи УкрСЕПРО на відповідність вимогам нормативних документів та вимо...

Page 107: ...ce We cannot guarantee that no accidents or damage will occur due to improper use of the device Please use this product with care and operate at your own risk For EU EFTA this product can be used in the following countries AT BE BG CH CY CZ DE DK EE EL ES FI FR HR HU IE IS IT LI LT LU LV MT NL NO PL PT RO SE SI SK UK Explanations of the symbols on the product label Symbol Explanation DC voltage In...

Reviews: