background image

35

Chapter 4


Configure the Router in Wireless Router Mode

4  3  4   WPS

WPS (Wi-Fi Protected Setup) can help you to quickly and securely connect to a network. 
This section will guide you to add a new wireless device to your router’s network quickly 
via WPS.

Note:

The WPS function cannot be configured if the wireless function of the router is disabled. Please make sure the wireless 
function is enabled before configuration.

1. Visit 

http://tplinkwifi.net

, and log in with the password you set for the router.

2. Go to 

Advanced

 > 

Wireless

 > 

WPS

3. Follow one of the following three methods to connect your client device to the 

router’s Wi-Fi network.

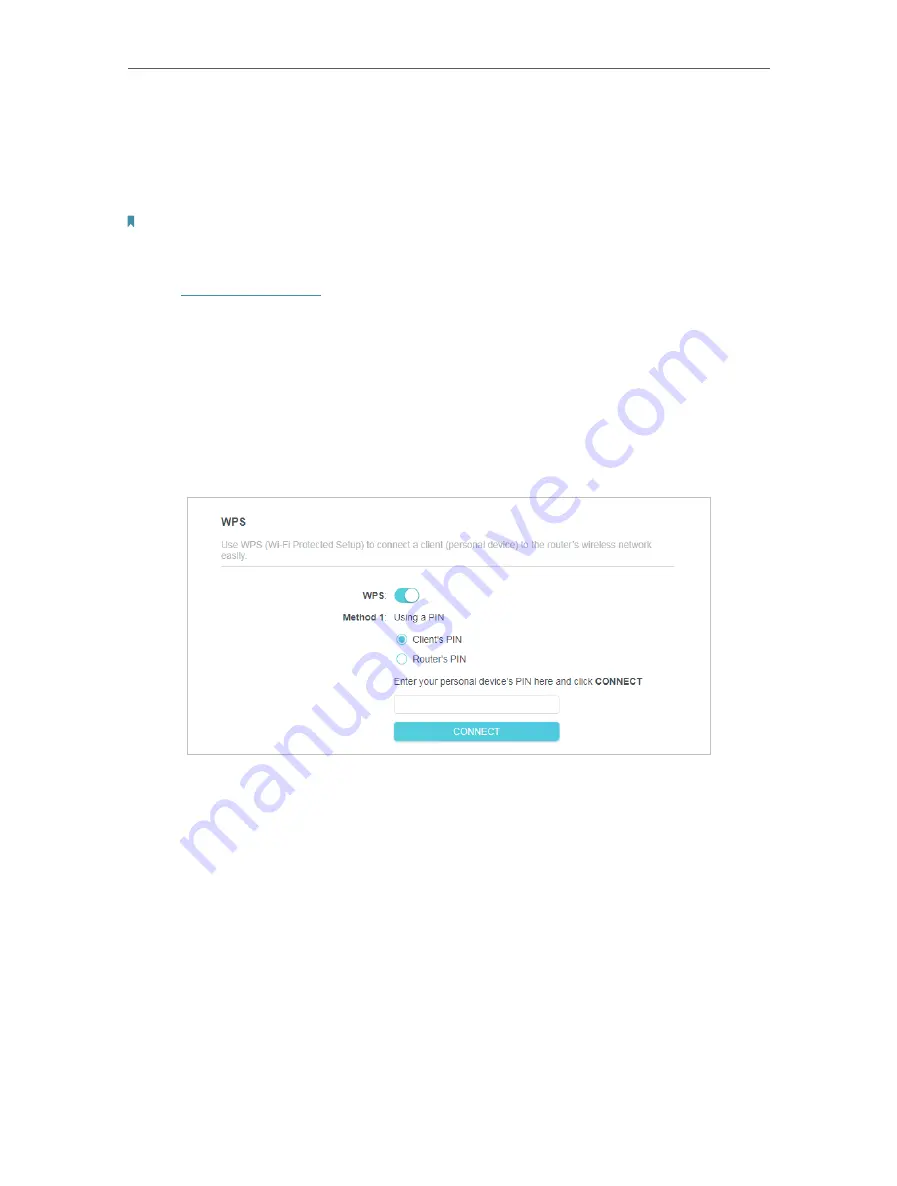
Method 1: Using a PIN

• Connects vis the Client’s PIN

1. Keep the WPS Status as 

Enabled

 and select 

Client’s PIN

.

2.  Enter the PIN of your device and click 

CONNECT

. Then your device will get connected 

to the router.

Summary of Contents for Archer C54

Page 1: ...REV1 0 0 1910012708 User Guide AC1200 Dual Band Wi Fi Router Archer C54...

Page 2: ...2 2 Range Extender Mode 11 2 2 3 Access Point Mode 12 Chapter 3 Log In to the Router 14 Chapter 4 Configure the Router in Wireless Router Mode 16 4 1 Operation Mode 17 4 2 Network 17 4 2 1 Status 17 4...

Page 3: ...4 10 3 Change Password 56 4 10 4 Local Management 56 4 10 5 Remote Management 57 4 10 6 System Log 59 4 10 7 Diagnostic 59 4 10 8 Time Settings 61 4 10 9 Reboot 62 4 10 10 LED Control 63 Chapter 5 Co...

Page 4: ...ion Mode 76 6 2 Firmware Upgrade 76 6 3 Backup Restore 77 6 4 Administration 78 6 4 1 Change Password 78 6 4 2 Local Management 78 6 5 System Log 79 6 6 Time Settings 80 6 7 Reboot 81 6 8 LED Control...

Page 5: ...nus items buttons etc The menu structures to show the path to load the corresponding page For example Advanced Wireless MAC Filtering means the MAC Filtering function page is under the Wireless menu t...

Page 6: ...ound where you find this guide or inside the package of the router Specifications can be found on the product page at https www tp link com A TP Link Community is provided for you to discuss our produ...

Page 7: ...Chapter 1 Get to Know About Your Router This chapter introduces what the router can do and shows its appearance It chapter contains the following sections Product Overview Appearance...

Page 8: ...it is simple and convenient to set up and use the TP Link router due to its intuitive web interface and the powerful Tether app 1 2 Appearance 1 2 1 Top Panel The router s LEDs view from left to right...

Page 9: ...WAN port is not connected Access Point Mode The WAN port is not connected Range Extender Mode The router is not connected to the host network 1 2 2 The Back Panel The following parts view from left to...

Page 10: ...l at the bottom of the router then use default information on it to connect to the router Note 1 Use the default network names SSIDs and password to join the networks Or scan the QR code to join the p...

Page 11: ...Chapter 2 Connect to the Internet This chapter contains the following sections Position Your Router Connect to the Internet...

Page 12: ...trong electromagnetic radiation and the device of electromagnetic sensitive Place the router in a location where it can be connected to the various devices as well as to a power source Make sure the c...

Page 13: ...et Connect to the power socket Power on the modem and then wait about 2 minutes for it to restart Connect the powered off modem to the router s WAN port via an Ethernet cable Verify that the LED turns...

Page 14: ...puter Method 3 Use the WPS button Wireless devices that support WPS including Android phones tablets most USB network cards can be connected to your router through this method Note WPS is not supporte...

Page 15: ...ction 5 Enjoy Forwirelessdevices youmayhavetoreconnecttothewirelessnetworkifyou have customized the SSID wireless name and password during the configuration 2 2 2 Range Extender Mode This mode boosts...

Page 16: ...he Wi Fi dead zone The location you choose must be within the range of your existing host network Extended Network Host Network Devices Host Router Router 7 Enjoy You can customize the SSID and passwo...

Page 17: ...ar of a web browser Create a password to log in Note If the above screen does not pop up it means that your IE Web browser has been set to a proxy Go to menu Tools Internet Options Connections LAN Set...

Page 18: ...Chapter 3 Log In to the Router This chapter introduces how to log in to the web management page of the router...

Page 19: ...th a Web browser such as Microsoft the Internet Explorer Mozilla Firefox or Apple Safari Follow the steps below to log in to your router 1 Set up the TCP IP Protocol in Obtain an IP address automatica...

Page 20: ...s Router Mode This chapter presents how to configure the various features of the router working as a wireless router It contains the following sections Operation Mode Network Wireless NAT Forwarding P...

Page 21: ...th the password you set for the router 2 Go to Advanced Operation Mode 3 Select the working mode as needed and click SAVE 4 2 Network 4 2 1 Status 1 Visit http tplinkwifi net and log in with password...

Page 22: ...ction Type Indicates the way in which your router is connected to the internet IP Address The WAN IP address of the router Subnet Mask The subnet mask associated with the WAN IP address Default Gatewa...

Page 23: ...The IP address range for the DHCP server to assign IP addresses Dynamic DNS This field displays the current settings of the Dynamic DNS Domain Name System and you can configure them on the Advanced Ne...

Page 24: ...efault MTU size unless required by your ISP Host Name This option specifies the name of the router GetIPwithUnicastDHCP AfewISPs DHCPserversdosupportthebroadcastapplications If you cannot get the IP a...

Page 25: ...bnet mask Default Gateway Enter the gateway IP address in dotted decimal notation provided by your ISP Primary Secondary DNS Optional Enter one or two DNS addresses in dotted decimal notation provided...

Page 26: ...se select Use the Following IP Address and enter the IP address provided by your ISP in dotted decimal notation DNS Address The default setting is to get an IP address dynamically from your ISP If you...

Page 27: ...kground L2TP If your ISP provides L2TP connection please select L2TP Username Password Enter the username and password provided by your ISP These fields are case sensitive VPN Server IP Domain Name En...

Page 28: ...e function as On Demand mode Enter a maximum time in minutes the internet connection can be inactive before it is terminated into the Max Idle Time The default value is 15 minutes If you want the inte...

Page 29: ...on as On Demand mode Enter a maximum time in minutes the internet connection can be inactive before it is terminated into the Max Idle Time The default value is 15 minutes If you want the internet con...

Page 30: ...of the LAN and click SAVE MAC Address The physical address of the LAN ports The value can not be changed IP Address Enter the IP address in dotted decimal notation of your router the default one is 1...

Page 31: ...ed and the router acts as a DHCP server it dynamically assigns TCP IP parameters to client devices from the IP Address Pool You can change the settings of DHCP Server if necessary and you can reserve...

Page 32: ...rd you set for the router 2 Go to Advanced Network DHCP Server and locate the Address Reservation section 3 Click Add in the Address Reservation section 4 Click VIEW CONNECTED DEVICES and select the y...

Page 33: ...ing your domain name no matter what your IP address is Before using this feature you need to sign up for DDNS service providers such as www comexe cn www dyndns org or www noip com The Dynamic DNS cli...

Page 34: ...same time For example in a small office my PC can surf the internet through Router A but I also want to visit my company s network Now I have a switch and Router B I connect the devices as shown in th...

Page 35: ...ame subnet with the router s IP which sends out data In the example the data packets will be sent to the LAN port of Router B and then to the Server so the default gateway should be 192 168 0 2 Interf...

Page 36: ...WPA PSK WPA2 Personal It s the WPA WPA2 authentication type based on pre shared passphrase It s also the recommended security type WPA WPA2 Enterprise It s based on Radius Server WEP It is based on t...

Page 37: ...uest Network 3 Enable the Guset Network function 4 Create a network name for your guest network 5 Select the Security type and create the Password of the guest network 6 Click SAVE Now you guests can...

Page 38: ...he wireless function can be automatically off at a specific time when you do not need the wireless function 1 Visit http tplinkwifi net and log in with the password you set for the router 2 Go to Adva...

Page 39: ...the router is disabled Please make sure the wireless function is enabled before configuration 1 Visit http tplinkwifi net and log in with the password you set for the router 2 Go to Advanced Wireless...

Page 40: ...an connect to your router with the PIN The default PIN is printed on the label of your router Method 2 Using the device s WPS button Click Start on the screen Within two minutes press the WPS button o...

Page 41: ...ions cannot access each other through WLAN Beacon Interval Enter a value between 40 1000 milliseconds for Beacon Interval here Beacon Interval value determines the time interval of the beacons The bea...

Page 42: ...lementation from high to low is Port Forwarding Port Triggering UPNP and DMZ 4 4 1 Port Forwarding When you build up a server in the local network and want to share it on the internet Port Forwarding...

Page 43: ...you are not clear about which port and protocol to use If the service you want to use is not in the Common Services list you can enter the corresponding parameters manually You should verify the port...

Page 44: ...he port triggering rules 1 Visit http tplinkwifi net and log in with the password you set for the router 2 Go to Advanced NAT Forwarding Port Triggering 3 Click Add 4 Click VIEW COMMON SERVICES and se...

Page 45: ...UPnP protocol can use this feature UPnP feature needs the support of operating system e g Windows Vista Windows 7 Windows 8 etc Some of operating system need to install the UPnP components Forexample...

Page 46: ...mes you can log in normally but cannot join a team with other players To solve this problem set your PC as a DMZ host with all ports opened How can I do that 1 Assign a static IP address to your PC fo...

Page 47: ...Parental Controls 3 Click Add to create a profile for a family member 4 Add basic profile information 1 Enter a Name for the profile to make it easier to identify 2 Under Devices click 3 Select the d...

Page 48: ...hapter 4 ConfiguretheRouterinWirelessRouterMode 1 Enter the key word of the website that you want to block Click if want to block multiple websites 2 Click NEXT 6 Set time restrictions on internet acc...

Page 49: ...s designed to ensure the efficient operation of the network when come across network overload or congestion Devices set as high priority will be allocated more bandwidth and so continue to run smoothl...

Page 50: ...outer from cyber attacks and validate the traffic that is passing through the router based on the protocol This function is enabled by default 1 Visit http tplinkwifi net and log in with the password...

Page 51: ...h the password you set for the router 2 Go to Advanced Security Access Control 3 Select the access mode to either block recommended or allow the device s in the list To block specific device s 1 Selec...

Page 52: ...2 Add devices to the whitelist Add connected devices Click Select From Device List and select the devices you want to be allowed Add unconnected devices Click Add Manually and enter the Device Name a...

Page 53: ...tacks by denying network access to an device with matching IP address in the Binding list but unrecognized MAC address I want to Prevent ARP spoofing and ARP attacks How can I do that 1 Visit http tpl...

Page 54: ...ay settings in this page It is recommended to keep them as default 4 9 IPv6 This function allows you to enable IPv6 function and set up the parameters of the router s Wide Area Network WAN and Local A...

Page 55: ...de If you select Router Fill in WAN and LAN information as required by different connection types 1 Normal The default connection type 1 Configure the WAN settings 2 Configure the LAN settings Fill in...

Page 56: ...retheRouterinWirelessRouterMode 2 PPPoE Select this type if your ISP uses PPPoEv6 and provides a username and password 1 Configure the WAN settings 2 Configure the LAN settings Fill in Address Prefix...

Page 57: ...gure the WAN settings 2 Configure the LAN settings If you select Pass Through Bridge Click SAVE No configuration is required 4 10 System 4 10 1 Firmware Upgrade TP Link is dedicated to improving and r...

Page 58: ...our website and upgrade the firmware to the latest version 1 Download the latest firmware file for the router from our website www tp link com 2 Visit http tplinkwifi net and log in with the password...

Page 59: ...ettings Click BACK UP to save a copy of the current settings in your local computer A bin file of the current settings will be stored in your computer To restore configuration settings 1 Click BROWSE...

Page 60: ...w password twice both case sensitive Click SAVE 4 Use the new password for future logins 4 10 4 Local Management 1 Visit http tplinkwifi net and log in with the password you set for the router 2 Go to...

Page 61: ...Remote Management 1 Visit http tplinkwifi net and log in with the password you set for the router 2 Go to Advanced System Administration and focus on the Remote Management section Note If your ISP as...

Page 62: ...Router s WAN IP address port number such as http 113 116 60 229 1024 to manage the router Tips You can find the WAN IP address of the router on Network Map Internet The router s WAN IP is usually a dy...

Page 63: ...r s WAN IP is usually a dynamic IP Please refer to Dynamic DNS if you want to log in to the router through a domain name 4 10 6 System Log 1 Visit http tplinkwifi net and log in with the password you...

Page 64: ...lays of packets across an Internet Protocol network 2 Enter the IP Address or Domain Name of the tested host 3 Modify the Ping Count number and the Ping Packet Size It s recommended to keep the defaul...

Page 65: ...rver via the internet 1 Visit http tplinkwifi net and log in with the password you set for the router 2 Go to Advanced System Time To set System Time 1 Select the way in which the router gets its time...

Page 66: ...10 9 Reboot Some settings of the router will take effect only after rebooting and the system will reboot automatically You can also reboot the router to clear cache and enhance running performance 1...

Page 67: ...me period during which the LED is off 1 Visit http tplinkwifi net and log in with the password you set for the router 2 Go to Advanced System LED Control 3 Enable Night Mode 4 Specify the LED off time...

Page 68: ...64 Chapter 4 ConfiguretheRouterinWirelessRouterMode...

Page 69: ...This chapter presents how to configure the various features of the router working as an access point It contains the following sections Operation Mode Firmware Upgrade Backup Restore Administration Sy...

Page 70: ...ures giving users a better network experience We will release the latest firmware at TP Link official website www tp link com You can download the latest firmware file from the Support page of our web...

Page 71: ...http tplinkwifi net and log in with the password you set for the router 2 Go to System Backup Restore To backup configuration settings Click BACK UP to save a copy of the current settings in your loca...

Page 72: ...Password 1 Visit http tplinkwifi net and log in with the password you set for the router 2 Go to System Administration and focus on the Change Password section 3 Enter the old password then a new pas...

Page 73: ...evice 3 Click VIEW CONNECTED DEVICES and select the device to manage the router from the Connected Devices list or enter the MAC address of the device manually 4 Specify a Description for this entry 5...

Page 74: ...ty between the router and the host or other network devices 1 Visit http tplinkwifi net and log in with the password you set for the router 2 Go to System Diagnostics 3 Enter the information 1 Choose...

Page 75: ...e Max TTL It s recommended to keep the default value 4 Click START to begin the diagnostics The figure below indicates the proper connection between the router and the Yahoo server www Yahoo com teste...

Page 76: ...erver 1 or NTP Server 2 4 Click SAVE To set up Daylight Saving Time 1 Select Enable Daylight Saving 2 Select the start time from the drop down list in the Start fields 3 Select the end time from the d...

Page 77: ...r router To reboot the router manually Click REBOOT and wait a few minutes for the router to reboot To set the router to reboot regularly 1 Tick the Enable box of Reboot Schedule 2 Specify the Reboot...

Page 78: ...cess Point Mode 4 Specify the LED off time and the LED will be off during this period every day Note The effective LED off time is based on the time of the router You can go to Advanced System Time La...

Page 79: ...Mode This chapter presents how to configure the various features of the router working as a range extender It contains the following sections Operation Mode Firmware Upgrade Backup Restore Administra...

Page 80: ...es giving users a better network experience We will release the latest firmware at TP Link official website www tp link com You can download the latest firmware file from the Support page of our websi...

Page 81: ...tp tplinkwifi net and log in with the password you set for the router 2 Go to System Backup Restore To backup configuration settings Click BACK UP to save a copy of the current settings in your local...

Page 82: ...assword 1 Visit http tplinkwifi net and log in with the password you set for the router 2 Go to System Administration and focus on the Change Password section 3 Enter the old password then a new passw...

Page 83: ...ice 3 Click VIEW CONNECTED DEVICES and select the device to manage the router from the Connected Devices list or enter the MAC address of the device manually 4 Specify a Description for this entry 5 C...

Page 84: ...6 6 Time Settings This page allows you to set the time manually or to configure automatic time synchronization The router can automatically update the time from an NTP server via the internet 1 Visit...

Page 85: ...the end time from the drop down list in the End fields 4 Click SAVE Note This setting will be used for some time based functions such as firewall You must specify your time zone once you log in to the...

Page 86: ...ot Schedule 2 Specify the Reboot Time when the router reboots and Repeat to decide how often it reboots 3 Click SAVE 6 8 LED Control The LED of the router indicates its activities and status You can e...

Page 87: ...eExtenderMode 4 Specify the LED off time and the LED will be off during this period every day Note The effective LED off time is based on the time of the router You can go to Advanced System Time Lang...

Page 88: ...ll need to reconfigure the router to surf the Internet once the router is reset and please mark down your new password for future use Q3 What should I do if I cannot log in to the router s web managem...

Page 89: ...85 4 Click LAN settings and deselect the following three options and click OK 5 Go to Advanced Restore advanced settings and click OK...

Page 90: ...nternet even though the configuration is finished 1 Visit http tplinkwifi net and log in to with the password you set for the router 2 Go to Advanced Network Status to check the Internet status If IP...

Page 91: ...s is 0 0 0 0 please try the methods below and try again Make sure the physical connection between the router and the modem is proper Clone the MAC address of your computer 1 Visit http tplinkwifi net...

Page 92: ...og in with the username and password you set for the router 2 Go to Advanced Network LAN 3 ModifytheLANIPaddressasthefollowpictureshows Herewetake192 168 2 1 as an example 4 Click Save Restart the mod...

Page 93: ...he steps below Make sure the wireless function of your device is enabled if you re using a laptop with a built in wireless adapter You can refer to the relevant document or contact the laptop manufact...

Page 94: ...other wireless network except your own please follow the steps below Make sure your computer device is still in the range of your router modem Move closer if it is currently too far away If you can fi...

Page 95: ...this network Check the wireless signal strength of your network if it is weak 1 3 bars please move the router closer and try again Change the wireless Channel of the router to 1 6 or 11 to reduce inte...

Page 96: ...roduct names are trademarks or registered trademarks of their respective holders No part of the specifications may be reproduced in any form or by any means or used to make any derivative such as tran...

Page 97: ...s equipment does cause harmful interference to radio or television reception which can be determined by turning the equipment off and on the user is encouraged to try to correct the interference by on...

Page 98: ...only Mobile Configurations The antennas used for this transmitter must be installed to provide a separation distance of at least 20 cm from all persons and must not be co located or operating in conju...

Page 99: ...eception which can be determined by turning the equipment off and on the user is encouraged to try to correct the interference by one or more of the following measures Reorient or relocate the receivi...

Page 100: ...meets the EU requirements 2014 53 EU Article 3 1a on the limitation of exposure of the general public to electromagnetic fields by way of health protection The device complies with RF specifications w...

Page 101: ...otential for harmful interference to co channel mobile satellite systems Avertissement 1 Le dispositif fonctionnant dans la bande 5150 5250 MHz est r serv uniquement pour une utilisation l int rieur a...

Page 102: ...wt Note 1 Exceeding 0 1 wt and exceeding 0 01 wt indicate that the percentage content of the restricted substance exceeds the reference percentage value of presence condition 2 Note 2 indicates that t...

Page 103: ...We cannot guarantee that no accidents or damage will occur due to improper use of the device Please use this product with care and operate at your own risk Explanations of the symbols on the product...

Reviews: