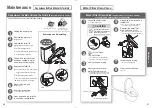
Gap between the Main Unit and the Toilet Lid
(Approximately once a month)
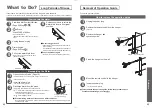
The toilet lid can be removed for thorough cleaning.
Soft cloth soaked in water
Toilet paper, etc.
(May cause damage.)
1
Unplug the power plug.
Removing and Reinstalling
Ⓓ
Ⓔ
Pin
Hinge
Hinge
Tab
Ⓑ
Ⓒ
Ⓐ
Hold with
both hands
2
Remove the main unit.
(Pages 38, 39)
3
Remove the toilet lid.
Slightly tilt the toilet lid to the front.
↓
Ⓐ
: Pull the left side outward.
↓
Ⓑ
: Disconnect the hinge from the tab and pull up.
↓
Ⓒ
: Disconnect the right side.
4
Wipe with a soft cloth that
has been soaked in water
and wrung-out thoroughly.
5
Reinstall the toilet lid.
Ⓓ
: Join the pin and the hinge on the right side.
↓
Slightly tilt the toilet lid to the front.
↓
Ⓐ
: While pulling out the left side,
↓
Ⓔ
: Mount by joining the hinge with the tab.
* Be careful not to pinch your ngers.
6
Mount the main unit.
(Pages 38, 39)
7
Insert the power plug.
The "Power" LED lights up.
8
Open and close the toilet lid
to check the reinstallation.
Maintenance
Gap between the Main Unit and the Toilet Lid
40
Water Filter Drain Valve
(Approximately once every 6 months)
<If you think the water pressure has weakened>
1
Close the shutoff valve.
The water supply stops.
CAUTION
Do not remove the water
lter drain valve while the
shutoff valve is open.
(Otherwise, water may leak out.)
Shutoff
valve
2
Press "Wand
CLEAN" button.
Open the wand cover. (Release the
pressure from the water supply pipe.)
3
Unplug the power plug.
4
Remove the cover and
water lter drain valve.
Loosen the water lter drain valve with
a at-head screwdriver and then pull it.
Cover
Flat-head screwdriver
Water Filter Drain Valve
5
Clean with a tool such as a
toothbrush.
Also, remove any dust from inside the
hole of the water lter drain valve.
6
Reinstall the water lter
drain valve and cover.
Insert the water lter drain valve and use a
at-head screwdriver to tighten it securely.
7
Insert the power plug.
The "Power" LED lights up.
8
Open the shutoff valve.
(Page 19)
Water Filter Drain Valve
41
Maintenance


