What to Do?
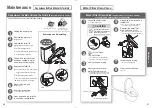
1
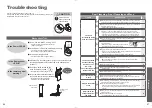
Use a bucket to ush water.
2
If the water level is low after
ushing, add more water.
.
s
r
o
d
o
s
t
n
e
v
e
r
P
•
Attention!
e
h
t
f
o
e
d
i
s
p
o
t
e
h
t
n
o
d
e
t
a
c
o
l
s
i
n
o
tt
u
b
"
H
S
U
L
F
"
n
e
h
w
y
l
n
o
(
"
F
F
O
"
o
t
"
H
S
U
L
F
O
T
U
A
"
t
e
s
,
k
r
o
w
g
n
it
r
a
t
s
e
r
o
f
e
B
•
remote control). (Page 44)
l
l
u
f
a
m
r
o
f
r
e
p
o
t
e
r
u
s
e
b
,
d
e
r
o
t
s
e
r
s
i
y
l
p
p
u
s
r
e
t
a
w
e
h
t
n
e
h
W
•
ush. (To prevent waste from remaining in the drain pipe.)
■
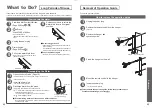
Replacing the batteries
1
Unplug the power plug.
2
Remove the remote control from the hanger.
(Page 18)
<Power>
3
Open the battery cover and replace two AA
batteries.
(Page 18)
.f
f
o
s
e
o
g
k
r
a
m
g
n
i
n
r
a
w
y
r
e
tt
a
b
w
o
l
e
h
T
•
4
Mount the remote control in the hanger.
5
Insert the power plug.
.
p
u
s
t
h
g
il
D
E
L
"
r
e
w
o
P
"
e
h
T
•
Attention!
• "ON" and "OFF" settings of the functions such as the energy saver function may be canceled when the batteries
are replaced.
Set them again.
If the water does not ow due to a water service interruption
If you cannot operate with the remote control
■
If the low battery warning mark "
" on the
display screen on the back of the remote
control lights up, please replace the batteries.
MENU
1.MANUAL
CLEANING
1/5
Low battery
warning mark
If the water does not ow due to a water service interruption
If you cannot operate with the remote control
Newspaper, dustcloth, etc.
Large bucket
Pour strongly, aiming
at the center of the
bowl unit.
62
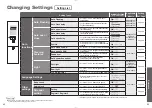
Freeze Damage Prevention
When the ambient temperature is likely to drop to 32 °F (0 °C) or lower, take measures to prevent freezing.
Attention!
.
e
r
u
t
a
e
f
r
e
v
a
s
y
g
r
e
n
e
e
h
t
e
s
u
t
o
n
o
d
,
r
e
w
o
l
r
o
32 °F (0 °C)
o
t
p
o
r
d
o
t
y
l
e
k
il
s
i
e
r
u
t
a
r
e
p
m
e
t
t
n
e
i
b
m
a
e
h
t
n
e
h
W
•
(May damage the product.)
Warm the bathroom or take measures against freezing so that the ambient temperature does not drop below 32 °F (0 °C).
•
• Before starting work, set "AUTO FLUSH" (only when "FLUSH" button is located on the top side of the remote control)
(Page 44) and "Auto open/close" (Except SW3046AT40, SW3046, SW3044AT40, SW3044) (Page 46) to "OFF".
How to freeze damage prevention
1
Close the shutoff valve.
(Page 41 Step
1
)
.
s
p
o
t
s
y
l
p
p
u
s
r
e
t
a
w
e
h
T
•
CAUTION
Do not remove the water lter
drain valve while the shutoff
valve is open.
(Otherwise, water may leak out.)
2
Drain the water from the toilet
tank.
e
h
t
li
t
n
u
.
c
t
e
/
n
o
tt
u
b
/
r
e
v
e
l
e
h
t
e
t
a
l
u
p
i
n
a
M
•
water stops.
3
Press
"Wand CLEAN" button.
.
r
e
v
o
c
d
n
a
w
e
h
t
n
e
p
O
•
(Release the pressure from the water
supply pipe.)
4
Unplug the power plug.
5
Drain the pipe.
①
r
e
t
a
w
d
n
a
r
e
v
o
c
e
h
t
e
v
o
m
e
R
lter drain
valve.
r
e
t
a
w
e
h
t
n
e
s
o
o
L
•
lter drain valve with
a at-head screwdriver and then pull it.
Water Filter
Drain Valve
Flat-head screwdriver
Cover
②
Drain the water from the water supply hose.
Water supply hose
Horizontally
③
r
e
t
a
w
e
h
t
ll
a
t
s
n
i
,r
e
t
a
w
e
h
t
g
n
i
n
i
a
r
d
r
e
tf
A
lter drain valve and cover.
r
e
t
a
w
e
h
t
t
r
e
s
n
I
•
lter drain valve and
use a at-head screwdriver to tighten it
securely.
6
Insert the power plug.
.
p
u
s
t
h
g
il
D
E
L
"
r
e
w
o
P
"
e
h
T
•
7
Set the toilet seat temperature
to "High".
(Page 28)
e
h
t
e
s
o
l
c
,
e
r
u
t
a
r
e
p
m
e
t
e
h
t
n
i
a
t
n
i
a
m
o
T
•
toilet seat and toilet lid after nishing work.
■
To use the product again
)
4
6
e
g
a
P
(
.
d
e
il
p
p
u
s
e
r
e
b
o
t
s
d
e
e
n
r
e
t
a
w
e
h
T
•
63
Reference


