background image

User’s Manual

3-34

Hardware, Utilities and Options

Disconnecting the i.LINK (IEEE1394) cable

To disconnect the i.LINK (IEEE1394) cable, follow the steps as detailed 
below:

1. Open the 

Safely Remove Hardware

 icon on the Windows Taskbar.

2. Point to 

i.LINK (IEEE1394) device

 and click.

3. Disconnect the cable from the computer then from the i.LINK device.

Serial port

The serial connector can be used to connect to RS-232C compatible 
devices.

RS-232C compatible devices include the following:

Modem

Mouse

Printer

Some models are equipped with a serial port.

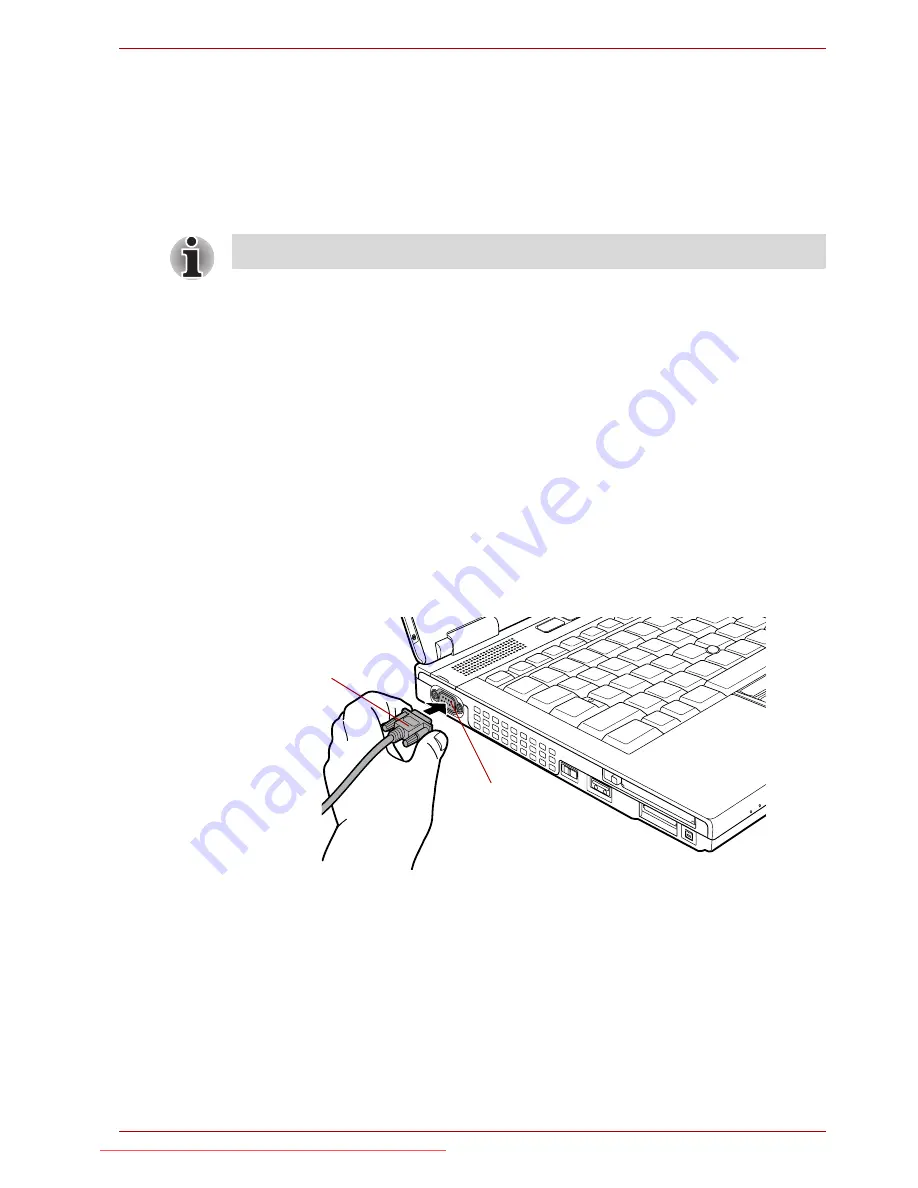
To connect a serial port, follow the steps as detailed below:

1. Turn the computer’s power off.

2. Connect the serial connector to the serial port and tighten the screws on 

the left and right hand side.

Figure 3-17 Connecting the serial connector to the serial port

Refer also to the documentation that came with your i.LINK device.

Serial connector

Serial port 

Downloaded from LpManual.com Manuals

Summary of Contents for TECRA P10 Satellite Pro S300 Series

Page 1: ...User s Manual TECRA A10 TECRA S10 TECRA P10 TECRA M10 Satellite Pro S300 Series Downloaded from LpManual com Manuals ...

Page 2: ...of the computer and the computer s batteries xvi Optical disc drive safety instructions xvii International precautions xxi Preface Conventions xxiii General Precautions Provide adequate ventilation xxvi Creating a computer friendly environment xxvii Stress injury xxvii Heat injury xxvii Pressure or impact damage xxviii PC Card overheating xxviii Mobile phones xxviii Instruction Manual for Safety a...

Page 3: ...sics TOSHIBA Dual Pointing Device 4 1 Using the Fingerprint Sensor 4 3 Web Camera 4 11 Using the TOSHIBA Face Recognition 4 12 Using optical disc drives 4 15 Writing CDs on DVD ROM CD R RW drives 4 19 Writing CD DVDs on DVD Super Multi drives 4 21 Media care 4 27 Sound System 4 28 Modem 4 31 Wireless communications 4 34 LAN 4 38 Computer Handling 4 40 Using the Hard Disk Drive HDD Protection 4 41 ...

Page 4: ... and Video mode Display controller B 1 Video mode B 1 Appendix C Wireless LAN Card Specifications C 1 Radio Characteristics C 2 Supported Frequency Sub bands C 3 Appendix D Bluetooth wireless technology Interoperability Bluetooth wireless technology and your Health D 2 Regulatory statements D 2 Using Bluetooth Adaptor from TOSHIBA equipment in Japan D 4 Appendix E AC Power Cord and Connectors Cert...

Page 5: ... TECRA M10 Satellite Pro S300 Battery Life 4 H 3 Hard Disk Drive HDD Capacity 5 H 3 LCD 6 H 3 Graphics Processor Unit GPU 7 H 3 Wireless LAN 8 H 4 Copy Protection 9 H 4 Images 10 H 4 Glossary Index Downloaded from LpManual com Manuals ...

Page 6: ...manual has been validated and reviewed for accuracy The instructions and descriptions it contains are accurate for the TOSHIBA TECRA A10 S10 P10 TECRA M10 Satellite Pro S300 Portable Personal Computer at the time of this manual s production However succeeding computers and manuals are subject to change without notice TOSHIBA assumes no liability for damages incurred directly or indirectly from err...

Page 7: ... the following measures Reorient or relocate the receiving antenna Increase the separation between the equipment and receiver Connect the equipment into an outlet on a circuit different from that to which the receiver is connected Consult the dealer or an experienced radio TV technician for help FCC conditions This device complies with part 15 of the FCC Rules Operation is subject to the following...

Page 8: ...n standards listed under the Low Voltage Directive 2006 95 EC the EMC Directive 2004 108 EC and or R TTE Directive 1999 5 EC The complete official EU CE Declaration can be obtained on following internet page http epps toshiba teg com VCCI Class B Information Modem warning notice Responsible for CE marking TOSHIBA EUROPE GMBH Hammfelddamm 8 41460 Neuss Germany Manufacturer Toshiba Corporation 1 1 S...

Page 9: ... for more details The hookflash timed break register recall function is subject to separate national type approvals It has not been tested for conformity to national type regulations and no guarantee of successful operation of that specific function on specific national networks can be given Japan regulations Region selection If you are using the computer in Japan technical regulations described i...

Page 10: ... local telephone company and give them the following information The telephone number of the line to which you will connect the modem The registration number that is located on the device The FCC registration number of the modem will be found on either the device which is to be installed or if already installed on the bottom of the computer outside of the main system label The Ringer Equivalence N...

Page 11: ...porarily discontinue service When practical they will notify you in advance of this disconnection If advance notice is not feasible you will be notified as soon as possible When you are notified you will be given the opportunity to correct the problem and informed of your right to file a complaint with the FCC In the event repairs are ever needed on your modem they should be performed by TOSHIBA C...

Page 12: ...er to disconnect the equipment Users should ensure for their own protection that the electrical ground connections of the power utility telephone lines and internal metallic water pipe systems if present are connected together This precaution may be particularly important in rural areas 2 The user manual of analog equipment must contain the equipment s Ringer Equivalence Number REN and an explanat...

Page 13: ... manner Consequently there would be no permit in force for this equipment and the Telecoms Act 1991 prescribes a penalty of 12 000 for the connection of non permitted equipment Notes for use of this device in New Zealand The grant of a Telepermit for a device in no way indicates Telecom acceptance of responsibility for the correct operation of that device under all operating conditions In particul...

Page 14: ... Blind dial delay ATS7 less than 90 Time to wait to carrier after dialing ATS10 less than 150 loss of carrier to hangup delay factory default of 15 recommended ATS11 90 DTMF dialing on off duration 90 ms ATX2 Dial tone detect but not U S A call progress detect When used in the Auto Answer mode the S0 register must be set with a value of 3 or 4 This ensures a person calling your modem will hear a s...

Page 15: ...hich might affect compliance with the relevant PTC Specifications The grant of this Telepermit is specific to the above products with the marketing description as stated on the Telepermit label artwork The Telepermit may not be assigned to other parties or other products without Telecom approval A Telepermit artwork for each device is included from which you may prepare any number of Telepermit la...

Page 16: ...on the market after August 13 2005 By participating in separate collection of products and batteries you will help to assure the proper disposal of products and batteries and thus help to prevent potential negative consequences for the environment and human health For more detailed information about the collection and recycling programmes available in your country please visit our website http eu ...

Page 17: ...system To ensure proper use of this product please read this instruction manual carefully and retain for future reference Should the unit ever require maintenance contact an authorized service location Use of controls adjustments or the performance of procedures other than those specified may result in hazardous radiation exposure To prevent direct exposure to the laser beam do not try to open the...

Page 18: ...se read this instruction manual carefully and retain for future reference Should the unit ever require maintenance contact an authorized service location Use of controls adjustments or the performance of procedures other than those specified may result in hazardous radiation exposure To prevent direct exposure to the laser beam do not try to open the enclosure Downloaded from LpManual com Manuals ...

Page 19: ...oduct please read this instruction manual carefully and retain for future reference Should the unit ever require maintenance contact an authorized service location Use of controls adjustments or the performance of procedures other than those specified may result in hazardous radiation exposure To prevent direct exposure to the laser beam do not try to open the enclosure Downloaded from LpManual co...

Page 20: ...f this product please read this instruction manual carefully and retain for future reference Should the unit ever require maintenance contact an authorized service location Use of controls adjustments or the performance of procedures other than those specified may result in hazardous radiation exposure To prevent direct exposure to the laser beam do not try to open the enclosure Downloaded from Lp...

Page 21: ...tung sorgfältig durch und bewahren diese bitte als Referenz auf Falls Probleme mit diesem Modell auftreten benachrichtigen Sie bitte die nächste autorisierte Service Vertretung Um einen direkten Kontakt mit dem Laserstrahl zu vermeiden darf das Gerät nicht geöffnet werden ADVARSEL Denne mærking er anbragt udvendigt på apparatet og indikerer at apparatet arbejder med laserstråler af klasse 1 hviket...

Page 22: ...ymätöntä silmilie vaarallista lasersäteilyä CAUTION USE OF CONTROLS OR ADJUSTMENTS OR PERFORMANCE OF PROCEDURES OTHER THAN THOSE SPECIFIED IN THE OWNER S MANUAL MAY RESULT IN HAZARDOUS RADIATION EXPOSURE VORSICHT DIE VERWENDUNG VON ANDEREN STEURUNGEN ODER EINSTELLUNGEN ODER DAS DURCHFÜHREN VON ANDEREN VORGÄNGEN ALS IN DER BEDIENUNGSANLEITUNG BESCHRIEBEN KÖNNEN GEFÄHRLICHE STRAHLENEXPOSITIONEN ZUR ...

Page 23: ...evices Then read Chapter 1 Getting Started for step by step instructions on setting up your computer If you are an experienced computer user please continue reading the preface to learn how this manual is organized then become acquainted with this manual by browsing through its pages Be sure to read the Special features section in Chapter 3 Hardware Utilities and Options to learn about features th...

Page 24: ...t two and at the same time press the third Display Messages Messages are used in this manual to bring important information to your attention Each type of message is identified as shown below ABC When procedures require an action such as clicking an icon or entering text the icon s name or the text you are to type in is represented in the typeface you see to the left S ABC Names of windows or icon...

Page 25: ...as follows Start The word Start refers to the button in Microsoft Windows Vista HDD or Hard disk drive Some models are equipped with a Solid State Drive SSD instead of a hard disk drive In this manual the word HDD or Hard disk drive also refers to the SSD unless otherwise stated Downloaded from LpManual com Manuals ...

Page 26: ... on or when an AC adaptor is connected to a power outlet even if your computer is in Sleep Mode In this condition observe the following Never cover your computer or AC adaptor with any object Never place your computer or AC adaptor near a heat source such as anelectric blanket or heater Never cover or block the air vents including those located at the base of the computer Always operate your compu...

Page 27: ...stress injuries to your hands and wrists that can be caused by extensive keyboard use Instruction Manual for Safety and Comfort also includes information on work space design posture and lighting that can help reduce physical stress Heat injury Avoid prolonged physical contact with the computer If the computer is used for long periods its surface can become very warm While the temperature will not...

Page 28: ...ou should also be careful when you remove a PC Card that has been used for a long time Mobile phones Please be aware that the use of mobile phones can interfere with the audio system The operation of the computer will not be impaired in any way but it is recommended that a minimum distance of 30cm is maintained between the computer and a mobile phone that is in use Instruction Manual for Safety an...

Page 29: ...Portable Personal Computer AC adaptor and power cord 2 pin plug or 3 pin plug Battery pack Spare AccuPoint pointing device cap Is included with some models Documentation TECRA A10 S10 P10 TECRA M10 Satellite Pro S300 Series User Information Guide Instruction Manual for Safety and Comfort End User License Agreement If any of the items are missing or damaged contact your dealer immediately Some of t...

Page 30: ...deo Player TOSHIBA SD Memory Utilities TOSHIBA SD Memory Boot Utility CD DVD Drive Acoustic Silencer TOSHIBA Assist TOSHIBA ConfigFree TOSHIBA HDD Protection TOSHIBA Disc Creator TOSHIBA Face Recognition Is preinstalled in some models Fingerprint Utility Windows Mobility Center Online Manual TECRA A10 S10 P10 TECRA M10 Satellite Pro S300 User s Manual This manual Downloaded from LpManual com Manua...

Page 31: ...nd proper use of this computer It is intended to help you be more comfortable and productive while using a notebook computer By following the recommendations in it you may reduce your chance of developing a painful or disabling injury to your hand arms shoulders or neck Use a virus check program and make sure it is updated regularly Never format storage media without checking its content formattin...

Page 32: ...ith the legal voltage and frequency specifications and requirements in the country of use Failure to do so could result in a fire or electric shock possibly resulting in serious injury The supplied power cord conforms to safety rules and regulations in the region the product is bought and should not be used outside this region For use in other regions please buy power cords that conform to safety ...

Page 33: ...the AC adaptor s DC output plug to the DC IN 15V jack on the back of the computer Figure 1 3 Connecting the DC output plug to the computer 3 Plug the power cord into a live wall outlet the Battery and DC IN indicators on the front of the computer should glow Either a 2 pin or 3 pin adaptor cord will be included with the computer depending on the model DC IN 15V jack DC output plug Downloaded from ...

Page 34: ... Opening it vigorously or slamming it shut could damage the computer Be careful not to open the display panel too far as this could put stress on the display panel s hinges and cause damage Do not press or push on the display panel Do not lift the computer by the display panel Do not close the display panel with pens or any other objects left in between the display panel and the keyboard When open...

Page 35: ...g off the power The power can be turned off in one of three modes either Shut Down Mode Hibernation Mode or Sleep Mode Shut Down Mode When you turn off the power in Shut Down Mode no data will be saved and the computer will boot to the operating system s main screen the next time it is turned on 1 If you have entered data either save it to the hard disk drive or to other storage media 2 Make sure ...

Page 36: ... so can cause data loss Do not turn the computer or peripheral devices back on immediately wait a short period to avoid any potential damage When you have to turn off your computer aboard an aircraft or in places where electronic devices are regulated or controlled always completely shut down the computer This includes turning off any wireless communication switches or devices and canceling settin...

Page 37: ...se note that this feature must be enabled within the Power Options to access it click Start Control Panel System and Maintenance Power Options When the AC adaptor is connected the computer will go into Sleep Mode according to the settings in the Power Options to access it Start Control Panel System and Maintenance Power Options To restore the operation of the computer from Sleep Mode press and hol...

Page 38: ...low battery condition You can return to your previous working environment immediately when you turn on the computer Saves power by shutting down the system when the computer receives no input or hardware access for the time period set by the System Hibernate feature Allows the use of the panel power off feature When the computer is in Sleep Mode the power indicator will blink orange If you are ope...

Page 39: ...e what closing the lid does 4 Enable the desired Hibernation Mode settings for When I press the power button and When I close the lid 5 Click the Save changes button Data save in Hibernation Mode When you turn off the power in Hibernation Mode the computer will take a moment to save the current data in memory to the hard disk drive During this time the Hard Disk Drive indicator will glow After you...

Page 40: ...System Recovery Options This partition stores files which can be used to repair the system in the event of a problem System Recovery Options The System Recovery Options feature is installed on the hard disk when shipped from the factory The System Recovery Options menu includes tools to repair startup problems run diagnostics or restore the system See the Windows Help and Support content for more ...

Page 41: ... copy and then click the Create button Be sure to connect the AC adaptor when you create Recovery Discs Be sure to close all other software programs except the Recovery Disc Creator Do not run software such as screen savers which can put a heavy load on the CPU Operate the computer at full power Do not use power saving features Do not write to the disc when the virus check software is running Wait...

Page 42: ...puter 1 Turn off your computer 2 While holding down 0 zero key on the keyboard turn on your computer 3 A menu will be displayed from which you should follow the on screen instructions If your optical disc drive can only write to CDs select CD as the Disc Set within the Recovery Disc Creator application Otherwise if your optical disc drive can write both CDs and DVDs select the type of media you wi...

Page 43: ...lect the CD ROM icon from the menu Please refer to the Boot Priority section in Chapter 7 HW Setup for further information 4 A menu will be displayed from which you should follow the on screen instructions When the sound mute feature has been activated by pressing the FN ESC key be sure to disable this to allow sounds to be heard before starting the restore process Please refer to Chapter 5 The Ke...

Page 44: ...splay panel closed Legal Footnote Non applicable Icons 1 For more information regarding Non applicable Icons please refer to the Legal Footnotes section in Appendix I or click the 1 above Please handle your computer carefully to avoid scratching or damaging the surface System indicators Microphone Volume control dial Headphone jack Microphone jack System indicators These LED indicators allow you t...

Page 45: ...ophone allows you to import and record sounds for your application please refer to the Sound System section in Chapter 4 Operating Basics for more information Cooling vents eSATA USB combo port PC Card slot PC Card eject button Bridge media slot Wireless communication switch i LINK IEEE1394 port Serial port Serial port Use this 9 pin port to connect serial devices such as an external modem serial ...

Page 46: ...tion of such equipment possibly resulting in serious injury eSATA USB combo port One eSATA USB combo port which complies to the USB 2 0 standard is provided on the left hand side of the computer The ports with the icon has USB Sleep and Charge This port has eSATA External Serial ATA function Keep foreign metal objects such as screws staples and paper clips out of the eSATA USB combo port Foreign m...

Page 47: ...gital video camera for high speed data transfer Some models are equipped with a i LINK IEEE1394 port Universal Serial Bus USB 2 0 ports Optical disc drive Modem jack Security lock slot Smart Card slot Smart Card slot This slot can accommodate a single Smart Card device Some models are equipped with a Smart Card slot Keep foreign metal objects such as screws staples and paper clips out of the Smart...

Page 48: ...pped with a modem jack Connection to any communication line other than an analog phone line could cause a PC system failure Connect the built in modem only to ordinary analog phone lines Never connect the built in modem to a digital line ISDN Never connect the built in modem to the digital connector on a public telephone or to a digital private branch exchange PBX Never connect the built in modem ...

Page 49: ...malfunction Do not connect the LAN cable to a power supply It could cause damage or malfunction Link indicator green This indicator glows green when the computer is connected to a LAN and the LAN is functioning properly LAN active indicator orange This indicator glows orange when data is being exchanged between the computer and the LAN External monitor port This port provides 15 pin analog VGA por...

Page 50: ...Port Replicator to ensure a secure connection Docking port This port enables connection of an optional TOSHIBA Express Port Replicator described in Chapter 3 Hardware Utilities and Options Some models are equipped with a Docking port Only the TOSHIBA Express Port Replicator can be used with this computer Do not attempt to use any other Port Replicator Keep foreign objects out of the docking port A...

Page 51: ...position in order to release the battery pack for removal For more detailed information on removing the battery pack please refer to Chapter 6 Power and Power Up Modes Battery pack The battery pack provides power to the computer when the AC adaptor is not connected For more detailed information on the use and operation of the battery pack please refer to Chapter 6 Power and Power Up Modes Battery ...

Page 52: ...Wireless LAN antenna Not shown Bluetooth antenna Not shown Wireless WAN antennas Not shown Wireless LAN antenna Not shown Web Camera Web Camera LED Display hinges The display hinges allow the display panel to be position at a variety of easy to view angles Display screen Please be aware that when the computer is operating on the AC adaptor the image displayed on the internal screen will be somewha...

Page 53: ...fer to the Using the Touch Pad section in Chapter 4 Operating Basics Touch Pad control buttons The control buttons located below the Touch Pad allow you to select menu items or manipulate text and graphics as designated by the on screen pointer AccuPoint control buttons Control buttons below the keyboard let you select menu items or manipulate text and graphics designated by the on screen pointer ...

Page 54: ...OSHIBA Presentation button Fingerprint Sensor This sensor enables you to enroll and recognize a fingerprint For detailed information on Fingerprint Sensor refer to Chapter 4 Using the Fingerprint Sensor Some models are equipped with a Fingerprint Sensor LCD Sensor switch This switch senses when the display panel is either closed or opened and activates the Panel Power Off On feature as appropriate...

Page 55: ...or if the computer s power supply malfunctions this indicator will flash orange Power The Power indicator normally glows green when the computer is turned on However if you turn the computer off into Sleep Mode this indicator will flash orange approximately one second on two seconds off both while the system is shutting down and while it remains turned off Battery The Battery indicator shows the c...

Page 56: ...tor glows green when the computer is accessing the Bridge media slot Wireless communication The Wireless communication indicator blinks orange when the Bluetooth and Wireless LAN functions are turned on Only some models are equipped with Bluetooth and Wireless LAN functions Wireless WAN The Wireless WAN indicator glows or blinks blue when the Wireless WAN function is on The indicator will glow or ...

Page 57: ...anufactured according to the specifications of six marketing regions When you purchase DVD Video make sure it matches your drive otherwise it will not play properly Numeric mode indicator Arrow mode indicator Arrow mode When the Arrow mode indicator lights green you can use the gray labeled keys on the keypad overlay as cursor keys Please refer to the Keypad overlay section in Chapter 5 The Keyboa...

Page 58: ...be erased or changed DVD RW DVD RW and DVD RAM discs can be recorded more than once Formats The drives support the following formats DVD ROM drive The drive supports the formats CD ROM DVD ROM DVD Video CD DA CD Text Photo CDTM single multi session CD ROM Mode 1 Mode 2 CD ROM XA Mode 2 Form1 Form2 Enhanced CD CD EXTRA and Addressing Method 2 DVD ROM CD R RW drive The drive supports the formats in ...

Page 59: ...s may be unreadable The read speed is slower at the center of a disc and faster at the outer edge DVD read 8 speed maximum CD read 24 speed maximum The read speed is slower at the center of a disc and faster at the outer edge DVD read 8 speed maximum CD read 24 speed maximum CD R write 24 speed maximum CD RW write 24 speed maximum Ultra speed media The read speed is slower at the center of a disc ...

Page 60: ... or 3 pin adaptor power lead will be bundled with the computer Do not use a 3 pin to 2 pin conversion plug The supplied power cord conforms to safety rules and regulations in the region the product is bought and should not be used outside of this region In order to use the adaptor computer in other regions you should please buy a power cord that conforms to the safety rules and regulations in that...

Page 61: ...supports Enhanced Intel SpeedStep Technology Intel CoreTM 2 Duo Processor which incorporates a 6MB level2 cache memory and also supports Enhanced Intel SpeedStep Technology Some models in this series use Intel Centrino 2 processor technology which is based on three separate components the Intel Core 2 Duo processor Intel Wi Fi Link 5300AGN OR 5100AGN and the Intel GM PM45 Express Chipset Legal Foo...

Page 62: ...ideo RAM available is dependent on the computer s system memory Start Control Panel Appearance and Personalization Personalization Display Settings The amount of Video RAM can be verified by clicking the Advanced Settings button in the Display Settings window Legal Footnote Memory Main System 3 For more information regarding Memory Main System please refer to the Legal Footnotes section in Appendi...

Page 63: ...Tour Hard disk drive or Solid state drive This computer is equipped with one of the following hard disk drive HDD types The capacity of each hard disk drive model is different Some models are equipped with a Solid State Drive SSD instead of a hard disk drive HDD 80GB 120GB 160GB 200GB 250GB SSD 64GB 128GB Please note that part of the hard disk or Solid state drive s overall capacity is reserved as...

Page 64: ...d 5 2GB DVD RAM media cannot be read from or written to Display panel TECRA A10 S10 P10 Satellite Pro S300 15 4 TFT LCD screen 16 million colors with one of the following resolutions WXGA 1280 horizontal x 800 vertical pixels WSXGA 1680 horizontal x 1050 vertical pixels TECRA M10 14 1 TFT LCD screen 16 million colors with one of the following resolutions WXGA 1280 horizontal x 800 vertical pixels ...

Page 65: ...are will help you to add various video effects to your video or photograph Please refer to the Web Camera section in Chapter 4 Operating Basics Modem The integrated modem provides capability for data and fax communications that support the V 90 V 92 standards and includes a modem jack for connection to the telephone line Please note that both the V 90 and V 92 standards are only supported in the U...

Page 66: ...read Spectrum Orthogonal Frequency Division Multiplexing radio technology that complies with the IEEE 802 11 Standard Legal Footnote Wireless LAN 8 For more information regarding Wireless LAN please refer to the Legal Footnotes section in Appendix I or click the 8 above TOSHIBA Assist button Press this button to launch the program automatically When power off Sleep Mode and Hibernation Mode press ...

Page 67: ... on password Two levels of password security supervisor and user are available to prevent unauthorized access to your computer Instant security A specific hot key function automatically locks the system providing data security Intelligent power supply 1 A microprocessor in the computer s intelligent power supply detects the battery s charge automatically calculates the remaining battery capacity a...

Page 68: ...is feature lets you turn off the power to the computer without exiting from your software The contents of main memory are automatically saved to the hard disk drive so that when you next turn the power on again you can continue working right where you left off Refer to the Turning off the power section in Chapter 1 Getting Started for more details Sleep Mode If you have to interrupt your work you ...

Page 69: ... computer system functions such as power consumption the cooling system and HDD Drop sensor It alerts users of specific system conditions via pop up messages It also tracks the usage of the computer and related devices logging the service relevant information on the computer s hard disk drive Refer to Appendix G TOSHIBA PC Health Monitor TOSHIBA Power Saver TOSHIBA Power Saver provides you with th...

Page 70: ...OSHIBA Flash Cards The TOSHIBA Flash Cards provide a quick way to modify selected system functions and to launch applications Hot key function TOSHIBA utility launcher function HW Setup This utility allows you to customize your hardware settings according to the way you work with the computer and the peripherals you use TOSHIBA Accessibility The TOSHIBA Accessibility utility provides support to mo...

Page 71: ...d party access to them is prevented Disable the password protected screen saver when returning from a power saving mode such as Sleep Mode Authentication of the User Password and if applicable the HDD Hard Disk Drive Password when booting up the computer Power on Security Single Sign on feature Fingerprint security cannot be used in models that do not have a fingerprint module installed TOSHIBA Fa...

Page 72: ...SD Memory Card Format Utility and other SD functions are packaged into TOSHIBA SD Memory Utilities TOSHIBA SD Memory Card Format This utility allows you to format an SD SDHC memory card by the SD standard format TOSHIBA Assist TOSHIBA Assist is a graphical user interface that provides access to specific tools utilities and applications that make the use and configuration of the computer easier TOS...

Page 73: ...maximum speed for quick data access or Quiet Mode which runs audio CDs at single speed and which can lessen operational noise It is ineffective with DVDs Display Rotation Settings This utility allows you to quickly rotate the Windows Desktop by either 0 degrees and 180 degrees In use you are able to perform a rotation function by pressing either CTRL ALT Up Arrow to rotate 0 degrees or CTRL ALT Do...

Page 74: ...kage must be configured in order to use TPM For further information on how to set up and use this utility please refer to the Infineon TPM Installation Guide from the C TOSAPINS Infineon TPM Installation Guide To enable TPM through the BIOS setup 1 Turn on the computer while pressing the ESC key 2 Press the F1 key when directed 3 Press the PGDN key 4 Press the down arrow key until TPM is highlight...

Page 75: ...ory PC Card Smart Card Bridge media slot Secure Digital SD Card SD memory card SDHC memory card miniSD Card microSD Card Memory Stick Memory Stick Memory Stick PRO Memory Stick PRO Duo xD picture card MultiMediaCard Additional memory module Peripheral devices Hard disk drive pack External monitor USB FDD Kit eSATA i LINK IEEE1394 Serial port TOSHIBA Express Port Replicator Other Security lock Down...

Page 76: ... insert PC Cards while the computer is turned on To insert a PC Card follow the steps as detailed below 1 Insert the PC Card into the PC Card slot on the side of the computer 2 Press the PC Card gently to ensure a firm connection is made Figure 3 1 Inserting the PC Card 3 After inserting the PC Card you should refer to its documentation and also check the configuration in Windows in order to ensur...

Page 77: ... can be recorded These cards can be used for a wide variety of applications including telephone related and electronic monetary payments This section contains information on the proper use of the Smart Card slot and it is strongly recommended that you read it before operating the computer Some models are equipped with a Smart Card slot If the PC Card is not inserted all the way into the computer t...

Page 78: ...ting a Smart Card 3 After inserting the Smart Card you should refer to its documentation and also check the configuration in Windows in order to ensure that it is correct When inserting a Smart Card into the Smart Card slot make sure to confirm that the card is oriented correctly before inserting Insert the Smart Card until it reaches the end of the Smart Card slot There will be about 2cm of the S...

Page 79: ... Personal Digital Assistants Before removing the Smart Card confirm that the Smart Card is not working with any program or system Be careful not to bend the Smart Card while removing it from the computer Smart Card Keep foreign objects out of the Bridge media slot Never allow metal objects such as screws staples and paper clips to enter the computer or Keyboard Foreign metal objects can create a s...

Page 80: ...nally However the logo on SD and SDHC memory cards is different so pay careful attention to the logo when purchasing This Bridge media slot supports the following memory media Secure Digital SD Card SD memory card SDHC memory card miniSD Card microSD Card Memory Stick Memory Stick Memory Stick PRO Memory Stick PRO Duo xD picture card MultiMediaCard MMC Please note that an adaptor is required to us...

Page 81: ...ia care Observe the following precautions when handling the card Card care Do not twist or bend cards Do not expose cards to liquids or store in humid areas or lay media close to containers of liquid Do not touch the metal part of a card or expose it to liquids or let it get dirty After using card return it to its case The card is designed so that it can be inserted only one way Do not try to forc...

Page 82: ...Memory Stick Memory Stick PRO Memory Stick PRO Duo MultiMediaCard MMC Inserting a memory media The following instructions apply to all types of supported media devices To insert a memory media follow the steps as detailed below 1 Turn the memory media so that the contacts metal areas are face down 2 Insert the memory media into the Bridge media slot on the side of the computer 3 Press the memory m...

Page 83: ...y media do not touch the metal contacts You could expose the storage area to static electricity which can destroy data Do not turn the computer off or switch to Sleep Mode or Hibernation Mode while files are being copied doing so may cause data to be lost Memory media Bridge media slot Make sure the Bridge Media slot indicator is out before you remove the memory media or turn off the computer s po...

Page 84: ...ly The computer will operate in dual channel mode You can access the inserted memory modules efficiently in dual channel Use only memory modules approved by TOSHIBA Do not try to install or remove a memory module under the following conditions a The computer is turned on b The computer was shut down in either Sleep or Hibernation Mode c Wake up on LAN is enabled d The wireless communication switch...

Page 85: ...emory module To install a memory module follow the steps as detailed below 1 Shut down the computer make sure the Power indicator is off refer to the Turning off the power section in Chapter 1 Getting Started if required 2 Remove the AC adaptor and all cables and peripherals connected to the computer 3 Close the display panel 4 Turn the computer upside down and remove the battery pack refer to Rep...

Page 86: ...ng it down until the latches on either side snap into place Figure 3 9 Seating the memory module Screw Memory module cover Slot A Slot B Notch Never allow metal objects such as screws staples and paper clips to enter the computer Foreign metal objects can create a short circuit which can cause computer damage and fire possibly resulting in serious injury Do not touch the connectors on the memory m...

Page 87: ...puter 3 Close the display panel 4 Turn the computer upside down and remove the battery pack refer to Replacing the battery pack section in Chapter 6 Power and Power Up Modes if required The slot A is reserved for the first memory module Use the slot B for expanded memory If only one module is installed use the slot A When inserting or removing memory modules use the A and B marked on the computer ...

Page 88: ...e 9 Seat the memory module cover in place and secure it with one screw 10 Install the battery pack refer to Replacing the battery pack section in Chapter 6 Power and Power Up Modes if required 11 Turn your computer over If you use the computer for a long time the memory modules and the circuits locating close to the memory modules will become hot In this case let them cool to room temperature befo...

Page 89: ...n the power the computer will automatically recognize the monitor and determine whether it is a color or monochrome device In the event that you find that there are issues getting an image displayed on the correct monitor you should consider using the FN F5 hot key to change the display settings if you then disconnect the external monitor before you turn the computer s power off be sure to press F...

Page 90: ...port Figure 3 14 Connecting the USB floppy diskette drive Eject button Floppy diskette slot Disk In Use Indicator USB connector Make sure the connector is properly aligned with the socket Do not try to force the connection doing so can damage the connecting pins USB connector USB port If you connect the USB floppy diskette drive after the computer has already been turned on it will take about ten ...

Page 91: ...computer s USB port eSATA External Serial ATA An device corresponding to eSATA function can be connected to the eSATA USB combo port on the computer Connecting the eSATA device To connect an eSATA device follow the steps as detailed below 1 Connect an eSATA cable to the eSATA USB combo port Figure 3 15 Connecting an eSATA cable to the eSATA USB combo port If you disconnect the USB floppy diskette ...

Page 92: ... particular risk that some frames will be deleted in the case of digital video transfer TOSHIBA assumes no liability for such loss of data Do not transfer data in areas where static electricity is easily generated or in areas subjected to electronic noise Data can be destroyed A connected eSATA device may not be recognized if it is connected to the computer s eSATA USB combo port while the compute...

Page 93: ...K device to from another i LINK device that is connected to the computer Connecting the i LINK IEEE1394 cable To connect the i LINK IEEE1394 cable follow the steps as detailed below 1 Make sure the connectors are properly aligned and plug the i LINK IEEE1394 cable into the computer Figure 3 16 Connecting the i LINK IEEE1394 cable into the computer 2 Plug the other end of the cable into the device ...

Page 94: ...onnector can be used to connect to RS 232C compatible devices RS 232C compatible devices include the following Modem Mouse Printer Some models are equipped with a serial port To connect a serial port follow the steps as detailed below 1 Turn the computer s power off 2 Connect the serial connector to the serial port and tighten the screws on the left and right hand side Figure 3 17 Connecting the s...

Page 95: ...on Check with your LAN administrator regarding set up procedures You must connect the AC adaptor before you connect to a TOSHIBA Express Port Replicator When a TOSHIBA Express Port Replicator is connected to the computer you can not use the following computer s ports LAN jack DC IN 15V jack and External monitor port When connecting an AC Adaptor to the TOSHIBA Express Port Replicator use only the ...

Page 96: ...er end attaches to a desk or similar object The methods used for attaching security cables differ from product to product Please refer to the instructions for the product you are using for more information Connecting the security lock In order to connect a security cable to the computer follow the steps as detailed below 1 Turn the computer so its right hand side faces you 2 Align the security cab...

Page 97: ...r replacement Please refer to Chapter 6 Power and Power Up Modes for further information High Capacity Battery Pack An additional battery pack can be purchased for use as either a spare or replacement Extended Capacity Battery Pack An additional battery pack can be purchased for use as either a spare or replacement Battery Charger The optional battery charger allows you to charge extra battery pac...

Page 98: ...move your fingertip across it in the direction you want the on screen pointer to go Figure 4 1 Touch Pad and Touch Pad control buttons The two buttons below the Touch Pad are used like the buttons on a standard mouse press the left button to select a menu item or to manipulate text or graphics designated by the pointer and press the right button to display a menu or other function depending on the...

Page 99: ...ccuPoint operation or an error message may appear if You touch the AccuPoint during power up You apply constant soft pressure during power up There is a sudden temperature change Strong stress is applied to the AccuPoint If an error message appears reboot the computer If an error message does not appear wait a moment for the pointer to stop then continue operation You can also tap the Touch Pad to...

Page 100: ...ion feature it is no longer necessary to input the password from the keyboard Fingerprint feature enables you to Logon to Windows and access a security enabled homepage through Internet Explorer Files and folders can be encrypted decrypted and third party access to them prevented Disable the password protected screen saver when returning from a power saving mode such as Sleep Mode Authentication o...

Page 101: ...trations show the recommended way to swipe your finger over the fingerprint sensor Figure 4 3 Swipe the finger Sensor Sensor Avoid swiping with your finger stiff or pressed too hard onto the sensor and take care to ensure that the center of the fingerprint is touching the sensor before swiping Either of these conditions may cause fingerprint reading to fail Check the center of the fingerprint whor...

Page 102: ...atic electricity is a common cause of sensor failures especially when the weather is dry Clean the sensor with a lint free cloth do not use detergent or any other chemicals to clean the sensor Avoid the following finger conditions for enrollment or recognition as they may result in fingerprint enrollment errors or a drop in the fingerprint recognition success rate Soaked or swollen finger for exam...

Page 103: ...t information will be enrolled and any previous information over written 4 The Fingerprint Enrollment screen will be displayed and the tutorial will begin First click Replay video and confirm the proper movement for the finger you wish to register Then confirm the message displayed on this screen and ensure that there is a check mark in the Run Interactive Tutorial box Once this has been done clic...

Page 104: ...r registered finger or enter the Windows logon password and click the Next button 3 The User s Fingers screen is displayed To delete all registered fingerprints To delete individual fingerprints It is strongly recommended that you register 2 or more fingerprints Repeat the procedure from step 3 to register another fingerprint 1 Click Delete All Fingerprints 2 Follow the on screen instructions to d...

Page 105: ...thentication If required you are also able to use fingerprint authentication in place of the usual Windows logon process using your username and password This method is especially useful where there are many users using the same computer as it removes the need for actual user selection when the system is started Fingerprint Authentication Procedure 1 Start up the computer 2 At the Windows Welcome ...

Page 106: ...etting can only be changed if the currently logged in user has administrator privileges 3 Swipe a registered finger on the fingerprint sensor 4 Click the Setting menu at the TrueSuiteAccessManager screen 5 Administrator Setting screen is displayed check the Enable Pre OS Fingerprint Authentication check box and then click OK 6 Click the Exit button at the TrueSuiteAccessManager screen You must ens...

Page 107: ... settings please refer to the Manual for Fingerprint Registration Enrollment for further instructions 1 To run this program click Start All Programs TrueSuite Access Manager Fingerprint Application with Admin 2 UserAccountControl screen is displayed click the Allow button This setting can only be changed if the currently logged in user has administrator privileges 3 Swipe a registered finger on th...

Page 108: ... pixel count for this web camera is 1 31 million maximum photograph size 1280x1024 pixels Some models are equipped with a Web Camera Please refer to the Camera Assistant Software Online Help for details Figure 4 4 Web Camera Web Camera Web Camera LED Do not point the web camera directly at the sun Do not touch or press strongly on the web camera lens Doing so may reduce image quality Use an eyegla...

Page 109: ...w the steps as described below 1 To launch this utility click Start All Programs TOSHIBA Utilities TOSHIBA Face Recognition TOSHIBA Face Recognition does not guarantee the correct identification of a user Changes to the likeness of a registrant such as hair style changes wearing a cap or wearing glasses may effect the recognition rates when such changes occur after the registrant had registered TO...

Page 110: ...ace shaped frame 7 Once your face has been positioned properly the recording will commence Start moving your neck very slightly to the left and right and then move your neck down and up 8 Registration will end after you have repeatedly moved your neck left right down and up When the register succeeds below message will be displayed on the screen Registration successful Now we ll do the verificatio...

Page 111: ...OSHIBA Face Recognition Help Windows Logon via TOSHIBA Face Recognition This section explains how to login to Windows with TOSHIBA Face Recognition Two authentication modes are provided AUTO Mode Login screen If the face authentication tile is selected by default you can log in without using the keyboard or mouse 1 1 Mode Login screen This mode is essentially the same as AUTO mode but the Select A...

Page 112: ...on was successful but an authentication error subsequently occurred during the login to Windows you will be asked to provide your account information Using optical disc drives The full size drive provides high performance execution of CD DVD ROM based programs You can run either 12 cm 4 72 or 8 cm 3 15 CD DVDs without an adaptor A Serial ATA interface controller is used for CD DVD ROM operation Wh...

Page 113: ...e 4 5 Pressing the eject button and pulling the disc tray open 3 Lay the CD DVD label side up in the disc tray Figure 4 6 Inserting a CD DVD Disc tray Eject button Laser lens When the disc tray is fully opened the edge of the computer will extend slightly over the CD DVD tray Therefore you will need to turn the CD DVD at an angle when you place it in the disc tray After seating the CD DVD however ...

Page 114: ...t Prevent foreign objects from entering the drive Check the surface of the disc tray especially the area behind the front edge of the disc tray to make sure there are no such objects before closing the drive If the CD DVD is not seated properly when the disc tray is closed the CD DVD might be damaged Also the disc tray might not open fully when you press the eject button Do not press the eject but...

Page 115: ...ot open Pressing the eject button will not open the disc tray when the computer power is off If the power is off you can open the disc tray by inserting a slender object about 15 mm such as a straightened paper clip into the eject hole near the eject button Figure 4 9 Manual release with the eject hole Eject hole Turn off the power before you use the eject hole If the CD DVD is spinning when you o...

Page 116: ...s to CD RW media will be affected by the quality of the disc itself and the way in which it is used Data written to a CD R disc cannot be deleted either in whole or in part Please refer to the Writable discs Chapter 2 for details about the types of writable CD and DVD discs that can be supported by this computer Do not turn off the power to the optical disc drive while the computer is accessing it...

Page 117: ...nd Do not use any hard disk utilities including those that are intended to enhance hard disk drive access speeds as they may cause unstable operation and damage data CD RW Ultra Speed media should not be used as data may be lost or damaged You should always write from the computer s hard disk drive onto the CD DVD do not try to write from shared devices such as a server or any other network device...

Page 118: ...use the computer on an unstable surface such as a stand Keep mobile phones and other wireless communication devices away from the computer Writing CD DVDs on DVD Super Multi drives You can use the DVD Super Multi drive to write data to either CD R CD RW DVD R DVD R Dual Layer DVD RW DVD R DVD R Double Layer DVD RW or DVD RAM discs The TOSHIBA Disc Creator is provided as writing software with this ...

Page 119: ...interruption that may be caused by the change or loss of the recorded contents Damage that may be caused by using third party equipment or software Given the technological limitations of current optical disc writing drives you may experience unexpected writing or rewriting errors due to disc quality or problems with hardware devices In view of this it is good practice to make two or more copies of...

Page 120: ...x speed media MITSUBISHI KAGAKU MEDIA CO LTD for 2x 4x and 6x speed media DVD RW Ricoh Co Ltd for 2 4x 4x and 8x speed media MITSUBISHI KAGAKU MEDIA CO LTD for 2 4x 4x and 8x speed media DVD RAM DVD Super Multi drive only DVD Specifications for DVD RAM Disc for Version 2 0 Version 2 1 or Version 2 2 Matsushita Electric Industrial Co Ltd for 3x and 5x speed media Hitachi Maxell Ltd for 3x and 5x sp...

Page 121: ...rom the wrong one In writing to DVD R DVD R Dual Layer DVD RW DVD R DVD R Double Layer DVD RW or DVD RAM media some space is required for file management so you may not be able to write to the full capacity of the disc Since the disc is based on the DVD standard it might be filled with dummy data if the written data is less than about 1GB Therefore in these circumstance even if you write only a sm...

Page 122: ...y other function including such tasks as using a mouse or Touch Pad or closing opening the display panel Start a communication application such as a modem Apply impact or vibration to the computer Install remove or connect external devices including such items as a PC Card SD SDHC memory card miniSD microSD Card Smart Card Memory Stick Memory Stick PRO Memory Stick PRO Duo xD picture card MultiMed...

Page 123: ...IBA Disc Creator cannot record in packet format You might not be able to use the Disc Backup function of TOSHIBA Disc Creator to back up a DVD R DVD R Dual Layer DVD RW DVD R DVD R Double Layer or DVD RW disc that was made with other software on a different optical media recorder If you add data to a DVD R DVD R Dual Layer DVD R or DVD R Double Layer disc that you have already recorded to you migh...

Page 124: ...s Handle your media with care Following the simple precautions listed below will increase the lifetime of your media and protect the data stored on it CD DVDs 1 Store your CD s and DVD s in the containers they originally came in to protect them and keep them clean 2 Do not bend the CD s or DVD s 3 Do not write on apply a sticker to or otherwise mar the surface of the CD or DVD that contains the da...

Page 125: ... conditions could cause data loss 7 Never use a wet or damp floppy diskette this could damage the floppy diskette drive or other devices within the computer 8 Data may be lost if the floppy diskette is twisted bent or exposed to direct sunlight extreme heat or cold 9 Do not place heavy objects on your floppy diskettes 10 Do not eat smoke or use items such as erasers near your floppy diskettes as f...

Page 126: ...p volume level Audio Enhancements In order to apply the sound effects for your current speaker follow the steps below 1 Right click on the speaker icon on the Taskbar and select Playback Devices from the sub menu 2 Select Speakers and click Properties 3 On the Enhancements tab select the sound effects you would like and click Apply Realtek HD Audio Manager You can confirm and change the audio conf...

Page 127: ...twork If you wish to communicate with someone on your computer you can use a messenger application However with such an application you would hear your own voice returning to you as echo during the communication if you did not use a headset system or headphone TOSHIBA Mic Effect will reduce these echoes generated on your computer To apply the echo cancellation follow the steps below 1 Click the ri...

Page 128: ...se a computer system failure Connect the built in modem only to ordinary analog phone lines Never connect the built in modem to a digital line ISDN Never connect the built in modem to the digital connector on a public telephone or to a digital private branch exchange PBX Never connect the built in modem to a key telephone system for residences or offices Avoid using your computer modem with the te...

Page 129: ...g system Open the Dialing Properties dialog box after selecting region Allows you to configure whether the dialing properties dialog box will be displayed automatically after you have selected a region Location list for region selection Displays a sub menu appears which details location information Open dialog box if the modem and Telephony Current Location region code do not match Displays a warn...

Page 130: ...to the digital connector on a public telephone or to a digital private branch exchange PBX Never connect the built in modem to a key telephone system for residences or offices Avoid using your computer modem with the telephone cable connected during an electrical storm There may be a remote risk of electric shock from lightning Modular cable Modem jack Telephone jack Do not pull on the cable or mo...

Page 131: ... disrupt Wi Fi or Bluetooth operation Turn all wireless functionalities off when near a person who may have a cardiac pacemaker implant or other medical electric device Radio waves may affect pacemaker or medical device operation possibly resulting in serious injury Follow the instruction of your medical device when using any wireless functionality Always turn off wireless functionality if the com...

Page 132: ...k together with security settings Consult the documentation accompanied with your router or ask your wireless network administrator for the settings Security TOSHIBA strongly recommend that you enable encryption functionality otherwise your computer will be open to illegal access by an outsider using a wireless connection If this occurs the outsider may illegally access your system eavesdrop or ca...

Page 133: ... not within a line of sight of each other Security Two advanced security mechanisms ensure a high level of security Authentication prevents access to critical data and makes it impossible to falsify the origin of a message Encryption prevents eavesdropping and maintains link privacy Bluetooth Stack for Windows by TOSHIBA Please note that this software is specifically designed for the following ope...

Page 134: ...mmunication switch You can enable or disable Wireless communication functions with the on off switch No transmissions are sent or received when the switch is off Slide the switch forward to turn it on and backward to turn it off Wireless communication Indicator The wireless communication indicator shows the status of the computer s wireless communication functions If you used the Taskbar to disabl...

Page 135: ...d to the computer Do not install or remove a memory module while Wake up on LAN is enabled The Wake up on LAN function consumes power even when the system is off Leave the AC adaptor connected while using this feature The Link speed 10 100 1000 megabits per second changes automatically depending on the network conditions connected device cable or noise and so on The computer must be configured pro...

Page 136: ...teps as detailed below 1 Pinch the lever on the connector in the computer s LAN jack and pull out the connector 2 Disconnect the cable from the LAN hub or router in the same manner Check with your LAN administrator and hardware or software vendor before disconnecting from the hub LAN jack LAN cable When the computer is exchanging data with the LAN the LAN Active indicator glows orange When the com...

Page 137: ...lp ensure trouble free operation Before moving the computer it is recommended that you change the setting associated with the Hard Disk Drive Protection feature Please refer to the section Using the Hard Disk Drive HDD Protection in this chapter for further information Make sure all disk disc activity has ended before moving the computer check that the HDD and other indicators on the front of the ...

Page 138: ...t of the computer and automatically moves the Hard Disk Drive head to a safe position to reduce the risk of damage that could be caused by head to disk contact When vibration is detected a message will be displayed on the screen and the icon in the Taskbar notification area will change to the protection state This message is displayed until the OK button is pressed or 30 seconds pass When vibratio...

Page 139: ... it is used in a stable environment such as on a table in the workplace or at home By setting different detection levels for the computer depending on whether it runs with the AC power desktop or with batteries handheld or mobile usage the detection level automatically switches according to the power connection mode 3D Viewer This feature displays a 3D object on the screen which moves in according...

Page 140: ...e computer is turned OFF Power OFF includes Sleep Mode Hibernation Mode or shutdown state This function can be used for ports that support the USB Sleep and Charge function hereinafter called compatible ports Compatible ports are USB ports that have the symbol icon You can use the USB Sleep and Charge function to charge certain USB compatible external devices such as mobile phones or portable digi...

Page 141: ... power of the computer is turned OFF As such we recommend that you connect the AC adaptor to the computer when using the USB sleep and charge function External devices connected to the USB bus power DC5V function that interfaces with the power ON OFF of the computer may always be in an operational state When there is a current overflow of the external devices connected to the compatible ports USB ...

Page 142: ... and stop using this function Battery Settings This utility can be used to specify the lower limit of remaining battery life for USB Sleep and Charge Move the slider bar to specify the lower limit If the remaining battery life falls below the setting the USB Sleep and Charge function will be stopped Checking the AC Only check box sets the utility to only charge when the AC adaptor is connected Hea...

Page 143: ...hat appear on the screen However there are some differences between using a typewriter and using a computer keyboard Letters and numbers produced in computer text vary in width Spaces which are created by a space character may also vary depending on line justification and other factors The lowercase l el and the number 1 one together with the uppercase O oh and the 0 zero are not interchangeable o...

Page 144: ...o TOSHIBA computers and is used in combination with other keys to form soft keys Soft keys are key combinations that enable disable or configure specific features Emulating keys on an enhanced keyboard Figure 5 1 A 104 key enhanced keyboard layout This computer s keyboard is designed to provide all the features of the 104 key enhanced keyboard Since the keyboard is smaller and has fewer keys some ...

Page 145: ...te that the power on default for both settings is off Press FN F12 ScrLock to lock the cursor on a specific line The power on default is off Press FN ENTER to simulate ENTER on the enhanced keyboard s numeric keypad Hot keys Hot keys pressing FN a function or ESC key let you enable or disable certain features of the computer Mute Pressing FN ESC turns the volume on and off Lock Pressing FN F1 ente...

Page 146: ...sing FN F7 increases the computer s display panel brightness in individual steps Wireless Pressing FN F8 switches the active wireless devices if the wireless communication switch is switched on Touch Pad Pressing FN F9 enables or disables the Touch Pad and AccuPoint function To use a simultaneous mode you must set the resolution of the internal display panel to match the resolution of the external...

Page 147: ...e the TOSHIBA Accessibility Utility to make the FN key sticky that is you can press it once release it and then press an F Number key To start the TOSHIBA Accessibility utility click Start All Programs TOSHIBA Utilities Accessibility Windows special keys The keyboard provides two keys that have special functions in Windows the Windows Start Button key activates the Start menu while the application...

Page 148: ...ays The numeric keypad overlay can be used for numeric data input or cursor and page control Arrow Mode To turn on Arrow Mode press FN F10 the Arrow Mode indicator lights and you are able to access cursor and page control functions by using the keys You are able to press FN F10 again to turn off this overlay function Numeric Mode To turn on Numeric Mode press FN F11 the Numeric Mode indicator ligh...

Page 149: ...meric entry while if the Arrow Mode indicator lights you can use the overlay for cursor and page control function 3 Release FN key to return to normal keyboard operation Temporarily changing modes If the computer is in Numeric Mode you can switch temporarily to Arrow Mode by pressing a SHIFT key while if it is in Arrow Mode you can switch temporarily to Numeric Mode by also pressing a SHIFT key Ge...

Page 150: ...status are affected by different power conditions including whether an AC adaptor is connected whether a battery pack is installed and what the charge level is for that battery Table 6 1 Power conditions Power on Power off no operation AC adaptor connected Battery fully charged Operates No charge LED Battery green DC IN green No charge LED Battery green DC IN green Battery partially charged or no ...

Page 151: ...igger point Operates LED Battery flashes orange DC IN off Battery charge is exhausted Computer shuts down No battery installed No operation LED Battery off DC IN off Flashing orange The battery charge is low the AC adaptor must be connected in order to recharge the battery Orange Indicates the AC adaptor is connected and the battery is charging Green Indicates the AC adaptor is connected and the b...

Page 152: ...save your data and shut down the computer or place the computer into Hibernation Mode Please be aware that when placing the computer into Hibernation Mode the contents of memory will be saved to the hard disk drive although for safety sake it is best to also save your data manually Green Indicates the AC adaptor is connected and is correctly supplying power to the computer Flashing orange Indicate...

Page 153: ...essage will be displayed when you turn on the power S RTC battery is low or CMOS checksum is inconsistent Press F1 key to set Date Time You can change the Real Time Clock settings by turning the computer on while pressing the ESC key and then the F1 key when prompted Please refer to Chapter 8 Troubleshooting for further information Care and use of the battery pack This section provides the importa...

Page 154: ...Ni MH battery and should be replaced only by your dealer or by a TOSHIBA service representative The battery can explode if not properly replaced used handled or disposed Dispose of the battery as required by local ordinances or regulations Charge the battery pack only in an ambient temperature between 5 and 35 degrees Celsius Otherwise the electrolyte solution might leak battery pack performance m...

Page 155: ...until the system automatically turns itself off 2 Connect the AC adaptor to the DC IN 15V jack of the computer and to a wall outlet that is supplying power 3 Charge the battery until the Battery indicator glows green Repeat these steps two or three times until the battery recovers normal capacity Monitoring battery capacity Remaining battery power can be monitored using the following methods Click...

Page 156: ...s power The environmental temperature operating time decreases at low temperatures The condition of the battery terminals you should always ensure the terminals stay clean by wiping them with a clean dry cloth before installing the battery pack Retaining data with power off Refer to User Information Guide about Retaining time Extending battery life To maximize the life of your battery packs At lea...

Page 157: ...uter s power off ensure that the Power indicator is off 3 Remove all cables and peripherals that are connected to the computer 4 Close the display panel and turn the computer upside down 5 Slide the battery lock 1 into its position 4 Connect the AC adaptor to the DC IN 15V jack of the computer and to a wall outlet that is supplying power The DC IN indicator should glow green and the Battery indica...

Page 158: ...ttery pack as far as it will go into the computer 1 2 Ensure that the battery pack is securely in place and the battery lock 2 is in its position Figure 6 2 Securing the battery pack 3 Turn your computer over Battery pack Battery release latch Battery lock Do not touch the battery release latch while holding the computer or the battery pack might fall out due to the unintentional release of the ba...

Page 159: ...rd correctly or insert a proper token Please use BIOS Setup to change or delete the HDD Passwords or to set the HDD Master Password Passwords set by the TOSHIBA Password Utility function are different from the Windows password After you set the password a dialog box will be displayed asking whether you want to save it to a floppy diskette or other media If you forget the password you can open the ...

Page 160: ...e validate old tokens but you can use the same SD Cards to create new tokens If you forget your HDD User Password TOSHIBA will NOT be able to assist you and your HDD will be rendered COMPLETELY and PERMANENTLY INOPERABLE TOSHIBA will NOT be held responsible for any loss of any data any loss of use or access to your HDD or for any other losses to you or any other person or organization that result ...

Page 161: ...ot Authentication If you would not like to swipe your finger or cannot authenticate the fingerprint for some reasons push the BACK SPACE key to skip the fingerprint authentication screen You can try to swipe the fingerprint up to five times If you failed fingerprint authentication five times you must enter the password manually to start the computer Enter the password manually To enter a password ...

Page 162: ...ease refer to Chapter 5 The Keyboard for further details Panel power on off You can set up your computer so that power is turned off automatically when you close the display panel and turned on again when you open it Please note that this function is only available for Sleep Mode or Hibernation Mode not for Shut Down Mode System automatic Sleep Hibernation This feature automatically turns off the ...

Page 163: ... HWSetup HW Setup window The HW Setup window contains a number of tabs General Display Boot Priority Keyboard CPU LAN Device Config and USB to allow specific functions of the computer to be configured In addition there are also three buttons OK Cancel and Apply OK Accepts your changes and closes the HW Setup window Cancel Closes the window without accepting your changes Apply Accepts all your chan...

Page 164: ...le on standard VGA mode and is not available as part of the Windows Desktop properties Default Return all HW Setup values to the factory settings About Display the HW Setup version The Power On Display is supported with some models Auto Selected Selects an external monitor if one is connected otherwise it selects the internal display default LCD Analog RGB Selects both the internal display and an ...

Page 165: ...1 2 hard disk drive 3 CD ROM 2 4 LAN HDD FDD CD ROM LAN The computer looks for bootable files on devices in the following order 1 hard disk drive 2 floppy diskette drive 1 3 CD ROM 2 4 LAN FDD CD ROM LAN HDD The computer looks for bootable files on devices in the following order 1 floppy diskette drive 1 2 CD ROM 2 3 LAN 4 hard disk drive HDD CD ROM LAN FDD The computer looks for bootable files on...

Page 166: ...n set manual boot device selection functions may be restricted The boot device selection methods described above will not change the boot priority settings that have been configured in HW Setup In addition if you press a key other than one of those listed or if the selected device is not installed the system will continue to boot according to the current and available settings in HW Setup Built in...

Page 167: ... disk drive default With this setting the USB memory device can be used to start the computer as though it were a hard disk drive based on the hard disk drive settings within both the Boot Priority and HDD Priority options detailed previously FDD Sets the USB memory to be the equivalent of a floppy diskette drive With this setting the USB memory device can be used to start the computer as though i...

Page 168: ...ower consumption and automatic clock speed switching functions are enabled in use the processor s operation is automatically switched when necessary default Always High The processor s power consumption and automatic clock speed switching functions are disabled in use the processor will always run at its highest level of power consumption and its highest speed Always Low The processor s power cons...

Page 169: ...e USB floppy diskette drive legacy emulation If your operating system does not support USB you can still use a USB floppy diskette drive by setting the USB FDD Legacy Emulation item to Enabled Enabled Enables Built in LAN functions Default Disabled Disables Built in LAN functions All Devices The computer s BIOS will setup and configure all devices Setup by OS The operating system will setup and co...

Page 170: ...oing and what actions you performed immediately before the problem occurred If you have a printer attached print a copy of the screen using the computer s PRTSC key Please also be aware that the questions and procedures described in this chapter are meant only as a guide they are not definitive problem solving techniques In reality many problems can be solved simply but a few may require help from...

Page 171: ...faster Analyzing the problem Sometimes the computer will give you clues that can help you identify why it is malfunctioning In view of this you should keep the following questions in mind Which part of the computer is not operating properly keyboard hard disk drive display panel touch pad touch pad control buttons as each device will produce different symptoms Check the options within the operatin...

Page 172: ...and configuration of your hardware First run through the items in the preliminary checklist as described previously then if you still cannot correct the problem try to identify the source the next section provides checklists for individual components and peripherals Before using a peripheral device or application software that is not an authorized Toshiba part or product make sure the device or so...

Page 173: ... appear on the screen and the system does not function normally The screen displays an error message In these instances turn off the computer check all cable connections and then restart it if the self test fails again contact your reseller dealer or service provider Power When the computer is not plugged into an AC power outlet the battery pack is the primary power source However your computer al...

Page 174: ... IN indicator stops blinking If the computer has reached room temperature and it still does not start or if it starts but shuts down quickly contact your reseller dealer or service provider Computer shuts down and its DC IN indicator is flashing green This indicates a problem with the heat dispersal system you should contact your reseller dealer or service provider Problem Procedure AC adaptor doe...

Page 175: ... you try again Unplug the AC adaptor and remove the battery to make sure its connecting terminals are clean if necessary wipe them with a soft dry cloth lightly dipped in alcohol Connect the AC adaptor and replace the battery taking care to ensure that it is securely seated in the computer Check the Battery indicator if it does not glow allow the computer to charge the battery for at least twenty ...

Page 176: ...ime in the System Time field 4 Press the END key a confirmation message will be displayed 5 Press the Y key the BIOS setup application will end and the computer will restart Problem Procedure Cannot enter password Please refer to the TOSHIBA Password Utility section in Chapter 6 Power and Power Up Modes for further information Problem Procedure Some letter keys produce numbers Check that the numer...

Page 177: ...y properly before closing it Problems above remain unresolved or other problems occur You should initially refer to the documentation supplied with you software to determine if it is this that is causing the problems Alternatively you may wish to run the TOSHIBA PC Diagnostic Tool to check the general operation of the computer If you are still unable to resolve the problem contact your reseller de...

Page 178: ...rvice provider Problem Procedure Problem Procedure You cannot access a CD DVD in the drive Make sure the drive s disc tray is securely closed Press gently until it clicks into place Open the disc tray and make sure the CD DVD is properly seated It should lie flat with the label facing up A foreign object in the disc tray could block laser light from reading the CD DVD Make sure there is no obstruc...

Page 179: ... sure the drive s disc tray is securely closed Press gently until it clicks into place Open the disc tray and make sure the CD DVD is properly seated It should lie flat with the label facing up A foreign object in the disc tray could block laser light from reading the CD DVD Make sure there is no obstruction Remove any foreign object Check whether the CD DVD is dirty If it is wipe it with a clean ...

Page 180: ...c drives section in Chapter 2 The Grand Tour Cannot write correctly If you have trouble writing make sure you are observing the following precautions Use only media recommended by TOSHIBA Do not use the mouse or keyboard during writing Use only the software supplied with the computer for recording Do not run or start other software during writing Do not jar the computer during writing Do not conne...

Page 181: ...water or a neutral cleaner Refer to the Media care section in Chapter 4 for details on cleaning Some CD DVDs run correctly but others do not The software or hardware configuration may be causing a problem Make sure the hardware configuration matches your software s needs Check the CD DVD s documentation Check the type of CD DVD you are using The drive supports DVD ROM DVD ROM DVD Video CD ROM CD D...

Page 182: ...rther information You cannot access the external floppy diskette drive Try another floppy diskette in the drive if you are able to access this disk then it indicates the original disk and not the drive is probably causing the problem If you are still unable to resolve the problem contact your reseller dealer or service provider Problem Procedure PC Card error occurs Remove the PC Card from the com...

Page 183: ... cannot write to an SD SDHC Card Remove the SD SDHC Card from the computer and check to ensure that it is not write protected You cannot read a file Check to ensure the required file is actually on the SD SDHC Card that is inserted into the computer If you are still unable to resolve the problem contact your reseller dealer or service provider Problem Procedure Smart Card error occurs Remove the S...

Page 184: ...ck Memory Stick PRO Memory Stick PRO Duo from the computer and check to ensure that it is not write protected You cannot read a file Check to ensure the required file is actually on the Memory Stick Memory Stick PRO Memory Stick PRO Duo that is inserted into the computer If you are still unable to resolve the problem contact your reseller dealer or service provider Problem Procedure xD picture car...

Page 185: ...ck to ensure the required file is actually on the MultiMediaCard that is inserted into the computer If you are still unable to resolve the problem contact your reseller dealer or service provider Problem Procedure Either the Touch Pad or the AccuPoint does not work Check the Device Select settings Click Start Control Panel Hardware and Sound Mouse icon Pressing FN F9 to enables On screen pointer d...

Page 186: ...ugh Adjust the touch Sensitivity 1 Click Start Control Panel Hardware and Sound Mouse icon 2 Within the Mouse Properties window click the Advanced tab 3 Click the Advanced feature settings button 4 Advanced feature settings is displayed 5 Within the Pointer speed and tapping settings click Settings button 6 Detailed Touch Pad settings window is displayed 7 Move the slider bar to adjust the sensiti...

Page 187: ...operties window click the Buttons tab 3 Set the double click speed as required and click OK The on screen pointer moves too fast or too slow In this instance you should initially try changing the speed setting within the Mouse Control utility 1 To access this utility click Start Control Panel Hardware and Sound Mouse icon 2 Within the Mouse Properties window click the Pointer Options tab 3 Set the...

Page 188: ...istics in a fingerprint However there may be instances where certain users are unable to register their fingerprints due to insufficient unique characteristics in their fingerprints The recognition success rate may differ from user to user The fingerprint cannot be read due to injuries to the finger In this instance you should try the recognition process again using another enrolled finger However...

Page 189: ... you are still able to use a USB mouse and or USB keyboard by setting the USB KB Mouse Emulation option within the TOSHIBA HW Setup utility to Enabled If you are still unable to resolve the problem contact your reseller dealer or service provider Problem Procedure I cannot use the USB Sleep and Charge function The setting of USB Sleep and Charge function may be Disabled Change the setting to Enabl...

Page 190: ...or change the USB Sleep and Charge function setting to Disabled or if there is a USB port that does not have the USB Sleep and Charge function compatible icon use that port External devices connected to the compatible ports do not work when connected to a compatible port Some external devices may not work when connected to a compatible port when the USB Sleep and Charge function is Enabled Reconne...

Page 191: ...device may not be recognized if it is connected to the computer s eSATA USB combo port while the computer is in Sleep Mode or Hibernation Mode If this occurs disconnect the eSATA device and then reconnect the device while the computer is turned on Ensure that any required eSATA device drivers are properly installed to achieve this you should refer to both the device documentation and the operating...

Page 192: ...ter is turned on you should first check that the installed memory module s are compatible with the computer If there is an error with a compatible memory module there is a possibility the memory module is damaged If you determine that an incompatible module has been installed you should follow the steps as detailed below 1 Turn off the computer 2 Disconnect the AC adaptor and all peripheral device...

Page 193: ...is secure Check within the Windows Device Manager application to ensure the sound device is enabled and that the device is properly working For further information please refer to Troubleshooting in Windows section of Windows Help and Support Annoying sound is heard In this instance you may be experiencing feedback from either the internal microphone or an external microphone connected to the comp...

Page 194: ...n After confirming that the monitor s power switch is on you should check the connections to make sure that the power cord adaptor is firmly connected to the monitor and to a working power outlet No display Try adjusting the contrast and brightness controls on the external monitor Press the FN F5 hot key in order to change the display priority and ensure that it is not set for the internal display...

Page 195: ...e sure the cable is securely connected to the computer and to the device Make sure the device s power is turned on Reinstall the drivers Open the Windows Control Panel and double click the Add Hardware icon Follow the on screen directions Restart Windows If problems persist contact your dealer This information is applicable to the models equipped with a built in modem Problem Procedure Communicati...

Page 196: ...rrectly Character display becomes garbled during a communication When transmitting data you should ensure that the parity bit and stop bit settings correspond with those of the remote computer you should check the flow control and communication protocol settings within your communication application You cannot receive an incoming call Ensure that the communication application s rings before auto a...

Page 197: ...s set to on If problems persist contact your LAN administrator Problem Procedure Cannot access Bluetooth device Check to ensure the computer s Wireless Communication Switch is set to on Check to ensure the Bluetooth Manager application is running on the computer and that power to the external Bluetooth device is turned on Check to ensure that no optional Bluetooth Adaptor is installed in the compu...

Page 198: ...e Consult the reseller or dealer from where you purchased your computer and or software they are your best resource for current information and support Problem Procedure The following message appears when executing Recovery Disc Creator The Recovery Disc Creator can not be launched because there is no recovery partition You will see this message if you have previously chosen to remove the partitio...

Page 199: ...ower No 300 Huaihai Zhong Road Shanghai P R China 200021 Netherlands TOSHIBA Information Systems Benelux B V Rivium Boulevard 41 2909 LK Capelle a d IJssel Singapore TOSHIBA Singapore Pte Ltd 438B Alexandra Road 06 01 Alexandra Technopark Singapore 119968 Spain TOSHIBA Information Systems ESPAÑA Parque Empresarial San Fernando Edificio Europa la Planta Escalera A 28830 Madrid United States of Amer...

Page 200: ...ze Environmental Requirements Conditions Ambient temperature Relative humidity Operating 5 C 41 F to 35 C 95 F 20 to 80 noncondensing Non operating 20 C 4 F to 65 C 149 F 10 to 90 noncondensing Wet bulb temperature 26 C maximum Conditions Altitude from sea level Operating 60 to 3 000 meters Non operating 60 to 10 000 meters maximum Downloaded from LpManual com Manuals ...

Page 201: ...nit NCU Type of NCU AA Type of line Telephone line analog only Type of dialing Pulse Tone Control command AT commands EIA 578 commands Monitor function Computer s speaker Communication specifications Communication system Data Full duplex Fax Half duplex Communication protocol Data ITU T Rec Former CCITT Bell Fax ITU T Rec Former CCITT V 21 V 22 V 22bis V 32 V 3 2bis V 34 V 90 103 212A V 17 V 29 V ...

Page 202: ...3 30666 32000 33333 34666 36000 37333 38666 40000 41333 42666 44000 45333 46666 48000 49333 50666 52000 53333 54666 56000 bps Fax 2400 4800 7200 9600 12000 14400 bps Transmitting level 10 dBm Receiving level 10 to 40 dBm Input output impedance 600 ohms 30 Error correcting MNP class 4 and ITU T V 42 Data compression MNP class 5 and ITU T V 42bis Power supply 3 3V supplied by computer Downloaded fro...

Page 203: ...de Video mode Video mode settings are configured via the Display Properties dialog To open the Display Properties dialog click Start Control Panel Appearance and Personalization Personalization Display Settings Due to the display panel s increased resolution lines may appear broken in when displaying images in full screen text mode If you are running some applications for example a 3D application ...

Page 204: ...orm Factor PCI Express Mini Card Compatibility IEEE 802 11 Standard for Wireless LANs Wi Fi Wireless Fidelity certified by the Wi Fi Alliance The Wi Fi CERTIFIED logo is a certification mark of the Wi Fi Alliance Network Operating System Microsoft Windows Networking Media Access Protocol CSMA CA Collision Avoidance with Acknowledgment ACK Downloaded from LpManual com Manuals ...

Page 205: ...ent The range of the wireless signal is related to the transmit rate of the wireless communication Communications at lower transmit range may travel larger distances The range of your wireless devices can be affected when the antennas are placed near metal surfaces and solid high density materials Range is also impacted due to obstacles in the signal path of the radio that may either absorb or ref...

Page 206: ... 11 Revision b g and n draft 2 0 1 Factory set default channels 2 The band width and the channel which can be used depends on the installed wireless LAN module And the approved channels on using are different at each country or region When using these channels in any country or region refer to the addendum sheet which is Approved Countries Regions for use The channel configuration is managed as fo...

Page 207: ...he module will use the default channel 10 In a Wireless LAN Access Point the Wireless LAN module will use the factory set default channel printed in bold unless the LAN Administrator selected a different channel when configuring the Wireless LAN Access Point device 5GHz Band Channels Sets Wireless IEEE 802 11 Revision a and n draft 2 0 Frequency Range Channel ID 5150 5850 MHz 34 5170 2 36 5180 2 3...

Page 208: ...utomatically start operation at the channel identified by the Wireless LAN Access Point When roaming between different access points the station can dynamically switch to another channel if required For Wireless LAN modules installed in wireless clients that operating in a peer to peer mode the module will use the default channel 10 In a Wireless LAN Access Point the Wireless LAN module will use t...

Page 209: ... change the frequency move your computer to the area outside of the interference range of 2 4 GHz Wireless LAN devices 40 meters 43 74 yards or more or stop transmitting from your computer Please visit the following TOSHIBA PC product support website Bluetooth and Wireless LAN devices operate within the same radio frequency range and may interfere with one another If you use Bluetooth and Wireless...

Page 210: ...xample include Using the equipment with Bluetooth wireless technology on board of airplanes or In any other environment where the risk of interference to other devices or services is perceived or identified as harmful If you are uncertain of the policy that applies on the use of wireless devices in a specific organization or environment e g airports you are encouraged to ask for authorization to u...

Page 211: ...t the equipment to outlet on a circuit different from that to which the receiver is connected Consult the dealer or an experienced radio TV technician for help TOSHIBA is not responsible for any radio or television interference caused by unauthorized modification of the devices included with this Bluetooth Adaptor from TOSHIBA or the substitution or attachment of connecting cables and equipment ot...

Page 212: ...ase operating immediately until no interference is achieved The said legal communications means radio communications is operated in compliance with the Telecommunications Act The low power radio frequency devices must be susceptible with the interference from legal communications or ISM radio wave radiated devices The frequency bandwidth of this equipment may operate within the same range as indus...

Page 213: ...Direct PC Device Authorization This device obtains the Technical Conditions Compliance Approval and it belongs to the device class of radio equipment of low power data communication system radio station stipulated in the Telecommunications Business Law The Name of the radio equipment EYTFXCS JAPAN APPROVALS INSTITUTE FOR TELECOMMUNICATIONS EQUIPMENT Approval Number D07 0040001 The following restri...

Page 214: ...st meet the following specifications Certification agencies Length Minimum 1 7 meters Wire size Minimum 0 75 mm2 Current rating Minimum 2 5 amperes Voltage rating 125 or 250 VAC depending on country region s power standards U S and Canada UL listed and CSA certified No 18 AWG Type SVT or SPT 2 Australia AS Japan DENANHO Europe Austria OVE Italy IMQ Belgium CEBEC The Netherlands KEMA Denmark DEMKO ...

Page 215: ...guration must be 6 15P 250V or 5 15P 125V as designated in the U S National Electrical code handbook and the Canadian Electrical Code Part II The following illustrations show the plug shapes for the U S A and Canada the United Kingdom Australia and Europe Finland FIMKO Sweden SEMKO France LCIE Switzerland SEV Germany VDE United Kingdom BSI USA United Kingdom AS approved Approved by the BS approved...

Page 216: ...sor tab in TOSHIBA Password Utility and set the password on the dialog screen that appears Then click on the Set button in TOSHIBA Anti theft Protection Timer Take the following action if the set limit is exceeded If the Supervisor Password is registered but the User Password is not enter the Supervisor Password to boot up the computer If both the Supervisor Password and the User Password are regi...

Page 217: ...ratures for various devices The stored data uses a very small portion of the total hard disk capacity approximately 3MB or less per year This information is used to identify and provide a notification of system conditions which may effect the performance of your Toshiba computer It may also be used to help diagnose problems should the computer require service by Toshiba or Toshiba s authorized ser...

Page 218: ...able the program By enabling the TOSHIBA PC Health Monitor software you agree with these terms and conditions and to the use and sharing of the collected information Once the program is enabled the TOSHIBA PC Health Monitor screen is displayed and the program will begin monitoring system functions and collecting information This message will no longer be displayed after clicking Enable this softwa...

Page 219: ...layed after running the TOSHIBA Cooling Performance Diagnostic Tool in step 3 it is recommended you turn off the computer and contact TOSHIBA support Cleaning the cooling module This section explains how to clean the cooling module To clean the cooling module follow the steps detailed below 1 Shut down the computer make sure the Power indicator is off refer to the Turning off the power section in ...

Page 220: ...aning tool Figure G 2 Lift the plastic film 7 Slide the Cooling module cover back into place on the computer to reattach 8 Install the battery pack refer to the Replacing the battery pack section in Chapter 6 Power and Power Up Modes if required 9 Turn your computer over Cooling module cover Hole Do not use a ball pen cotton swap or similar to remove dust If these touch the inside of the computer ...

Page 221: ...features and specifications corresponding to all of the icons or switches shown on the computer chassis CPU 2 Central Processing Unit CPU Performance Legal Footnotes CPU performance in your computer product may vary from specifications under the following conditions use of certain external peripheral products use if battery power instead of AC power use of certain multimedia computer generated gra...

Page 222: ...hapter 8 Troubleshooting for more information 64 Bit Computing 64 bit processors are designed to take advantage of 32 and 64 bit computing 64 bit computing requires that the following hardware and software requirements are met 64 bit Operating System 64 bit CPU Chipset and BIOS Basic Input Output System 64 bit Device drivers 64 bit applications Certain device drivers and or applications may not be...

Page 223: ...and therefore shows less storage capacity Available storage capacity will also be less if the product includes one or more pre installed operating systems such as Microsoft Operating System and or pre installed software applications or media content Actual formatted capacity may vary LCD 6 Over a period of time and depending on the usage of the computer the brightness of the LCD screen will deteri...

Page 224: ... The actual transmission speed will be lower than the theoretical maximum speed The wireless adapter is based on a draft 2 0 release version of the IEEE 802 11n specification and may not be full compatible with or support some feature e g security of certain Wi Fi equipment Copy Protection 9 Applicable copy protection standards included in certain media may prevent or limit recording or viewing of...

Page 225: ...etal oxide semiconductor CPU central processing unit CRT cathode ray tube DC direct current DDC display data channel DDR double data rate DIMM dual inline memory module DVD digital versatile disc DVD R Digital Versatile Disc Recordable DVD RAM Digital Versatile Disc Random Access Memory DVD R Dual Layer Digital Versatile Disc Recordable Dual Layer DVD ROM Digital Versatile Disc Read Only Memory DV...

Page 226: ...ock S P DIF Sony Philips Digital Interface Format SDRAM synchronous dynamic random access memory SLI Scalable Link Interface SO DIMM small outline dual in line memory module SSD Solid state drive TFT thin film transistor USB Universal Serial Bus UXGA ultra extended graphics array VGA video graphics array WAN wide area network WSXGA wide super extended graphics array WSXGA wide super extended graph...

Page 227: ...binary codes that represent the most commonly used letters numbers and symbols asynchronous Lacking regular time relationship As applied to computer communications asynchronous refers to the method of transmitting data that does not require a steady stream of bits to be transmitted at regular time intervals B backup A copy of a file usually on a removable disk kept in case the original file is los...

Page 228: ...e device such as a floppy diskette or hard disk drive It is usually described in terms of kilobytes KB where one KB 1024 bytes megabytes MB where one MB 1024 KB and gigabytes GB where one GB 1024 MB CardBus An industry standard bus for 32 bit PC Cards CD An individual compact disc See also CD ROM CD R A Compact Disc Recordable disc can be written once and read many times See also CD ROM CD ROM A C...

Page 229: ...eripheral components assembled to process data into useful information configuration The specific components in your system such as the terminal printer and disk drives and the settings that define how your system works You use the HW Setup program to control your system configuration controller Built in hardware and software that controls the functions of a specific internal or peripheral device ...

Page 230: ...application Computer system documentation typically includes procedural and tutorial information as well as system functions double click To press and release the pointing device s primary button rapidly twice without moving the pointing device In the Windows operating system this refers to the pointing device s left button unless otherwise stated driver A software program generally part of the op...

Page 231: ...ata transfer at speeds of up to 4 Mbps file A collection of related information a file can contain data programs or both fingerprint sensor The fingerprint sensor compares and analyzes the unique characteristics in a fingerprint firmware A set of instructions built into the hardware which controls and directs a microprocessor s activities flash memory Non volatile memory that can be written to as ...

Page 232: ...are hertz A unit of wave frequency that equals one cycle per second host computer The computer that controls regulates and transmits information to a device or another computer hot key The computer s feature in which certain keys in combination with the extended function key FN can be used to set system parameters such as speaker volume HW Setup A TOSHIBA utility that lets you set the parameters f...

Page 233: ...tted code is in turn representative of the ASCII character marked on the key kilobyte KB A unit of data storage equal to 1024 bytes See also byte and megabyte L L1 cache Level one cache Memory cache built into the processor to help improve processing speed See also cache memory L2 cache L2 cache Memory cache installed on the motherboard to help improve processing speed It is slower than L1 cache a...

Page 234: ...modulates to digital format where received monitor A device that uses rows and columns of pixels to display alphanumeric characters or graphic images See also CRT motherboard A name sometimes used to refer to the main printed circuit board in processing equipment It usually contains integrated circuits that perform the processor s basic functions and provides connectors for adding other boards tha...

Page 235: ...rical relationship between two parameter values integers both of which are either on or off odd or even 0 or 1 2 In serial communications an error detection bit that is added to a group of data bits making the sum of the bits even or odd Parity can be set to none odd or even password A unique string of characters used to identify a specific user The computer provides various levels of password pro...

Page 236: ...hat information in RAM is lost when you turn off your computer This type of memory is used for your computer s main memory See also memory Compare ROM resolution A measure of the sharpness of the images that can be produced by a printer or displayed on a screen For a printer resolution is expressed in dots per inch dpi For a screen it is expressed as the number of pixels available horizontally and...

Page 237: ...also hardware stop bit One or more bits of a byte that follow the transmitted character or group codes in asynchronous serial communications synchronous Having a constant time interval between successive bits characters or events system disk A diskette that contains the operating system files needed to start the computer Any diskette can be formatted as a system disk A system disk is also called a...

Page 238: ... is another term for the communication protocol to permit an Ethernet connection using wireless communication components window A portion of the screen that can display its own application document or dialog box Often used to mean a Microsoft Windows window Wireless LAN Local Area Network LAN through wireless communication Wireless WAN Wide Area Network WAN through wireless communication write pro...

Page 239: ...ng vents 2 2 D DC IN indicator 2 12 6 3 Display 3 4 automatic power off 3 7 brightness down 5 4 brightness up 5 4 controller B 1 hinges 2 9 opening 1 6 screen 2 9 Docking port 2 7 Documentation list 1 1 Dual Pointing Device AccuPoint 2 10 4 2 AccuPoint control buttons 2 10 Touch Pad 2 10 4 1 8 16 Touch Pad control buttons 2 10 4 1 Touch Pad location 2 9 using 4 1 DVD Super Multi drive problems 8 1...

Page 240: ... 41 Heat dispersal 3 8 4 45 Hibernation Mode 3 8 Hot keys 3 6 Brightness Down 5 4 Brightness Up 5 4 Hibernate 5 4 Lock 5 3 Mute 5 3 Output 5 4 Power Plan 5 3 Sleep 5 4 TOSHIBA Zooming Utility enlarge 5 5 TOSHIBA Zooming Utility reduce 5 5 Touch Pad 5 4 Wireless 5 4 Zoom 5 5 HW Setup accessing 7 1 Boot priority 7 3 CPU 7 6 device config 7 7 display 7 2 general 7 2 keyboard 7 5 LAN 7 6 USB 7 7 windo...

Page 241: ...ng 3 17 Power button location 2 9 conditions 6 1 Hibernation Mode 1 10 indicators 6 2 panel on off 3 7 6 13 Shut Down mode Boot Mode 1 7 Sleep Mode 1 8 System Auto Off 6 13 turning off 1 7 turning on 1 7 Problems AC power 8 5 Additional memory module 8 23 Analyzing the problem 8 2 Battery 8 6 Bluetooth 8 28 Dual Pointing device 8 16 DVD Super Multi drive 8 12 DVD ROM drive 8 9 DVD ROM CD R RW driv...

Page 242: ...T TOSHIBA Assist 3 12 TOSHIBA Assist button 3 6 TOSHIBA ConfigFree 3 12 TOSHIBA Disc Creator 3 13 4 26 TOSHIBA DVD RAM Utility 3 13 TOSHIBA Express Port Replicator 3 37 TOSHIBA HDD Protection 3 8 TOSHIBA Mic Effect 3 12 TOSHIBA PC Diagnostic Tool 3 10 TOSHIBA Presentation button 3 6 TOSHIBA SD Memory Boot Utility 3 12 TOSHIBA SD Memory Card Format 3 12 TOSHIBA Value Added Package 3 9 TOSHIBA Zoomi...

Reviews: