background image

41

Operations

40

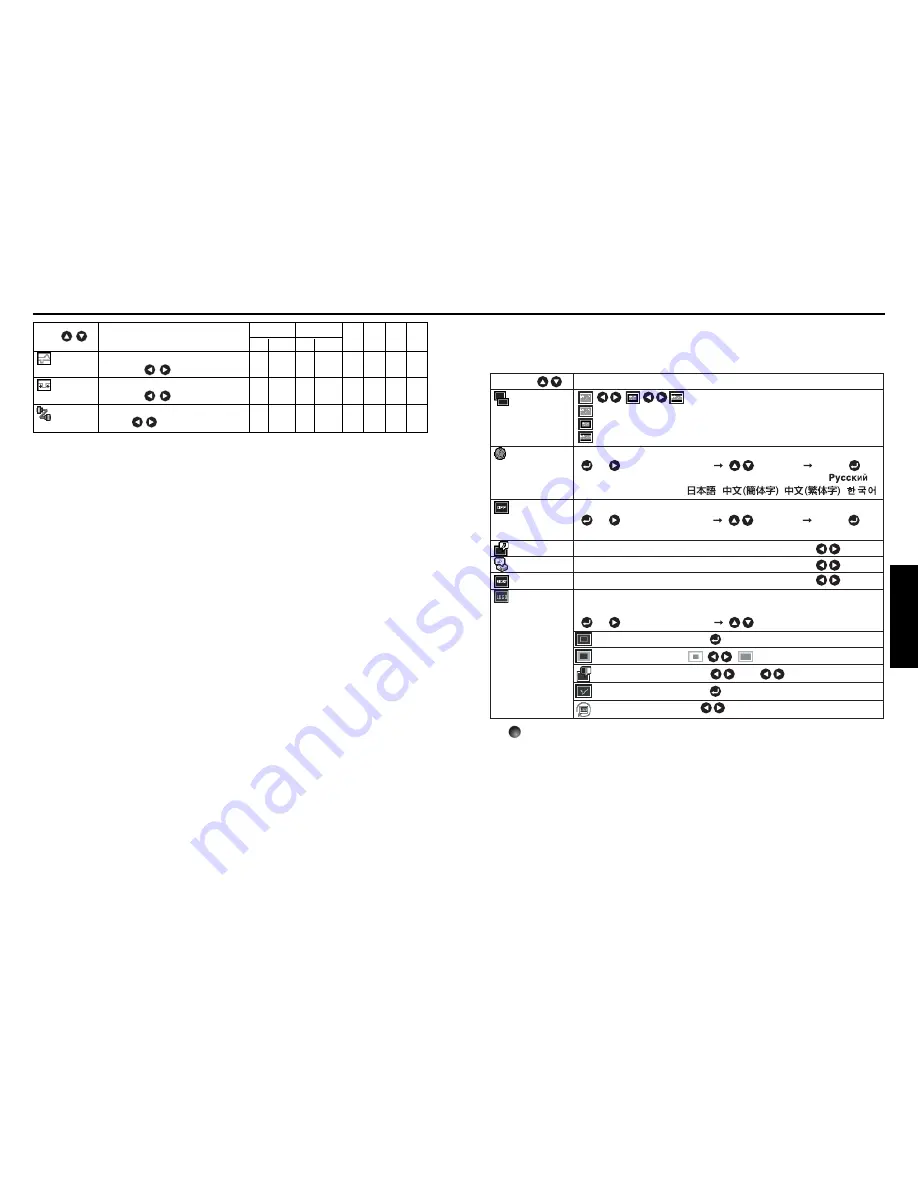
The display setting menu

Use this menu to set screen display-related items.
(The items in gray color cannot be set with the current input selection.)

(Full):  Display with 1024 

×

 768 dot resolution

(Thru): Display with sampling resolution (for computer input only)
(Wide):  Wide-screen display

Select one of the languages below to use for displaying the menu and messages
[      or      : Enter setting mode]     [          :Selection]      [Apply:       ]

English/Français/Deutsch/Italiano/Español/Português/               /
Svenska/Türkçe/Polski/            /                      /                      /

Screen to display when there is no input signal
[      or      : Enter setting mode]     [          :Selection]      [Apply:       ]

Logo

/

Blue

/

None

Display icons as function guides

On

Off

Sound a beep when operation is done.

On

Off

Display start-up screen when power is turned on

On

Off

Display a logo customized by the user for the start-up screen or when 
there is no input signal.
[      or      : Enter setting mode]     [          : Selection]

      Logo registration

Press       to display the registration menu.

      Display style

      Background

Black           Blue           White

      Logo confirmation

Press      .

      Reset logo

Yes           No

Description

Item

Screen size

Language

Background

Icon

Beep

Start-up screen

User logo

Detailed description

[

Screen size

]

• If “Thru” is selected for [

Screen size

], portions exceeding the native resolution

(1024 

×

 768 pixels) will not appear on the screen. Note that for RGB signals with

clock frequency 140MHz or lower, all input pixel signals are sampled. However, if
the clock speed is higher than this, the RGB pixel signal is thinned before
sampling.

• If you use the screen size setting function on commercial video software,

broadcast or cable-broadcasting programs to display images with the varying
aspect ratio except for the purpose of your private viewing and listening, it may
infringe the copyright protected by the copyright laws.

Description

Digital (DVI) Analog (D-SUB)(BNC)


Item 


RGB Y/P

B

/P

R

RGB Y/P

B

/P

R

Video S-video PC card USB

 Clamp 1

Adjusts the clamp pulse position.

No

No

Yes

No

No

No

No

No

Lower

Higher

 Clamp 2

Adjusts the clamp pulse width.

No

No

Yes

No

No

No

No

No

Narrower

Wider

 Equalizer

Reduce noise on the screen.

Yes

Yes

No

No

No

No

No

No

Adjust with 


.

*

1: [

Tint

] and [

NTSC mode

] can be displayed and adjusted only when the video signal is set to

[

NTSC

] and [

NTSC4.43

].

*

2: [

Noise reduction

] may not work depending on signal type.

*

3: [

NTSC mode

] is set to JAPAN when the language is set to Japanese. It is set to US for other

languages.

Using the menus (Continued)

Summary of Contents for TDP-TW300

Page 1: ...Others Maintenance Operations Preparations Before Using OWNER S MANUAL DATA PROJECTOR TDP TW300 ...

Page 2: ...se contact your local authorities or the Electronic Industries Alliance www eiae org USA only MODEL NAME TDP TW300 FCC Radio Frequency Interference Statement Note This equipment has been tested and found to comply with the limits for a Class A digital device pursuant to part 15 of the FCC Rules These limits are designed to provide reasonable protection against harmful interference when the equipme...

Page 3: ...RVE ALL WARNINGS AND INSTRUCTIONS GIVEN IN THIS OWNER S MANUAL AND THOSE MARKED ON THE UNIT RETAIN THIS BOOKLET FOR FUTURE REFERENCE This unit is fully transistorized and does not contain any parts that can be repaired by the user DO NOT REMOVE THE CABINET COVER OR YOU MAY BE EXPOSED TO DANGEROUS VOLTAGE REFER SERVICING TO QUALIFIED SERVICE PERSONNEL ONLY 1 Read Owner s Manual After unpacking this...

Page 4: ...uld break please handle with care to avoid injury and contact your dealer for repair service The broken pieces of glass may cause to injury In the unlikely event of the lamp rupturing thoroughly clean the area around the projector and discard any edible items placed in that area 18 Servicing Do not attempt to service this product yourself as opening or removing covers may expose you to dangerous v...

Page 5: ... in that situation the malfunction may result Ensure to wait until the condensation naturally disappears In a high altitude location where air is thin cooling efficiency is reduced so use the projector with Fan mode set to High p 45 POWER SUPPLY CORD SELECTION 19 Replacement Parts When replacement parts are required be sure the service technician has used replacement parts specified by the manufac...

Page 6: ...tion in the U S and other countries Adobe is a registered trademark and Acrobat Reader is a trademark of Adobe Systems Incorporated Notational Conventions Used in This Manual References to pages with related information are annotated as follows For example if making a reference to page 36 p 36 The illustrations in this document are for reference purposes only and may not reflect your package exact...

Page 7: ...memory 50 Setting Wireless Utility 51 Functions 51 Communication mode 51 Caution when using the wireless LAN functions 52 Setup using the setting display 2 53 Setting Wireless Utility 54 Computer settings 57 Projecting images stored in a memory PC card or USB memory 58 Memory PC cards 58 USB memories 59 Backing up data 59 JPEG files 59 Setting slideshow options 60 Playing a slide show from a thumb...

Page 8: ...65 to use the functions of the wireless LAN PC card Installing Acrobat Reader Windows Run the CD ROM select the Reader English folder and run ar500enu exe Follow the on screen instructions Macintosh Run the CD ROM select the Reader English folder and run Reader Installer Follow the on screen instructions to install the software Viewing the manual Run the CD ROM and double click on Start pdf Acroba...

Page 9: ... inside the battery cover p 45 Note For the remainder of this manual buttons are referred to as follows Selection buttons ENTER button Names of each part on the control panel and remote control Control panel Remote Control Name Main Function Control panel 1 ENTER button Accepts the selected mode 2 MENU button Displays menus p 38 3 KEYSTONE button Adjusts keystone distortion p 30 4 ON STANDBY butto...

Page 10: ... removing PC card p 23 10 RESET switch inside depression Press if CARD indicator turns red p 23 11 Eject button Press to remove PC card p 23 12 PC card slot Insert PC cards here p 23 13 USB terminal Connects a commercial USB memory p 21 14 CAMERA POWER terminal DC power supply terminal 15 V Reserved for future use 15 VIDEO IN terminal S VIDEO Input S video signals from video equipment AUDIO L R In...

Page 11: ...irection of the mouse remote control receiver and retry Mouse control Remote Control Front Remote Control Rear PAGE PAGE R CLICK L CLICK EASY SETUP Operating the remote control Turn on the ON OFF switch of the remote control Point toward the projector s infrared remote sensor and press a button on the remote control Operating the projector from the front Approx 15 Approx 5m Operating the projector...

Page 12: ...ower in case of anomaly Let everyone involved with the use of the projector know that fact Floor mounted front projection Floor mounted rear projection Ceiling mounted front projection Ceiling mounted rear projection Projection Distance and Size Use the figures tables and formulas below to determine the projection size and projection distance Projection sizes are approximate values for full size p...

Page 13: ... 2 IN or from the COMPUTER 3 IN terminal as selected with the INPUT button If no input is selected the MONITOR OUT terminal outputs the input signals last selected among the COMPUTER 1 IN COMPUTER 2 IN and the COMPUTER 3 IN terminals Digital RGB signals are not output A computer monitor usually cannot accept Y PB PR signals correctly Before connection Read the owner s manual of the device you are ...

Page 14: ...ing fan continues to operate for a short while in order to expel excess internal heat C In standby mode Note The projector consumes about 16W of power in standby We recommend that you unplug the power cord or turn off the main power switch if you will not be using the projector for an extended period When Wireless standby is On it consumes about 23W during standby Precautions If the power cord is ...

Page 15: ...nal will appear If a signal not supported by the projector is input the Unsupport signal will appear If an unavailable operation button is pressed the icon will appear 1 2 1 2 1 2 3 1 Turn on the power Turn on the power by following the instructions in Turning the power on p 26 The Easy setup function works to automatically adjust the screen focus and correct the keystone distortion If RGB signals...

Page 16: ... be sure to set Auto focus and select the items to be adjusted by Auto adjustment p 42 With Easy setup in the Default setting menu set to On the screen focus is automatically adjusted and the keystone distortion vertical and horizontal is corrected when the power is turned on Automatic keystone distortion correction and auto setting are selected by factory setting Note A message appears on the scr...

Page 17: ...he freeze Even if an image is frozen on the projector the pictures are running on the video or other equipment If you use this function on commercial video software broadcast or cable broadcasting except for the purpose of your private viewing and listening it may infringe the copyright protected by the copyright laws Remote Control Remote Control Remote Control Notes A message appears on the scre...

Page 18: ...B memory Size Sub input Item Description Note To enlarge the screen fully select Full for Size Remote Control Using handy features Continued Display a sub screen PIP function Another image can be added in smaller size referred as sub screen in this manual to the projected image referred as main screen Press the remote control s PIP button A sub screen is displayed in the currently projected image ...

Page 19: ...remote control 3 The password cancel confirmation screen is displayed OK or Cancel 4 Select OK and press the button The Password is canceled and becomes Off Note The password entry screen appears when the power is turned back on only after the main power switch is turned off or the power cord is unplugged If you forgot the password please inquire your dealer Screen combination of PIP and SPLIT fun...

Page 20: ...ion Adjust the vertical position of the image No No Yes No No No No No Move down Move up You can call up on screen menus and conduct a number of adjustments and settings using the operation buttons p 16 on the control panel main unit side and remote control How to use the menus The menu shown below is for operation instructions purposes and might differ from the actual display Using the menus Exec...

Page 21: ...n User logo Detailed description Screen size If Thru is selected for Screen size portions exceeding the native resolution 1024 768 pixels will not appear on the screen Note that for RGB signals with clock frequency 140MHz or lower all input pixel signals are sampled However if the clock speed is higher than this the RGB pixel signal is thinned before sampling If you use the screen size setting fun...

Page 22: ... confirmation Select OK or Cancel and press the button If the picture does not fall within the area operate the computer to scroll the screen 4 Press the button to register 5 Registration starts A message is displayed while registration is in process Notes You can register a logo from computer input only The area that can be registered is 512 384 dots at the center of the screen To register a comp...

Page 23: ...ctor The remote control operations are available Control panel operations are locked after the setting is done To release the key lock press the control panel s RETURN button for 10 seconds The key lock is released with a beep sound Computer 1 Digital Y PB PR 1 Digital Computer 1 Analog Y PB PR 1 Analog Computer 2 Y PB PR 2 Computer 3 Y PB PR 3 Video S video Wireless Card USB memory Input select s...

Page 24: ...us Continued The control setting menu This menu sets items regarding wired LAN By this setting you can transmit operation status messages from the projector to the specified E mail address Wired LAN setting Select item Projector name Enter a character string 0 to 64 characters using numeric keys of the remote control DHCP Use Not use IP address Enter a character string using numeric keys of the re...

Page 25: ...ed time approaches 2 000 hours consult with a store about getting a TLPLW6 replacement lamp sold separately prepared 4 Version shows the version of the projector s internal control program This version is referred to for customer service etc 5 In case that appears for MAC address please contact your dealer Note The displayed information will not be refreshed if the status changes To refresh the in...

Page 26: ...een the projector and computer placed indoors This figure is not guaranteed and should be considered as merely a guideline Infrastructure communication mode A mixed wireless and wired LAN can be created via access points Connecting to the rest of the world via a wired LAN or the Internet generally requires a high level of security Use the appropriate transmission mode for your network environment ...

Page 27: ...rks signify the items can be selected from the list by using After an item is selected apply it by pressing Press or to open the menu 4 Back RETURN button 5 End Press the MENU button or RETURN button The menu disappears 30 seconds after the last operation Caution when using the wireless LAN functions The Wireless LAN in this unit uses the 2 4 GHz waveband If there is a similar wireless LAN in the ...

Page 28: ...ify a string of 5 arbitrary characters or a string of ten characters in hexadecimal notation For use at the 128 bit level specify a string of 13 arbitrary characters or a string of 26 characters in hexadecimal notation Note Alphabetic characters A to F a to f used in hexadecimal notation are case insensitive the uppercase characters and their lowercase equivalents are handled to be identical Setti...

Page 29: ...e communication mode to Infrastructure DHCP If you set DHCP to Use the IP address of the projector is assigned automatically by the DHCP server If your network environment does not assign IP addresses automatically set DHCP to Not use then set the following items IP address Subnet mask and Gateway manually IP address When DHCP is set to Not use consult with your network administrator for the setti...

Page 30: ...nce on this list is not a guarantee of operation TOSHIBA Mobile Disk PAMHD005 5GB PAMHD002 2GB SmartMedia TOSHIBA PDR SM32 32MB PDR SM64 64MB SD memory cards TOSHIBA SD M512 512MB SD M256 256MB SD M128 128MB miniSD cards TOSHIBA SD S64 64MB SD S32 32MB Adapters BUFFALO MCR 5A RXD A The TOSHIBA IPC5019A SmartMedia PC card adapter is not ATA compliant and so cannot be used by this projector USB memo...

Page 31: ...nly a thumbnail image of JPEG files The thumbnail image of the JPEG files in the folder is not displayed Off Displays a dummy icon without displaying thumbnail preview Unplug device Run when unplugging a USB memory a USB memory card reader or a digital camera and the like Setting slideshow options Slideshow is the function to display the JPEG image files stored in a memory PC card or a USB memory ...

Page 32: ...st display screen press the RETURN button 4 Changing slides Pressing the buttons with a slide displayed changes slides previous slide next slide These buttons are not available during an automatic play Projecting images stored in a memory PC card or USB memory Continued Playing a slide show from a thumbnail list With Auto demo set to Off in Setting slideshow options data readout begins when a memo...

Page 33: ...ftware can be reproduced Note however that the software is partly covered under the GNU General Public License Version 2 hereafter GPL2 You can obtain a copy of GPL2 at http www fsf org copyleft gpl html AXE will provide the GPL covered source code of the software in accordance with the terms of GPL2 Contact AXE if you need it An OS of axLinux is a registered trademark of AXE Inc 5 Rotating a slid...

Page 34: ... High speed has the opposite effect Installing the applications If you will use the wireless LAN PC card function install the application on the supplied CD ROM onto your computer System Requirements Supported OS Windows 2000 Windows XP CPU Pentium M 1 GHz or higher recommended RAM 256 MB or more recommended Screen area resolution 1024 by 768 pixels recommended Application Types and Major Function...

Page 35: ...t If the desired application is not on the list launch it Note that if too many applications are running it will consume the computer s resources which could slow communication speed 5 Select the projector to be transmitted The IDs of projectors accessible for communication will be listed When a projector name is set that name appears instead of MAC address Select the checkbox of the projector you...

Page 36: ...aunch the Wireless Utility software application When the Wireless Utility launches the Screen Image transmission mode window appears on the computer screen 2 Click the Tool button The Wireless LAN Setting Utility dialog box appears 3 Select Simple 1 1 connection then click OK The connection starts up When a connection confirmation message appears proceed as instructed in the message 4 The projecto...

Page 37: ...n the computer s screen 4 Unplug the USB memory from the computer To unplug the USB memory follow the instructions in the user s manual supplied with the USB memory or the computer Setting on the projector 1 Turn the projector power on 2 Insert the supplied wireless LAN PC card to the PC card slot 3 Switch the input to Wireless Card 4 Plug the USB memory into the projector A message appears notify...

Page 38: ...h to save the converted file b Enter a file name of up to 8 characters in the File Name field and c Press the Save button 7 a In the JPEG Conversion Tool click on the Conversion button b A confirmation dialog box opens Click Yes The computer converts the file When it finishes a message appears informing you that a JPEG file has been created 1 2 5 7 a 1 2 5 7 a 3 b 3 b 3 a 4 6 b 6 c 6 a 7 b 7 b 2 C...

Page 39: ...with Microsoft PowerPoint This process provides presentations without using a computer by converting presentation files created with Microsoft PowerPoint into JPEG files storing them on a memory PC card and displaying them in a slide show To use this conversion mode Microsoft PowerPoint must be installed on the computer Only static images are supported by this process Animation and audio are not s...

Page 40: ...ector Projector Displays the contents of status display in the menu Wireless Card Displays the contents of status display of the Wireless Card input USB Memory Displays the contents of status display of the USB memory input Maintenance Describes an error if it occurs for example when the lamp has blown Note Clicking the button opens a popup help window Setting up the projector using a Web browser ...

Page 41: ...place the lamp when a sign appears on the screen When the replacement time approaches a message will appear on the screen The risk of burst will increase if the lamp is continuously used without being replaced Frequently check the used hours and prepare spares when the replacement time approaches Refer to Status display p 48 When the lamp is broken If glass components including a lamp and a lens s...

Page 42: ... then tighten the screws loosened in step 3 until the outer lamp cover is no longer loose Be sure to replace the outer lamp cover 9 Reset the lamp timer See the lamp s manual for instructions on resetting the lamp timer Notes and Precautions Press the button twice to display a rough guide the time of lamp use the Lamp time item in the Status display menu p 48 It is recommended that the lamp be rep...

Page 43: ...e p 20 Are there any obstructions between the remote control and projector Are there any fluorescent or other bright lights shining at the projector s infrared remote sensor The indicator lights and a beep sound inform you of internal abnormalities No power Problem with projector Unplug the power cord and contact your dealer Lamp went out during use or won t come on Lamp temperature is high so tha...

Page 44: ...o mini jack 1 5 V rms 22 kΩ or more USB port USB port USB 2 0 High speed enabled Tape A Output voltage 5 VDC Supply current 500 mA PC card slot Compliant with PC Card Standard TYPE II Notes This model complies with the above specifications Designs and specifications are subject to change without notice This model may not be compatible with features and or specifications that may be added in the fu...

Page 45: ...signals RGB signals This projector supports the following RGB signals Note however that depending on the computer model the screen may show flicker or streaking Please adjust the projector if this happens Resolution 720 x 400 640 x 480 800 x 600 832 x 624 1024 x 768 1152 x 864 1280 x 960 1280 x 1024 1400 x 1050 1600 x 1200 Mode 720x400_85 VGA_60 VGA_72 VGA_75 VGA_85 SVGA_56 SVGA_60 SVGA_72 SVGA_75...

Page 46: ... on DON Status display off DOF Note Contact your dealer for control cable and other commands Specifications Continued Pin assignment of DVI I terminal Pin No 1 2 3 4 5 6 7 8 9 10 11 12 13 14 15 Pin description T M D S data 2 T M D S data 2 T M D S data 2 4 shielded T M D S data 4 N C T M D S data 4 N C DDC clock DDC data Analog vertical sync signal T M D S data 1 T M D S data 1 T M D S data 1 3 sh...

Page 47: ......

Reviews: