61
Operations
60
Projecting images stored in a memory PC card or USB memory (Continued)
•
[Interval]
You can set the display interval of time (in seconds or minutes) for slide shows to be
played automatically.
•
[Display effect]
When playing a slide show, the projector can give various display effects or transitions
to each slide being displayed.
The transitions available are listed below:
•
None
Display each slide normally.
•
Wipe
Display the next slide gradually upward (Wipe
↑
), downward (Wipe
↓
), to the left
(Wipe
←
), or to the right (Wipe
→
), over the current slide.
•
Dissolve
Display the next slide gradually in a certain fixed block pattern over the current slide.
•
Cover
Display the next slide as sliding upward (Cover
↑
), downward (Cover
↓
), to the left
(Cover
←
), or to the right (Cover
→
), over the current slide.
•
Checker
Display the next slide gradually from the left using checkered blocks over the current
slide.
•
Zoom/Rotate zoom
Display the next slide by enlarging it gradually, either straight from the center (Zoom)
or while turning it starting from the center (Spin zoom), over the current slide.
•
Belt wipe
Display the next slide gradually in stripes from both sides, over the current slide.
•
Blind
Display the next slide, as if it opened like a window blind, over the current slide.
•
[Play icon]
The slideshow icon can be displayed.
•
Standard
The projector handles the slideshow icon as follows depending on the “
On/Off
”
setting of
Icon
on the projector’s menu.
Icon On
: The projector displays the icon upon the start of playing a slide show and
turns it off after a few seconds.
Icon Off
: The projector does not display the icon.
•
Continuous
The projector keeps the icon displayed during the slide show.
•
[Thumbnail preview]
Select the form of thumbnail preview.
All
:
Displays a thumbnail preview of JPEG files, and if any JPEG files exist in the
folder displays the leading thumbnail image.
File
: Displays only a thumbnail image of JPEG files. The thumbnail image of the JPEG
files in the folder is not displayed.
Off
: Displays a dummy icon without displaying thumbnail preview.
•
[Unplug device]
Run when unplugging a USB memory, a USB memory card reader or a digital camera
and the like.
■
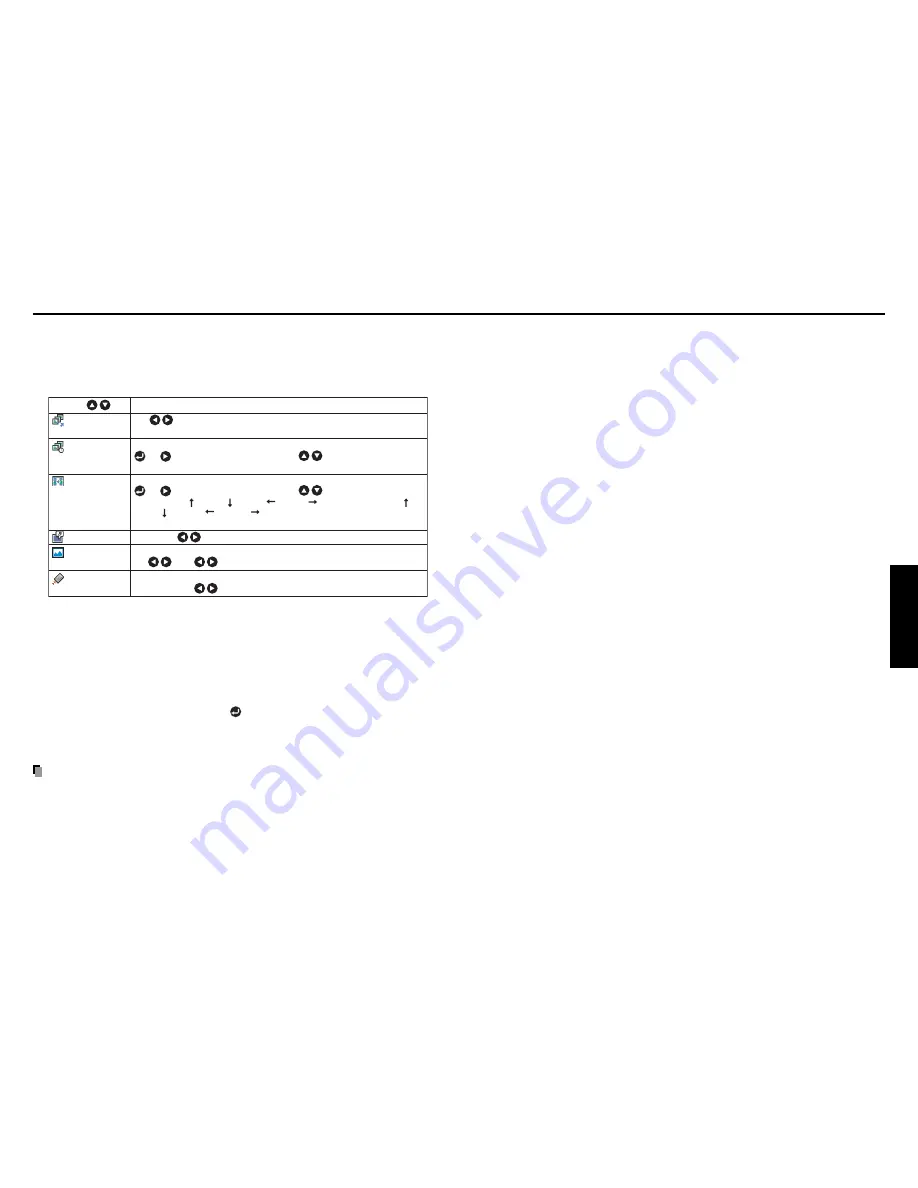
Setting slideshow options
Slideshow is the function to display the JPEG image files stored in a memory PC card
or a USB memory one after another at fixed time intervals. When switching from one
image to the next, Slideshow can add various display effects (transitions) to them. If you
select
Slideshow
, the following items can be set.
Description
Item
Auto. demo
Interval
Transition
Play icon
Thumbnail
preview
Unplug device
On Off
(Select whether to automatically start a slide show
when a PC card in plugged.)
Select the slide show display interval.
or : Begin a slide show. Use the buttons to select.
5 sec./10 sec./30 sec./1 min./3 min./5 min./10 min.
Select the slide show display effect.
or : Begin a slide show. Use the buttons to select.
None / Wipe / Wipe / Wipe / Wipe / Dissolve / Cover /
Cover / Cover / Cover / Checker / Zoom / Rotate zoom /
Belt wipe / Blind
Standard Continuous
Switch the form of thumbnail preview.
All File Off
Run when unplugging a USB device.
Confirm
:
Yes No
●
Details on individual items
•
[Auto. demo]
On
: A slide show begins automatically when a memory PC card is inserted and input
switches to Wireless/Card. At this time, the JPEG files in the root directory of the
memory PC card are used in the slide show. If the input has already been switched
to Wireless/Card, the slide show begins automatically when the memory PC card
is inserted.
The Auto Demo function is also available with a USB device.
• To pause the slide show, press the
button. Pressing this button again allows
the slide show to begin. To stop the slide show, press the
RETURN
button.
Off
: A list of thumbnails will be displayed when connecting with a memory PC card, a
USB device or the like. Select a desired JPEG file from the list.
Note
• The Auto Demo function does not work when using a USB memory card reader to mount
multiple media.
Summary of Contents for TDP-TW300
Page 47: ......


