


– 5 –
EN-9
EN-10
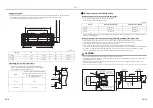
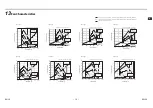
Drilling on the wall
•
Please install the indoor unit and connect the pipelines. Perform the heat insulation treatment on the refrigerant
connecting pipe and drainage pipe. (For details, refer to the installation manual of the indoor unit)
•
Please make the drill on the wall according to the table below.
(Unit: mm)
Confirming the location of indoor unit
Model
E
e
F
f
014 Type
652
780~790
125
160~165
018 Type
852
980~990
125
160~165
027 Type
1052
1180~1190
125
160~165
•
Please refer to the following table to confirm and adjust the
distance “d” between the wall and the screw holes for fixing the
panel assembly on the mounting frame (2).
D (mm)
Confirm and adjust the distance d (mm)
between the wall and the screw holes for
fixing the panel assembly on the
mounting frame (2)
D = 91
d = 61
91 < D ≤ 101
61 < d ≤ 71
Dimension for opening on the wall (e)
(2) Mounting frame
Contour line of drill on the wall
Mounting frame (external dimension) (E)
D
ime
nsi
o
n f
o
r dr
il
l on th
e
w
a
ll
(
f)
Mou
n
ti
ng
fr
a
m
e (
in
n
e
r di
men
sion)
(
F
)
65~69
65~69
d
D
Wall
Screw
holes
Indoor unit
(2) Mounting
frame
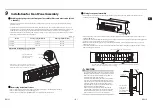
Air duct connection: if 101 < D ≤ 1000
Install the air duct on the frame and stick the sponge.
•
Please install the air duct (purchased locally) on the frame.
•
Please use ducts of the following dimensions.
(Unit: mm)
•
For the pasting method of heat insulation material (5)(6)(7)(8), please refer to [Sticking sponge on mounting frame] in [8.
Installation of 3DW Diffusor].
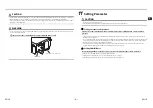
Install the wooden frame to the wall opening and fix the mounting frame with screws.
•
Please install the indoor unit and connect the pipelines. Perform the heat insulation treatment on the refrigerant
connecting pipe and drainage pipe. (For details, refer to the installation manual of the indoor unit)
•
Please make the drill on the wall according to “Drilling on the wall”.
•
Please refer to the figure below to install the wooden frame (locally purchased) to the wall opening.
•
Please fix the heat-insulated mounting frame (2) to the wooden frame with wooden screws (purchased locally), and adjust
the distance “d” between the wall and the fixing screw for front panel assembly on the mounting frame (2) to 61 mm.
•
Please use heat insulation materials (purchased locally) to insulate the periphery of the air duct.
CAUTION
•
If canvas duct is applied, please ensure that the length is less than 150 mm.
•
To prevent condensation, please control the height difference between the 3DW Diffusor and the air outlet for the indoor
unit within the tolerance of 15 mm.
•
When sticking a sponge, press it carefully to ensure that there is no clearance or loosening. Otherwise, there will be
condensation and dirt on the ceiling.
Model
Inner dimension (width)
Inner dimension (height)
014 Type
652 or more
129 or more
018 Type
852 or more
129 or more
027 Type
1052 or more
129 or more
0±15
d=61
165
Screw
holes
He
ig
ht
d
ifferenc
e
of
ai
r o
u
tle
t
The air duct must be
heat-insulated
(Purchased locally)
Wooden screw for fixing
mounting frame x4
(Purchased locally)
In
n
e
r d
im
e
ns
io
n
of wood
en fr
a
m
e
D 1000 or less
Dr
il
li
n
g
on
t
h
e
w
a
ll
1
60~
165
Wooden frame
(Purchased
locally)
Air duct
Canvas duct
150 or less
Square duct
Wall
Canvas duct
150 or less
Summary of Contents for TCB-TDL0141SDY-E
Page 12: ...D0X7203601 00 ...


