4-14
T200, T200CS
4.6
Back Cover
Removing the Back Cover
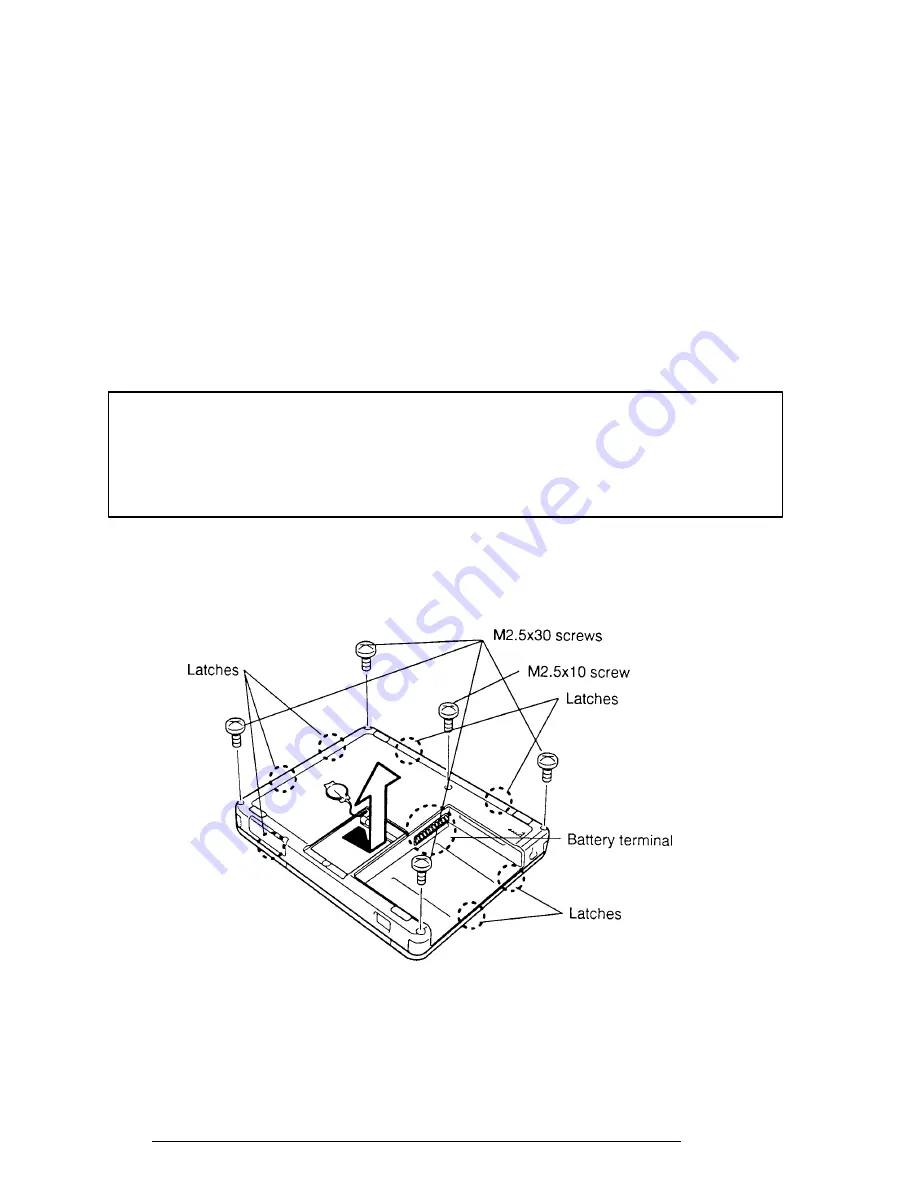
To remove the computer’s back cover, follow the steps below and refer to Figure 4-8.
1.
Turn off the power to the computer. Disconnect the AC adapter, power cord and
all external cables connected to the computer.
2.
Remove the battery pack, optional memory card, optional PCMCIA cards, and
HDD as described in sections 4.2, 4.3, 4.4 and 4.5.
3.
Remove the
four M2.5x30 screws
and
one M2.5x10 screw
(Figure 4-8).
NOTES:
1. The terminals for the battery extend outside the back cover, so be careful not
to damage them when removing the cover.
2.
The latches tightly secure the back cover. To release them, firmly press on the
back cover above each latch as you pry it free.
3.
When removing the cover, you will need to press in the eject button of the
optional PCMCIA card 2.
4.
Pull the cover to release the
seven latches
connecting it to the computer (Figure 4-8).
Figure 4-8 Removing the Back Cover
Summary of Contents for T200
Page 23: ...T200 T200CS 2 3 Figure 2 1 Troubleshooting Flowchart 1 2 ...
Page 24: ...2 4 T200 T200CS Figure 2 1 Troubleshooting Flowchart 2 2 ...
Page 82: ...3 32 T200 T200CS ...
Page 90: ...3 40 T200 T200CS Head XX Sector XX Model name ...
Page 154: ...B 2 T200 T200CS Figure B 2 Upper System Board FOGSD2 Back ...
Page 156: ...B 4 T200 T200CS B 2 Lower System Board FOGSU2 Figure B 3 Lower System Board FOGSU2 Front ...
Page 157: ...T200 T200CS B 5 Figure B 4 Lower System Board FOGSU2 Back ...
Page 170: ...T200 T200CS D 1 Appendix D USA Display Codes Table D 1 USA Display Codes ...


