E
ng
lis
h
Connecting to television
I
MPORTANT!
– You only need to make one video connection
from the following options, depending on the
capabilities of your television.
– Connect the DVD player directly to the
television.
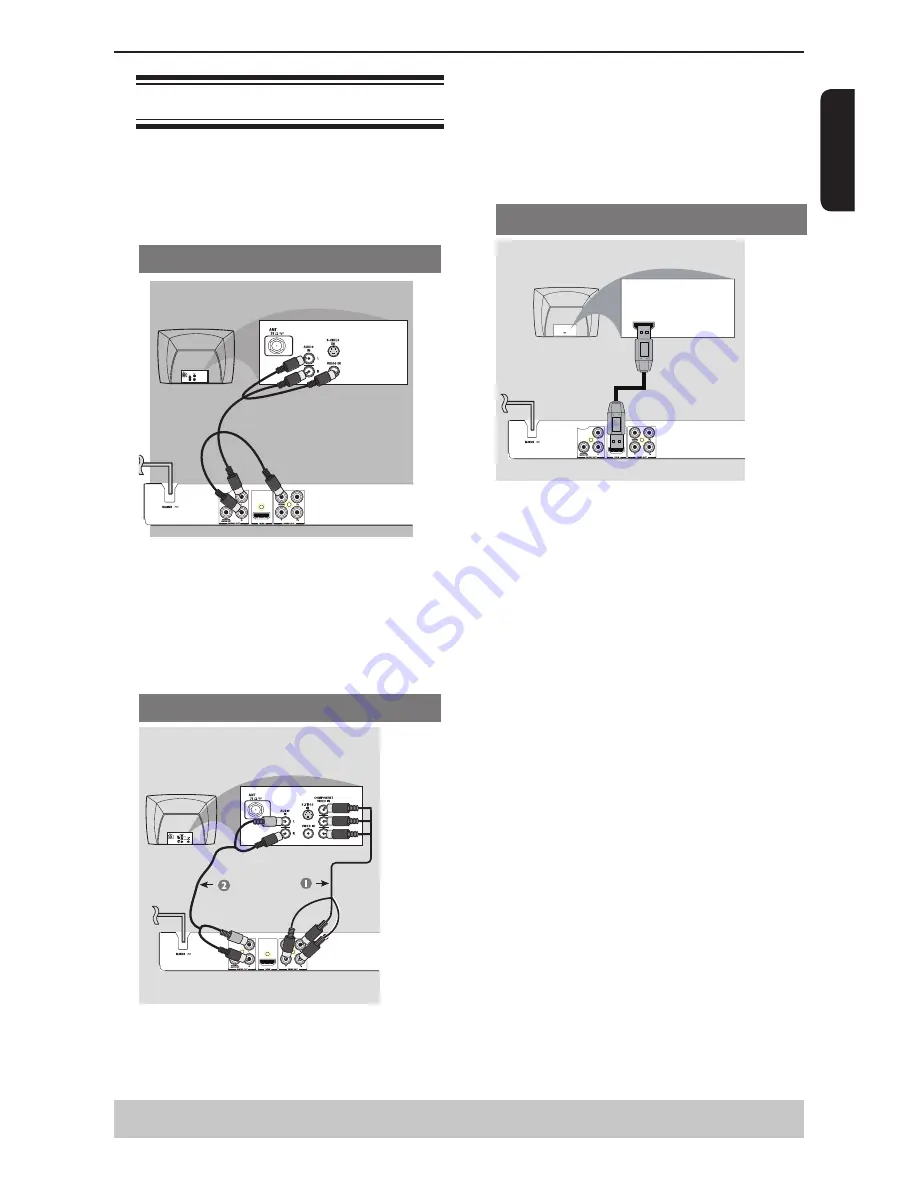
Using Composite Video Jack(CVBS)
A
Use the composite video cable (yellow) to connect
the DVD player
'
s VIDEO(CVBS) jack to the video
input jack(or labeled as A/V in, Video In or
Composite) on the TV(cable supplied).
To hear the sound of this DVD player through your
TV, use the audio cables(white/red)to connect
AUDIO OUT(L/R)jacks of the DVD player to
corresponding AUDIO IN jacks on the TV(cable
supplied).
Using Component Video Jacks(Y, P
B
, P
R
)
IMPORTANT!
-The progressive scan video quality is only
possible when using Y, P
B,
P
R
and a progressive
scan TV is required.
A
Use the component video cables (red/blue/green) to
connect the DVD player
'
s Y, P
B,
P
R
jacks to the
corresponding Component video input jacks (or
labeled as Y, P
b,
P
r
) on the TV (cable not supplied).
B
Use the audio cables (white/red) to connect AUDIO
OUT (L/R) jacks of the DVD player to the
corresponding AUDIO IN jacks on the TV(cable not
supplied).
C
Proceed to page 11 for detailed Progressive Scan set
up.
Using HDMI
TM
cable
HDMI IN
HDMI IN
HDTV / DVI TV
IMPORTANT!
– A simple 1-cable connection with a device
having an HDMI( high definition multimedia
interface ) connector allows digital transfer of
both digital video signals and multi-channel audio
signals. Use this connection for best picture
quality.
– It has plug and play capability using only one
HDMI cable for both audio / video output.
A
Use an HDMI cable (not supplied) to connect the DVD
player’s HDMI out to HDMI IN on the HDMI TV.
Tips:
- Before making or changing any connections, make
sure that all the devices are disconnected from the
power outlet.
- If your TV has a DVI IN jack, you need a HDMI-
DVI adapter cable to connect the HDMI out jack on
the DVD player. This HDMI-DVI cable has only video
output capability, so it is necessary to use separate
analogue cable to transfer the audio signals. See
“Connecting to a Stereo System” or “Connecting to a
Digital AV Receiver” in pages 7-8.
Selecting HDMI mode
During playback, press HDMI on the remote control to
select the HDMI video resolution. The video resolution
changes as follows every time HDMI is pressed.
Auto
g
480p
g
720p
g
1080i
g
1080p
Tips:
- If Auto is selected, it follows preference HDMI aspect
ratio of TV.
- The HDMI mode that is not supported by your TV
will not be selected.
- No Sound will be output from the HDMI cable if the
Digital Output is not set to PCM.
-If the audio format of the Digital Output does not
match the capabilities of your receiver, the receiver
will produce a strong, distorted sound or no sound at
all.
Connections
Helpful hint:
Before making or changing any connections, make sure that all the devices are
disconnected from the power outlet.


