background image

Inserting memory media

The following instructions apply to all types of supported media devices. To
insert memory media, follow the steps as detailed below:
1.

Turn the memory media so that the contacts (metal areas) face down.

2.

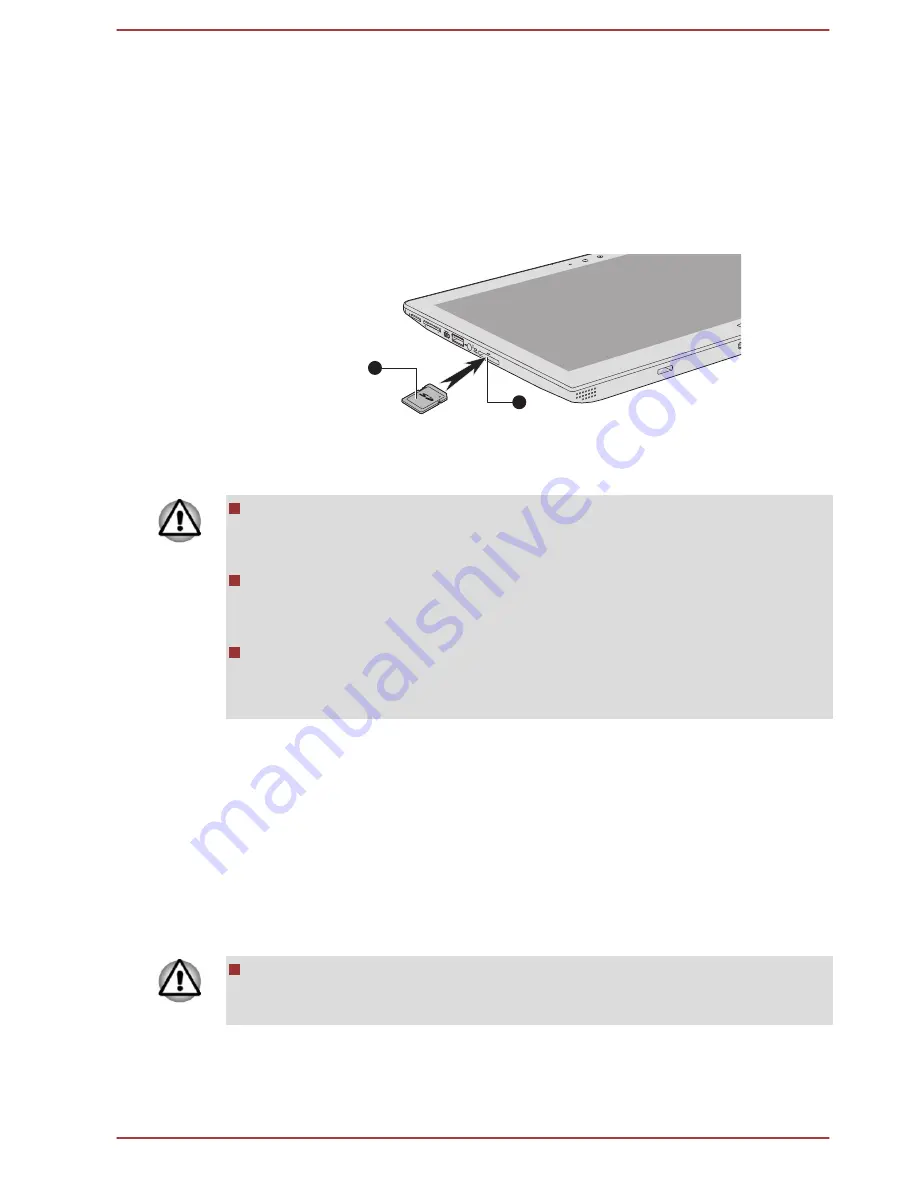
Insert the memory media into the memory media slot on the computer.

3.

Press the memory media gently until it clicks into place.

Figure 4-5 Inserting memory media

1

2

1. Memory media slot

2. Memory media

Product appearance depends on the model you purchased.

Make sure the memory media is oriented properly before you insert it.
If you insert the media in wrong direction, you may not be able to
remove it.
When inserting the memory media, do not touch the metal contacts.
You could expose the storage area to static electricity, which can
destroy data.
Do not turn the computer off or switch to Sleep Mode or Hibernation
Mode while files are being copied - doing so may cause data to be
lost.

Removing memory media

The following instructions apply to all types of supported media devices. To
remove memory media, follow the steps as detailed below:
1.

Click the 

Safely Remove Hardware and Eject Media

 icon on the

Windows Taskbar.

2.

Select 

memory media

.

3.

Push the memory media until you hear a click to partially release it.

4.

Grasp the media and pull it out of the slot.

If you remove the memory media or turn off the power while the
computer is accessing the memory media, you may lose data or
damage the media.

User's Manual

4-13

Summary of Contents for Satellite Click 2 L30W-B

Page 1: ...User s Manual Satellite L30W B L35W B Satellite Click L30W B L35W B Satellite Click 2 L30W B L35W B Series ...

Page 2: ...ions 2 1 Using your computer for the first time 2 3 Getting to know Windows 2 9 Turning off the power 2 11 Chapter 3 The Grand Tour The Computer tablet mode 3 1 The Computer laptop mode 3 5 Internal Hardware Components 3 8 Power Condition Descriptions 3 11 Chapter 4 Operating Basics Operating in Tablet Mode 4 1 Using the Touch Screen 4 2 Using the Touch Pad 4 3 The Keyboard 4 4 Battery 4 6 Memory ...

Page 3: ... Monitor 5 14 TOSHIBA Setup Utility 5 16 System Recovery 5 17 Chapter 6 Troubleshooting Problem solving process 6 1 Hardware and system checklist 6 4 TOSHIBA support 6 14 Chapter 7 Appendix Specifications 7 1 AC Power Cord and Connectors 7 2 Information for Wireless Devices 7 3 Legal Footnotes 7 13 Glossary 7 15 Index User s Manual iii ...

Page 4: ...ve including conversion to digital format alteration transfer of copied material and distribution on a network without the permission of the copyright owner is a violation of copyright or author s rights and is subject to civil damages or criminal action Please comply with copyright laws in making any reproduction from this manual Disclaimer This manual has been validated and reviewed for accuracy...

Page 5: ...y be trademarks or registered trademarks of their respective companies Regulatory Information FCC information FCC notice Declaration of Conformity Information This equipment has been tested and found to comply with the limits for a Class B digital device pursuant to part 15 of the FCC rules These limits are designed to provide reasonable protection against harmful interference in a residential ins...

Page 6: ...g two conditions 1 This device may not cause harmful interference 2 This device must accept any interference received including interference that may cause undesired operation Contact Address TOSHIBA America Information Systems Inc 9740 Irvine Boulevard Irvine California 92618 1697 Telephone 949 583 3000 This information is only applicable for the countries regions where it is required EU Declarat...

Page 7: ... in working environments other than the above mentioned Residential commercial and light industry environments For example the following environments are not approved Industrial Environments e g environments where a mains voltage of 380 V three phase is used Medical Environments Automotive Environments Aircraft Environments Any consequences resulting from the use of this product in working environ...

Page 8: ...utes les exgences du Règlement sur le matériel brouileur du Canada Following information is only valid for EU member States Disposal of products The crossed out wheeled dust bin symbol indicates that products must be collected and disposed of separately from household waste Integrated batteries and accumulators can be disposed of with the product They will be separated at the recycling centres The...

Page 9: ... that the terminal contacts are covered by non conductive tape For more detailed information about the collection and recycling programmes available in your country please visit our website www toshiba eu recycling or contact your local city office or the retail outlet where you purchased the product These symbols may not stick depending on the country and region where you purchased REACH Complian...

Page 10: ...Following information is only for India The use of this symbol indicates that this product may not be treated as household waste By ensuring this product is disposed of correctly you will help prevent potential negative consequences for the environment and human health which could otherwise be caused by inappropriate waste handling of this product For more detailed information about recycling of t...

Page 11: ...in binary form must reproduce the above copyright notice this list of conditions and the following disclaimer in the documentation and or other materials provided with the distribution 3 All advertising materials mentioning features or use of this software must display the following acknowledgment This product includes software developed by the OpenSSL Project for use in the OpenSSL Toolkit http w...

Page 12: ...ibrary is free for commercial and non commercial use as long as the following conditions are aheared to The following conditions apply to all code found in this distribution be it the RC4 RSA lhash DES etc code not just the SSL code The SSL documentation included with this distribution is covered by the same copyright terms except that the holder is Tim Hudson tjh cryptsoft com Copyright remains E...

Page 13: ...NCIDENTAL SPECIAL EXEMPLARY OR CONSEQUENTIAL DAMAGES INCLUDING BUT NOT LIMITED TO PROCUREMENT OF SUBSTITUTE GOODS OR SERVICES LOSS OF USE DATA OR PROFITS OR BUSINESS INTERRUPTION HOWEVER CAUSED AND ON ANY THEORY OF LIABILITY WHETHER IN CONTRACT STRICT LIABILITY OR TORT INCLUDING NEGLIGENCE OR OTHERWISE ARISING IN ANY WAY OUT OF THE USE OF THIS SOFTWARE EVEN IF ADVISED OF THE POSSIBILITY OF SUCH DA...

Page 14: ...ties covering The FreeType Project and assume no liability related to The FreeType Project Finally many people asked us for a preferred form for a credit disclaimer to use in compliance with this license We thus encourage you to use the following text Portions of this software are copyright C year The FreeType Project www freetype org All rights reserved Please replace year with the value from the...

Page 15: ...ing conditions Redistribution of source code must retain this license file FTL TXT unaltered any additions deletions or changes to the original files must be clearly indicated in accompanying documentation The copyright notices of the unaltered original files must be preserved in all copies of source files Redistribution in binary form must provide a disclaimer that states that the software is bas...

Page 16: ...etype org Disposing of the computer and the computer s batteries The computer s battery is not user accessible Contact an authorized TOSHIBA service provider for details regarding how to dispose of the computer and the batteries General Precautions TOSHIBA computers are designed to optimize safety minimize strain and withstand the rigors of portability However certain precautions should be observe...

Page 17: ...ge such as air conditioner vents or heaters Extreme heat cold or humidity Liquids and corrosive chemicals Stress injury Carefully read the Instruction Manual for Safety and Comfort It contains information on the prevention of stress injuries to your hands and wrists that can be caused by extensive keyboard use It also includes information on work space design posture and lighting that can help red...

Page 18: ...small amount of glass cleaner onto a soft clean cloth and then wiping the screen gently with the cloth Never spray cleaner directly onto the computer or let liquid run into any part of it Never use harsh or caustic chemical products to clean the computer Moving the computer While the computer is designed for flexible day to day usage you should exercise a few simple precautions when moving it in o...

Page 19: ... computer and a mobile phone that is in use Instruction Manual for Safety and Comfort All important information on the safe and proper use of this computer is described in the enclosed Instruction Manual for Safety and Comfort Be sure to read it before using the computer Safety Icons Safety icons are used in this manual to bring important information to your attention Each type of message is ident...

Page 20: ... Keyboard Dock attached to the computer AC adaptor and power cord 2 pin plug or 3 pin plug Documentation User Information Guide Instruction Manual for Safety and Comfort If any of the items are missing or damaged contact your dealer immediately Dual Operating Mode Your computer is provided with a TOSHIBA Keyboard Dock and supports dual operating mode your computer can be easily converted from a ta...

Page 21: ...pointer to the lower right or upper right corner of your screen you will find a list of charms Search Share Start Devices and Settings Desktop Click the Desktop tile from the Start screen to access the desktop Start screen You can go back to the Start screen from an app or the desktop by the following ways Click the Start charm Move the mouse pointer all the way into the lower left corner of the s...

Page 22: ...is a good idea to periodically back up the internal Hard Disk Drive or other main storage device to external media General storage media is not durable or stable over long periods of time and under certain conditions may result in data loss Before you install a device or application save any data in memory to the Hard Disk Drive or other storage media Failure to do so may result in the loss of dat...

Page 23: ...wn the palm rest with one hand so that the body of the keyboard dock is not raised slowly lift the display panel this will allow the angle of the display panel to be adjusted to provide optimum clarity Figure 2 2 Opening the display panel 1 1 Display panel Product appearance depends on the model you purchased Use reasonable care when opening and closing the display panel Opening it vigorously or s...

Page 24: ...o the keyboard dock Never remove the tablet without unlocking by the release latch otherwise it may cause damage to the computer Never turn the computer holder without the computer docked otherwise it may cause damage or possibly result in mechanical malfunction To disconnect and remove the computer from the keyboard dock follow the steps below Failure to follow the procedures below may result in ...

Page 25: ...e from AC power It is also the fastest way to get started because the battery pack will need to be charged before you can operate from battery power The AC adaptor can automatically adjust to any voltage ranging from 100 to 240 volts and to a frequency of either 50 or 60 hertz enabling you to use this computer in almost any country region The adaptor converts AC power to DC power and reduces the v...

Page 26: ... AC adaptor to the computer always follow the steps in the exact order as described in this User s Manual Connecting the power cable to a live electrical outlet should be the last step otherwise the adaptor DC output plug could hold an electrical charge and cause an electrical shock or minor bodily injury when touched As a general safety precaution avoid touching any metal parts Never place your c...

Page 27: ...ct appearance depends on the model you purchased 1 DC IN 19V jack 2 DC output plug 3 Plug the power cord into a live wall outlet the DC IN Battery indicator should glow Turning on the power This section describes how to turn on the power the Power indicator will then indicate the status Please refer to the Power Condition Descriptions section for more information After you turn on the power for th...

Page 28: ... refer to the Windows Help and Support Start screen The Start screen is the launching pad for everything you can do in the Windows operating system providing new and easy ways to access everything from your favorite apps and Web sites to your contacts and other important information From the Start screen you can just start typing to search for what you want From there you can easily switch between...

Page 29: ... Share This charm allows you to share items links photos and more Start This charm takes you to the Start screen or if already on the Start screen returns you to your last app Devices This charm allows you to manage your hardware Settings This charm allows you to access your computer s settings volume brightness connecting to the internet and more Tiles Tiles can be accessed and launched from the ...

Page 30: ...e media 2 Make sure all disk disc activity has stopped before removing the disk disc If you turn off the power while a disk disc is being accessed you may lose data or damage the disk Never turn off the power while an application is running Doing so could cause loss of data Never turn off the power disconnect an external storage device or remove storage media during data read write Doing so can ca...

Page 31: ...ks or preserve unsaved data which could interfere with aviation or other systems possibly causing serious injury Before entering Sleep Mode be sure to save your data Do not switch to Sleep Mode while transferring data to external media such as USB devices memory media or other external memory devices Data will be lost When the AC adaptor is connected the computer will go into Sleep Mode according ...

Page 32: ...you shut down the computer When the computer is in Sleep Mode the Power indicator will blink white If you are operating the computer on battery power you can lengthen the overall operating time by turning it off into Hibernation Mode Sleep Mode will consume more power while the computer is off Sleep Mode limitations Sleep Mode will not function under the following conditions Power is turned back o...

Page 33: ... Hibernation Mode click the power icon on the Start screen and then select Hibernate In order to show Hibernate in Power menu you need to setup according to the following steps 1 Click Desktop Assist Control Panel System and Security Power Options on the desktop 2 Click Choose what the power button does or Choose what closing the lid does 3 Click Change settings that are currently unavailable 4 Se...

Page 34: ... the current data in memory to the Hard Disk Drive After you turn off the computer and the content of memory has been saved to the Hard Disk Drive turn off the power to any peripheral devices Do not turn the computer or devices back on immediately Wait a moment to let all capacitors fully discharge User s Manual 2 15 ...

Page 35: ...you operate the computer Legal Footnote Non applicable Icons For more information regarding Non applicable Icons please refer to the Legal Footnotes section Please handle your computer carefully to avoid scratching or damaging the surface The Computer tablet mode The following figure shows the essential components of the computer User s Manual 3 1 ...

Page 36: ...rface 8 Stereo speakers 18 Force shutdown hole 9 Wireless communication antennas not shown 19 Hook holes 10 Power button 20 DC IN 19V jack Product appearance depends on the model you purchased Display screen 33 8cm 13 3 LCD screen configured with the following resolutions 1366 horizontal x 768 vertical pixels Please be aware that when the computer is operating on the AC adaptor the image displayed...

Page 37: ...ht sensor can detect the light quality and intensity outside and can use this information to automatically adjust the display screen brightness Do not cover the ambient light sensor otherwise it may not work properly Microphone The built in microphone allows you to import and record sounds for your application please refer to the Sound System and Video mode section for more information Windows but...

Page 38: ...ed with a specific device might not operate properly Before removing a USB device from the USB port of your computer click the Safely Remove Hardware and Eject Media icon on the Windows Taskbar and then select the USB device that you want to remove Keep foreign metal objects such as screws staples and paper clips out of the USB port Foreign metal objects can create a short circuit which can cause ...

Page 39: ...n when the computer is hung Hook holes Designed for engaging the hooks on the keyboard dock and ensuring a firm connection DC IN 19V jack The AC adaptor connects to this jack in order to power the computer and charge its internal batteries Please note that you should only use the model of AC adaptor supplied with the computer at the time of purchase using the wrong AC adaptor can cause damage to t...

Page 40: ...n the model you purchased DC IN 19V jack The AC adaptor connects to this jack in order to power the computer and charge its internal batteries Please note that you should only use the model of AC adaptor supplied with the computer at the time of purchase using the wrong AC adaptor can cause damage to the computer Universal Serial Bus USB 3 0 port One Universal Serial Bus port which complies to the...

Page 41: ... Foreign metal objects can create a short circuit which can cause damage and fire possibly resulting in serious injury Force Shut down hole Insert a slender object such as a needle into this hole to force a shut down when the computer is hung Front with the display open This section shows the computer with the display panel open In order to open the display lift the display panel up and position i...

Page 42: ...ns located on the bottom of the Touch Pad are used like the buttons on a standard mouse press the left button to select a menu item or to manipulate text or graphics designated by the pointer and press the right button to display a menu or other function depending on the software you are using Internal Hardware Components This section describes the internal hardware components of your computer The...

Page 43: ... included in your model open the TOSHIBA PC Health Monitor utility by clicking Desktop Assist Support Recovery PC Health Monitor on the desktop and then click PC Information Please note that part of the Hard Disk s overall capacity is reserved as administration space In this manual the word HDD or Hard Disk Drive also refers to the SSD unless otherwise stated SSD is a large capacity storage media ...

Page 44: ...tures utilized GPU performance is only optimized when operating in AC power mode and may decrease considerably when operating in battery power mode Legal Footnote Graphics Processing Unit GPU For more information regarding Graphics Processing Unit GPU please refer to the Legal Footnotes section Intel Display Power Saving Technology Intel GPU models include the Display Power Saving Technology featu...

Page 45: ... may be turned on automatically When you carry your computer aboard an aircraft or in places where electronic devices are regulated or controlled always completely shut down the computer When Intel Smart Connect Technology is enabled the computer will periodically wake up from sleep mode which consumes the battery power When battery power is less than 15 Intel Smart Connect Technology may not work...

Page 46: ... point Operates LED flashes amber Remaining battery capacity is exhausted Computer shuts down DC IN Battery indicator Check the DC IN Battery indicator to determine the status of the battery pack and the power status with the AC adaptor connected The following indicator conditions should be noted Flashing amber The battery charge is low The AC adaptor must be connected in order to recharge the bat...

Page 47: ... is on or off Power indicator Check the Power indicator to determine the power status of the computer the following indicator conditions should be noted White Indicates power is being supplied to the computer and the computer is turned on Flashing white Indicates that the computer is in Sleep Mode and that there is sufficient power available AC adaptor or battery to maintain this condition No ligh...

Page 48: ...he case if you brought the computer from a cold environment into a warm room When rapid temperature changes are unavoidable leave the computer for around two hours before turning it on to prevent the formation of condensation Remove all external peripheral devices and their connection cables from the computer before carrying Do not drop the computer or apply excessive impact to it Do not leave the...

Page 49: ...he Landscape mode to proceed Using the Touch Screen You can use your finger to manipulate icons buttons menu items the onscreen keyboard and other items on the touch screen Tap Simply tap your finger once on the touch screen to activate an item such as an app Press and hold Press your finger down and leave it there for a few seconds This will show information to help you learn more about an item o...

Page 50: ...ouch screen gestures to interact with Windows operating system please refer to Help and Support Do not press or push with excess force on the touch screen Do not apply excess force when cleaning the touch screen Never touch the screen with a sharp object such as a ball point pen which may scratch or damage the surface Do not use a protecting sheet for the touch screen as it may decrease its sensit...

Page 51: ...charms Search Share Start Devices Settings Swipe from the top edge opens or closes the app command bar Some of the Touch Pad operations described in this section are only supported in certain applications The Keyboard The number of keys available on your keyboard will depend on which country region your computer is configured for with keyboards being available for numerous languages There are diff...

Page 52: ...you to use special functions without pressing the FN key Special function mode Standard F1 F12 mode Function F1 FN F1 Launches the help file supplied with the software F2 FN F2 Decreases the computer s display panel brightness in individual steps F3 FN F3 Increases the computer s display panel brightness in individual steps F4 FN F4 Changes the active display device To use a simultaneous mode you ...

Page 53: ...t on or off This function is supported with some models Some functions will show the toast notification at the edges of the screen Those toast notifications are disabled at factory default You can enable them in the TOSHIBA Function Key application To access it click Desktop Assist Tools Utilities Function Key on the desktop Windows special keys The keyboard provides two keys that have special fun...

Page 54: ...fort for detailed precautions and handling instructions The battery pack can explode if not used handled or disposed of properly Dispose of the battery as required by local ordinances or regulations Charge the battery pack only in an ambient temperature between 5 and 35 degrees Celsius Otherwise the electrolyte solution might leak battery pack performance might deteriorate and the battery life mig...

Page 55: ... charge at all To ensure the battery charges to its full capacity you should charge it at room temperature of between 5 C to 35 C 41 F to 95 F The battery is nearly completely discharged In this instance you should leave the AC adaptor connected for a few minutes and the battery should begin charging The DC IN Battery indicator may show a rapid decrease in battery operating time when you try to ch...

Page 56: ...me A battery s usefulness depends on how long it can supply power on a single charge while how long the charge lasts in a battery depends on Processor speed Screen brightness System Sleep Mode System Hibernation Mode Display power off period Hard Disk Drive power off period How often and for how long you use the Hard Disk Drive and external disk drives for example optical disc How much charge the ...

Page 57: ...to the DC IN 19V jack of the computer and to a wall outlet that is supplying power The DC IN Battery indicator should glow amber to indicate that the battery pack is being charged however in the event that DC IN Battery indicator does not glow this indicates that power is not being supplied check the connections for the AC adaptor and the power cord 5 Charge the battery pack until the DC IN Batter...

Page 58: ... device and you may not reproduce any copyrighted material except for your personal enjoyment Below is a simple explanation for distinguishing SD memory cards from SDHC memory cards and SDXC memory cards SD SDHC and SDXC memory cards appear the same externally However the logo on memory cards is different so pay careful attention to the logo when purchasing The SD memory card logo is The SDHC memo...

Page 59: ...r expose it to liquids or let it get dirty After using card return it to its case The card is designed so that it can be inserted only one way Do not try to force the card into the slot Do not leave a card partially inserted in the slot Press the card until you hear it click into place Set the write protect switch to the lock position if you do not want to record data Memory cards have a limited l...

Page 60: ...ove it When inserting the memory media do not touch the metal contacts You could expose the storage area to static electricity which can destroy data Do not turn the computer off or switch to Sleep Mode or Hibernation Mode while files are being copied doing so may cause data to be lost Removing memory media The following instructions apply to all types of supported media devices To remove memory m...

Page 61: ...on the computer As the port operation of all external display devices have not been confirmed some devices may not function properly The HDMI micro port HDMI High Definition Multimedia Interface port digitally transfers both video and audio data without reducing the quality HDMI compatible external display devices including televisions can be connected via the HDMI port To connect an HDMI compatib...

Page 62: ...e playback device manually by the following steps 1 Click Desktop Assist Control Panel Hardware and Sound Sound on the desktop 2 In the Playback tab select the playback device which you want to switch to 3 To use the internal speakers on your computer select Speakers To use the television or the external monitor that you have connected to the computer select a different playback device 4 Click the...

Page 63: ...he external display via HDMI port and can receive Wi Fi signals from your computer To wirelessly connect to an external display you can follow the steps as described below 1 In the Settings charm click Change PC settings PC and devices Devices 2 Click Add a device Your computer will start searching for the Wireless display device 3 After the Wireless display device is searched follow the on screen...

Page 64: ...r icon on the Windows Taskbar and then select Open Volume Mixer from the sub menu To adjust the volume level of speakers or headphones move the Speakers slider To adjust the volume level of an application that you are using move the slider for the corresponding application Microphone Level Follow the steps below to change the microphone recording level 1 Right click on the speaker icon on the Wind...

Page 65: ...ocals Bass enhancement for rich low frequency production High frequency definition for crisp details To access the utility click Desktop Assist Media Entertainment DTS Sound on the desktop U S patents apply to this product See http patents dts com Manufactured under license from DTS Licensing Limited Video mode Video mode settings are configured via the Screen Resolution dialog To open the Screen ...

Page 66: ...uter and details how to start them For further information on their operation you may refer to each utility s online manual help files or README TXT file if applicable TOSHIBA Desktop Assist TOSHIBA Desktop Assist is a graphical user interface that provides access to specific tools and TOSHIBA utilities and applications that make the use and configuration of the computer easier To access this util...

Page 67: ... processor that performs high quality image enhancements such as Color Correction and Sharpness on video playbacks This feature is only provided with some models To access this utility click Desktop Assist Tools Utilities Display Utility on the desktop For details on this utility see the help file TOSHIBA Password Utility This utility allows you to set a password in order to restrict access to the...

Page 68: ...harge mode The battery will not be fully charged in this mode thus extending the battery s life cycle It is recommended using the computer with AC adapter connected as the battery operating time is comparatively short in this mode Depending on the usage situation the battery s life cycle might not be extended properly To access this utility click Desktop Assist Tools Utilities eco Utility on the d...

Page 69: ...berLink MediaStory TOSHIBA Function Key This utility allows you to perform some features by pressing a specified key or combined with the FN key To setup this utility click Desktop Assist Tools Utilities Function Key on the desktop For details please refer to the Function Key section TOSHIBA Service Station This application allows your computer to automatically search for TOSHIBA software updates ...

Page 70: ...ased To access the setup files of the drivers utilities click Applications and Drivers in the Apps view Windows Store applications are not included in the setup files above but can be downloaded from Windows Store Special features The following features are either unique to TOSHIBA computers or are advanced features which make the computer more convenient to use Access each function using the foll...

Page 71: ...automatically turns power to the computer off when the display panel is closed and turns it back on when the display panel is opened This can be specified in the Power Options Low battery automatic Hibernation Mode 1 When battery power is exhausted to the point that computer operation cannot be continued the system automatically enters Hibernation Mode and shuts itself down This can be specified i...

Page 72: ...e Power Options When the processor s temperature falls within normal range the fan and the processor operation will return to its standard speed If the processor s temperature reaches an unacceptably high level with either setting the computer automatically shuts down to prevent any damage In this instance all unsaved data in memory will be lost TOSHIBA Password Utility The TOSHIBA Password Utilit...

Page 73: ...nt password correctly Owner String text box You can use this box to associate text with the password After you enter text click Apply or OK When the computer is started this text will be displayed together with the prompt asking you to enter a password You can use BIOS Setup to set change or delete the HDD Password or HDD Master Password Please refer to TOSHIBA Setup Utility section for further in...

Page 74: ... Getting Started section The following message will appear in the screen Enter Password At this point the function keys do not work They will function after you enter the password 2 Enter the Password 3 Press ENTER If you enter the password incorrectly three times in a row or if you don t enter the password within 1 minute the computer shuts off In this case some features that can power on the com...

Page 75: ...u to access the wake on keyboard function or to configure the function keys USB Allows you to set conditions for USB SATA Allows you to set conditions for SATA The settings or options explained here may vary depending on the model you purchased After you changed the settings a dialog box may appear to prompt you that the changes will take effect after the computer is restarted Make sure to restart...

Page 76: ...recommended that you connect the AC adaptor to the computer while using Sleep and Charge function External devices connected to the USB bus power DC5V function that interfaces with the power ON OFF of the computer may always be in an operational state When there is a current overflow of the external devices connected to the compatible ports USB bus power DC5V supply may be stopped for safety reaso...

Page 77: ... features when the battery level reaches Specifies the lower limit of remaining battery life by moving the slider bar If the remaining battery life falls below the setting the Sleep and Charge function will be stopped This setting is only available when the Function under Battery Mode is enabled System ON CDP Charge This function enable disable CDP Charging Downstream Port to use rapid USB charge ...

Page 78: ... photo This software is only provided with some models It is recommended that the AC adaptor be connected while TOSHIBA Media Player is running Power saving features may interfere with smooth playback When TOSHIBA Media Player is used with a battery power set the Power Options to Balance The screen saver is disabled while TOSHIBA Media Player is playing a video file or slideshows of photos The com...

Page 79: ...limited to a maximum resolution of 2048 x 2048 pixels Any photo over that resolution will be scaled proportionally to a maximum size of 2048 x 2048 pixels This app doesn t support DMS The playback of some media files may not be normal by this player This may also happen when using Windows Media Player and Video app User Interface and operational procedures might differ depending on the application...

Page 80: ...European Union Those countries may or may not have the same data protection laws or data protection levels as required by your home country or region You may disable the TOSHIBA PC Health Monitor at any time by uninstalling the software via Uninstall a program in the Control Panel Doing so will automatically delete all collected information from the internal storage drive The TOSHIBA PC Health Mon...

Page 81: ...ess the Power button to turn on the power Release the Volume down button after TOSHIBA Setup Utility is loaded Please make sure that fast startup is disabled in the Power Options by following the steps below 1 Click Desktop Assist Control Panel System and Security Power Options on the desktop 2 Click Choose what the power button does or Choose what closing the lid does 3 Click Change settings that...

Page 82: ...t the AC adaptor when you create Recovery Media Be sure to close all other software programs except the Recovery Media Creator Do not run software such as screen savers which can put a heavy load on the CPU Operate the computer at full power Do not use power saving features Do not write to the media when the virus check software is running Wait for it to finish then disable virus detection program...

Page 83: ...normal 3 Insert the first blank disc into the external optical disc drive tray or insert the USB Flash Memory into one available USB port 4 Click Desktop Assist Support Recovery Recovery Media Creator on the desktop 5 After Recovery Media Creator starts select the type of media and the title you wish to copy and then click the Create button Restoring the pre installed software from your created Re...

Page 84: ...start 3 Hold down the F12 key and then release this key one second after the computer is power on 4 Use the up and down cursor key to select the appropriate option from the menu according to your actual recovery media 5 A menu will be displayed from which you should follow the on screen instructions If you have previously chosen to remove the recovery partition and are trying to create Recovery Me...

Page 85: ...ws operating system the Hard Disk may be reformatted and all data may be lost 1 Click the power icon on the Start screen and then select Restart 2 Hold down 0 zero key and then release this key one second after the computer is power on Choose Yes if you want to continue 3 Select Troubleshoot 4 Select Reset your PC 5 Follow the on screen instructions to finish the recovery You can also perform the ...

Page 86: ... in this chapter are meant only as a guide they are not definitive problem solving techniques In reality many problems can be solved simply but a few may require help from TOSHIBA Support if you find you need to consult others be prepared to describe the problem in as much detail as possible Preliminary checklist You should always consider the simplest solution first the items detailed in this che...

Page 87: ...random characters Make a screenshot of the current display and if possible look up the messages in the documentation included with the computer software or operating system Check that all connecting cables are correctly and firmly attached as loose cables can cause erroneous or intermittent signals Do any indicators light if so which ones what color are they and do they stay on or blink Write down...

Page 88: ...ore turning the power on again by pressing the power button Your program stops responding If you are working with a program that suddenly freezes all operations chances are the program has stopped responding You can exit the failed program without shutting down the operating system or closing other programs To close a program that has stopped responding 1 Press CTRL ALT and DEL simultaneously once...

Page 89: ...g HDD Recovery If your computer starts to load the Operating System instead of desired advanced options follow the steps below Please make sure that fast startup is disabled in the Power Options by following the steps below 1 Click Desktop Assist Control Panel System and Security Power Options on the desktop 2 Click Choose what the power button does or Choose what closing the lid does 3 Click Chan...

Page 90: ...tically Leave the computer off until it reaches the room temperature If the computer has reached room temperature and it still does not start or if it starts but shuts down quickly contact TOSHIBA Support AC power If you have trouble turning on the computer with the AC adaptor connected you should check the status of the DC IN Battery indicator Please refer to the Power Condition Descriptions sect...

Page 91: ...y the battery might not charge to its full potential in these instances you should fully discharge the battery and then attempt to charge it again Check the Power saver option under Select a power plan in the Power Options Real Time Clock Problem Procedure The BIOS setting and system date time are lost The lasting time of the Real Time Clock RTC has run out you will need to set the date and time i...

Page 92: ...ings appear on the computer s display panel These marks may have come from contact with the keyboard and Touch Pad while the display panel has been closed You should try to remove the marks by gently wiping the display panel with a clean dry cloth or if this fails with a good quality LCD screen cleaner In this latter instance you should always follow the instructions with the screen cleaner and al...

Page 93: ...r to Operating Basics Problem Procedure Memory media card error occurs Remove the memory media card from the computer and then reinsert it in order to ensure it is firmly connected If the problem persists then you should refer to the documentation supplied with your memory media card for further information You cannot write to a memory media card Remove the memory media card from the computer and ...

Page 94: ...he desktop 2 Within the Mouse Properties window click the Buttons tab 3 Set the double click speed as required and click OK The on screen pointer moves too fast or too slow In this instance you should initially try changing the speed setting within the Mouse Control utility 1 To access this utility click Desktop Assist Control Panel Hardware and Sound Mouse on the desktop 2 Within the Mouse Proper...

Page 95: ...speed as required and click OK The on screen pointer moves too fast or too slow In this instance you should initially try changing the speed setting within the Mouse Control utility 1 To access this utility click Desktop Assist Control Panel Hardware and Sound Mouse on the desktop 2 Within the Mouse Properties window click the Pointer Options tab 3 Set the pointer speed as required and click OK Th...

Page 96: ...ct an external device if some external devices are connected After that turn the power of the computer ON OFF to restore the function If this function can not be still used even if only one external device is connected stop using the external device because its current is over the acceptable value of this computer Some external devices may not be able to use the Sleep and Charge function In this c...

Page 97: ...n or change to disable Sleep and Charge function Sound system In addition to the information in this section please also refer to the documentation supplied with your audio device Problem Procedure No sound is heard Press the function keys to increase or decrease volume Check the software volume settings Please check to see if Mute is turned to Off Check to make sure the headphone connection is se...

Page 98: ...as the primary display device in extended desktop mode it will not display when the computer wakes up from Sleep Mode if the external monitor has been disconnected while in Sleep Mode To keep this from happening do not disconnect the external monitor while the computer is in Sleep or Hibernation Mode Remember to turn off the computer before disconnecting the external monitor When the display panel...

Page 99: ...A support If you require any additional help using your computer or if you are having problems operating the computer you may need to contact TOSHIBA for additional technical assistance Before you call Some problems you experience may be related to software or the operating system so it is important that you investigate other sources of assistance first Before contacting TOSHIBA try the following ...

Page 100: ...TOSHIBA technical support If you are still unable to solve the problem and suspect that it is hardware related visit TOSHIBA technical support website http www toshiba co jp worldwide User s Manual 6 15 ...

Page 101: ...ode Approximately 331 w x 244 5 d x 22 9 h millimeters laptop mode not including parts that extend beyond the main body Environmental Requirements Conditions Ambient temperature Relative humidity Operating 5 C 41 F to 35 C 95 F 20 to 80 noncondensing Non operating 20 C 4 F to 60 C 140 F 10 to 90 noncondensing Wet bulb temperature 29 C maximum Conditions Altitude from sea level Operating 60 to 3 00...

Page 102: ... or SPT 2 Australia AS Japan DENANHO Europe Austria OVE Italy IMQ Belgium CEBEC The Netherlands KEMA Denmark DEMKO Norway NEMKO Finland FIMKO Sweden SEMKO France LCIE Switzerland SEV Germany VDE United Kingdom BSI In Europe two conductors power cord must be VDE type H05VVH2 F or H03VVH2 F and for three conductors power cord must be VDE type H05VV F For the United States and Canada two pin plug con...

Page 103: ...b g n ac as defined and approved by the Institute of Electrical and Electronics Engineers Bluetooth Modules are designed to be interoperable with any product with Bluetooth wireless technology that is based on Frequency Hopping Spread Spectrum FHSS radio technology and is compliant to Bluetooth Specification depending on the model you purchased as defined and approved by the Bluetooth Special Inte...

Page 104: ...standards and recommendations TOSHIBA believes Wireless products are safe for use by consumers These standards and recommendations reflect the consensus of the scientific community and result from deliberations of panels and committees of scientists who continually review and interpret the extensive research literature In some situations or environments the use of Wireless products may be restrict...

Page 105: ...to be configured for all computers connected to the same network in order to re enable network connections Please be sure to use new network name Security TOSHIBA strongly recommend that you enable encryption functionality otherwise your computer will be open to illegal access by an outsider using a wireless connection If this occurs the outsider may illegally access your system eavesdrop or cause...

Page 106: ...5 to 5 85GHz and that these radars could cause interference and or damage to LE LAN devices Bluetooth wireless technology Some computers in this series have Bluetooth wireless communication function which eliminates the need for cables between electronic devices such as computers printers and mobile phones When it is enabled Bluetooth provides the wireless personal area network environment which i...

Page 107: ... use Refarming of the 2 4GHz band has been ongoing in recent years to allow current relaxed regulation Full implementation planned 2012 Italy For private use a general authorization is required if WAS RLAN s are used outside own premises For public use a general authorization is required Luxembourg Implemented General authorization required for network and service supply Norway Implemented This su...

Page 108: ...e used outside own premises Luxembourg Implemented General authorization required for network and service supply Russian Federation Limited e i r p 100mW Permitted to use only for indoor applications closed industrial and warehouse areas and on board aircraft 1 Permitted to use for local networks of aircraft crew service communications on board aircraft in area of the airport and at all stages of ...

Page 109: ... systèmes de satellites mobiles utilisant les mêmes canaux Les utilisateurs devraient aussi être avisés que les utilisateurs de radars de haute puissance sont désignés utilisateurs principaux c à d qu ils ont la priorité pour les bandes 5 25 5 35GHz et 5 65 5 85GHz et que ces radars pourraient causer du brouillage et ou des dommages aux dispositifs LAN EL The term IC before the equipment certifica...

Page 110: ...o communications is operated in compliance with the Telecommunications Act The low power radio frequency devices must be susceptible with the interference from legal communications or ISM radio wave radiated devices Using this equipment in Japan In Japan the frequency bandwidth of 2 400MHz to 2 483 5MHz for second generation low power data communication systems such as this equipment overlaps that...

Page 111: ...ent uses OFDM modulation 4 4 The interference range of this equipment is less than 40m 5 This equipment uses a frequency bandwidth from 2 400MHz to 2 483 5MHz It is possible to avoid the band of mobile object identification systems 3 Indication for Bluetooth The indication shown below appears on this equipment 4 1 2 3 1 1 2 4 This equipment uses a frequency of 2 4 GHz 2 FH This equipment uses FH S...

Page 112: ...b g n and Bluetooth The Name of the radio equipment BCM43142 DSP Research Inc Approval Number D135106201 The following restrictions apply Do not disassemble or modify the device Do not install the embedded wireless module into other device Radio approvals for wireless devices This equipment is approved to the radio standard by the countries regions in the following table If you use this equipment ...

Page 113: ...veral applications or functionalities simultaneously use of computer in areas with low air pressure high altitude 1 000 meters or 3 280 feet above sea level use of computer at temperatures outside the range of 5 C to 30 C 41 F to 86 F or 25 C 77 F at high altitude all temperature references are approximate and may vary depending on the specific computer model contact TOSHIBA support for details CP...

Page 114: ... technical limitation that the overlapped memory is not available to the operating system Even though some tools might display the actual physical memory built into your computer the memory available to the operating system will still be approximately 3 GB only Computers configured with a 64 bit operating system can address 4 GB or more of system memory Battery Life Battery life may vary considera...

Page 115: ...ions power management settings and features utilized GPU performance is only optimized when operating in AC power mode and may decrease considerably when operating in battery power mode Total Available Graphics Memory is the total of as applicable Dedicated Video Memory System Video Memory and Shared System Memory Shared System Memory will vary depending on system memory size and other factors Wir...

Page 116: ...DVD RAM Digital Versatile Disc random Access Memory DVD R DL Digital Versatile Disc Recordable Dual Layer DVD ROM Digital Versatile Disc read Only Memory DVD RW Digital Versatile Disc rewritable DVD R DL Digital Versatile Disc Recordable Double Layer FAT File Allocation Table FCC Federal Communications Commission FHD Full High Definition GB gigabyte GBps gigabytes per second HD High Definition HD ...

Page 117: ...y Card International Association RAM Random Access Memory RGB Red Green and Blue RFI Radio Frequency Interference ROM Read Only Memory RTC Real Time Clock S P DIF Sony philips Digital Interface Format SD Secure Digital SDHC Secure Digital High Capacity SDXC Secure Digital Extended Capacity SDRAM Synchronous Dynamic Random Access Memory SSD Solid State Drive TFT Thin film Transistor URL Uniform Res...

Page 118: ...wer off 5 5 opening 2 4 screen 3 2 Documentation list 2 1 Dual Pointing Device Touch Pad 6 9 E Equipment checklist 2 1 External monitor problems 6 13 G Graphics Processing Unit 3 10 H Hard disk drive automatic power off 5 5 HDMI out port 3 4 K Keyboard function keys 4 5 Function keys F1 F12 4 5 problems 6 6 Windows special keys 4 6 M Media care Card care 4 12 Memory card care 4 12 memory media car...

Page 119: ...al monitor 6 13 Hardware and system checklist 6 4 HDD 6 7 6 8 Internal display panel 6 7 Keyboard 6 6 Memory Media Card 6 8 Overheating power down 6 5 Power 6 5 Real Time Clock 6 6 Sound system 6 12 TOSHIBA support 6 14 Touch Pad 6 9 USB device 6 10 USB mouse 6 10 R Recovery hard disk drive 5 19 Recovery Media 5 18 Restarting the computer 2 11 S SD SDHC SDXC Card formatting 4 12 note 4 11 Sleep Mo...

Page 120: ...W Web Camera 3 3 Wireless communication 7 4 User s Manual Index 3 ...

Reviews: