background image

Force Shut down hole

Insert a slender object such as a needle into this
hole to force a shut down when the computer is
hung.

Orientation lock
button

Press to lock/unlock automatic rotation of the
screen orientation.

Volume up/down
buttons

Press these buttons to increase or decrease the
volume.

Power indicator

The 

Power

 indicator glows white when the

computer is turned on. However, if you turn the
computer off into Sleep Mode, this indicator will
flash white.

Battery indicator

The 

Battery

 indicator shows the condition of the

DC IN and the battery's charge - white indicates
the battery is fully charged while the power is
being correctly supplied from the AC power
adaptor.
Please refer to the 

Power Condition Descriptions

section for more information on this feature.

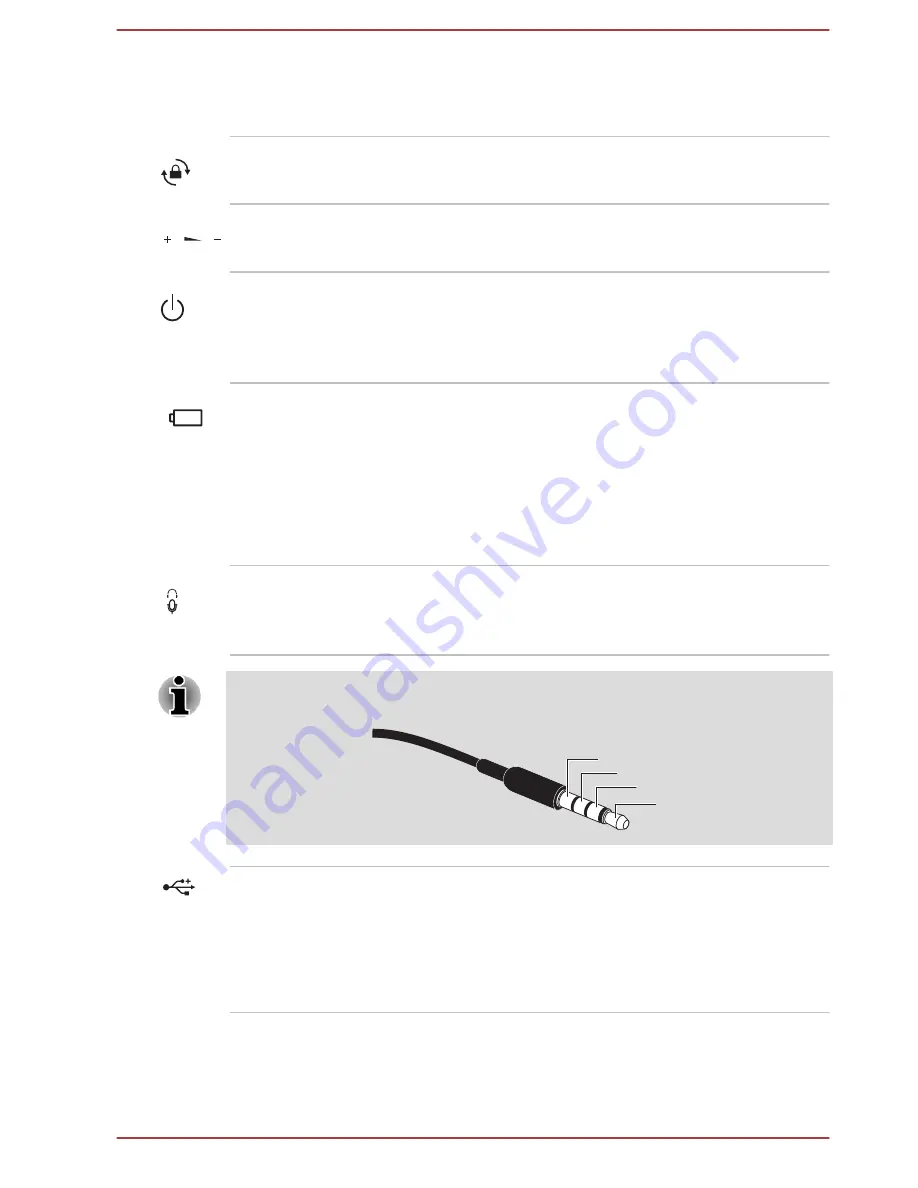
Headphone/
Microphone combo
jack

A 3.5 mm mini headphone/microphone combo
jack enables connection of a monaural
microphone or a stereo headphone.

Both the internal and external microphones will be disabled if you use a
headset other than the type as shown below.

Mic

Ground

Right

Left

Universal Serial Bus
(USB 3.0) port

One Universal Serial Bus port, which complies to
the USB 3.0 standard, is provided on the right
side of the computer.
The USB 3.0 port is compliant with USB 3.0
standard and backward compatible with USB 2.0
devices.

User's Manual

3-4

Summary of Contents for PORTEGE Z10t-A WT310 series

Page 1: ...User s Manual PORTÉGÉ Z10t A WT310 series ...

Page 2: ... 1 Conventions 2 2 Using your computer for the first time 2 3 Turning off the power 2 11 Chapter 3 The Grand Tour The Computer 3 1 TOSHIBA Keyboard Dock 3 7 The Computer laptop mode 3 10 Internal Hardware Components 3 11 Power Condition Descriptions 3 15 Chapter 4 Operating Basics Operating in Tablet Mode 4 1 Using the Touch Screen 4 3 Using the Touch Pad 4 4 TOSHIBA Pointing Device 4 5 The Keyboa...

Page 3: ...SHIBA PC Health Monitor 5 11 TOSHIBA Setup Utility 5 12 System Recovery 5 13 Chapter 6 Troubleshooting Problem solving process 6 1 Hardware and system checklist 6 4 TOSHIBA support 6 13 Chapter 7 Appendix Specifications 7 1 External RGB monitor port pin assignment 7 2 AC Power Cord and Connectors 7 2 Information for Wireless Devices 7 4 Legal Footnotes 7 13 Glossary 7 15 Index User s Manual iii ...

Page 4: ...sion to digital format alteration transfer of copied material and distribution on a network without the permission of the copyright owner is a violation of copyright or author s rights and is subject to civil damages or criminal action Please comply with copyright laws in making any reproduction from this manual Disclaimer This manual has been validated and reviewed for accuracy The instructions a...

Page 5: ... service names in this manual may be trademarks or registered trademarks of their respective companies Regulatory Information The regulatory information herein may vary Pease check the ID information on the back of the device for specific information applicable to the model you purchased FCC information FCC notice Declaration of Conformity Information This equipment has been tested and found to co...

Page 6: ...rized by TOSHIBA could void the user s authority to operate the equipment FCC conditions This device complies with part 15 of the FCC Rules Operation is subject to the following two conditions 1 This device may not cause harmful interference 2 This device must accept any interference received including interference that may cause undesired operation Contact Address TOSHIBA America Information Syst...

Page 7: ... light industry environments TOSHIBA do not approve the use of this product in working environments other than the above mentioned Residential commercial and light industry environments For example the following environments are not approved Industrial Environments e g environments where a mains voltage of 380 V three phase is used Medical Environments Automotive Environments Aircraft Environments...

Page 8: ...s exgences du Règlement sur le matériel brouileur du Canada Following information is only valid for EU member States Disposal of products The crossed out wheeled dust bin symbol indicates that products must be collected and disposed of separately from household waste Integrated batteries and accumulators can be disposed of with the product They will be separated at the recycling centres The black ...

Page 9: ...t stick depending on the country and region where you purchased REACH Compliance Statement The new European Union EU chemical regulation REACH Registration Evaluation Authorization and Restriction of Chemicals entered into force on 1 June 2007 TOSHIBA will meet all REACH requirements and is committed to provide our customers with information about the chemical substances in our products according ...

Page 10: ...IS LICENSED UNDER THE AVC THE VC 1 AND MPEG 4 VISUAL PATENT PORTFOLIO LICENSE FOR THE PERSONAL AND NON COMMERCIAL USE OF A CONSUMER FOR I ENCODING VIDEO IN COMPLIANCE WITH THE ABOVE STANDARDS VIDEO AND OR II DECODING AVC VC 1 AND MPEG 4 VIDEO THAT WAS ENCODED BY A CONSUMER ENGAGED IN A PERSONAL AND NONCOMMERCIAL ACTIVITY AND OR WAS OBTAINED FROM A VIDEO PROVIDER LICENSED BY MPEG LA TO PROVIDE SUCH...

Page 11: ...t be called OpenSSL nor may OpenSSL appear in their names without prior written permission of the OpenSSL Project 6 Redistributions of any form whatsoever must retain the following acknowledgment This product includes software developed by the OpenSSL Project for use in the OpenSSL Toolkit http www openssl org THIS SOFTWARE IS PROVIDED BY THE OpenSSL PROJECT AS IS AND ANY EXPRESSED OR IMPLIED WARR...

Page 12: ...met 1 Redistributions of source code must retain the copyright notice this list of conditions and the following disclaimer 2 Redistributions in binary form must reproduce the above copyright notice this list of conditions and the following disclaimer in the documentation and or other materials provided with the distribution 3 All advertising materials mentioning features or use of this software mu...

Page 13: ...s found in such packages and which do not fall under their own explicit license The license affects thus the FreeType font engine the test programs documentation and makefiles at the very least This license was inspired by the BSD Artistic and IJG Independent JPEG Group licenses which all encourage inclusion and use of free software in commercial and freeware products alike As a consequence its ma...

Page 14: ...cense applies to all files distributed in the original FreeType Project including all source code binaries and documentation unless otherwise stated in the file in its original unmodified form as distributed in the original archive If you are unsure whether or not a particular file is covered by this license you must contact us to verify this The FreeType Project is copyright C 1996 2000 by David ...

Page 15: ...ll use the name of the other for commercial advertising or promotional purposes without specific prior written permission We suggest but do not require that you use one or more of the following phrases to refer to this software in your documentation or advertising materials FreeType Project FreeType Engine FreeType library or FreeType Distribution As you have not signed this license you are not re...

Page 16: ...t Never place your computer or AC adaptor near a heat source such as an electric blanket or heater Never cover or block the air vents including those located at the base of the computer Always operate your computer on a hard flat surface Using your computer on a carpet or other soft material can block the vents Always provide sufficient space around the computer Overheating your computer or AC ada...

Page 17: ... avoid direct contact with the metal plate supporting the various interface ports as this can become hot The surface of the AC adaptor can become hot when in use but this condition does not indicate a malfunction If you need to transport the AC adaptor you should disconnect it and let it cool before moving it Do not lay the AC adaptor on a material that is sensitive to heat as the material could b...

Page 18: ... follow this instruction may result in minor heat injury Be careful not to subject the computer to impact or shock a failure to follow this instruction could result in damage to computer computer failure or loss of data Never transport your computer with any cards installed this may cause damage to either the computer and or the card resulting in computer failure Always use a suitable carry case w...

Page 19: ...y hazardous situation which could result in death or serious injury if you do not follow instructions A caution informs you that improper use of equipment or failure to follow instructions may cause data loss equipment damage or may result in minor or moderate injury Please read A note is a hint or advice that helps you make best use of your equipment User s Manual 1 16 ...

Page 20: ... included in the pen slot with some models Spare AccuPoint cap provided with some models AC adaptor and power cord 2 pin plug or 3 pin plug Cleaning cloth provided with some models Stylus Pen is included together with spare pen tips and a tip removal tool in the small case coming with the product Documentation User Information Guide Instruction Manual for Safety and Comfort If any of the items are...

Page 21: ...ight click the mouse once Press and hold on the touch screen Double click Tap the Touch Pad or click the left Touch Pad control button twice laptop mode Left click the mouse twice Tap the touch screen twice Charm By swiping in from the right edge of the touch screen or pointing the mouse pointer to the lower right or upper right corner of your screen you will find a list of charms Search Share Sta...

Page 22: ...ontent formatting destroys all stored data It is a good idea to periodically back up the internal Solid State Drive or other main storage device to external media General storage media is not durable or stable over long periods of time and under certain conditions may result in data loss Before you install a device or application save any data in memory to the Solid State Drive or other storage me...

Page 23: ...adjusted to provide optimum clarity Figure 2 2 Opening the computer body 1 1 Computer body Product appearance depends on the model you purchased Use reasonable care when opening and closing computer body Opening it vigorously or slamming it shut could damage the computer Be careful not to open the computer body too far as this could put stress on the hinges and cause damage Please close the comput...

Page 24: ... and remove the computer from the keyboard dock follow the steps below 1 Disconnect and remove all peripheral devices and cables connected to the computer 2 Press the Eject button on the keyboard dock and make sure that the icon is disappeared from the taskbar or that Eject Docking Station is no longer in the pop up menu after clicking this icon 3 Slide and hold the Release latch to the left unloc...

Page 25: ...se power cables that comply with the legal voltage and frequency specifications and requirements in the country of use Failure to do so could result in a fire or electric shock possibly resulting in serious injury The supplied power cord conforms to safety rules and regulations in the region the computer is bought and should not be used outside this region For use in other regions please buy power...

Page 26: ...Figure 2 4 Connecting the power cord to the AC adaptor 2 pin plug Figure 2 5 Connecting the power cord to the AC adaptor 3 pin plug Either a 2 pin or 3 pin adaptor cord will be included with the computer depending on the model User s Manual 2 7 ...

Page 27: ... Computer appearance depends on the model you purchased 3 Plug the power cord into a live wall outlet the Battery indicator should glow Turning on the power This section describes how to turn on the power the Power indicator will then indicate the status Please refer to the Power Condition Descriptions section for more information Never keep your body too close to the computer while turning on the...

Page 28: ... appearance depends on the model you purchased Initial setup The Windows Startup Screen will be the first screen displayed when you turn on the power Follow the on screen instructions on each screen in order to properly install the operating system When it is displayed be sure to read the License Terms carefully Getting to know Windows For detailed information on what is new and how to operate Win...

Page 29: ...r computer It can help you find apps documents photos and your favorite music Share This Charm allows you to share music and photos with your favorite social Web sites Start This Charm takes you to the Start screen or if already on the Start screen returns you to your last app Devices This Charm allows you to manage your hardware devices Settings This Charm allows you to manage your system setting...

Page 30: ... loss 3 Click the Settings charm 4 Click Power and then select Shut down 5 Turn off any peripheral devices connected to your computer Do not turn the computer or peripheral devices back on immediately wait a short period to avoid any potential damage Restarting the computer Certain conditions require that you reset the computer for example if You change certain computer settings If you need to res...

Page 31: ... Security Power Options To prevent the computer from automatically entering Sleep Mode disable Sleep Mode within the Power Options To restore the operation of the computer from Sleep Mode press the power button or any key on the keyboard dock for a short amount of time Please note that keyboard keys can only be used if the Wake up on Keyboard option is enabled within the TOSHIBA System Settings If...

Page 32: ...turned off so that the next time it is turned on the previous state is restored Please note that the Hibernation Mode feature does not save the status of any peripheral devices connected to the computer Save your data While entering Hibernation Mode the computer saves the contents of memory to the Solid State Drive However for safety sake it is best to save your data manually Data will be lost if ...

Page 33: ...er Hibernation Mode automatically when you press the power button or close the lid In order to define these settings you can follow the steps as described below 1 Click Power Options and then click Choose what the power button does or Choose what closing the lid does 2 Enable the desired Hibernation Mode settings for When I press the power button and When I close the lid 3 Click the Save changes b...

Page 34: ...efore you operate the computer Legal Footnote Non applicable Icons For more information regarding Non applicable Icons please refer to the Legal Footnotes section Please handle your computer carefully to avoid scratching or damaging the surface The Computer The following figure shows each important component of the computer User s Manual 3 1 ...

Page 35: ...ocking interface 6 Windows button 20 Hook holes 7 Power button 21 Stereo speakers 8 Force shutdown hole 22 Cooling vents 9 Orientation lock button 23 Web Camera back 10 Volume up down button 24 Web Camera LED back 11 Power indicator 25 Reserve Pen 12 Battery indicator 26 Reserve Pen slot 13 Headphone Microphone combo jack 27 Wireless communication antennas not shown 14 Universal Serial Bus USB 3 0...

Page 36: ...ool Do not point the web camera directly at the sun Do not touch or press strongly on the web camera lens Doing so may reduce image quality Use an eyeglass cleaner cleaner cloth or other soft cloth to clean the lens if it becomes dirty Web Camera LED front The Web Camera LED glows when the Web Camera is operating Ambient light sensor Ambient light sensor can detect the light quality and intensity ...

Page 37: ... white indicates the battery is fully charged while the power is being correctly supplied from the AC power adaptor Please refer to the Power Condition Descriptions section for more information on this feature Headphone Microphone combo jack A 3 5 mm mini headphone microphone combo jack enables connection of a monaural microphone or a stereo headphone Both the internal and external microphones wil...

Page 38: ...d and MultiMediaCard Refer to the Memory media section for more information Keep foreign metal objects such as screws staples and paper clips out of the Memory media slot Foreign metal objects can create a short circuit which can cause damage and fire possibly resulting in serious injury SIM Card slot This slot lets you insert a SIM card which enables a high speed access to the Internet corporate ...

Page 39: ...s also equipped with a back Web Camera used for recording video or taking photographs Do not point the web camera directly at the sun Do not touch or press strongly on the web camera lens Doing so may reduce image quality Use an eyeglass cleaner cleaner cloth or other soft cloth to clean the lens if it becomes dirty Web Camera LED back The Web Camera LED glows when the Web Camera is operating Rese...

Page 40: ...1 Touch Pad 7 AccuPoint 2 Touch Pad ON OFF icon 8 Computer holder 3 TOSHIBA eco icon 9 Hook 4 Touch Pad control buttons 10 Docking connector 5 AccuPoint control buttons 11 Hook 6 Keyboard 12 Eject button Product appearance depends on the model you purchased Figure 3 3 Back view of the keyboard dock 13 14 15 16 13 DC IN 19V jack 15 HDMI port 14 LAN jack 16 External RGB monitor port Product appearan...

Page 41: ...d below the Touch Pad are used like the buttons on a standard mouse touch the left button to select a menu item or to manipulate text or graphics designated by the pointer and touch the right button to display a menu or other function depending on the software you are using AccuPoint control buttons The control buttons located below the AccuPoint allow you to select menu items or manipulate texts ...

Page 42: ...ase note that you should only use the model of AC adaptor supplied with the computer at the time of purchase using the wrong AC adaptor can cause damage to the computer LAN jack This jack lets you connect to a LAN The adaptor has built in support for Ethernet LAN 10 megabits per second 10BASE T Fast Ethernet LAN 100 megabits per second 100BASE TX and Gigabit Ethernet LAN 1000 megabits per second 1...

Page 43: ...SB devices that are available Some functions associated with a specific device might not operate properly Keep foreign metal objects such as screws staples and paper clips out of the USB port Foreign metal objects can create a short circuit which can cause damage and fire possibly resulting in serious injury The Computer laptop mode The following figure shows the front of the computer when TOSHIBA...

Page 44: ...internal hardware components of your computer The actual specifications may vary depending on the model you purchased Battery pack This computer includes a battery pack inside However please do not attempt to dismount or replace it by yourself Please contact an authorized TOSHIBA service provider if necessary The rechargeable lithium ion battery pack provides power to the computer when the AC adap...

Page 45: ...utility by clicking Desktop Desktop Assist Support Recovery PC Health Monitor and then click PC Information Please note that part of the Solid State Drive s overall capacity is reserved as administration space In this manual the word HDD or Hard disk drive also refers to the SSD unless otherwise stated SSD is a large capacity storage media which uses Solid State Memory in place of a magnetic disk ...

Page 46: ...ode will run on any computer that supports that mode Legal Footnote Graphics Processing Unit GPU For more information regarding Graphics Processing Unit GPU please refer to the Legal Footnotes section Intel Display Power Saving Technology Intel GPU includes the Display Power Saving Technology feature that can save the computer s power consumption by optimizing picture contrast on the internal LCD ...

Page 47: ...n 4 You can select the period of time from Sleep Mode to Hibernation Mode using Rapid Start Entry after If the Immediately option is selected the computer will switch to Hibernation Mode immediately after your computer goes into the Sleep Mode When Intel Rapid Start Technology is enabled switching from Sleep Mode to Hibernation Mode consumes power When you carry your computer aboard on an aircraft...

Page 48: ...ge LED amber Quick charge LED amber AC adaptor not connected Remaining battery capacity is above low battery trigger point Operates LED off Remaining battery capacity is below low battery trigger point Operates LED flashes amber Remaining battery capacity is exhausted Computer shuts down Battery indicator Check the Battery indicator to determine the status of the battery pack and the power status ...

Page 49: ... occur regardless of whether the computer s power is on or off Power indicator Check the Power indicator to determine the power status of the computer the following indicator conditions should be noted White Indicates power is being supplied either from the AC adaptor or battery to the computer and the computer is turned on Flashing white Indicates that the computer is in Sleep Mode and that there...

Page 50: ...o not use the computer while walking or driving a car Do not expose the computer to rapid temperature changes such as would be the case if you brought the computer from a cold environment into a warm room When rapid temperature changes are unavoidable leave the computer for around two hours before turning it on to prevent the formation of condensation Remove all external peripheral devices and the...

Page 51: ... orientation automatically changes according to the rotation angle detected Figure 4 3 Rotating the computer sideways You can also lock the orientation and always use the computer in Portrait or Landscape mode by pressing the Orientation lock button However under the following conditions the Orientation lock button is disabled and the screen orientation will always be in Landscape mode The compute...

Page 52: ...sing the Touch Screen You can use your finger to manipulate icons buttons menu items the onscreen keyboard and other items on the touch screen Tap Simply tap your finger once on the touch screen to activate an item such as an app Press and hold Press your finger down and leave it there for a few seconds until a white square appears This will show information to help you learn more about an item or...

Page 53: ...en cleaning the touch screen Never touch the screen with a sharp object such as a ball point pen which may scratch or damage the surface Do not use a protecting sheet for the touch screen as it may decrease its sensitivity to gestures Using the Touch Pad The Touch Pad located on the TOSHIBA Keyboard Dock may support the following gestures Tap Tap once on the Touch Pad to activate an item such as a...

Page 54: ...bar Some of the Touch Pad operations described in this section are only supported in certain applications TOSHIBA Pointing Device AccuPoint To use the AccuPoint simply push it with your finger tip in the direction you want to move the on screen pointer The Touch Pad control buttons below the AccuPoint are used like the buttons on a standard mouse press the left button to select a menu item or to m...

Page 55: ...If an error message does not appear wait a moment for the pointer to stop then continue operation Replacing the cap The AccuPoint cap is an expendable item that should be replaced after prolonged use 1 To remove the AccuPoint cap gently dig the cap out with finger Figure 4 6 Removing the AccuPoint cap 2 Position a new cap on the peg and press it into place The peg is square so be careful to align ...

Page 56: ...tion You can choose to enable disable the Pen button or the Eraser function in Pen Options To access it click Desktop Desktop Assist Control Panel Hardware and Sound Pen and Touch Pen Options Observe the following precautions on the handling of the Stylus Pen and the Reserve Pen Do not apply excess force when cleaning the touch screen In order to avoid damages to the display screen please refrain ...

Page 57: ...pen point as a bent or deformed pen point will cause a malfunction Keep the small parts of the pen such as the pen point or the knob of the side buttons away from infants and small children to prevent the accidental ingestion by them Do not use a ball point pen instead of the pen included with the product The pen tip of the Reserve Pen cannot be replaced if it is worn You can purchase a new one fr...

Page 58: ...y push the Reserve Pen into the Reserve Pen slot until it clicks into place Figure 4 10 Inserting the Reserve Pen 2 1 1 Reserve Pen slot 2 Reserve Pen Pen actions You can use the Stylus Pen or the Reserve Pen to enter data start programs move objects and execute other actions Single tap Lightly tap the tip of the pen on an object and lift it immediately to execute an action A single tap is similar...

Page 59: ... object to a new location Replacing the pen tip The pen tip of the Stylus Pen can be replaced with a new one which is provided when it is worn To replace the pen tip follow the steps as described below 1 Pinch the tip with a draw out tool and pull it out 2 Insert a new pen tip into the Stylus Pen carefully and press it securely Figure 4 11 Replacing the pen tip 1 2 1 Pen tip 2 Draw out tool Do not...

Page 60: ... on your keyboard Doing so could cause damage to the parts under the key caps Keyboard indicator The following figure shows the position of the CAPS LOCK indicator which shows the following conditions When the CAPS LOCK indicator glows the keyboard will produce capitals when any letter is typed Figure 4 12 CAPS LOCK indicator 1 1 CAPS LOCK indicator CAPS LOCK This indicator glows green when letter...

Page 61: ...plane mode on or off FN F9 Enables or disables the Touch Pad FN F10 Turns on Arrow Mode FN F11 Turns on Numeric Mode FN F12 Locks the cursor on a specific line FN ESC Turns the sound on or off FN 1 Reduces the icon size on the desktop or the font sizes within one of the supported application windows FN 2 Enlarges the icon size on the desktop or the font sizes within one of the supported applicatio...

Page 62: ...he numeric keypad on a standard 104 105 key enhanced keyboard Turning on the overlays The numeric keypad overlay can be used for numeric data input or cursor and page control Arrow Mode To turn on Arrow Mode press FN F10 you are able to access cursor and page control functions by using the keys You are able to press FN F10 again to turn off this overlay function Numeric Mode To turn on Numeric Mod...

Page 63: ...ecific ASCII codes 1 Hold down ALT with the overlay on or ALT FN with overlay off 2 Using the overlay keys type the ASCII code of the character you require 3 Release ALT or ALT FN the ASCII character will appear on the display screen Touch keyboard Touch keyboard is an on screen virtual keyboard allowing you to type on the touch screen Touch keyboard provides a full size keyboard a thumb keyboard ...

Page 64: ...le your battery pack properly Refer to the enclosed Instruction Manual for Safety and Comfort for detailed precautions and handling instructions The computer s RTC battery is a Ni MH battery and should be replaced only by your dealer or by a TOSHIBA service representative The battery can explode if not properly replaced used handled or disposed Dispose of the battery as required by local ordinance...

Page 65: ...ld if the battery is extremely hot it might not charge at all To ensure the battery charges to its full capacity you should charge it at room temperature of between 5 C to 35 C 41 F to 95 F The battery is nearly completely discharged In this instance you should leave the AC adaptor connected for a few minutes and the battery should begin charging The Battery indicator may show a rapid decrease in ...

Page 66: ...ating time A battery s usefulness depends on how long it can supply power on a single charge while how long the charge lasts in a battery depends on Processor speed Screen brightness System Sleep Mode System Hibernation Mode Display power off period Solid State Drive power off period How often and for how long you use the Solid State Drive and external disk drives for example optical disc How much...

Page 67: ... a low battery condition go to Step 4 4 Connect the AC adaptor to the DC IN 19V jack of the computer and to a wall outlet that is supplying power The Battery indicator should glow amber to indicate that the battery pack is being charged however in the event that Battery indicator does not glow this indicates that power is not being supplied check the connections for the AC adaptor and the power co...

Page 68: ...tors facing up 6 Insert the SIM card tray into the SIM card slot and push the center of the tray to close it Press gently until it locks into place Figure 4 15 Inserting the SIM card 1 2 3 1 SIM card slot 3 SIM card tray 2 SIM card Product appearance depends on the model you purchased Never allow metal objects such as screws staples and paper clips to enter the computer Foreign metal objects can c...

Page 69: ...ot be detected due to the information accuracy Specifically your current location may not be detected in the following places or situations Inside or directly under a building Inside a bag or box Among dense trees When there is an obstacle person or object in the front of the antenna Underground tunnel underground or underwater Buildings streets or residential areas Near to the high voltage cables...

Page 70: ...nnecting the LAN cable To connect the LAN cable follow the steps as detailed below Connect the AC adaptor before connecting the LAN cable The AC adaptor must remain connected during LAN use If you disconnect the AC Adaptor while the computer is accessing a LAN the system may hang up Do not connect any power supplying device to the LAN cable that is connected to the LAN jack Otherwise malfunctions ...

Page 71: ...ossible to guarantee that all memory media will operate properly The slot does not support Magic Gate functions Figure 4 17 Examples of memory media Secure Digital SD Card microSD card adaptor and microSD card MultiMediaCard MMC Points to note about the memory media card SD SDHC SDXC memory cards comply with SDMI Secure Digital Music Initiative which is a technology adopted to prevent unlawful cop...

Page 72: ...including the protected area you will need to obtain an appropriate application that applies the copy protection system Media care Observe the following precautions when handling the card Do not twist or bend cards Do not expose cards to liquids or store in humid areas or lay media close to containers of liquid Do not touch the metal part of a card or expose it to liquids or let it get dirty After...

Page 73: ...ou do not want to record data Inserting memory media The following instructions apply to all types of supported media devices To insert memory media follow the steps as detailed below 1 Remove the dummy card The dummy card shapes like an actual SD memory card and can keep dirt and dust out of the memory media slot Figure 4 18 Removing the dummy card 1 2 1 Memory media slot 2 Dummy card 2 Turn the ...

Page 74: ...il you hear a click Removing memory media The following instructions apply to all types of supported media devices To remove memory media follow the steps as detailed below 1 Click the Desktop tile and open the Safely Remove Hardware and Eject Media icon on the Windows Taskbar 2 Point to memory media and click the left Touch Pad control button 3 Push the memory media until you hear a click to part...

Page 75: ... both ports are connected only HDMI port is activated Some models may include the Triple Monitor function that can display image on Triple Monitor independently External RGB monitor port An external analog monitor can be connected to the External RGB monitor port on the keyboard dock To connect an external analog monitor follow the steps as detailed below 1 Connect the RGB cable to the External RG...

Page 76: ... Interface port digitally transfers both video and audio data without reducing the quality HDMI compatible external display devices including televisions can be connected via the HDMI port To connect an HDMI compatible display device follow the steps as detailed below As the port operation of all HDMI display devices have not been confirmed some HDMI display devices may not function properly To co...

Page 77: ...se adjust the playback device manually by the following steps 1 Click Desktop Desktop Assist Control Panel Hardware and Sound Sound 2 In the Playback tab select the playback device which you want to switch to 3 To use the internal speakers on your computer select Speakers To use the television or the external monitor that you have connected to the computer select a different playback device 4 Clic...

Page 78: ...ay with built in support for Intel WiDi An external display with HDMI port and a digital adaptor featuring Intel WiDi The adaptor is a device that connects to the external display via HDMI port and can receive Wi Fi signals from your computer Type Intel WiDi from the Start screen and click Intel R WiDi Intel WiDi application will launch and you are ready to start the connection To learn more detai...

Page 79: ...en tips and a tip draw out tool are included Reserve Pen Reserve Pen can be purchased from your TOSHIBA dealer Use the Reserve Pen in place of the Stylus Pen if it is lost or broken Not all the accessories are available in your region Please contact your reseller or TOSHIBA dealer for more information Sound System and Video mode This section describes some of the audio control functions Volume Mix...

Page 80: ...io configuration using the Realtek HD Audio Manager To launch the Realtek HD Audio Manager Click Desktop Desktop Assist Control Panel Hardware and Sound Realtek HD Audio Manager When you first launch the Realtek HD Audio Manager you will see two device tabs Speakers is the default output device Microphone is the default input device To change the default device click the Set Default Device button ...

Page 81: ... volume output delivering maximum volume without creating clipping or distortion Dialog enhancement for clear and intelligible vocals Bass enhancement for rich low frequency production High frequency definition for crisp details Consistent volume level across content To access the utility Click Desktop Desktop Assist Media Entertainment DTS Studio Sound U S patents apply to this product See http p...

Page 82: ...you may refer to each utility s online manual help files or README TXT file if applicable All the utilities described here can be accessed from Desktop Desktop Assist Furthermore some utilities can also be launched from Start screen and desktop shortcut TOSHIBA Desktop Assist TOSHIBA Desktop Assist is a graphical user interface that provides access to specific tools and TOSHIBA utilities and appli...

Page 83: ...ou can install Split Screen utility by yourself Split Screen utility enables you to create multiple display zones on a screen and to fit the active windows to within those zones To access this utility click Desktop Desktop Assist Tools Utilities Display Utility For details on Desktop Text Size utility and Split Screen utility see the help file TOSHIBA Password Utility This utility allows you to se...

Page 84: ... back video music and photo TOSHIBA Media Player can play back contents on a local library home network SkyDrive To access it click the Media Player icon on the Start screen For details please refer to the Tutorial TOSHIBA Function Key This utility allows you to perform some features by pressing a specified key or combined with the FN key To setup this utility click Desktop Desktop Assist Tools Ut...

Page 85: ...solution Plug in for Windows Media Player Help You may not have all the software listed above depending on the model you purchased To access the setup files of the drivers utilities type Applications from the Start screen and then click Applications and Drivers from the list that appears TOSHIBA Media Player by sMedio TrueLink application is not included in the setup files above but can be downloa...

Page 86: ... in the Power Options Power on password Two levels of password security supervisor and user are available to prevent unauthorized access to your computer Intelligent power supply 1 A microprocessor in the computer s intelligent power supply detects the battery s charge automatically calculates the remaining battery capacity and protects electronic components from abnormal conditions such as a volt...

Page 87: ... mouse button or pressing the keyboard will wakeup the computer Heat dispersal 1 To protect against overheating the processor is equipped with an internal temperature sensor which activates a cooling fan or lowers the processing speed if the computer s internal temperature rises to a certain level You are able to select whether to control this temperature by either turning on the fan first then if...

Page 88: ...aracter and do not enter as ASCII code or copy and paste the character string In addition ensure that the registered password is correct by outputting the character string to the password file When entering a password do not enter any characters for example or produced by pressing the SHIFT or ALT keys Delete button Click this button to delete a registered password Before you can delete a password...

Page 89: ...sor Password some functions might be restricted when a user logs on with the User Password To set a Supervisor Password Desktop Desktop Assist Tools Utilities Password Utility Supervisor Password This utility lets you do the following Register or delete the Supervisor Password Specify restrictions for general users Starting the computer using a password If you have already registered a user passwo...

Page 90: ...s and closes the TOSHIBA System Settings window Cancel Closes the window without accepting your changes Apply Accepts all your changes without closing the TOSHIBA System Settings window Some options shown in grey are possible to confirm their status TOSHIBA System Settings screen may have the following tabs General Allows you to view the current BIOS version or change certain settings back to thei...

Page 91: ...will not enter Sleep Hibernation and shut down mode automatically while TOSHIBA Media Player is running The display automatic power off function is disabled while TOSHIBA Media Player is playing a video file or slideshows of photos The Resolution function was specially adjusted for the internal monitor Hence please turn OFF Resolution when viewing on external monitor Playback of high bit rate cont...

Page 92: ...edure to open TOSHIBA Media Player Online help When TOSHIBA Media Player is running click Help of the Settings charm TOSHIBA PC Health Monitor The TOSHIBA PC Health Monitor application proactively monitors a number of system functions such as power consumption battery health and the system cooling informing you of significant system conditions This application recognizes the system and individual ...

Page 93: ...top Desktop Assist Support Recovery PC Health Monitor The TOSHIBA PC Health Monitor main screen will be displayed and on clicking Please click here to enable TOSHIBA PC Health Monitor the PC Health Monitor Software Notice Acceptance screen will be displayed Please carefully read the information displayed Selecting ACCEPT and clicking OK will enable the program By enabling the TOSHIBA PC Health Mon...

Page 94: ...o designated to execute the corresponding key function on the keyboard dock Details are described as follows Button Key Function Windows Enter key Proceed or confirm operation Volume up Up arrow key Select an item Volume down Down arrow key Select an item Orientation lock Turn on off the virtual on screen keyboard System Recovery There is a hidden partition allocated on the Solid State Drive for t...

Page 95: ...uter is stored on the Solid State Drive and can be copied to either disc media or USB Flash Memory by using the following steps 1 Select either blank disc or USB Flash Memory The application will allow you to choose from a variety of different media onto which the recovery image can be copied including disc media and USB Flash Memory Please note that some of the disc media may not be compatible wi...

Page 96: ... Mode option UEFI Boot in the BIOS setup utility before restoring 1 Load the Recovery Media into the external Optical Disc Drive or insert the recovery USB Flash Memory into one available USB port 2 In the Settings charm click Power and then select Restart 3 Hold down the F12 key and then release this key one second after the computer is power on In tablet mode hold down the Volume up button until...

Page 97: ...comes impossible to setup your computer Make sure that the AC adaptor is connected during the restoring process When you reinstall the Windows operating system the Solid State Drive may be reformatted and all data may be lost 1 In the Settings charm click Power and then select Restart 2 Hold down 0 zero key and then release this key one second after the computer is power on In tablet mode hold dow...

Page 98: ... in this chapter are meant only as a guide they are not definitive problem solving techniques In reality many problems can be solved simply but a few may require help from TOSHIBA Support if you find you need to consult others be prepared to describe the problem in as much detail as possible Preliminary checklist You should always consider the simplest solution first the items detailed in this che...

Page 99: ... random characters Make a screenshot of the current display and if possible look up the messages in the documentation included with the computer software or operating system Check that all connecting cables are correctly and firmly attached as loose cables can cause erroneous or intermittent signals Do any indicators light if so which ones what color are they and do they stay on or blink Write dow...

Page 100: ...ing the power on again by pressing the power button Your program stops responding If you are working with a program that suddenly freezes all operations chances are the program has stopped responding You can exit the failed program without shutting down the operating system or closing other programs To close a program that has stopped responding 1 Press CTRL ALT and DEL simultaneously once then cl...

Page 101: ...n Volume down button press Power button Boot menu F12 while holding down Volume up button press Power button Recovery options 0 zero Recovery options can also be accessed from Boot menu by selecting HDD Recovery If your computer starts to load the Operating System instead of desired advanced options follow the steps below 1 In the Settings charm click Power and then select Restart 2 Hold down the ...

Page 102: ... Procedure Computer shuts down automatically Leave the computer off until the it reaches room temperature If the computer has reached room temperature and it still does not start or if it starts but shuts down quickly contact TOSHIBA Support AC power If you have trouble turning on the computer with the AC adaptor connected you should check the status of the DC IN Battery indicator Please refer to ...

Page 103: ...ight not charge to its full potential in these instances you should fully discharge the battery and then attempt to charge it again Check the Power saver option under Select a power plan in the Power Options Real Time Clock Problem Procedure The BIOS setting and system date time are lost The charge in the Real Time Clock RTC battery has run out you will need to set the date and time in the BIOS se...

Page 104: ...m Procedure No display Press the function keys to adjust the display priority and to make sure it is not set for output to an external monitor Markings appear on the computer s display panel These marks may have come from contact with the keyboard and Touch Pad while the display panel has been closed You should try to remove the marks by gently wiping the display panel with a clean dry cloth or if...

Page 105: ...efer to Operating Basics Problem Procedure Memory media card error occurs Remove the memory media card from the computer and then reinsert it in order to ensure it is firmly connected If the problem persists then you should refer to the documentation supplied with your memory media card for further information You cannot write to a memory media card Remove the memory media card from the computer a...

Page 106: ...ound Mouse 2 Within the Mouse Properties window click the Buttons tab 3 Set the double click speed as required and click OK The on screen pointer moves too fast or too slow In this instance you should initially try changing the speed setting within the Mouse Control utility 1 To access this utility click Desktop Desktop Assist Control Panel Hardware and Sound Mouse 2 Within the Mouse Properties wi...

Page 107: ...speed as required and click OK The on screen pointer moves too fast or too slow In this instance you should initially try changing the speed setting within the Mouse Control utility 1 To access this utility click Desktop Desktop Assist Control Panel Hardware and Sound Mouse 2 Within the Mouse Properties window click the Pointer Options tab 3 Set the pointer speed as required and click OK The on sc...

Page 108: ...software volume settings Please check to see if Mute is turned to Off Check to make sure the headphone connection is secure Check within the Windows Device Manager application to ensure the sound device is enabled and that the device is properly working Annoying sound is heard In this instance you may be experiencing feedback from either the internal microphone or an external microphone connected ...

Page 109: ...isconnected while in Sleep Mode To keep this from happening do not disconnect the external monitor while the computer is in Sleep or Hibernation Mode Remember to turn off the computer before disconnecting the external monitor When the display panel and an external monitor are set to clone mode and they are turned off by the timer the display panel or the external monitor may not display when turne...

Page 110: ...istance Before you call Some problems you experience may be related to software or the operating system so it is important that you investigate other sources of assistance first Before contacting TOSHIBA try the following Review troubleshooting sections in the documentation supplied with your software and or peripheral devices If a problem occurs when you are running software applications consult ...

Page 111: ...eters Computer only not including parts that extend beyond the main body Environmental Requirements Conditions Ambient temperature Relative humidity Operating 5 C 41 F to 35 C 95 F 20 to 80 noncondensing Non operating 20 C 4 F to 60 C 140 F 10 to 90 noncondensing Wet bulb temperature 29 C maximum Conditions Altitude from sea level Operating 60 to 3 000 meters Non operating 60 to 10 000 meters maxi...

Page 112: ...A Data Signal I O 13 HSYNC Horizontal Sync Signal O 14 VSYNC Vertical Sync Signal O 15 SCL Data Clock Signal O I O I Input to computer I O O Output from computer AC Power Cord and Connectors The power cord s AC input plug must be compatible with the various international AC power outlets and the cord must meet the standards for the country region in which it is used All cords must meet the followi...

Page 113: ...H03VVH2 F and for three conductors power cord must be VDE type H05VV F For the United States and Canada two pin plug configuration must be a 2 15P 250V or 1 15P 125V and three pin plug configuration must be 6 15P 250V or 5 15P 125V as designated in the U S National Electrical code handbook and the Canadian Electrical Code Part II The following illustrations show the plug shapes for the U S A and C...

Page 114: ... Group This Bluetooth product is not compatible with devices using Bluetooth Version 1 0B specifications The wireless devices have not completed verification of connection and operation with all devices which are using the Wireless LAN or Bluetooth radio technology Bluetooth and Wireless LAN devices operate within the same radio frequency range and may interfere with one another If you use Bluetoo...

Page 115: ...r to turning on the equipment Wireless LAN Technology The computer s wireless communication function supports some wireless communication devices Only some models are equipped with both Wireless LAN and Bluetooth functions Do not use the Wireless LAN Wi Fi or Bluetooth functionalities near a microwave oven or in areas subject to radio interference or magnetic fields Interference from a microwave o...

Page 116: ... Type of product Wireless communication is often subject to local radio regulations Although Wireless LAN wireless networking products have been designed for operation in the license free 2 4GHz and 5GHz band local radio regulations may impose a number of limitations to the use of wireless communication equipment Radio Frequency Band 5GHz 5150 5850 MHz Revision a and n Band 2 4GHz 2400 2483 5 MHz ...

Page 117: ...s link privacy Worldwide operation The Bluetooth radio transmitter and receiver operate in the 2 4GHz band which is license free and compatible with radio systems in most countries in the world Radio links You can easily establish links between two or more devices with these links being maintained even if the devices are not within a line of sight of each other Radio Regulatory Information The Wir...

Page 118: ...z Frequencies in Europe Italy For private use a general authorization is required if WAS RLAN s are used outside own premises Luxembourg Implemented General authorization required for network and service supply Russian Federation Limited e i r p 100mW Permitted to use only for indoor applications closed industrial and warehouse areas and on board aircraft 1 Permitted to use for local networks of a...

Page 119: ...ply for outdoor usage The user should use the wireless LAN utility to check the current channel of operation If operation is occurring outside of the allowable frequencies for outdoor use as listed above the user must contact the applicable national spectrum regulator to request a license for outdoor operation Canada Industry Canada IC This device complies with RSS 210 of the Industry Canada Rules...

Page 120: ... user should not be less than 20cm Please refer to the computer user s manual for the details regarding antenna location The installer of this radio equipment must ensure that the antenna is located or pointed such that it does not emit RF field in excess of Health Canada limits for the general population consult Safety Code 6 obtainable from Health Canada s website www hc sc gc ca Taiwan Article ...

Page 121: ...on systems RFID used in factory production lines Other Radio Stations 1 Before using this equipment ensure that it does not interfere with any of the equipment listed above 2 If this equipment causes RF interference to other radio stations promptly change the frequency being used change the location of use or turn off the source of emissions 3 Contact an authorized TOSHIBA service provider if you ...

Page 122: ...lass of radio equipment of low power data communication system radio station stipulated in the Telecommunications Business Law of Japan Intel Centrino Advanced N 6235 a g n Wireless LAN and Bluetooth The Name of the radio equipment 6235ANHMW DSP Research Inc Approval Number D111083003 Atheros 802 11b g n Wireless LAN Bluetooth The Name of the radio equipment AR5B225 DSP Research Inc Approval Numbe...

Page 123: ...be aware that your selected model may not have all the features and specifications corresponding to all of the icons or switches shown on the computer chassis CPU Central Processing Unit CPU Performance Legal Footnotes CPU performance in your computer product may vary from specifications under the following conditions use of certain external peripheral products use of battery power instead of AC p...

Page 124: ...y not be compatible with a 64 bit CPU operating system and therefore may not function properly Memory Main System Part of the main system memory may be used by the graphics system for graphics performance and therefore reduce the amount of main system memory available for other computing activities The amount of main system memory allocated to support graphics may vary depending on the graphics sy...

Page 125: ...s processing unit GPU performance may vary depending on product model design configuration applications power management settings and features utilized GPU performance is only optimized when operating in AC power mode and may decrease considerably when operating in battery power mode Total Available Graphics Memory is the total of as applicable Dedicated Video Memory System Video Memory and Shared...

Page 126: ... DVD R Digital Versatile Disc recordable DVD RAM Digital Versatile Disc random Access Memory DVD R DL Digital Versatile Disc Recordable Dual Layer DVD ROM Digital Versatile Disc read Only Memory DVD RW Digital Versatile Disc rewritable DVD R DL Digital Versatile Disc Recordable Double Layer FAT File Allocation Table FCC Federal Communications Commission GB gigabyte GBps gigabytes per second HDD Ha...

Page 127: ...erence ROM Read Only Memory RTC Real Time Clock S P DIF Sony philips Digital Interface Format SD Secure Digital SDHC Secure Digital High Capacity SDRAM Synchronous Dynamic Random Access Memory SSD Solid State Drive TFT Thin film Transistor URL Uniform Resource Locator USB Universal Serial Bus UXGA Ultra Extended Graphics Array VGA Video Graphics Array WAN Wide Area Network WSXGA Wide Super Extende...

Page 128: ...XGA Extended Graphics Array User s Manual 7 18 ...

Page 129: ... power off 5 4 opening 2 4 screen 3 3 Display controller 3 13 Documentation list 2 1 Dual Pointing Device Touch Pad 6 9 E Equipment checklist 2 1 External monitor problems 6 12 H Hard disk drive automatic power off 5 5 HDMI out port 3 5 3 10 HW Setup accessing window K Keyboard function keys 4 11 Function keys F1 F12 4 11 problems 6 6 Windows special keys 4 13 Keypad overlay Arrow mode 4 13 Numeri...

Page 130: ...ol buttons 4 5 Touch Pad 3 8 Power conditions 3 15 Hibernation Mode 2 13 panel on off 5 5 Shut Down mode 2 11 Sleep Mode 2 11 turning off 2 11 turning on 2 8 Problems AC power 6 5 Analyzing the problem 6 2 Battery 6 6 Dual Pointing device 6 8 External monitor 6 11 Hardware and system checklist 6 4 HDD 6 7 6 8 Internal display panel 6 7 Keyboard 6 6 Memory Media Card 6 8 Overheating power down 6 5 ...

Page 131: ...ep Mode setting 2 11 System automatic 5 5 Sound system problems 6 11 T TOSHIBA Desktop Assist 5 1 TOSHIBA Display Utility 5 2 U USB device problems 6 10 V Video mode 4 32 Video RAM 3 13 W Web Camera 3 3 Wireless communication 7 5 User s Manual Index 3 ...

Reviews: