background image

Step 5: Set System Parameters


—————————————————————————————————

16

Strata DK PC-DKT

Important!

Always use the dialog box provided to restart Windows and never the 
“Ctrl-Alt-Del” method.

5. (Optional) If you have Windows 95, make a Shortcut icon for the PC-DKT on the 

Windows desktop.

6. (Optional) Place the keyboard template (included) on your keyboard.

Step 5: Set System Parameters

1. Windows 95: Double-click the PC-DKT icon or click Start, then Programs, 

Toshiba PC-DKT, and PC-DKT.

Windows 3.1/3.11: Find the Toshiba PC-DKT group and click the PC-DKT icon.

2. From the menu bar, click Setup, then System Setup.

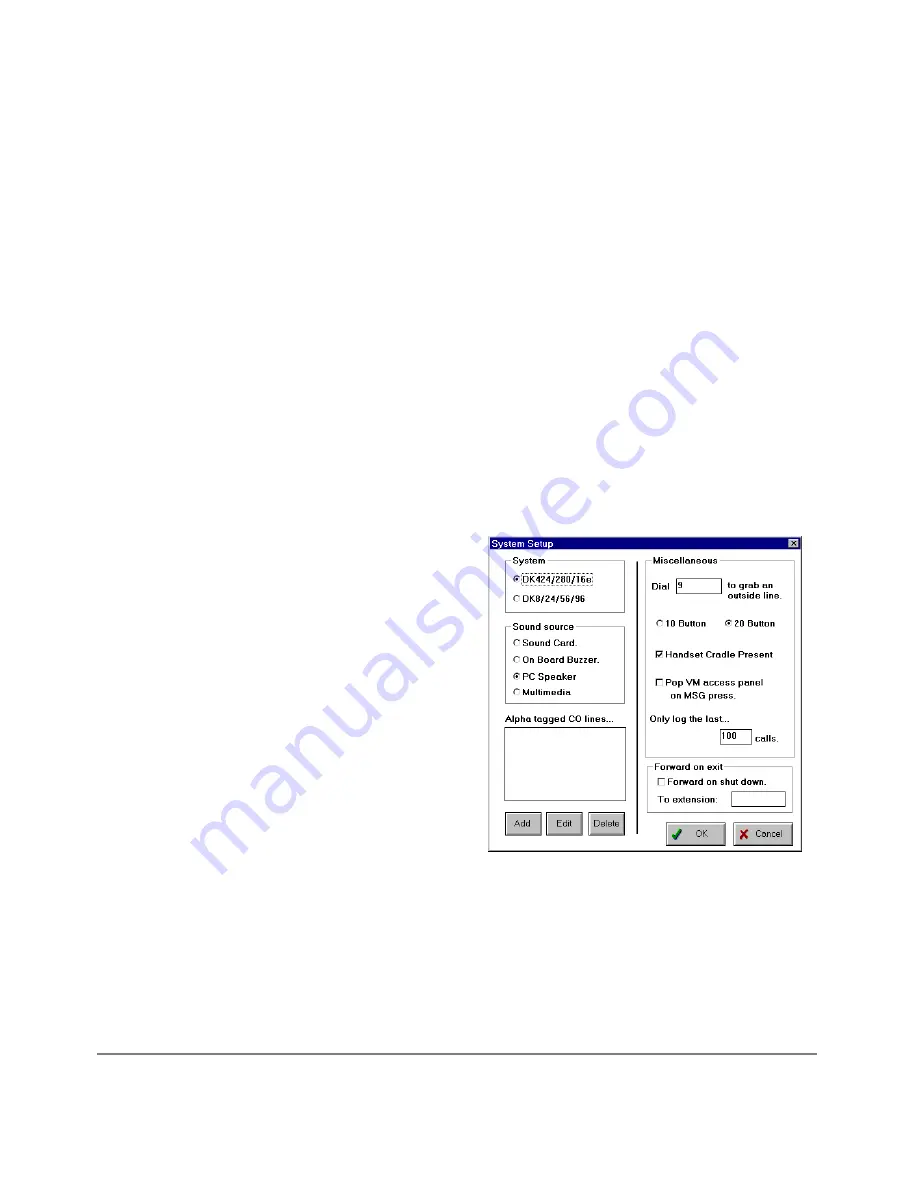
3. From the System Setup dialog box 

(shown right), modify:

System – choose the type of Strata 
DK system you are using. Features 
may vary, see your System 
Administrator for details.

Sound source – set the PC-DKT’s 
ring tone by selecting one of the 
following:

Sound card – define your own system 
tones using the Ring Sounds option on 
the Setup Menu (see 

‘Ring sounds’ 

on 

Page 48

).

On-board buzzer – emits single beep when receiving an incoming call.

PC Speaker – provides the tones and is the default device for the PC-DKT.

Multimedia (Port 4 on the PC-DKT card) – provides voice announcements and 
true DKT ringing tones.

2135

Summary of Contents for PC-DKT

Page 1: ...May 1999 Digital Business Telephone Systems PC Digital Telephone User Guide ...

Page 2: ...chnologies Limited Strata is a registered trademark of Toshiba Corporation Stratagy is a registered trademark of Toshiba America Information Systems Inc Trademarks registered trademarks and service marks are the property of their respective owners Strata DK General End User Information The Strata DK Digital Business Telephone System is registered in accordance with the provisions of Part 68 of the...

Page 3: ...DKT Card 2 PC DKT Main Screen 3 10 20 Key Screen Sizes 3 Minimized Screen Size 4 Buttons 4 Menu Bar 5 Keyboard Control Summary 6 Chapter 2 Installation Step 1 Before You Start 9 Make Sure You Have Everything 9 Make Sure Your PC Meets PC DKT s Minimum Requirements 10 Do You Know How to Work on PCs 10 Read This Important PC DKT Handling Information 10 ...

Page 4: ...p 6 Set Up StrataBase 18 Step 7 Program the Strata DK 19 Chapter 3 Operation Basic Operation 21 Accessing the PC DKT 21 Exiting the PC DKT 21 Quick Reference 22 Caller ID 23 Conference Call 24 File Menu 25 StrataBase 25 View Call Log 28 Voice Mail Access Panel 31 Functions Menu 32 Page All 32 Automatic Callback ACB 32 Call Forward 33 Display 35 Call Pickup 35 Door Phone Access 36 Use CO Line 36 ...

Page 5: ...ting 39 Override 40 Transfer 41 LCD Messaging 42 Timed Reminder 44 Record 44 Setup Menu 45 Always on top 45 Button Setup 45 Pop up options 45 Extension Name 46 LED Colors 47 Ring sounds 48 Paging Group Names 49 Voice Mail Settings 49 System Setup 51 Help Menu 51 Contents 51 About 51 ...

Page 6: ...iv Strata PC DKT ...

Page 7: ...iar with operating a PC mouse and Microsoft Windows software Organization Chapter 1 The Grand Tour provides an overview of the PC DKT system The Main screen on screen buttons menu bar and keyboard control summary are all described Chapter 2 Installation gives step by step instructions for installing both the system hardware and software Chapter 3 Operation provides an overview of basic operations ...

Page 8: ... the equipment and in this manual Letters in brackets represent buttons which have Directory Numbers on them For example The left column gives you the single or numbered steps you need to perform a procedure These steps apply to both mouse or keyboard use The right column gives the immediate response to your action This column also includes additional notes and comments WARNING Alerts you when the...

Page 9: ...lephone User Guide DK8 16 SDN represents a Secondary appearance of a PDN A PDN which appears on another telephone is considered an SDN represents buttons on a telephone Courier letters represent PC Digital Telephone keyboard keys Times Roman words that are capitalized represent a specific dialog box button For example Transfer button Click means to press and then release the mouse button Press mea...

Page 10: ...Related Documents viii Strata PC DKT ...

Page 11: ...p it displayed on top of all active applications You can also use the PC DKT with a Toshiba Cordless Digital Telephone and switch between them at the touch of a button even during a call The PC DKT provides all the features of a Toshiba LCD Digital Telephone while giving you these advanced features StrataBase directory stores frequently called numbers and other contact information Speed dial direc...

Page 12: ...mize ring tones to identify internal external recall and emergency calls It also can play separate sound wave WAV tones to give each telephone line its own ringing sound PC sound card required Call recording and playback enables you to store recorded calls as sound wave WAV files and attach them to other applications PC sound card required On line help makes the PC DKT easy to use Account code cal...

Page 13: ...he buttons you can toggle between the 10 20 Key and Minimize screen sizes 10 20 Key Screen Sizes The 10 or 20 Key size shown below is selected from the System Setup option Setup menu The two screens are the same except for the number of keys available Programmable Buttons On Hook Off Hook Off hook Call Announce Message Waiting Indicator LCD Control Buttons Soft Keys Conference Transfer Intercom Bu...

Page 14: ...KT and can include external telephone and internal extension numbers It is loaded automatically from your hard disk when the PC DKT is started and is saved after any entry changes To access the directory click on the main screen s StrataBase button or select the StrataBase option from the File menu See StrataBase on Page 25 for instructions on using the feature Minimize Maximize The Minimize Maxim...

Page 15: ...gh either the handset or the speaker of an off hook busy digital telephone On Hook Off Hook Emulates the physical action of going On Hook and Off Hook Menu Bar The Menu Bar consists of the following drop down menus Detailed descriptions of the individual menu options can be found in Chapter 3 2542 ...

Page 16: ...key see Table 1 For example to redial your last call you can press the End key to access StrataBase press Insert To assist you in using these keyboard shortcuts a keyboard template is included with your PC DKT pack See the illustration below for placement F2 F3 F4 F5 F6 F7 F8 F9 F10 F11 F12 Del Num Lock Page Up Home Insert Page Down End Delete 7 Home 8 9 Pg Up Enter 1 End Ins 2 0 3 Pg Dn 4 5 6 F1 ...

Page 17: ... On Function F1 F10 Flexible buttons 1 10 Shift F1 Shift F10 Flexible buttons 11 20 F11 Screen Size Cnf Trn Page Up Increases sound volume Hold Page Dn Decreases sound volume Enter On Off Hook Insert StrataBase 0 9 0 9 Shift 8 End Redial last Call Home Call Log Delete OCA Enter On Off Hook F12 Message Waiting ...

Page 18: ...Keyboard Control Summary 8 Strata DK PC DKT ...

Page 19: ...rst then carefully follow all of the steps Step 1 Before You Start Make Sure You Have Everything The PC DKT pack includes PC DKT card PC DKT software Keyboard template 6 ft line cord RJ 11 connector 6 ft line cord for analog port RJ 45 to RJ 11 This user guide Optional equipment available from Toshiba Handset Cradle with phone cable Cordless digital telephone ...

Page 20: ...ontact a qualified installation specialist CAUTION Toshiba cannot be held liable for any damage that is caused during the installation of the PC DKT card Read This Important PC DKT Handling Information The PC DKT card is delicate Handle it with care Always Check that the PC case is correctly grounded First touch metal e g your PC casing before touching the PC DKT card This ensures that there are n...

Page 21: ...ws 95 from the Taskbar click Start Settings then Control Panel Double click the System icon Click the Device Manager tab and make sure Computer is highlighted Click Properties button By clicking on Interrupt request IRQ and Input output I O you can view the settings for the system Windows 3 11 exit the DOS C prompt and run Microsoft Diagnostics type MSD EXE 2 Exit all open applications Windows 95 ...

Page 22: ...interrupt and address settings shown at right The PC DKT must not conflict with another device s interrupt or memory address settings If a conflict exists change the jumpers with the aid of Table 2 2138 2178 Strata Phone System Power Fail Phone Fax Modem Multi Media Handset Headset Address Select 9 8 7 6 5 4 3 2 3 5 7 910111215 IRQ Select Address Select 9 8 7 6 5 4 3 2 3 5 7 910111215 IRQ Select 2...

Page 23: ... cables and power up the PC Important When powering up the PC watch for any errors that may come up If any errors associated with the PC DKT card appear you may have an Interrupt or Address conflict If this happens you must pick a different setting Table 2 Interrupts Addresses Hardware Interrupt Link Jumpers Memory Address Link Jumpers Interrupt 3 5 7 9 10 11 12 15 Address 9 8 7 6 5 4 3 2 3 200h 5...

Page 24: ...cable supplied between your PC sound card and PC DKT s Port 4 Make sure to match the IN mini plug to the IN jack on the sound card and the OUT mini plug to the OUT jack on the sound card 5 Optional but highly recommended Connect a cable between a handset cradle option available and the PC DKT s Port 5 Note A headset may be used but it lacks the functionality of the cradle hookswitch If you use a 4...

Page 25: ...r B Windows 95 Click Start followed by Run Windows 3 1 3 11 From the Program Manager click File 2 Type A SETUP EXE and press Enter 3 When the Interrupt Request Setting Options dialog box displays shown at right select the appropriate IRQ This setting must match the setting on the PC DKT card Click Continue 4 When the Address Settings Options dialog box appears shown at right select the appropriate...

Page 26: ...roup and click the PC DKT icon 2 From the menu bar click Setup then System Setup 3 From the System Setup dialog box shown right modify System choose the type of Strata DK system you are using Features may vary see your System Administrator for details Sound source set the PC DKT s ring tone by selecting one of the following Sound card define your own system tones using the Ring Sounds option on th...

Page 27: ...n of your choice default is No Forward on exit Note This feature must be activated if there is no backup telephone 4 When you are satisfied with your settings click OK Button Setup Before using the PC DKT you must program the buttons that emulate the flexible buttons on a 20 button DKT These buttons may be either line or feature buttons depending on your system programming The flexible buttons are...

Page 28: ...ames customize the list of group names eight internal and four external for paging Voice Mail Settings connect the PC DKT to your voice mail application and customize the button labels Configure these features to suit your needs See Setup Menu on Page 45 for details Step 6 Set Up StrataBase The StrataBase functions as a dialing directory of external telephone and internal extension numbers From a ...

Page 29: ...ompliant application To activate this feature the following program changes are required 03 Flexible PCB Slot Assignments PDKU2 OCA DIU 62 PDKU2 DSS OCA DIU 64 Assigns the appropriate PDKU2 cards as having the DIU interface 20 Computer and Data Interface Unit Configuration LED 11 RPCI DI DNIS to PC Option DNIS Number or Name tag information that is sent to a telephone can be sent or blocked If DNI...

Page 30: ...Step 7 Program the Strata DK 20 Strata DK PC DKT ...

Page 31: ... DKT Windows 95 Double click or click Start then Programs Toshiba PC DKT and PC DKT Windows 3 1 3 11 From the Toshiba PC DKT group click PC DKT The PC DKT Main screen displays If you have a backup phone connected it shuts off until you exit the PC DKT Exiting the PC DKT 1 Click the Windows Close button or click File then Exit 2 You are asked to confirm the closure Click Yes If you do not have a ba...

Page 32: ... keyboard s numeric key pad or the main screen s dial pad keys Answer a Call Click On Hook or lift the handset See also Caller ID on Page 23 Make a Call Click a DN for an internal call or a line button for an external call Dial the number or use StrataBase Transfer a Call Click Cnf Trn minus on numeric keypad or access Transfer on the Functions menu Dial the directory number where the call will be...

Page 33: ...unction see Pop up options on Page 45 Message Waiting Click Msg and enter your security code See Mes sage Waiting on Page 39 for more details Access Voice Mail Click File then Voice Mail Access Panel See Voice Mail Access Panel on Page 31 for more details Change Main Screen Size Press F11 or click Change Sound Volume Press Page Up Page Down or use Volume Control on the Main screen Access StrataBas...

Page 34: ...nd the StrataBase record for the incoming caller displays Click the Add button and the Add Edit Telephone Details dialog box displays You can now add the caller to your StrataBase Copy Button The Caller ID information is placed on the Clipboard and exports into compliant Windows applications You can select the copied fields through the Clipboard options panel of the Pop up options dialog box Confe...

Page 35: ...irectory and provides names addresses and telephone numbers that can be used by the PC DKT in the Caller ID and Call Logging functions Each entry in the StrataBase is a separate record with clearly defined fields 2 Dial a DN or access a second CO line and dial the telephone number 3 When the party answers click Cnf Trn Wait for the called station to answer The DN or CO line LED from which the conf...

Page 36: ...m a Called ID pop up box Note When you first install the PC DKT there are no names in the directory Using StrataBase as a Dialing Directory With the person company s record displayed click on the extension telephone number you want to dial The call is initiated and the Main screen is displayed with the number you dialed shown in the LCD 2150 ...

Page 37: ...ion requires an Account Code called Forced precede the telephone number click Auto dial first field The Account Code automatically dials first when you call the individual company s external number Voluntary Account Codes are optional and can be added after accessing a CO line or during a call They cannot be added after the call is disconnected 3 When you are finished click OK to save the entries ...

Page 38: ...ter StrataBase searches for all names containing that letter see sample at right View Call Log The PC DKT logs all your incoming and outgoing calls You can view calls by Details names telephone numbers Call Direction Call Type and Incoming Call type The dialog box contains a list of all specified calls with the last call at the top of the list Any number in the list can be dialed so that the log a...

Page 39: ...numbers found in the StrataBase Numbers that cannot be found will show Unlisted Click on Show Numbers to show manually dialed calls not in StrataBase Call Direction Click on Incoming Outgoing or Show Both to display the needed data Call Type Click on Internal External or Show Both to display the needed call types Incoming Calls The Incoming Call Log dialog box is activated only when you select the...

Page 40: ...es in between or hold down Ctrl and click on each individual entry with the mouse cursor Each entry will be highlighted Pressing Delete in each case deletes all of the highlighted entries StrataBase This function enables you to go directly to StrataBase to add edit delete information Select any entry in the list by clicking on it with the mouse or using Tab Click StrataBase If the selected entry p...

Page 41: ...ystem Setup screen for the Msg button to work in this feature see Step 5 Set System Parameters on Page 16 for instructions To display the Voice Mail Access panel 1 Click File then Voice Mail Access Panel or click Msg The Log In String dials Once you have logged in to the VM system the Voice Mail Access Panel dialog box displays 2 Click the Play Next Last Rewind or Stop buttons to listen to your me...

Page 42: ...atic Callback ACB If you reach a busy DND station or line group you can set ACB to have the system call you back when the called station line group becomes available To set ACB 1 After reaching a busy station line group click Functions then Automatic Callback 2 Hang up the telephone Your station rings quickly when the called station or line group becomes idle 3 Answer within three rings to prevent...

Page 43: ...Forward has priority over the Station Hunt feature Call Forward must be set before the call is received Stations can have many DNs However a station must be the designated owner of a DN to Call Forward the DN Each station is designated as the owner of at least one DN which is called the station s PDN Call Forward buttons are used to Call Forward the PDNs only Use the Call Forward access codes to C...

Page 44: ...hen receiving Voice First hands free or OCA calls Callers can activate Call Forward No Answer by dialing 1 during their voice announcement Busy No Answer Forwards all calls to your station when your line is busy in Do Not Disturb mode or if you do not answer within a designated time Your system can be programmed to bypass Call Forward No Answer by dialing 1 during their voice announcement Cancel C...

Page 45: ...Hold provides you with several ways to pick up incoming calls calls on hold at other stations telephone group page and an external page To pick up a call 1 Lift your handset 2 Click Functions then Call Pickup 3 Select one of the following Specific Extension You are prompted to enter the ringing or held extension number CO Line On Hold You are prompted to enter the held CO line number Any Ringing L...

Page 46: ...set Use CO Line When you receive a call on a CO Line or DN the associated LED flashes To use a specific group CO Line to make a call 1 Click Functions then Use CO Line 2 Select one of the following Specific A dialog box displays Enter CO line number 1 200 and click OK Group A dialog box displays Enter a Group line number 1 16 and click OK 3 The PC DKT goes off hook The LCD of the Main screen shows...

Page 47: ...ing groups displays 3 Select a paging group from the list 4 Using a normal voice make your announcement and hang up Pick Up Group You can pickup calls ringing stations within your own group in another group or from the page zones To pickup a call 1 Click Functions then Pickup Group 2 Select one of the following Own You are connected to the caller Selected You are prompted for a group number Extern...

Page 48: ...m Call Park Recall timer expires the parked call automatically recalls to your station If your station is busy the parked call camps on to your station To park a call 1 Click Functions then Call Parking 2 Select Park Call 3 Enter Orbit number 999 and click OK The Strata DK system automatically selects the lowest available orbit number and displays it on your LCD If you are using a Personal Park Or...

Page 49: ...ck Set at Remote Station The Message Waiting light is set at the distant station Answer Message Waiting Your station rings the caller or voice mail device that left the message If there is no answer hang up and try later To answer Message Waiting 1 Click Functions then Message Waiting 2 Click Answer This calls the station which set the message The Message Waiting light turns off when the caller an...

Page 50: ...utive Override lets you enter an established conversation Note Your station must be enabled in system programming to use the Do Not Disturb and Executive Overrides Also a telephone can be enabled in system programming to block Executive Override from all other telephones To send an override signal enter into a conversation 1 Click Functions then Override 2 Select one of the following Busy Override...

Page 51: ...ck Functions then Transfer or press minus on the numeric keypad 2 Dial the directory number to where the call will be transferred 3 Announce the call if the called station is idle then hang up The call transfers Note The directory number could be the DN of a telephone a Hunt Group Number or an ACD Group To answer a transferred call When receiving a transferred call you hear an internal ring tone a...

Page 52: ...saging 2 Select one of the following options Out to Lunch In a Meeting No further actions are needed Call Back at Return on A data request box displays with the first word s displayed e g Call Complete the message and click OK System Message A dialog box displays prompting you to enter a system message number 65 99 Enter the number and click OK Note The Strata DK system installer must enter these ...

Page 53: ... 2 Click Send Message A dialog box displays asking you to enter the extension of the phone to which you are send ing the message 3 Enter the extension number Click OK A second dialog box displays 4 Select the type of message to be sent i e personal system If you chose personal a list of personal mes sages is displayed Select a message If you chose system enter a system message number 65 99 5 Click...

Page 54: ...hour of the day HH then two digits for the minutes MM 4 If you require the message to appear on a daily basis click Daily reminder 5 From the Message drop down menu click a personal or system message to display on the Timed Reminder Also available is a No Message display 6 Click Set To cancel a Timed Reminder 1 Click Functions then Timed Reminder 2 From the Select reminder drop down menu select a ...

Page 55: ...e active application Button Setup The Button Setup enables you to set the Flexible buttons to the following key types PDN Key External Key Speed Dial Key None of the above SDN PhDN See Button Setup on Page 17 for instructions on using this function Pop up options The Pop up options dialog box contains two panels Pop up box and Copy button Pop up box Panel The four options within this panel determi...

Page 56: ... type of information that is passed to the clipboard when you receive an incoming call and provides a means of passing a Caller s ID to TAPI Note The Name Number option must be ordered from your telephone company at an additional cost Extension Name 1 Click Setup then Extension Name 2 Click Set and enter a name and extension number The name number can be displayed in the LCD of the Main screen whe...

Page 57: ...el then a color from the grid on the left 4 Select the second box from the Color States panel then a color from the grid on the left If you choose the same color for this box that you did in Step 3 the LED does not flash and is a steady color If you choose a different color the LED flashes For example if the first box is red and the second is blue and the line state is On Hold then whenever a call...

Page 58: ...e WAV file you want to use Select the file and click OK The file name displays in the Associated Sound box 4 Optional Once the file is listed in the box you can hear the ringing tones by clicking Play 5 Repeat the procedure for each line for which you want to set change a ringing tone 6 To change the Recall WAV file highlight the default selection of recall wav and click Browse Repeat the selectio...

Page 59: ...ed group from the dialog box and the name displays in the Group Name box 3 Put the cursor in the box and edit the name 4 Repeat this procedure for each name you want to change 5 When you are finished click OK Voice Mail Settings The PC DKT can be connected to any system supported Voice Mail application provided that the VM system has been installed and is fully operational To set up voice mail fac...

Page 60: ...sword When you use this to log in the PC DKT will dial the voice mail system at 500 then wait for any key to be pressed after the voice mail system answers the call Then your extension number will be dialed automatically Note For security reasons it is not advisable to keep your password in the string 3 Optional Change any or all of the button labels and enter the applicable voice mail access code...

Page 61: ...16 for detailed instructions Help Menu Contents A detailed help file is provided with the operating procedures and functionality provided in a menu driven format About Provides a dialog box which lists information on the software writers and version number of the PC DKT The software and DK telephone system continues to be updated therefore the version number can be used to determine the version le...

Page 62: ...Help Menu 52 Strata DK PC DKT ...

Page 63: ...2 B backup phone 14 22 basic operations 21 before you start 9 button setup 45 buttons call log 4 minimize maximize 4 OCA 5 on hook off hook 5 setup 17 StrataBase 4 C cables 9 14 call forward 33 call log 28 delete entries 30 view 23 wipe 30 call parking 38 call pickup 35 caller ID 23 calls answer 22 conference 22 24 forward 33 incoming 29 log 28 make 22 outgoing 29 parking 38 pickup 35 redial 22 tr...

Page 64: ... pickup 35 display 35 door phone access 36 LCD messaging 42 message waiting 39 override 40 page all 32 page group 37 pick up group 37 record 44 timed reminder 44 transfer 41 use CO line 36 H handset cradle 9 14 headset 9 14 help menu 51 I incoming calls 29 installation before you start 9 connect cables 14 handling information 10 IRQ 11 12 15 memory address settings 11 12 15 PC requirements 10 PC D...

Page 65: ...oup names 49 PC DKT accessing 21 basic operations 21 card 2 11 customize 18 exiting 21 features 1 installation 9 PDN 17 pick up group 37 pop up options 45 R record option 44 ring sounds 48 S setup menu 45 always on top 45 button setup 17 45 extension name 46 LED colors 47 paging group names 49 pop up options 45 ring sounds 48 system setup 16 51 voice mail settings 49 software installation 15 sound...

Page 66: ...56 Index editing 27 searching 28 system setup 16 51 T timed reminder 44 transfer 41 U use CO line 36 V view call log 23 voice mail access 23 access panel 31 settings 49 W WAV files 48 ...

Reviews: