background image

Preparation 3 - Registering Size of Paper Placed    37

Preparation 3 - Registering Size of Paper Placed

When you place paper in a drawer for the first time or when you place paper whose size is differ-
ent from that of the paper which has been placed in the drawer, the new paper size needs to be 
registered into the equipment.
Registration of standard sizes (A3, A4, A4-R, A5-R, B4) differs from that of standard sizes other 
than these.

Registering standard size (A3, A4, A4-R, A5-R, B4)

In this section, A4 size is registered in the drawer of the equipment as an example.

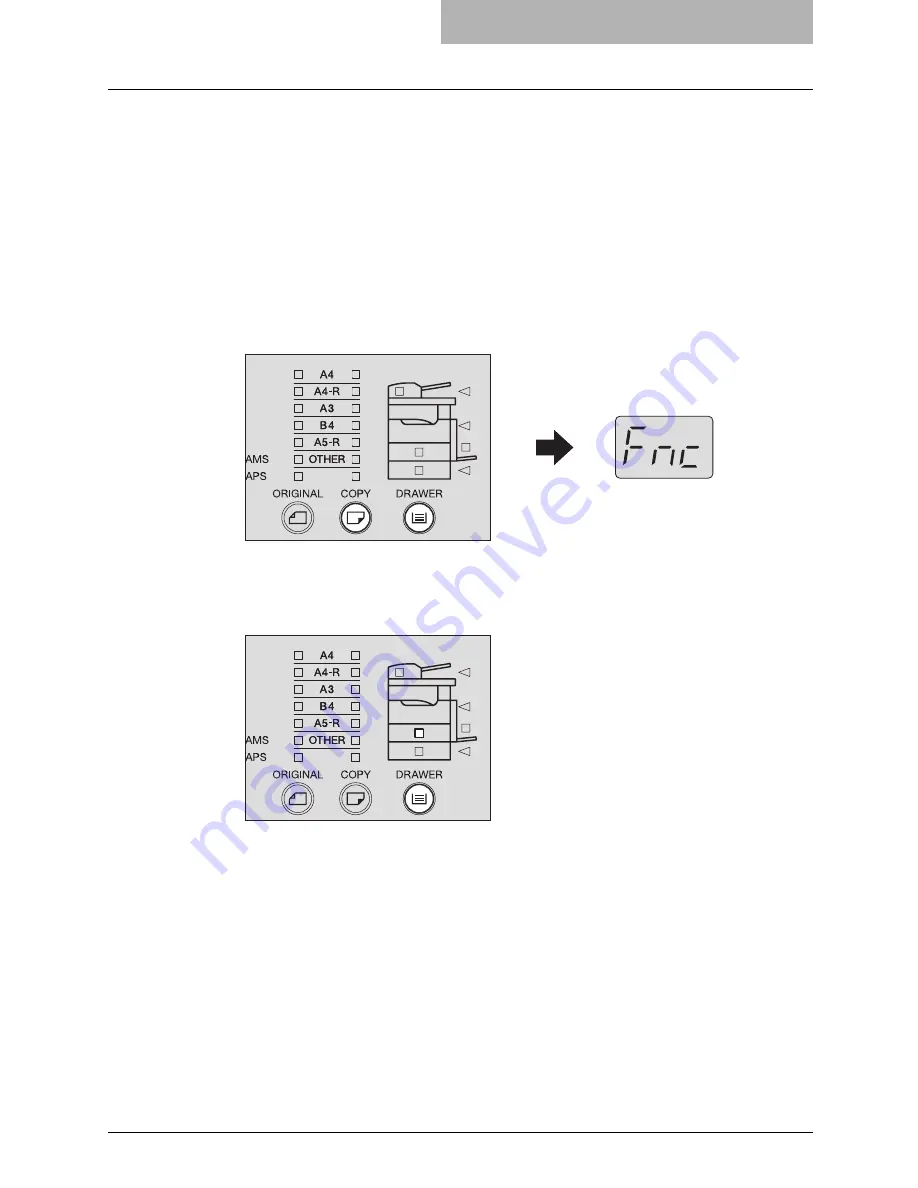
1

Press and hold the [COPY] and [DRAWER] buttons simultaneously 
for more than two seconds.

“Fnc” appears on the LED display.

2

Press the [DRAWER] button several times until the lamp of the 
drawer in which you placed paper is lit.

Summary of Contents for e-studio 166

Page 1: ...MULTIFUNCTIONAL DIGITAL SYSTEMS Operator s Manual for Copying Functions ...

Page 2: ......

Page 3: ...l for the operation of this equipment This operator s manual describes the following y How to use this equipment y How to inspect and carry out maintenance on this equipment y How to remedy mechanical and copying problems Be sure to read this manual before using the e STUDIO166 206 Keep this manual handy and retain it for future reference ...

Page 4: ... resulting from the use of this product in restricted working environments are not the responsibility of TOSHIBA TEC The consequences of the use of this product in restricted working environments may be an electromag netic interference with other devices or machines in the nearby surrounding area This can result into malfunction including data loss data error pertaining to this product or the othe...

Page 5: ...roduct may not be disposed as unsorted municipal waste and has to be collected separately By ensuring this product is disposed of correctly you will help prevent potential negative consequences for the environment and human health which could otherwise be caused by inappropriate waste handling of this product For more detailed information about the take back and recycling of this product please co...

Page 6: ...stalled in your computer download one of them This can be done via the website of Adobe Systems Incorporated Operator s Manual for Copying Functions Booklet This manual This manual describes the basic operations mainly copying functions of this equipment It also describes safety precautions to ensure correct and safe use of this equipment Be sure to read this before you use the equip ment Operator...

Page 7: ...original is placed in a landscape direction e g A4 size original on the original glass Paper or originals of A3 or B4 size can only be placed in a landscape direction therefore R is not added to these sizes Indicates a potentially hazardous situation which if not avoided could result in death serious injury or serious damage or fire in the equipment or sur rounding assets Indicates a potentially h...

Page 8: ...of Adobe Systems Incorporated y Other company or product names shown in this manual may be a brand name or a trade mark of each company 2007 TOSHIBA TEC CORPORATION All rights reserved Under the copyright laws this manual cannot be reproduced in any form without prior written permission of TOSHIBA TEC CORPORATION No patent liability is assumed however with respect to the use of the information con...

Page 9: ...opy Paper 31 Acceptable media types 31 Recommended paper 32 Placing paper in drawers 33 Preparation 3 Registering Size of Paper Placed 37 Registering standard size A3 A4 A4 R A5 R B4 37 Registering other standard sizes 38 Chapter 2 HOW TO MAKE COPIES Placing Originals 42 Acceptable originals 42 Placing originals on the original glass 43 Placing booklet type originals such as books or catalogues 44...

Page 10: ...Level 71 Chapter 4 SETTINGS AND MANAGEMENT OF EQUIPMENT Switching Operation Sound On Off 74 Checking Total Number Copied 75 Chapter 5 TROUBLESHOOTING When Message Lamp is Lit Blinking 78 Paper Jams 81 Checking position of paper jams 81 Paper jams within Automatic Document Feeder optional 82 Paper jams on bypass tray 84 Paper jam behind transfer unit 85 Paper jams within fuser unit 86 Paper jams wi...

Page 11: ...9 Cleaning charger 101 Cleaning transfer charger 102 Chapter 7 SPECIFICATIONS AND OPTIONS e STUDIO166 206 Specifications 106 Continuous copying speed 107 Specifications of Options 108 Packing List 109 INDEX 111 ...

Page 12: ...10 CONTENTS ...

Page 13: ...ng or printing operation is available even if you are using a toner cartridge other than the one we recommend In that case however the equipment cannot detect whether the toner cartridge is installed or not and therefore the toner lamp is lit even if the toner cartridge is cor rectly installed You cannot utilize the toner remaining check function either If you are using a toner cartridge other tha...

Page 14: ...mum Image Quality TOSHIBA toner is manufactured using ultra fine quality materials under precisely controlled con ditions to ensure that your TOSHIBA equipment will continually generate sharp high quality images Cost Advantage Genuine TOSHIBA toner provides value Only the proper amount of toner is used during the reproduction process thereby enabling the machine to continue to operate until all th...

Page 15: ...d by various options y The Automatic Document Feeder ADF dramatically saves time when you need to copy massive amounts of originals y The Paper Feed Unit PFU adds one more drawer y Electronic sorting 4 is realized with the Expansion Memory Ecological energy saving design y The toner recycling system in which used toner is recovered and reused is adopted y Its warm up time has become be approx 25 s...

Page 16: ...ipe or any other object not suitable for grounding y Plug the power cable securely into the outlet If it is not plugged in properly it could heat up and cause a fire or give you an electric shock y Do not damage break or attempt to repair the power cable The following things should not be done to the power cable Twisting it Bending it Pulling it Placing anything on it Making it hot Situating it ne...

Page 17: ... sure that there is enough space around the system to facilitate changing of parts maintenance and clearing paper jams If there is insufficient space some operations such as bypass feeding will become difficult and the equipment could even break down To insure optimal operation allow clearances of at least 80 cm on the right and 10 cm on the left and behind y Be sure to fix the power cable securel...

Page 18: ...emove the plug from the outlet for safety purposes during that time If an insulation failure occurs this could cause a fire or give you an electric shock Caution y Do not place heavy objects 4 kg or more on the original glass and do not press on it with force Breaking the glass could cause personal injury y Do not place heavy objects 4 kg or more on the equipment If the objects fall off this could...

Page 19: ...ral Precautions 17 Position of Certification label etc Explanatory label Identification label Warning label Warning for high temperature areas fuser unit Warning for high temperature areas ventilation holes ...

Page 20: ...re or get an electric shock Always contact your service representative for maintenance or repair of the internal parts of the equipment y Do not let liquids such as water and oil get into the system when cleaning the floor This could cause a fire and give you an electric shock Caution y Always keep the plug and outlet clean Prevent them from accumulating dust and dirt This could cause a fire and g...

Page 21: ...ions events or accidents beyond the rea sonable control of TOSHIBA TEC CORPORATION including without limitation acts of God war riot civil commotion malicious or deliberate damage fire flood or storm natural calamity earthquakes abnormal voltage or other disasters c additions modifications disassembly transportation or repairs by any person other than service technicians authorized by TOSHIBA TEC ...

Page 22: ...tion of the development and wider usage of office equipment including energy efficient computers in order to address environmental issues such as global warming Manufacturers that participate in this Programme can attach the Energy Star logo to products after confirming that they meet the energy saving standards of this Pro gramme Also these standards and logo are commonly used within the U S Envi...

Page 23: ...Inner side 23 Configuration of options 25 Control panel 26 Preparation 1 Turning Power ON 29 Turning power ON 29 Saving energy when not in use Energy saving mode 30 Preparation 2 Placing Copy Paper 31 Acceptable media types 31 Recommended paper 32 Placing paper in drawers 33 Preparation 3 Registering Size of Paper Placed 37 Registering standard size A3 A4 A4 R A5 R B4 37 Registering other standard...

Page 24: ...type of the originals P 46 Placing originals on Automatic Document Feeder optional P 82 Paper jams within Automatic Document Feeder optional 3 Operator s Manual pocket Back side optional KK 1660 Keep the Operator s Manual in this 4 Side cover 5 Bypass tray Use this to make copies on special media types such as thick paper overhead transparen cies or tracing paper P 50 Using Bypass Tray P 84 Paper ...

Page 25: ...paper P 42 Placing Originals 2 Control panel Use this to perform copying key in the copy quantity or set other functions P 26 Control panel 3 Toner cartridge P 11 Recommended toner cartridges P 89 Replacing Toner Cartridge 4 Power switch Turn the power of the equipment ON or OFF with this P 29 Preparation 1 Turning Power ON 5 Paper exit stopper Use this to prevent the exiting paper from falling Op...

Page 26: ...er speed certified by the USB Implementers Forum y Connect the equipment with a PC directly by the USB cable When it is connected with a PC via a USB hub the equipment may not be recognized 8 Receiving tray 9 Scanning area The data of originals transported from the Automatic Document Feeder optional MR 2017 are scanned here P 100 Daily Inspection 10 Original scale Use this to check the size of an ...

Page 27: ...s listed below are available Contact your service technician or service representative for the details Platen Cover included KA 1640PC Automatic Document Feeder MR 2017 Expansion Memory GC 1240 Main body Paper Feed Unit MY 1027 Operator s Manual Pocket Back side KK 1660 ...

Page 28: ...e of paper placed on the bypass tray P 50 Using Bypass Tray 3 DATA lamp The lamp blinks when print data are being received from a PC connected to the equipment 4 Message lamps Each of five lamps shows you the current status of the equipment For the meaning of each lamp and countermeasure of each status see the following page P 78 When Message Lamp is Lit Blinking 5 Zoom buttons lamp Use them to se...

Page 29: ...saving mode 10 FUNCTION CLEAR button lamp Use this to clear all setting changes 11 CLEAR STOP button Use this to stop the copy job in process or return the copy quantity keyed in to 1 12 START button lamp Use this to start copying Copies can be made when the lamp is lit It blinks when the equip ment is waiting for copying to be started For basic copy operations see the following page P 47 Making C...

Page 30: ... released When the Automatic Document Feeder optional on which the originals are placed is raised 19 COPY button lamps Use this button to select the size of paper to be used The lamp of the paper size currently selected blinks when this size of paper is not placed in the drawer or on the bypass tray See the following page for details P 62 Manual paper selection 20 ORIGINAL button lamps Use this bu...

Page 31: ... the warm up has finished auto job start The START lamp keeps blinking from when you press the START button to when the warm up finishes 2 Key in the access code if the equipment is managed under the access code function Key in the 3 digit access code and then press the START button Then the equipment is ready for copying y If the access code function is enabled press the FUNCTION CLEAR button aft...

Page 32: ...turn the equipment into the energy saving mode manually Press the ENERGY SAVER button on the control panel The equipment is now in the energy saving mode The ENERGY SAVER lamp is lit Cancelling the energy saving mode Press the ENERGY SAVER button The energy saving mode is canceled The energy saving mode can be cancelled also in the following cases y When the Platen Cover or the Automatic Document ...

Page 33: ...her than the TOSHIBA recommended ones are used this could cause an equipment malfunction y You cannot mix various paper sizes in one drawer y LT format is the standard size for only use in North America Abbreviations for LT format sizes LT Letter LD Ledger LG Legal ST Statement COMP Computer Feeder Media type Paper size Maximum sheet capacity 1 Drawers of the equip ment and Paper Feed Unit optiona...

Page 34: ...y smooth or rough Do not use the types of paper listed below since they may cause an equipment malfunction y Paper whose surface is specially treated y Paper once printed with other copiers or printers Storing paper Observe the following cautions when storing copy paper y Wrap copy paper in its wrapping paper to prevent it from gathering dust y Do not expose copy paper to direct sunlight y Store c...

Page 35: ...r in the drawer For the acceptable paper see the following page P 31 Acceptable media types 1 Turn the power of the equipment ON 2 Pull out the drawer carefully Pull out the drawer until it comes to a stop 3 Press down the paper plate Press it down until you hear a click sound and it is no longer lifted up ...

Page 36: ...iling guide A and then reinstall the guide at the position of the desired paper size The paper size is indicated on the bottom inner surface of the drawer 5 While pushing the green knob of the side guides fully widen the gap between them Widen the gap with both hands A ...

Page 37: ...1 Acceptable media types y Fan the paper well before placing it in the drawer otherwise multiple feeding could occur y Place the paper face up You may tell its face by the note on its wrapping paper 7 Adjust the side guides to the desired paper size Be sure that a gap of approx 0 5 mm less than 1 0 mm in total is left between the paper and each side guide shown as A in the picture If the gap is in...

Page 38: ...ght when closing the drawer This could cause injury Register the paper size into the equipment When you place paper register the size of the paper into the equipment Be sure that the size is registered correctly or it could cause a paper jam For the registration of paper size see the following page P 37 Preparation 3 Registering Size of Paper Placed Be sure to register the paper size when you have...

Page 39: ...o be registered into the equipment Registration of standard sizes A3 A4 A4 R A5 R B4 differs from that of standard sizes other than these Registering standard size A3 A4 A4 R A5 R B4 In this section A4 size is registered in the drawer of the equipment as an example 1 Press and hold the COPY and DRAWER buttons simultaneously for more than two seconds Fnc appears on the LED display 2 Press the DRAWE...

Page 40: ... status 4 Press the START button The paper size has been registered Registering other standard sizes When standard size paper other than A3 A4 A4 R A5 R or B4 is placed register this size as OTHER size Key in the code number of the paper size to register it as OTHER size See the table below for the code number of each size 1 ST R and A5 R can be placed only on the bypass tray Paper size Code No Pa...

Page 41: ... Press and hold the COPY and DRAWER buttons simultaneously for more than two seconds Fnc appears on the LED display 2 Press the DRAWER button several times until the lamp of the drawer in which you placed paper is lit 3 Press the COPY button several times until the OTHER lamp is lit Fxx appears in the LED display Two digits come at xx ...

Page 42: ...e number of the paper placed in the drawer e g Placing LT size code number 10 If the FUNCTION CLEAR button is pressed at this step the size is not registered and the equipment will return to its normal status 5 Press the START button The paper size has been registered as OTHER size ...

Page 43: ... originals such as books or catalogues 44 Using Automatic Document Feeder optional 45 Placing originals on Automatic Document Feeder optional 46 Making Copies 47 Stopping Resuming copying 48 Interrupting copying and making another copy Interrupt copy 49 Using Bypass Tray 50 Preparation Registering paper size placed on bypass tray 51 Bypass copying on standard size paper 55 ...

Page 44: ...tween 50 g m2 and 127 g m2 5 Some media types may not be used 6 A5 size originals must be placed in a landscape direction When the built in memory has become full during scanning When the built in memory in the equipment has become full during the scanning of the copy job scanning stops even if the number of sheets scanned so far has not exceeded the maximum value In this case the FUNCTION CLEAR l...

Page 45: ...th force Breaking the glass could injure you 1 Raise the Platen Cover or the Automatic Document Feeder optional 2 Place the original face down on the original glass and align it against the left rear corner of the glass When copying highly transparent originals When copying highly transparent originals such as overhead transparencies or tracing paper place a blank sheet of paper A the same size as...

Page 46: ... Document Feeder optional 2 Open the desired page of the original and place it face down Align it against the left rear corner of the glass 3 Lower the Platen Cover or the Automatic Document Feeder optional carefully y Do not try to lower the Platen Cover or the Automatic Document Feeder optional forcibly when the original is very thick There will be no problem in copying even if they are not full...

Page 47: ... or curled ones y Ones with carbon paper y Taped pasted or cut out ones y Clipped or stapled ones y Ones with holes or tears y Damp ones y Overhead transparencies or tracing paper y Coating paper e g coated with wax y Ones with many holes punched e g loose leaf paper The following types of originals are usable but need extra care y Ones which cannot be made to slide with the fingers or whose surfa...

Page 48: ... top sheet of the originals will be scanned first y The total sheets of originals placed must not exceed 100 50 to 80 g m2 or the stack height of the originals must not exceed 16 mm regardless of their sizes When placing a large amount of originals with a long width Pull out the original stopper so that the exiting originals will not fall When replacing this stopper lift it slightly and push it in...

Page 49: ...wing pages P 42 Acceptable originals P 46 Placing originals on Automatic Document Feeder optional P 43 Placing originals on the original glass P 44 Placing booklet type originals such as books or catalogues 3 Key in the desired number of copies copy quantity when you copy more than one set e g 5 sets If you want to correct the copy quantity keyed in press the CLEAR STOP button and then key in the ...

Page 50: ...hen press the START button Copying resumes Press the FUNCTION CLEAR button to end the copy job When the paper has run out When the paper in the drawer has run out during copying the copying stops and the paper empty lamp blinks The DRAWER lamp corresponding to the one whose paper has run out blinks Add paper to the drawer and press the START button Copying then resumes Stopping Resuming copying Pr...

Page 51: ...omatic Document Feeder optional and the sort functions are used 1 Press the INTERRUPT button The INTERRUPT lamp blinks and the lamp will be fully lit after a while When the INTERRUPT button is pressed during scanning the INTERRUPT lamp blinks and then the lamp will be fully lit after the scanning has finished 2 Replace the original with a new one 3 Select the copy modes as required and then press ...

Page 52: ...ts when TOSHIBA recommended paper is used See the following page for the TOSHIBA recommended paper P 32 Recommended paper 2 50 to 63 g m2 paper can be used if it is set on the bypass tray sheet by sheet 3 Be sure to use the overhead transparencies that TOSHIBA recommends When transparencies other than the TOSHIBA recommended ones are used this could cause an equipment malfunction Media type Paper ...

Page 53: ...zes A3 A4 A4 R A5 R and B4 P 52 Registering other standard sizes Registering standard size A3 A4 A4 R A5 R B4 In this section the registration procedure is described with A4 size paper placed on the bypass tray as an example 1 Press and hold the COPY and DRAWER buttons simultaneously for more than two seconds Fnc appears on the LED display 2 Press the DRAWER button several times until the lamp of ...

Page 54: ...eturn to its normal status 4 Press the START button The paper size has been registered Registering other standard sizes When standard size paper other than A3 A4 A4 R A5 R or B4 is placed register this size as OTHER size Key in the code number of the paper size to register it as OTHER size See the table below for the code number of each size Paper size Code No Paper size Code No B5 05 LT R 11 B5 R...

Page 55: ...an example 1 Press and hold the COPY and DRAWER buttons simultaneously for more than two seconds Fnc appears on the LED display 2 Press the DRAWER button several times until the lamp of the bypass tray is lit 3 Press the COPY button several times until the OTHER lamp is lit Fxx appears in the LED display Two digits come at xx ...

Page 56: ...e paper placed on the bypass tray e g Placing LT size code number 10 If the FUNCTION CLEAR button is pressed at this step the size is not registered and the equipment will return to its normal status 5 Press the START button The paper size has been registered as OTHER size ...

Page 57: ...ring paper size placed on bypass tray 1 Place paper straight on the bypass tray face down Then align the side guides to the paper length while holding A y Be sure that the stack height of paper does not exceed the indicators of the side guides y Fan the stack of paper well before placing it on the bypass tray y Do not push the paper forcibly into the entrance of the bypass feeder This could cause ...

Page 58: ...pass tray is lit You can select the media type from the following three THICK PAPER 1 Thick paper 81 to 105 g m2 THICK PAPER 2 Thick paper 106 to 163 g m2 sticker labels TRANSPARENCY Overhead transparencies y You do not need to select the media type when you use plain paper 64 to 80 g m2 or tracing paper y If you select a different media type from the one you placed on the bypass tray this could c...

Page 59: ...has run out during copying copying continues with the paper of the same size in the drawer as the one on the bypass tray If the size of the paper on the bypass tray has not been registered in advance however copying stops In this case add paper to the bypass tray and press the START but ton to resume copying y When bypass copying has finished the FUNCTION CLEAR lamp blinks Press the FUNCTION CLEAR...

Page 60: ......

Page 61: ...es Default Settings 60 Paper Selection 61 Automatic paper selection APS 61 Manual paper selection 62 Zooming In Out Copy Image 64 Automatic magnification selection AMS 64 Specifying both the sizes of the original and the copy paper 66 Specifying reproduction ratio manually 67 Copying in Same Page Order as Originals Sort Copying 69 Selecting Image Mode 70 Adjusting Density Level 71 ...

Page 62: ...er selection APS can be set only when the Automatic Document Feeder optional is used 2 Sort copying can be set only when the Expansion Memory optional is used If you need to change the default settings listed above contact your service representative Item Contents Default setting at installation Reproduction ratio 25 200 100 Copy quantity 1 999 1 Paper selection Automatic paper selection APS 1 Man...

Page 63: ...nsparen cies or when an original is placed on the original glass Automatic paper selection APS can be used only when you place originals on the Automatic Document Feeder optional Automatic paper selection APS When you place a standard size original on the Automatic Document Feeder optional the equipment detects its size and automatically selects copy paper of the same size as the original The stan...

Page 64: ...iginal glass and also when you use the following originals whose sizes may not be detected correctly with automatic paper selection y Highly transparent ones e g overhead transparencies tracing paper y Wholly dark ones or ones with dark borders y Non standard size e g newspapers magazines In this method if the desired size of copy paper is not placed in the drawer replace the paper already placed ...

Page 65: ...lection 63 3 Press the DRAWER button several times until the lamp of the desired drawer is lit e g Selecting the drawer of the equipment 4 Select the other copy modes as required and then press the START button ...

Page 66: ...n the originals are overhead transparencies or when an original is placed on the original glass Specifying reproduction ratio manually Specify the reproduction ratio manually with the Zoom buttons zooming out zooming in from 25 to 200 Automatic magnification selection AMS Specify the copy paper size to be used in advance The equipment then detects the size of the original and automatically sets th...

Page 67: ... is lit 4 Place the original on the Automatic Document Feeder optional The equipment detects the size of the original and then the most suitable reproduction ratio to the copy paper size is set 5 Select the other copy modes as required and then press the START button If the FUNCTION CLEAR lamp is blinking and copying stops The direction of the original placed is not correct Press the FUNCTION CLEA...

Page 68: ...on several times until the lamp of the desired paper size is lit e g Selecting A4 for copy paper y You can select the desired paper size with the DRAWER button in the same proce dure y When standard size paper other than A3 A4 A4 R A5 R or B4 is placed register this size as OTHER size in advance P 38 Registering other standard sizes The most appropriate reproduction ratio for both the sizes of the...

Page 69: ...ton until the desired reproduction ratio appears One press of each button increases or decreases the reproduction ratio by 1 When you keep pressing either of them the reproduction ratio also keeps changing The reproduction ratio can be set from 25 to 200 y Press the button to return it to 100 y Press the and buttons simultaneously to set it 25 the minimum reproduction ratio y Press the and buttons...

Page 70: ... Selecting A4 for copy paper y You can select the desired paper size with the DRAWER button in the same proce dure y When standard size paper other than A3 A4 A4 R A5 R or B4 is placed register this size as OTHER size in advance P 38 Registering other standard sizes 6 Select the other copy modes as required and then press the START button ...

Page 71: ...tion only when the origi nals are placed on the Automatic Document Feeder optional The Automatic Document Feeder and Expansion Memory both optional are required for sort copying 1 Place paper in the drawer 2 Place the original 3 Press the SORT button The SORT lamp is lit and sort copying is enabled 4 Select the other copy modes as required and then press the START button Copied and sorted in 2 set...

Page 72: ...d photographs mixed PHOTO Originals with photographs TEXT Originals with text only or with text and fine illustrations only TEXT PHOTO is set by default at the installation of the equipment 1 Place paper in the drawer 2 Place the original 3 Press the original mode button until the lamp of the desired mode is lit e g Original with photographs 4 Select the other copy modes as required and then press...

Page 73: ...ensity mode in the following procedure 1 Place paper in the drawer 2 Place the original 3 Press the density adjustment buttons light or dark to adjust the density to the desired level The density level can be set within 7 stages One press of each button increases or decreases the density level by one stage When you keep pressing either of them the density level also keeps changing 4 Select the oth...

Page 74: ......

Page 75: ...OF EQUIPMENT This chapter describes how to switch ON or OFF the operation sound and how to check the total number of sheets you have copied with this equipment Switching Operation Sound On Off 74 Checking Total Number Copied 75 ...

Page 76: ...uipment on or off 1 Press the light and dark buttons simultaneously for more than two seconds Fnc appears on the LED display The density adjustment lamps show the sound status as follows All lamps on Sound on All lamps off Sound off 2 Press the AUTO button to switch the sound on or off 3 Press the START button The equipment returns to its normal status ...

Page 77: ...conds The upper digits of the total number appear on the LED display The total number is shown blinking e g The total number is 12 527 2 Switch the display to check the rest of the total number Press the zooming out or zooming in button to switch the display 3 Press any button other than the or button when you have finished checking The equipment returns to its normal status The total number of sh...

Page 78: ......

Page 79: ...ing position of paper jams 81 Paper jams within Automatic Document Feeder optional 82 Paper jams on bypass tray 84 Paper jam behind transfer unit 85 Paper jams within fuser unit 86 Paper jams within Paper Feed Unit optional 88 Replacing Toner Cartridge 89 Before Calling Service Technician 94 General operation 94 Toner related items 95 Original Copy paper related items 95 Image trouble 96 ...

Page 80: ...cartridge by means of the cartridge detecting function and the toner remaining check function only when a TOSHIBA recommended toner cartridge is used as follows Lit There is now little toner left in the toner cartridge or the toner cartridge is not installed correctly Blinking The toner in the toner cartridge has run out y When the toner lamp is lit there is still a little toner remaining in the t...

Page 81: ...ctly installed and notifies you if it is not Toner remaining check function This function notifies you when there is little toner remaining in the cartridge Any copying or printing operation is available even if you are using a toner cartridge other than the one we recommend In that case however the equipment cannot detect whether the toner cartridge is installed or not and therefore the toner lam...

Page 82: ...act your ser vice representative When the key of the digital keys and the CLEAR STOP button are pressed simulta neously an error code consisting of a letter of the alphabet and numbers appears on the LED display Contact your service representative with this code Never attempt to repair disassemble or modify the equipment by yourself This could cause an electric shock a fire or serious injury Conta...

Page 83: ...due to one of the causes listed below Check the following items when they occur frequently y Originals which are not acceptable for the Automatic Document Feeder optional are placed P 45 Precautions for Automatic Document Feeder optional y Paper which is not acceptable for the equipment is used P 32 Paper types not acceptable y The sizes of paper placed in the drawer or on the bypass tray are not ...

Page 84: ... the equipment Do not touch the fuser unit or the metal part around the unit When you release paper jammed within the fuser unit do not touch the fuser unit or the metal part around the unit This could cause burns or injury to your hands if you touch the inside of the equipment Do not touch the photoconductive drum When you release the paper jammed within the transfer unit or the fuser unit be car...

Page 85: ...Paper Jams 83 2 Release the jammed original 3 Turn the dial to release the jammed original 4 Open the transport guide ...

Page 86: ...te 6 Close the transport guide and then close the upper cover Paper jams on bypass tray 1 Pull out the paper jammed on the bypass tray Check the lower part of the transport guide in the paper feeding area Paper may be jammed under the transport guide behind the transfer unit Check if any paper is jammed P 85 Paper jam behind transfer unit ...

Page 87: ...ght between the equipment and the side cover This could injure you 1 Open the side cover 2 Pull the transfer unit toward you carefully to lay it down while hold ing up the green lever 3 Release the jammed paper Be sure not to touch the photoconductive drum when releasing the jammed paper ...

Page 88: ...e careful not to let your fingers be caught between the equipment and the side cover This could injure you y Do not touch the fuser unit or the metal part around the unit This could cause burns or injury to your hands if you touch the inside of the equipment 1 Open the side cover and then lay down the transfer unit Then press down the two fuser pressure release levers green until they come to a st...

Page 89: ... the jammed paper up or down as shown below depending on the position of the paper Be sure not to touch the photoconductive drum when releasing the jammed paper 4 Return the transport guide to its original position and then close the transfer unit and the side cover A Pulling it up Pulling it down ...

Page 90: ...5 TROUBLESHOOTING 88 Paper Jams Paper jams within Paper Feed Unit optional 1 Open the paper feed cover of the unit 2 Release the jammed paper 3 Close the paper feed cover of the unit ...

Page 91: ...ridge check the product name of the cartridge If you can see T 1640 this cartridge is usable y Do not dispose of used toner cartridges Contact your service representative y Do not touch the parts on the circuit board mounted on the toner cartridge because they may be damaged Never attempt to incinerate toner cartridges This could cause an explosion 1 Open the front cover 2 Hold down the green leve...

Page 92: ...ge Never attempt to incinerate toner cartridges This could cause an explosion Do not dispose of used toner cartridges Contact your service representative 4 Shake the new toner cartridge well to loosen the toner inside 5 Remove the protective sheet from the end of the cartridge ...

Page 93: ...e green lever is raised and raise it if not y Insert the toner cartridge until you hear a click sound 8 Clean the charger Hold the cleaning knob of the charger and pull it out toward you carefully until it comes to a stop Then reinsert it in its original position carefully Repeat this procedure two or three times Check if the cleaning knob is fully inserted after cleaning ...

Page 94: ...eplacing Toner Cartridge 9 Open the side cover 10 Pull the transfer unit toward you carefully to lay it down while hold ing up the green lever 11 Remove the transfer charger cleaner from the front pocket of the transfer unit ...

Page 95: ...nd then check if the cleaner pad has contacted with the transfer charger wire 3 Clean the wire from its front end to the other end in two reciprocating motions 4 Remove the cleaner from the front end of the transfer charger after cleaning 13 Return the transfer charger cleaner into the cleaner pocket and then close the transfer unit 14 Close the side cover 15 Close the front cover The equipment st...

Page 96: ...of paper have continuously exited and the equipment stops copy ing to prevent the copied paper from overflowing from the tray Remove the paper from the receiving tray and then press the START button Copy ing resumes Press the FUNCTION CLEAR button to end the copy job Printing stops before it is fin ished The START lamp and the middle paper jam position lamp are lit and the Out of paper error dialo...

Page 97: ... for copying after the toner cartridge is inserted The toner cartridge inserted is not usable for this equip ment Check the product name of the toner car tridge If you can see T 1640 this car tridge is usable Phenomenon Usual cause Countermeasure An original jams An original not acceptable for the equipment is being used Check if the original is acceptable for the equipment P 45 Precautions for Au...

Page 98: ...en sheet scanning area or guides are dirty Clean them P 100 Daily Inspection The copy density is set darker Make the density lighter if you use the manual copy density mode Or use the automatic copy density mode Highly transparent originals such as OHP films or tracing paper are used Place a blank sheet of paper the same size as the original or larger over the orig inal The copy image is fogged Th...

Page 99: ... or guides are stained Clean them P 100 Daily Inspection The charger is dirty Clean the charger P 101 Cleaning charger The copy image has white streaks in a horizontal direc tion The transfer charger wire is dirty Clean the transfer charger wire P 102 Cleaning transfer charger Phenomenon Usual cause Countermeasure ...

Page 100: ......

Page 101: ... MAINTENANCE AND INSPECTION This chapter describes how to clean this equipment to ensure you get the best possible copy performance Daily Inspection 100 Cleaning charger 101 Cleaning transfer charger 102 ...

Page 102: ...Scanning area Wipe with a sheet of soft dry cloth or soft cloth dampened in water and squeezed tightly Do not use alcohol or solvent 2 Original glass 3 Guides 4 Platen sheet Clean in the following procedure according to the level of staining Wipe with a soft dry cloth Wipe with a soft cloth dampened in water and squeezed tightly Wipe with a soft cloth dampened in alcohol and squeezed tightly and t...

Page 103: ...ng the procedure below 1 Open the front cover 2 Clean the charger Hold the cleaning knob of the charger and pull it out toward you carefully until it comes to a stop Then reinsert it in its original position carefully Repeat this procedure two or three times Check if the cleaning knob is fully inserted after cleaning 3 Close the front cover ...

Page 104: ... of the whole image may be lowered Clean the transfer charger wire following the procedure below Be careful not to let your fingers be caught between the equipment and the side cover This could injure you 1 Open the side cover 2 Pull the transfer unit toward you carefully to lay it down while hold ing up the green lever 3 Remove the transfer charger cleaner from the front pocket of the transfer un...

Page 105: ...eaner onto the front wall and then check if the cleaner pad has contacted with the transfer charger wire 3 Clean the wire from its front end to the other end in two reciprocating motions 4 Remove the cleaner from the front end of the transfer charger after cleaning 5 Return the transfer charger cleaner into the cleaner pocket and then close the transfer unit 6 Close the side cover ...

Page 106: ......

Page 107: ...7 SPECIFICATIONS AND OPTIONS e STUDIO166 206 Specifications 106 Specifications of Options 108 Packing List 109 ...

Page 108: ...P 13 LG Acceptable copy paper weight Drawer 64 80 g m2 Bypass 64 80 g m2 for continuous feed 50 163 g m2 for single feed Warm up time Approx 25 seconds First copy time A4 portrait Approx 7 6 seconds Continuous copy speed See P 107 Continuous copying speed Multiple copying Up to 999 copies digital key entry Excluded image width Copy Leading edge 3 0 2 0 mm Trailing edge 2 0 2 0 mm Both edges 2 0 2 ...

Page 109: ...nded paper is used for the values of the specifications above y The bypass copying speed is as listed above when specifying the paper size y This specification varies depending on the copying conditions and the environment Paper size Feeder e STUDIO166 e STUDIO206 A4 A5 R 1 B5 LT ST R 1 Drawer 16 20 Bypass tray 16 20 A4 R B5 R LT R Drawer 15 5 15 5 Bypass tray 15 5 15 5 B4 FOLIO LG COMP 13 LG Draw...

Page 110: ...ss in height more than 80 g m2 Feeding speed 45 5 182 mm s Acceptable originals A3 A4 A4 R A5 R B4 B5 B5 R FOLIO LD LG LT LT R ST R COMP A5 and ST size are not acceptable Paper weight 50 127 g m2 Power source Power supplied from the equipment Dimensions 600 mm W x 513 mm D x 135 mm H Weight Approx 11 0 kg Power consumption 30 W max Model name MY 1027 Acceptable paper size A3 A4 A4 R B4 B5 B5 R FOL...

Page 111: ...Packing List 109 Packing List Packing list Operator s Manual Power cable Photoconductive drum Set up report CD ROM 2 pcs ...

Page 112: ......

Page 113: ...R button lamps 28 E ENERGY SAVER button lamp 27 30 Energy saving mode 30 F Features 13 Front cover 23 FUNCTION CLEAR button lamp 27 Fuser unit 86 G General precautions 14 I Image mode 70 Inspection 100 INTERRUPT button lamp 27 49 Interrupt copy 49 L LED display 27 M Making copies 47 Manual paper selection 62 Media type 31 45 50 56 Media type setting button lamps 26 Message lamps 26 78 O Operation ...

Page 114: ...ce call lamp 80 Side cover 22 SORT button lamp 26 Sort copying 69 Sound 74 Specifications 106 108 Specifications of options 108 START button lamp 27 Sticker labels 31 Stopping copying 48 Storing paper 32 T Thick paper 31 50 Toner cartridge 11 23 79 89 Toner lamp 78 Toner remaining check function 11 Total number copied 75 Tracing paper 31 Transfer charger 102 Transfer unit 85 Transparencies 31 50 T...

Page 115: ...DP 1660 2060 OME06015700 ...

Page 116: ...R061120C8500 TTEC 2007 01 2007 TOSHIBA TEC CORPORATION All rights reserved MULTIFUNCTIONAL DIGITAL SYSTEMS Operator s Manual for Copying Functions 2 17 2 HIGASHIGOTANDA SHINAGAWA KU TOKYO 141 8664 JAPAN ...

Reviews: