background image

TruRecorder

This software is a recording application that can
check recorded data quickly and easily, analyze
voices to automatically identify specific speakers,
and allow you to mark important statements in
the recording.
To access it, click 

TruRecorder

 in 

All apps

.

For more detailed information, see the Help of
this utility.

TOSHIBA
Maintenance Utility

TOSHIBA Maintenance Utility is provided to
erase the internal storage. This utility allows you
to delete all data and partitions, and also
overwrite all sectors on the internal storage.
If there is an external hard disk drive connected
to your computer, it can also be erased.
However, if you do not want to delete the data
from the external hard disk drive, disconnect it
from your computer.
To access this utility:
1.

Go to 

Settings

 and click 

Update & security

-> Recovery

.

2.

Click 

Restart now

 under 

Advanced 

startup

.

3.

Click 

Troubleshoot -> TOSHIBA 

Maintenance Utility

.

If you select the deletion method and continue
with the operation, you will lose all data (including
the operating system and recovery partition) on
the internal storage. Make sure that you have
already created recovery media if you want to
use the computer after erasing your internal
storage.

Dolby

®

 Digital Plus™

Advanced Audio™

Dolby Digital Plus Advanced Audio is a suite of
audio technologies that enables a PC to deliver a
crisp, clear cinematic surround sound experience
over its built-in speakers. It also adds clarity to
sound from headphones.
To access this utility, tap the 

Dolby Digital Plus 

Advanced Audio

 in 

All apps

.

You might not have all the software listed in this section depending on the
model you purchased.
To access the setup files of the drivers/utilities, click Applications and
Drivers
 under TOSHIBA group in All apps.

User's Manual

5-3

Summary of Contents for dynaPad WT12PE-A Series

Page 1: ...User s Manual TOSHIBA WT12PE A Series ...

Page 2: ...2 1 Dual Operating Mode 2 1 Conventions 2 2 Using your computer for the first time 2 2 Getting to know Windows 2 7 Turning off the power 2 9 System Recovery 2 13 Chapter 3 The Grand Tour Tablet computer 3 1 TOSHIBA Keyboard Dock 3 5 Internal Hardware Components 3 6 Chapter 4 Operating Basics Operating in tablet mode 4 1 Using the Touch Screen 4 4 Using the Touch Pad 4 5 Using the Stylus Pen 4 5 Th...

Page 3: ...ccess Code Logon Utility 5 8 TOSHIBA Product Improvement Program 5 8 TOSHIBA Setup Utility 5 9 Chapter 6 Troubleshooting Problem solving process 6 1 Hardware and system checklist 6 4 TOSHIBA support 6 13 Chapter 7 Appendix Specifications 7 1 Information for Wireless Devices 7 2 Legal Footnotes 7 11 Glossary 7 14 Index User s Manual iii ...

Page 4: ...yond that stipulated above including conversion to digital format alteration transfer of copied material and distribution on a network without the permission of the copyright owner is a violation of copyright or author s rights and is subject to civil damages or criminal action Comply with copyright laws in making any reproduction from this manual Disclaimer This manual has been validated and revi...

Page 5: ...aration of Conformity Information This equipment has been tested and found to comply with the limits for a Class B digital device pursuant to part 15 of the FCC rules These limits are designed to provide reasonable protection against harmful interference in a residential installation This equipment generates uses and can radiate radio frequency energy and if not installed and used in accordance wi...

Page 6: ...Boulevard Irvine California 92618 1697 Telephone 949 583 3000 This information is only applicable for the countries regions where it is required EU Declaration of Conformity This product is carrying the CE Mark in accordance with the related European Directives Responsible for CE Marking is TOSHIBA EUROPE GMBH Hammfelddamm 8 41460 Neuss Germany The complete and official EU Declaration of Conformit...

Page 7: ... use of this product in working environments other than the above mentioned Residential commercial and light industry environments For example the following environments are not approved Industrial Environments e g environments where a mains voltage of 380 V three phase is used Medical Environments Automotive Environments Aircraft Environments Any consequences resulting from the use of this produc...

Page 8: ... les exigences du Règlement sur le matériel brouilleur du Canada Following information is only valid for EU member States Disposal of products The crossed out wheeled dust bin symbol indicates that products must be collected and disposed of separately from household waste Integrated batteries and accumulators can be disposed of with the product They will be separated at the recycling centres The b...

Page 9: ...ly friendly disposal ensuring that the terminal contacts are covered by non conductive tape For more detailed information about the collection and recycling programmes available in your country please visit our website www toshiba eu recycling or contact your local council office or the retail outlet where you purchased the product These symbols might not stick depending on the country and region ...

Page 10: ...ne getirmektedir The number of possible pixel failures of your display is defined according to ISO 9241 307 standards If the number of pixel failures is less than this standard they will not be counted as defect or failure Battery is a consumption product since the battery time depends on the usage of your computer If the battery can not be charged at all then it is a defect or failure The changes...

Page 11: ... style Open Source licenses In case of any license issues related to OpenSSL please contact openssl core openssl org OpenSSL License Copyright c 1998 2011 The OpenSSL Project All rights reserved Redistribution and use in source and binary forms with or without modification are permitted provided that the following conditions are met 1 Redistributions of source code must retain the above copyright ...

Page 12: ... NEGLIGENCE OR OTHERWISE ARISING IN ANY WAY OUT OF THE USE OF THIS SOFTWARE EVEN IF ADVISED OF THE POSSIBILITY OF SUCH DAMAGE This product includes cryptographic software written by Eric Young eay cryptsoft com This product includes software written by Tim Hudson tjh cryptsoft com Original SSLeay License Copyright C 1995 1998 Eric Young eay cryptsoft com All rights reserved This package is an SSL ...

Page 13: ...thereof from the apps directory application code you must include an acknowledgement This product includes software written by Tim Hudson tjh cryptsoft com THIS SOFTWARE IS PROVIDED BY ERIC YOUNG AS IS AND ANY EXPRESS OR IMPLIED WARRANTIES INCLUDING BUT NOT LIMITED TO THE IMPLIED WARRANTIES OF MERCHANTABILITY AND FITNESS FOR A PARTICULAR PURPOSE ARE DISCLAIMED IN NO EVENT SHALL THE AUTHOR OR CONTR...

Page 14: ... You can use this software for whatever you want in parts or full form without having to pay us royalty free usage You may not pretend that you wrote this software If you use it or only parts of it in a program you must acknowledge somewhere in your documentation that you have used the FreeType code credits We specifically permit and encourage the inclusion of this software with or without modific...

Page 15: ...HT HOLDERS BE LIABLE FOR ANY DAMAGES CAUSED BY THE USE OR THE INABILITY TO USE OF THE FREETYPE PROJECT 2 Redistribution This license grants a worldwide royalty free perpetual and irrevocable right and license to use execute perform compile display copy create derivative works of distribute and sublicense the FreeType Project in both source and object code forms and derivative works thereof for any...

Page 16: ...s license or another one contracted with the authors grants you the right to use distribute and modify it Therefore by using distributing or modifying the FreeType Project you indicate that you understand and accept all the terms of this license 4 Contacts There are two mailing lists related to FreeType freetype nongnu org Discusses general use and applications of FreeType as well as future and wa...

Page 17: ...uter from Sleep Mode by pressing the power button Your ENERGY STAR certified computer should be set by default to enter a low power sleep mode after a period of inactivity Simply touching the mouse or keyboard wakes the computer in seconds These sleep features can save you up to 23 per year 200 kWh per year in electricity and prevent up to 300 pounds of greenhouse gas emissions annually To learn h...

Page 18: ...e system failure computer or AC adaptor damage or a fire possibly resulting in serious injury Creating a computer friendly environment Place the computer on a flat surface that is large enough for the computer and any other items you are using such as a printer Leave enough space around the computer and other equipment to provide adequate ventilation Otherwise they might overheat To keep your comp...

Page 19: ...o any form of strong impact as this can damage the computer s components or otherwise cause it to malfunction Cleaning the computer To help ensure long trouble free operation keep the computer free of dust and dirt and use care with all liquids around it Be careful not to spill liquids into the computer If the computer does get wet turn the power off immediately and let the computer dry completely...

Page 20: ...e card resulting in computer failure Always use a suitable carry case when transporting the computer When carrying your computer be sure to hold it securely so that it does not fall or hit anything Do not carry your computer by holding any of its protruding elements Mobile phones Be aware that the use of mobile phones can interfere with the audio system The operation of the computer will not be im...

Page 21: ...use of equipment or failure to follow instructions might cause data loss equipment damage or might result in minor or moderate injury Please read A note is a hint or advice that helps you make best use of your equipment User s Manual 1 18 ...

Page 22: ...r 2 pin or 3 pin Stylus Pen is included together with spare pen tips one AAAA battery and tether string in the small case coming with the product Documentation User Information Guide Instruction Manual for Safety and Comfort If any of the items are missing or damaged contact your dealer immediately Dual Operating Mode Depending on the model you purchased your device might be provided a TOSHIBA Key...

Page 23: ...ton twice Left click the mouse twice Tap the touch screen twice Start The word Start refers to the button in the lower left corner of the screen All apps You can find a list of all your apps and programs in the All apps To access it click Start and select All apps in the lower left corner Using your computer for the first time Be sure to read the enclosed Instruction Manual for Safety and Comfort ...

Page 24: ...TOSHIBA Keyboard Dock provided with some models can turn your tablet into a laptop for extensibility including a physical keyboard Hold both sides of the tablet computer and attach the tablet computer to the keyboard dock The tablet computer and keyboard dock snap together when they get closer Figure 2 1 Connecting the keyboard dock Product appearance depends on the model you purchased Make sure t...

Page 25: ...sult in data loss 1 Disconnect and remove all peripheral devices and cables connected to the computer 2 Slowly lift the tablet computer to remove it while holding down the keyboard dock Figure 2 2 Removing the tablet computer from the keyboard dock Product appearance depends on the model you purchased Do not remove the tablet computer immediately after docking operation Wait at least 5 seconds Use...

Page 26: ...h the legal voltage and frequency specifications and requirements in the country of use Failure to do so might result in a fire or electric shock possibly resulting in serious injury The supplied power cord conforms to safety rules and regulations in the region the computer is bought and should not be used outside this region For use in other regions buy power cords that conform to safety rules an...

Page 27: ... on the model The Micro USB connector of the AC adaptor must be correctly plugged into the Micro USB port on the tablet computer Failure to do so correctly might result in possible damage to the Micro USB port 2 Plug the power cord into a live wall outlet Turning on the power Press the Power button to turn on the power Figure 2 4 Turning on the power 1 1 Power button After you turn on the power fo...

Page 28: ...tion You can access the Start menu from an app or the desktop in the following ways Tap the Start button in the lower left corner of the screen Press the Windows logo key on your keyboard Most used allows quick access to your frequently used apps and your recently installed apps are highlighted under Recently added You can pin your favorite apps to the Start menu as tiles in grid like pattern and ...

Page 29: ...tion center icon on the Windows taskbar to view your notifications and quick actions Settings Settings provides system settings including advanced settings in the Control Panel They are divided in categories so that you can configure optimize or personalize Windows You can also type in the keyword and use Search to find any setting To open Settings click Start All apps Settings You can pin it to t...

Page 30: ... stopped before removing the disk disc If you turn off the power while a disk disc is being accessed you might lose data or damage the disk Never turn off the power while an application is running Failure to do so can cause data loss Never turn off the power disconnect an external storage device or remove storage media during data read write Failure to do so can cause data loss 3 Click Start Power...

Page 31: ...nication functionalities and canceling settings that reactivate the computer automatically such as a timer recording function Failure to shut down the computer in this way might allow the operating system to reactivate and run pre programmed tasks or preserve unsaved data which might interfere with aviation or other systems possibly causing serious injury Before entering Sleep Mode be sure to save...

Page 32: ... where you left off when you shut down the computer If you are operating the computer on battery power you can lengthen the overall operating time by turning it off into Hibernation Mode Sleep Mode consumes more power while the computer is off Sleep Mode limitations Sleep Mode will not function under the following conditions Power is turned back on immediately after shutting down Memory circuits a...

Page 33: ...ick Start Power and then select Hibernate To show Hibernate in Power menu set up according to the following steps 1 Click Control Panel System and Security Power Options under Windows System in All apps 2 Click Choose what the power button does 3 Click Change settings that are currently unavailable 4 Select the Hibernate check box from Shutdown settings 5 Click the Save changes button Automatic Hi...

Page 34: ...software from the recovery image Make sure that you have already created recovery media before you start TOSHIBA Maintenance Utility This recovery media can be used to restore your system after you have erased your internal storage Creating Recovery Media This section describes how to create Recovery Media Be sure to connect the AC adaptor when you create Recovery Media Be sure to close all other ...

Page 35: ...Flash Memory into the Micro USB port 4 Click Control Panel System and Security Security and Maintenance Recovery Create a recovery drive under Windows System group in All apps 5 Follow the on screen instructions to finish creating the Recovery Media Restoring the pre installed software from your created Recovery Media If the pre installed files are damaged you are able to use the Recovery Media yo...

Page 36: ...OSHIBA support for assistance Restoring the pre installed software from the Internal Storage A portion of the total internal storage space is used to store the recovery image which can be used to restore pre installed software in the event of a problem Make sure that the AC adaptor is connected during the restoring process Operate the computer at full power Make sure to dock the computer to TOSHIB...

Page 37: ... restoration through PC settings in the operating system 1 Go to Settings and click Update security Recovery 2 Click Get started under Reset this PC 3 Follow the on screen instructions to finish the recovery User s Manual 2 16 ...

Page 38: ...ch before you operate the computer Legal Footnote Non applicable Icons For more information regarding Non applicable Icons refer to the Legal Footnotes section Handle your computer carefully to avoid scratching or damaging the surface Tablet computer The following figure shows essential components of the tablet computer User s Manual 3 1 ...

Page 39: ...nce depends on the model you purchased Web Camera back Your computer is equipped with a back Web Camera used for recording video or taking photographs Do not point the web camera directly at the sun Do not touch or press strongly on the web camera lens Failure to do so might reduce image quality Use an eyeglass cleaner cleaner cloth or other soft cloth to clean the lens if it becomes dirty Docking...

Page 40: ...eate a short circuit which can cause damage and fire possibly resulting in serious injury HDMI Micro port HDMI Micro port can connect to HDMI cable with Type D connector An HDMI cable sends video and audio signals In addition to this it can send and receive control signals Refer to the HDMI port section for more information Be careful when you connect an HDMI cable the tablet computer might be lif...

Page 41: ...Wireless WAN Wireless LAN Bluetooth Do not cover the wireless communication antennas area with any metal objects otherwise the wireless function might not work Legal Footnote Wireless LAN For more information regarding Wireless LAN refer to the Legal Footnotes section Stereo speakers The speakers emit sound generated by your software as well as audio alarms such as low battery condition generated ...

Page 42: ...the tablet computer To connect a USB device you must purchase a Micro B plug Standard A receptacle cable Pen hole This hole is used for inserting the pen clip TOSHIBA Keyboard Dock The following figure shows each important component of the keyboard dock Figure 3 2 The keyboard dock 4 4 3 1 2 1 Docking connector 3 Touch Pad 2 Keyboard 4 Touch Pad control buttons Product appearance depends on the mo...

Page 43: ...ht vary depending on the model you purchased Battery pack The tablet computer includes a battery pack inside Do not attempt to dismount or replace the battery pack by yourself Contact an authorized TOSHIBA service provider if necessary The rechargeable lithium polymer battery pack provides power to the computer when the AC adaptor is not connected For more detailed information on the use and opera...

Page 44: ...r Click Control Panel Appearance and Personalization Display Adjust resolution under Windows System in All apps The amount of Video RAM can be verified by clicking the Advanced settings button in the Screen Resolution window Graphics Processing Unit Graphics Processing Unit GPU performance might vary depending on product model design configuration applications power management settings and feature...

Page 45: ...ode Remove all external peripheral devices and their connection cables from the computer before carrying Hold the computer firmly on your forearm Be careful not to accidentally touch the Windows button Remove the AC adaptor from the computer when using it held in your forearm Do not use the computer while walking or driving a car Do not drop the computer or apply excessive impact to it Do not leav...

Page 46: ...Use the pen in the areas enclosed by the dotted line as shown in the following figure Figure 4 2 Use area of the pen Changing the screen orientation When operating the computer in tablet mode you can change the screen orientation by rotating the computer sideways The screen orientation automatically changes according to the rotation angle detected Figure 4 3 Rotating the computer sideways 1 2 1 Po...

Page 47: ...n to use this feature note that the performance of any compass feature varies depending on environmental conditions For example any source using electromagnetic or radio waves Before using any compass feature the compass needs to be calibrated for accuracy To calibrate disconnect the AC adaptor and remove all peripherals cables and then horizontally vertically rotate the computer with the power on...

Page 48: ... more fingers on an item and then turn your hand to rotate things in the direction you turn your hand Only some items can be rotated Slide Drag your finger on the touch screen to move through what is on the screen Swipe Quickly move your finger in from the edge of the screen without pausing when you first touch it Swipe from the left edge views all your open apps in task view Swipe from the right ...

Page 49: ...epending on the software you are using Similar to right click Pinch or stretch Place two or more fingers down on the Touch Pad and move them toward each other pinch or away from each other stretch This shows different levels of information or visually zooms in or out Two Finger Scroll Place two fingers down and slide them vertically or horizontally from anywhere on the Touch Pad This allows you to...

Page 50: ...hen cleaning the touch screen To avoid damages to the display screen refrain from doing anything other than the specified operation methods Failure to do so might cause a malfunction or characteristic deterioration Do not tap or press the pen forcefully against the display as this might damage the pen and the screen itself Avoid using or keeping the pen in areas where the temperature changes rapid...

Page 51: ...by them Do not use a ball point pen instead of the pen included with the product The pen tip of the Reserve Pen cannot be replaced if it is worn You can purchase a new one from a TOSHIBA authorized dealer Wipe the display screen before you use the stylus pen Clean the fingerprints or smudges if the sensitivity to pen writing decreases Do not use a protecting sheet for the touch screen as it might ...

Page 52: ...insert the pen into the pen hole on the tablet computer when you do not need to use it or you want to take the pen with your tablet computer Figure 4 8 Inserting the Stylus Pen 1 2 To remove the Stylus Pen slowly pull the pen to remove it from the Pen hole on the tablet computer User s Manual 4 8 ...

Page 53: ...an use the provided tether string to hang the Stylus Pen on your tablet computer 1 Hang the tether string to your tablet computer first Figure 4 10 Using the tether string 2 Hang the other end to your Stylus Pen Figure 4 11 Using the tether string User s Manual 4 9 ...

Page 54: ...ppears Lift the pen to open a pop up menu or execute a specific action Press and hold is similar to right clicking the mouse Drag Touch the pen on the screen Without lifting the pen drag it across the screen to select text or objects Drag and drop Touch the pen on the screen to select an object Without lifting the pen drag it across the screen Lift the pen to drop the object to a new location Repl...

Page 55: ...ed dealer The Keyboard The number of keys available on the keyboard dock depends on which country region your computer is configured for with keyboards being available for numerous languages There are different types of keys specifically typewriter keys function keys and Windows special keys Keyboard indicator The following figure shows the position of the CAPS LOCK indicator which shows the follo...

Page 56: ...ividual steps F4 FN F4 Changes the active display device To use a simultaneous mode you must set the resolution of the internal display panel to match the resolution of the external display device F5 FN F5 Enables or disables the Touch Pad F6 FN F6 Moves media backward F7 FN F7 Plays or pauses media playback F8 FN F8 Moves media forward F9 FN F9 Decreases the computer s volume F10 FN F10 Increases...

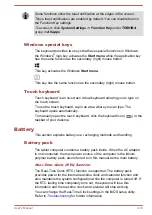
Page 57: ...pe The keyboard opens automatically To manually open the touch keyboard click the keyboard icon in the taskbar of your desktop Battery This section explains battery use recharging methods and handling Battery pack The tablet computer contains a battery pack inside When the AC adaptor is not connected the main power source of the computer is the lithium polymer battery pack also referred to in this...

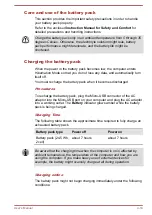
Page 58: ... pack when it becomes discharged Procedures To recharge the battery pack plug the Micro USB connector of the AC adaptor into the Micro USB port on your computer and plug the AC adaptor into a working outlet The Battery indicator glows amber while the battery pack is being charged Charging Time The following table shows the approximate time required to fully charge an exhausted battery pack Battery...

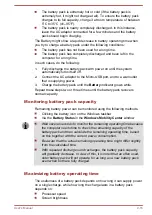
Page 59: ...ows white Repeat these steps two or three times until the battery pack recovers normal capacity Monitoring battery pack capacity Remaining battery power can be monitored using the following methods Clicking the battery icon on the Windows taskbar Via the Battery Status in the Windows Mobility Center window Wait several seconds to monitor the remaining operating time because the computer needs time...

Page 60: ...following at least once a month 1 Turn off the computer s power 2 Disconnect the AC adaptor and turn on the computer s power If it does not turn on then go to Step 4 3 Operate the computer on battery power for five minutes If you find that the battery pack has at least five minutes of operating time continue operating until the battery pack is fully discharged However if the Battery indicator flas...

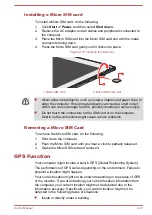
Page 61: ...n the SIM card or on the computer Debris on the connectors might cause access problems Removing a Micro SIM Card To remove the Micro SIM card do the following 1 Shut down the computer 2 Push the Micro SIM card until you hear a click to partially release it 3 Grasp the Micro SIM card and remove it GPS Function Your computer might include a built in GPS Global Positioning System The performance of G...

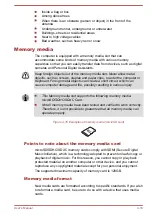
Page 62: ...ly resulting in serious injury This Memory media slot supports the following memory media microSD SDHC SDXC Card Not all memory media have been tested and verified to work correctly Therefore it is not possible to guarantee that all memory media can operate properly Figure 4 16 Examples of memory media microSD card Points to note about the memory media card microSD SDHC SDXC memory cards comply wi...

Page 63: ...ners of liquid Do not touch the metal part of a card or expose it to liquids or let it get dirty After using card return it to its case The card is designed so that it can be inserted only one way Do not try to force the card into the slot Memory cards have a limited lifespan so it is important to back up important data Do not write to a card if the battery power is low Low power might affect writ...

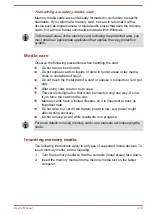
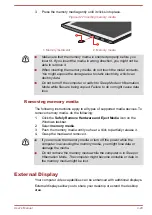
Page 64: ...llowing instructions apply to all types of supported media devices To remove memory media do the following 1 Click the Safely Remove Hardware and Eject Media icon on the Windows taskbar 2 Select memory media 3 Push the memory media until you hear a click to partially release it 4 Grasp the media and remove it If you remove the memory media or turn off the power while the computer is accessing the ...

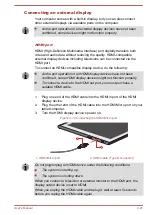
Page 65: ...s have not been confirmed some HDMI display devices might not function properly To connect a device to the HDMI out port you must purchase a suitable HDMI cable 1 Plug one end of the HDMI cable into the HDMI in port of the HDMI display device 2 Plug the other end of the HDMI cable into the HDMI Micro port on your tablet computer 3 Turn the HDMI display device s power on Figure 4 18 Connecting the ...

Page 66: ...unction key to select the display device before starting to play video Do not change the display device or audio device while playing media files Do not change the display device under the following conditions While data is being read or written While communication is being carried out Selecting HD Format To select the display mode do the following 1 Click Control Panel Appearance and Personalizat...

Page 67: ...y and set up the display settings You can also manually manage how the external displays work and change the display settings by pressing P while holding down the Windows key If you disconnect the external display before you turn off the computer s power be sure to switch to the internal display Optional TOSHIBA Accessories To make your computer even more powerful and convenient to use you can add...

Page 68: ... select Recording devices from the sub menu 2 Select Microphone and click Properties 3 On the Levels tab move the Microphone slider to increase or decrease the microphone volume level If you feel the microphone volume level is inadequate move the Microphone Boost slider to a higher level Video mode Video mode settings are configured via the Screen Resolution dialog To open the Screen Resolution di...

Page 69: ...rsion and configure the function key options To access this utility click System Settings under TOSHIBA group in All apps TOSHIBA Setup Utility TOSHIBA Setup Utility is a BIOS setup utility that provides you a menu based user interface so that you can easily view and change BIOS settings For more information refer to the TOSHIBA Setup Utility section TOSHIBA Service Station This application allows...

Page 70: ...ds books printed material notebooks and so on This application recognizes the target from the photograph and performs reflection reduction color enhancement and cropping of the target and then lets you save the changed photograph To access it click TruCapture in All apps For more detailed information see the Help of this utility TruNote This software is note taking application that can take and ma...

Page 71: ... and click Update security Recovery 2 Click Restart now under Advanced startup 3 Click Troubleshoot TOSHIBA Maintenance Utility If you select the deletion method and continue with the operation you will lose all data including the operating system and recovery partition on the internal storage Make sure that you have already created recovery media if you want to use the computer after erasing your...

Page 72: ... Sleep Mode or Hibernation Mode when there is no input or hardware access for a specified time This can be specified in the Power Options Power on password Two levels of password security supervisor and user are available to prevent unauthorized access to your computer Intelligent power supply 1 A microprocessor in the computer s intelligent power supply detects the battery charge automatically ca...

Page 73: ...eep Mode depending on the external devices connected to the USB ports For example if a mouse or USB keyboard is connected to a USB port clicking the mouse button or pressing the keyboard will wake up the computer Heat dispersal 1 To protect against overheating the processor is equipped with an internal temperature sensor which lowers the processing speed if the computer s internal temperature rise...

Page 74: ...e the character string In addition ensure that the registered password is correct by outputting the character string to the password file When entering a password do not enter any characters for example or produced by pressing the SHIFT or ALT keys Delete button Click this button to delete a registered password Before you can delete a password you must first enter the current password correctly Ch...

Page 75: ...a Supervisor Password some functions might be restricted when a user logs on with the User Password To set a Supervisor Password Click Password Utility under TOSHIBA group in All apps and click Supervisor Password This utility lets you do the following Register or delete the Supervisor Password Specify restrictions for general users Starting the computer using a password If you have already regist...

Page 76: ...Access Code Logon Utility is completely secure or error free at all times TOSHIBA is not liable for any failure or damage that might arise out of your use of the Tablet Access Code Logon Utility even if advised of the possibility thereof TOSHIBA ITS AFFILIATES AND SUPPLIERS SHALL HAVE NO RESPONSIBILITY FOR DAMAGE TO OR LOSS OF ANY BUSINESS PROFITS PROGRAMS DATA NETWORK SYSTEMS OR REMOVABLE STORAGE...

Page 77: ...nd those countries might or might not have the same data protection laws or data protection levels as required by your home country or region Once enabled you can select to disable the monitoring operation at any time by clicking Product Improvement Program under TOSHIBA group in All apps and uninstall the application by using the Uninstall a program utility in the Control Panel Uninstalling the P...

Page 78: ...nder Windows System in All apps 2 Click Choose what the power button does 3 Click Change settings that are currently unavailable 4 Deselect the Turn on fast startup check box from Shutdown settings 5 Click the Save changes button TOSHIBA Setup Utility can be navigated through the touch screen or the provided Stylus Pen To save the changes and exit the utility press the F10 key and proceed by selec...

Page 79: ...n this chapter are meant only as a guide they are not definitive problem solving techniques In reality many problems can be solved simply but a few might require help from TOSHIBA Support If you find you need to consult others be prepared to describe the problem in as much detail as possible Preliminary checklist You should always consider the simplest solution first The items detailed in this che...

Page 80: ...m characters Make a screenshot of the current display and if possible look up the messages in the documentation included with the computer software or operating system Check that all connecting cables are correctly and firmly attached as loose cables can cause erroneous or intermittent signals Do any indicators light if so which ones what color are they and do they stay on or blink Write down what...

Page 81: ...15 seconds before turning on the power again by pressing the power button Your program stops responding If you are working with a program that suddenly freezes all operations chances are the program has stopped responding You can exit the failed program without shutting down the operating system or closing other programs To close a program that has stopped responding 1 Press CTRL ALT and DEL simul...

Page 82: ...in the Power Options by the following steps 1 Click Control Panel System and Security Power Options under Windows System in All apps 2 Click Choose what the power button does 3 Click Change settings that are currently unavailable 4 Deselect the Turn on fast startup check box from Shutdown settings 5 Click the Save changes button 1 Click Start Power and then select Restart 2 While holding down the ...

Page 83: ...reached room temperature and it still does not start or if it starts but shuts down quickly contact TOSHIBA Support AC power Problem Procedure AC adaptor does not power the computer Check the connections to make sure that the power cord adaptor is firmly connected to the computer and a working power outlet Check the condition of the cord and terminals If the cord is frayed or damaged it should be ...

Page 84: ...en attempt to charge it again Check the Power saver option under Choose or customize a power plan in the Power Options Real Time Clock Problem Procedure The BIOS setting and system date time are lost The lasting time of the Real Time Clock RTC has run out You must set the date and time in the TOSHIBA Setup Utility by using the following steps 1 Launch the BIOS setup utility Refer to the TOSHIBA Se...

Page 85: ...monitor Markings appear on the computer s display panel These marks might have come from contact with the keyboard and Touch Pad while the display panel has been closed Try to remove the marks by gently wiping the display panel with a clean dry cloth or if this fails with a good quality LCD screen cleaner In this latter instance you should always follow the instructions with the screen cleaner and...

Page 86: ...h your mouse Touch Pad Problem Procedure The Touch Pad does not work Check the Device Select settings by the following steps 1 Click Control Panel Hardware and Sound Mouse under Windows System in All apps 2 In the Advanced tab click Advanced feature settings Device Select On screen pointer does not respond to pointing device operation In this instance the system might be busy Try moving the mouse ...

Page 87: ...s System in All apps If you are still unable to resolve the problem contact TOSHIBA Support USB mouse Problem Procedure On screen pointer does not respond to mouse operation In this instance the system might be busy Try moving the mouse again after waiting a short while Remove the mouse from the computer and then reconnect it to a free USB port to ensure that it is firmly attached Double clicking ...

Page 88: ...tion supplied with the mouse for instructions on how to clean it If you are still unable to resolve the problem contact TOSHIBA Support USB device In addition to the information in this section also refer to the documentation supplied with your USB device Problem Procedure USB device does not work Remove the USB device from the computer and then reconnect it to a free port to ensure that it is fir...

Page 89: ...her the internal microphone or an external microphone connected to the computer Refer to Sound System and Video mode for further information Volume cannot be adjusted during Windows start up or shut down If you are still unable to resolve the problem contact TOSHIBA Support External monitor Also refer to Operating Basics and to the documentation supplied with your monitor for further information P...

Page 90: ...s in Sleep or Hibernation Mode Remember to turn off the computer before disconnecting the external monitor When the display panel and an external monitor are set to clone mode and they are turned off by the timer the display panel or the external monitor might not display when turned on again If this occurs press the function key to reset the display panel and external monitor to clone mode Displa...

Page 91: ...cal assistance Before you call Some problems you experience might be related to software or the operating system so it is important that you investigate other sources of assistance first Before contacting TOSHIBA try the following Review troubleshooting sections in the documentation supplied with your software and or peripheral devices If a problem occurs when you are running software applications...

Page 92: ... mode Approximately 299 4 w x 202 7 d x 14 9 h millimeters laptop mode not including parts that extend beyond the main body Environmental Requirements Conditions Ambient temperature Relative humidity Operating 5 C 41 F to 35 C 95 F 20 to 80 noncondensing Non operating 20 C 4 F to 60 C 140 F 10 to 90 noncondensing Wet bulb temperature 29 C maximum Conditions Altitude from sea level Operating 60 to ...

Page 93: ...al interest Group This Bluetooth product is not compatible with devices using Bluetooth Version 1 0B specifications The wireless devices have not completed verification of connection and operation with all devices which are using the Wireless LAN or Bluetooth radio technology Bluetooth and Wireless LAN devices operate within the same radio frequency range and might interfere with one another If yo...

Page 94: ...r to turning on the equipment Wireless LAN Technology The wireless communication function of the computer supports some wireless communication devices Only some models are equipped with both Wireless LAN and Bluetooth functions Do not use the Wireless LAN Wi Fi or Bluetooth functionalities near a microwave oven or in areas subject to radio interference or magnetic fields Interference from a microw...

Page 95: ...ess communication is often subject to local radio regulations Although Wireless LAN wireless networking products have been designed for operation in the license free 2 4 GHz and 5 GHz band local radio regulations might impose a number of limitations to the use of wireless communication equipment Radio Frequency Band 5 GHz 5150 5850 MHz Revision a and n Band 2 4 GHz 2400 2483 5 MHz Revision b g and...

Page 96: ...akes it impossible to falsify the origin of a message Encryption prevents eavesdropping and maintains link privacy Worldwide operation The Bluetooth radio transmitter and receiver operate in the 2 4 GHz band which is license free and compatible with radio systems in most countries in the world Radio links You can easily establish links between two or more devices with these links being maintained ...

Page 97: ...z Frequencies in Europe Italy For private use a general authorization is required if WAS RLAN s are used outside own premises Luxembourg Implemented General authorization required for network and service supply Russian Federation Limited e i r p 100mW Permitted to use only for indoor applications closed industrial and warehouse areas and on board aircraft 1 Permitted to use for local networks of a...

Page 98: ...ply for outdoor usage The user should use the Wireless LAN utility to check the current channel of operation If operation is occurring outside of the allowable frequencies for outdoor use as listed above the user must contact the applicable national spectrum regulator to request a license for outdoor operation Canada Industry Canada IC This device complies with RSS 210 of the Industry Canada Rules...

Page 99: ...er to the FCC information section for the detailed information This device and its antenna s must not be co located or operating in conjunction with any other antenna or transmitter The radiated output power of the Wireless device is far below the FCC radio frequency exposure limits Nevertheless the Wireless device shall be used in such a manner that the potential for human contact during normal o...

Page 100: ...w power data communication systems such as this equipment overlaps that of mobile object identification systems premises radio station and specified low power radio station 1 Important notice The frequency bandwidth of this equipment may operate within the same range as industrial devices scientific devices medical devices microwave ovens licensed radio stations and non licensed specified low powe...

Page 101: ... 2 4 This equipment uses a frequency of 2 4 GHz 2 FH This equipment uses FH SS modulation 3 1 The interference range of this equipment is less than 10m 4 This equipment uses a frequency bandwidth from 2 400 MHz to 2 483 5 MHz It is impossible to avoid the band of mobile object identification systems 4 About the JEITA 5GHz Wireless LAN supports W52 W53 W56 Channel Device Authorization This device o...

Page 102: ... use this equipment in the countries regions which are not listed in the following table contact TOSHIBA Support As of October 2015 Austria Belgium Bulgaria Canada Cyprus Czech Rep Denmark Estonia Finland France Germany Greece Hong Kong Hungary Iceland India Ireland Italy Japan Korea Latvia Liechtenstein Lithuania Luxemburg Malta Monaco Netherlands Norway Philippines Poland Portugal Romania Slovak...

Page 103: ... from specifications due to design configuration Under some conditions your computer product might automatically shutdown This is a normal protective feature designed to reduce the risk of lost data or damage to the product when used outside recommended conditions To avoid risk of lost data always make back up copies of data by periodically storing it on an external storage medium For optimum perf...

Page 104: ... life numbers are achieved on select models and configurations tested by TOSHIBA at the time of publication Recharge time varies depending on usage Battery might not charge while computer is consuming full power After going through many charge and discharge cycles the battery loses its ability to perform at maximum capacity and needs to be replaced This is a normal phenomenon for all batteries To ...

Page 105: ...n surrounding electromagnetic environment obstacles access point design and configuration and client design and software hardware configurations The actual transmission speed is lower than the theoretical maximum speed Copy Protection Applicable copy protection standards included in certain media might prevent or limit recording or viewing of the media Glossary The terms in this glossary cover top...

Page 106: ...ions Commission FHD Full High Definition GB gigabyte GBps gigabytes per second HD High Definition HD High Definition Plus HDD Hard Disk Drive HDMI High definition Multimedia Interface HDMI CEC High definition Multimedia Interface Consumer Electronics Control HTML Hypertext Markup Language IEEE Institute of Electrical and Electronics Engineers I O Input Output IRQ interrupt request ISP Internet Ser...

Page 107: ...mory RTC Real Time Clock S P DIF Sony philips Digital Interface Format SD Secure Digital SDHC Secure Digital High Capacity SDXC Secure Digital Extended Capacity SDRAM Synchronous Dynamic Random Access Memory SSD Solid State Drive TFT Thin film Transistor URL Uniform Resource Locator USB Universal Serial Bus WAN Wide Area Network WQHD Wide Quad High Definition www World Wide Web User s Manual 7 16 ...

Page 108: ...vice Touch Pad 6 8 E Equipment checklist 2 1 External monitor problems 6 11 G Graphics Processing Unit 3 7 H HDMI Micro port 3 3 K Keyboard function keys 4 12 Function keys F1 F12 4 12 problems 6 6 Windows special keys 4 13 M Media care Card care 4 19 memory media card inserting 4 19 removing 4 20 Memory media slot 4 18 Moving the computer 1 16 P Password power on 5 4 Starting the computer by pass...

Page 109: ...eating power down 6 5 Power 6 5 Real Time Clock 6 6 Sound system 6 10 TOSHIBA support 6 13 Touch Pad 6 8 USB device 6 10 USB mouse 6 9 R Recovery hard disk drive 2 15 Recovery Media 2 14 Restarting the computer 2 9 S SD SDHC SDXC Card formatting 4 19 note 4 18 SIM Card installing 4 17 removing 4 17 Sleep Mode setting 2 10 System automatic 5 4 Sound system problems 6 10 T Touch Screen 4 4 U USB dev...

Reviews:

Related manuals for dynaPad WT12PE-A Series