background image

Chapter 6: Using the TV’s features

51

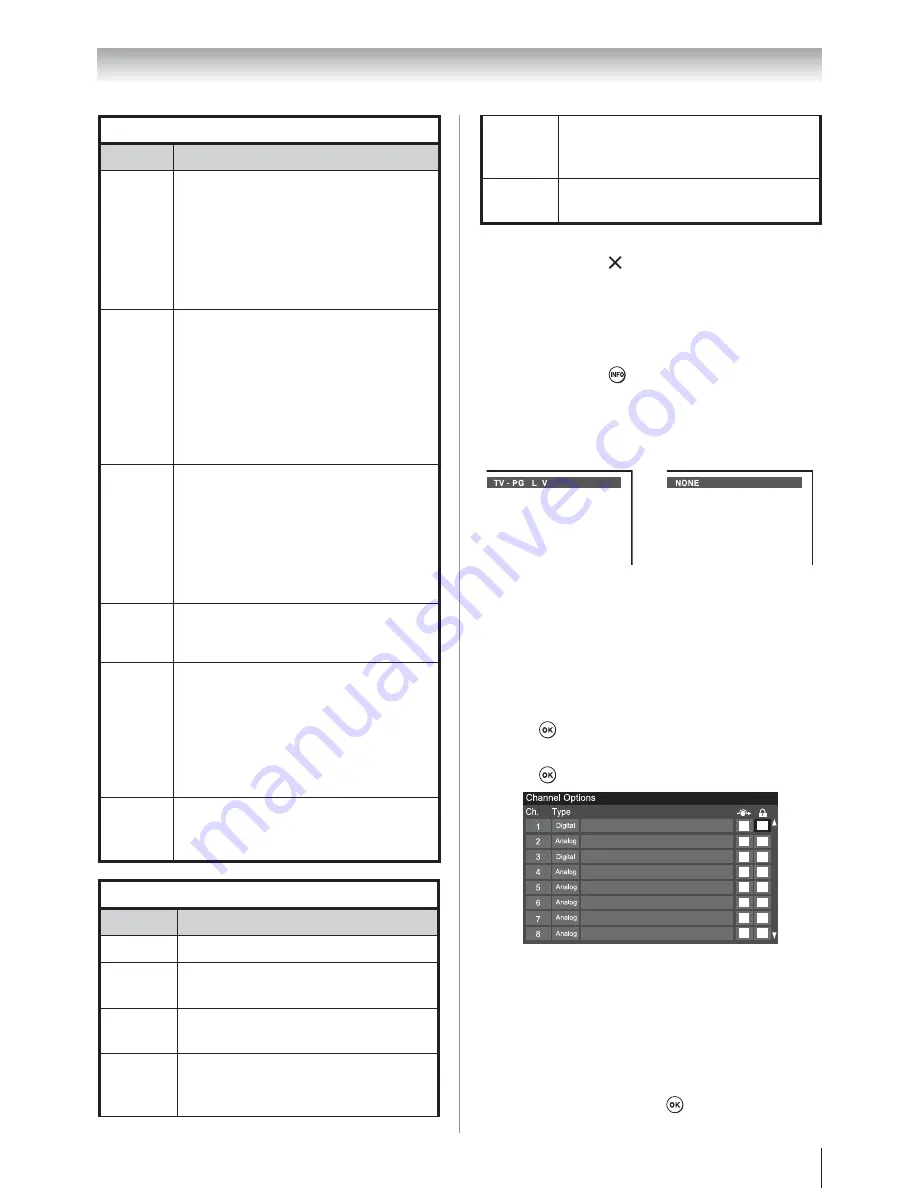
Independent rating system for broadcasters

Ratings

Description and Content themes

TV-MA

Mature Audience Only (This 
program is specifically designed 
to be viewed by adults and 
therefore may be unsuitable for 
children under 17.)

L

) Crude or indecent language 

S

Explicit sexual activity 

V

) Graphic 

violence

TV-14

Parents Strongly Cautioned (This 
program contains some material 
that many parents would find 
unsuitable for children under 14 
years of age.)

D

) Intensely suggestive dialog 

L

) Strong, coarse language 

S

) Intense sexual situations 

V

Intense violence

TV-PG

Parental Guidance Suggested 
(This program contains material 
parents may find unsuitable for 
younger children.)

D

) Some suggestive dialog 

L

Infrequent coarse language 

S

) Some sexual situations 

V

Moderate violence

TV-G

General Audience (Most parents 
would find this program suitable 
for all ages.)

TV-Y7,
TV-
Y7FV

Directed to Older Children (This 
program is designed for children 
age 7 and above. Note: Programs 
in which fantasy violence may be 
more intense or more combative 
than other programs in this 
category are designated TV-Y7FV.)

TV-Y

All Children (This program is 
designed to be appropriate for all 
children.)

Independent rating system for movies

Ratings

Description and Content themes

X

X-rated (For adults only)

NC-17

Not intended for anyone 17 and 
under

R

Restricted (Under 17 requires 
accompanying parent or adult)

PG-13

Parents Strongly Cautioned (Some 
material may be inappropriate for 
children under 13)

PG

Parental Guidance Suggested 
(Some material may not be 
suitable for children)

G

General Audience (Appropriate 
for all ages)

Note:


U

If you place an “  ” in the box next to “ 

‘None’ Rated

,” programs rated “

None

” will 

be blocked; however, programs that do not 
provide any rating information will not be 
blocked.


U

To display the rating of the program you are 
watching, press 

on the remote control. If 

it is rated “None,” the word “

NONE

” appears 

in the 

INFO

 screen (as shown below right). If 

rating information is not provided, no rating 
will appear in the 

INFO

 screen.

Locking channels

With the Lock feature, you can lock specific 
channels. The locked channels can only be accessed 
by entering the PIN.

To lock channels:

1  

From the 

Setup

 menu, highlight 

Installation

 and 

press

.

2  

Press

S

 or 

T

 to select 

Channel Options

 and 

press

. The list of channels will appear.

3  

Press

X

 and then 

S

 or 

T

 to select a channel in 

the lock column. 

4  

PIN code entry will be required to set a locked 
channel.

Note:

 If the PIN code has not been set yet, a 

warning message will appear.

5  

A tick will appear in the box.
To remove the tick, press 

 again.

(continued)

Summary of Contents for 40UL605

Page 1: ...te program For details please contact your TV antenna installer cable provider or satellite provider 4 3 20 2 4 LL 2IGHTS 2ESERVED WNER S 2ECORD The model number and serial number are on the back of your TV Record these numbers in the spaces below Refer to these numbers whenever you communicate with your Toshiba dealer about this TV Model number Serial number WNER S ANUAL Integrated High Definition...

Page 2: ...rely attached to the floor wall in accordance with the installation instructions See item 25 on page 4 WARNING If you decide to wall mount this television always use a UL Listed wall bracket appropriate for the size and weight of this television The use of any wall bracket other than a UL Listed wall bracket appropriate for the size and weight of this television for wall mounting this television c...

Page 3: ...or table The TV may fall causing serious personal injury death or serious damage to the TV Important Safety Instructions 1 Read these instructions 2 Keep these instructions 3 Heed all warnings 4 Follow all instructions 5 Do not use this apparatus near water 6 Clean only with dry cloth 7 Do not block any ventilation openings Install in accordance with the manufacturer s instructions 8 Do not instal...

Page 4: ...voltage surges and built up static charges see Section 810 of the National Electric Code Antenna lead in wire Antenna discharge unit NEC Section 810 20 Grounding conductors NEC Section 810 21 Power service grounding electrode system NEC Art 250 Part H Ground clamp Electric service equipment Ground clamps 33 DANGER RISK OF SERIOUS PERSONAL INJURY OR DEATH s Use extreme care to make sure you are nev...

Page 5: ...parts specified by the manufacturer s Upon completion of service ask the service technician to perform routine safety checks to determine that the TV is in safe operating condition Choosing a location for your LCD TV To Display your LCD TV on the included Pedestal Stand Observe the following safety precautions 1 Read and Follow the pedestal assembly instructions included with the pedestal CAUTION ...

Page 6: ...ow removal of the pedestal stand 3 Once you have removed all four screws holding the pedestal stand in place remove the pedestal stand from the TV 46 TV Four screws VESA Mounting Pattern Hook Sturdy strap as short as possible Four screws Hook Sturdy strap as short as possible 40 TV VESA Mounting Pattern CAUTION Always place the TV on the floor or a sturdy level stable surface that can support the ...

Page 7: ...on in case of absence of information to transmit or operational failure Note that this is not intended to prohibit transmission of control or signaling information or the use of repetitive codes where required by the technology If this device is going to be operated in 5 15 5 25GHz frequency range then it is restricted in indoor environment only Important Any changes or modifications not expressly...

Page 8: ...gh level of precision technology however there may be an occasional pixel dot of light that does not operate properly does not light remains constantly lit etc This is a structural property of LCD technology is not a sign of malfunction and is not covered under your warranty Such pixels are not visible when the picture is viewed from a normal viewing distance Note Interactive video games that invo...

Page 9: ...med channel 42 Tuning to a specific channel programmed or unprogrammed 42 Switching between two channels using SurfLock 42 Selecting the picture size 42 Scrolling the TheaterWide picture TheaterWide 2 and 3 only 44 Using the auto aspect ratio feature 44 Using the FREEZE feature 45 Adjusting the picture 45 Selecting the picture mode 45 Adjusting the picture quality 46 Using the closed caption mode ...

Page 10: ...the TV s network features 65 Using your home network 65 Setting up the Network 66 Advanced Network Setup 69 Network Connection Test 70 Using the software keyboard 70 Performing a Software Upgrade 71 Using the Widgets feature 71 Chapter 9 Troubleshooting 72 General troubleshooting 72 Chapter 10 Appendix 75 Specifications 75 Acceptable signal formats for PC IN and HDMI terminals 76 Limited United St...

Page 11: ...s Digital Audio Out optical audio connection with Dolby Digital optical output format page 49 s CableClear digital picture noise reduction page 63 s PC IN Analog RGB computer terminal pages 20 21 s REGZA LINK allows control of external devices from the TV remote via HDMI connection page 59 s ClearFrame 120 Hz anti blur feature page 63 s DLNA allows you to enjoy multimedia files from your home netw...

Page 12: ...r TV 4 BEFORE connecting cables or devices to the TV learn the functions of the TV s connections and controls pages 13 14 5 Connect your other electronic device s to the TV pages 15 23 6 Install the batteries in the remote control page 24 7 See Learning about the remote control page 25 for an overview of the buttons on the remote control 8 Program the remote control to operate your other device s ...

Page 13: ...ge 24 2 Touch Sensor To use Touch Sensor touch on the LED whole Except for POWER key the first touch on the sensor key shows Touch Sensor window and futher touch work according to Touch Sensor window indication POWER To turn the TV on and off VOL These buttons adjust the volume level When a menu is on screen these buttons function as left right menu navigation buttons CH ST When no menu is on scre...

Page 14: ...ry to receive 1080p signals 5 LAN IN LAN port is used to connect the TV to your home network 6 VIDEO COLOR STREAM HD IN These include standard A V connections These are switched by AV input mode page 36 Note Component Standard composite video cables carry only video information separate audio cables are required for a complete connection 7 DIGITAL AUDIO OUT Optical audio output in Dolby Digital or...

Page 15: ...erface cable is for use with devices with an HDMI output An HDMI cable delivers digital audio and video in its native format This cable carries both video and audio information therefore separate audio cables are not required for a complete HDMI device connection pages 18 19 and page 21 Note HDMI cable provides better picture performance than a standard composite video Optical audio cable Optical ...

Page 16: ...ignal Select the ANT CABLE video input source on the TV To view basic and premium Cable channels Turn OFF the VCR Select the ANT CABLE video input source on the TV Tune the TV to channel 3 or 4 whichever channel the Cable box output is set to Use the Cable box controls to change channels Standard A V cables Coaxial cable To view the VCR or camcorder video Turn ON the VCR or camcorder video Select ...

Page 17: ...ormance 1080p is not supported To view antenna or Cable channels Select the ANT CABLE video input source on the TV To view the DVD player Turn ON the DVD player Select the ColorStream HD video input source on the TV To view satellite programs using the component video connections Turn on the satellite receiver Select the ColorStream HD video input source on the TV To view the VCR or view and recor...

Page 18: ...o mode page 36 HDMI device TV back panel To view the HDMI device video Select the HDMI 1 HDMI 2 HDMI 3 or HDMI 4 video input source on the TV To select the video input source press INPUT on the remote control page 25 To program the TV remote control to operate other devices see Chapter 3 To connect a DVI device you will need s One HDMI to DVI adapter cable HDMI type A connector per DVI device For ...

Page 19: ...nnected REGZA LINK feature may not operate properly U For proper operation it is recommended that you use HDMI cables with the HDMI Logo Before controlling the device s s After completing the above connections set the REGZA LINK Setup menu as you desire page 60 s The connected devices must also be set For details see the operation manual for each device s The REGZA LINK feature uses the CEC techno...

Page 20: ...erly creating a high noise level that may damage speakers or headphones THIS DAMAGE IS NOT COVERED BY YOUR WARRANTY U The DIGITAL AUDIO OUT terminal may not output some digital audio sources because of copy restrictions Manufactured under license from Dolby Laboratories Dolby and the double D symbol are trademarks of Dolby Laboratories Connecting a personal computer PC With either the PC IN or HDM...

Page 21: ...u may not be able to pause during multi angle scenes s Signal names for mini D sub 15 pin connector Pin No Signal name Pin No Signal name Pin No Signal name 1 R 6 Ground 11 Reserved 2 G 7 Ground 12 SDA 3 B 8 Ground 13 H sync 4 Reserved 9 5V 14 V sync 5 Reserved 10 Ground 15 SCL To connect a PC to the HDMI terminal on the TV When connecting a PC to the HDMI terminal on the TV use an HDMI to DVI ada...

Page 22: ...usic files that are stored on a DLNA CERTIFIED Server and play them on your TV Connecting the TV directly to a PC without an Internet connection You will need s Crossover LAN cable TV right side panel Connecting the TV to a home network without an Internet connection You will need s Standard LAN cables s Router with Hub Computer TV right side panel Computer Router with Hub Server PC ...

Page 23: ...ansmission speed over the wireless LAN and the distance over which wireless LAN can reach may vary depending on surrounding electromagnetic environment obstacles access point design and configuration and client design and software hardware configurations The actual transmission speed will be lower than the theoretical maximum speed The Dual Band WLAN Adapter is based on the IEEE 802 11n specificat...

Page 24: ...osed to excessive heat such as sunshine fire or the like Note U Be sure to use AAA size carbon zinc batteries U Dispose of batteries in a designated disposal area U Batteries should always be disposed of with the environment in mind Always dispose of batteries in accordance with applicable laws and regulations U If the remote control does not operate correctly or if the operating range becomes red...

Page 25: ...7 CH ST cycles through programmed channels when no menu is on screen pages 34 35 8 VOL adjusts the volume level 9 WIDGETS selects featured websites from Net TV menu 10 FAV accesses the Favorites List in the Channel Browser page 39 11 CH RTN returns to the last viewed channel or source page 42 12 MUTE reduces or turns off the sound page 47 13 QUICK accesses Quick menu 14 INFO displays TV status inf...

Page 26: ...S selects the next higher channel T selects the next lower channel 6 DVD RTN Returns to previous DVD s menu 7 INFO Displays TV status information on screen 8 STWX Press to navigate DVD menus may not work on some DVD players 9 OK Required by some satellite receivers and DVD players to activate certain functions 10 EXIT Closes on screen menus DVD CLEAR Press to reset the title and chapter number 11 ...

Page 27: ... Input TV TV TV TV WIDGETS Net TV MUTE Mute TV TV TV TV QUICK Quick Menu VOL Volume Up Down TV TV TV TV CHST Channel Up Down Channel Up Down Channel Up Down Channel Up Down FAV TOP MENU FAV Browser Top Menu CH RTN DVD RTN Last Channel DVD Return INFO Info Info Display OK OK Select Enter Enter S Menu Up FAV Up Menu Up Menu Up T Menu Down FAV Down Menu Down Menu Down W Menu Left C B Back Menu Left M...

Page 28: ... for your device 4 To test the code turn on the device point the remote control at it and press See notes below s If the correct code was entered the device will turn off s If the device does not respond repeat steps 1 4 using another code s If the device does not respond to another code you will need to use the remote control that came with the device 5 Remember to set the MODE SELECT switch back...

Page 29: ...058 Pansat 036 052 Primestar 015 042 Proscan 008 009 013 Radio Shack 022 023 030 RCA 008 009 013 016 Realistic 030 Samsung 059 Sony 014 055 Star Choice 057 106 Star Trak 025 026 037 054 STS 024 Toshiba 000 001 002 003 004 005 006 007 020 031 056 Uniden 021 028 030 032 035 039 043 045 047 058 Zenith 027 TV VCR Combo Action 078 GE 059 062 Goldstar 065 Panasonic 065 Precision 078 Quasar 065 Realistic...

Page 30: ...44 057 Pioneer 006 024 043 055 Portland 012 013 015 Proscan 001 002 048 Proton 061 Quasar 045 Radio Shack 010 031 065 Radio Shack Realistic 007 009 010 016 018 020 021 022 031 049 Radix 010 RCA 001 002 003 009 024 025 029 035 040 042 045 048 055 056 063 071 083 Realistic 007 009 010 011 016 018 020 021 022 031 049 051 056 060 065 075 079 Ricoh 047 Runco 034 Samsung 009 011 038 056 073 084 Sansui 0...

Page 31: ...UDU menu Netflix p Opens the Netflix menu Media Player p Opens the Media Player menu REGZA LINK Player Control p Opens the REGZA LINK Player Control Sleep Timer p Opens the Sleep Timer menu Preferences CC Selector p Launches the temporary CC Selector Base CC Mode p Off CC1 CC2 CC3 CC4 T1 T2 T3 T4 Digital CC Settings p Opens the Digital CC Setup menu Input Labeling p Opens the Input Labeling menu A...

Page 32: ...u layout The Installation menu contains the Terrestrial and System Status menus To open the Installation menu illustrated below press on the remote control or TV control panel open the Setup menu select Installation and press Icon Item Option Terrestrial Input Configuration p Opens the Input Configuration menu Channel Program p Start p Scans for new channels on ANT CABLE Channel Options p Opens th...

Page 33: ...ps you access some options quickly Press to display the Quick menu and press S or T to select the option Note Quick menu items are different depending on the current mode Quick menu Item Option Picture Mode p Sports Standard Movie PC Preference Picture Size p Natural TheaterWide 1 TheaterWide 2 TheaterWide 3 Full 4 3 HD Native Dot by Dot Media Player p Opens the Media Player menu Sort p Title New ...

Page 34: ...etup menu 2 Press S or T to select Quick Setup and press 3 A confirmation message will appear on the screen press W or X to select Yes and press and press 4 Other procedures are the same as Initial Setup Selecting the menu language You can choose from three different languages English French and Spanish for the on screen display of menus and messages To select the menu language 1 Press and open th...

Page 35: ... as shown below Open the Terrestrial menu highlight Channel Program to bring up the Start Scan and press again to begin channel programming The TV will automatically cycle through all the antenna channels and store all active channels in the channel memory While the TV is cycling through the channels the message Scanning channels please wait appears as shown above 5 To cancel channel programming p...

Page 36: ...el To close the screen and return to the Terrestrial menu Highlight Done and press To return to normal viewing Press Note Skipped channels cannot be selected with or however they can still be accessed using the number keys on the remote control Setting AV Input mode This setting determines the configuration of the shared AV input on your TV You can set this input for either ColorStream HD or Video...

Page 37: ...mation and view the related information To close the screen and return to the Installation menu Highlight Done and press To return to normal viewing Press To view the Connective information 1 Press and open the Setup menu 2 Highlight Installation and press 3 A new set of Installation menu icons will appear Open the System Status menu highlight Connective information and press To close the screen a...

Page 38: ... to highlight HDMI 1 HDMI 2 HDMI 3 or HDMI 4 If the connected CEC device has any connected devices a separate device selection popup window will appear Chapter 6 Using the TV s features Press repeatedly to highlight the desired input source and then press Note U When selecting REGZA LINK input sources from the popup window using some REGZA LINK devices may automatically turn on U When selecting in...

Page 39: ...nnels and inputs This feature allows you to s Navigate the contents of all of your inputs s Keep a list of your favorite channels see Favorites Browser below s Keep a history of the last 32 channels or inputs viewed s Quickly surf and tune your recently viewed channels inputs from the Channel Browser History List illustrated on the next page s Surf via Browse mode to immediately tune channels as y...

Page 40: ...rward through the channel History the ANT CABLE channel list the Inputs list the REGZA LINK list or the favorite channels inputs in the Favorites list Elements of the Channel Browser 1 Current list History ANT CABLE Inputs Favorites or REGZA LINK 2 Input type 3 Channel or input currently being viewed 4 Channel or input that is currently highlighted in the browser 5 Channels stored in the History L...

Page 41: ...List Note See page 34 for details on configuring the antenna input U Once 32 channels or inputs are stored in the History List the oldest item will be removed from the list when a new channel or input is tuned U Turning off the TV will clear the History List Setting the Channel Tuning Mode This feature allows you to choose how tuning will be handled for analog and digital channels when the TV is i...

Page 42: ...ls using SurfLock The SurfLock feature temporarily memorizes one channel to the button so you can return to that channel quickly from any other channel by pressing To memorize a channel to the button 1 Tune the TV to the channel you want to program into the button 2 Press and hold for about 2 seconds until the message Memorized appears on screen The channel has been programmed to the button 3 You ...

Page 43: ...dden To view the hidden edges either scroll the picture TheaterWide 2 and 3 only or try viewing the program in Full or Natural picture size Picture Size Natural Some program formats will display with sidebars and or bars at the top and bottom TheaterWide 1 for 4 3 format programs The center of the picture remains close to its original proportion but the left and right edges are stretched wider to ...

Page 44: ...odes for each input To set the scroll settings 1 Press and open the Picture menu 2 Highlight Theater Settings and press 3 In the Picture Size field select either TheaterWide 2 or TheaterWide 3 you cannot scroll in any other mode 4 Press T to highlight the Picture Scroll field 5 Press W or X to scroll the picture up and down as needed 6 To save the new settings highlight Done and press To revert to...

Page 45: ...ing picture Using the FREEZE function for any purpose other than your private viewing may be prohibited under the Copyright Laws of the United States and other countries and may subject you to civil and criminal liability Adjusting the picture Selecting the picture mode You can select your desired picture settings from four different modes as described below Mode Picture Quality Sports Bright and ...

Page 46: ...de that you began adjusting the picture settings from highlight Reset and press The picture qualities you adjusted are automatically saved in the Preference mode Selecting the picture mode until Reset is selected Using the closed caption mode Base closed captions The closed caption mode has two options s Captions An on screen display of the dialogue narration and sound effects of TV programs and v...

Page 47: ...rent Base CC Mode setting You can also use the CC Selector to select digital closed caption services if available When such services are not available the CC Selector presents a default list of services If the selected service is not available the next best service will be used instead To select closed captions 1 Press and open the Preferences menu 2 Highlight CC Selector and press 3 Press S or T ...

Page 48: ...step 3 above Note U A second audio program SAP can be heard only on those TV stations that offer it For example a station might broadcast another language as a second audio program If you have SAP on you will see the current program on the screen but hear the other language instead of the program s normal audio U If you have SAP on and the station you are watching is not broadcasting a second audi...

Page 49: ...gital Dynamic Range Control will function in relation to Optical Output Format PCM mode Using the Locks menu The Locks menu includes the Enable Rating Blocking Edit Rating Limits Input Lock Front Control Panel Lock GameTimer and New PIN Code features You can use these features after entering the correct PIN code Entering the PIN code 1 Press and highlight the Locks menu icon 2 Press T which displa...

Page 50: ...nloaded To download the additional rating system if available 1 Press and highlight the Locks menu icon 2 Press T to display the PIN code entering screen 3 Enter your four digit PIN code and press 4 Press T to highlight Enable Rating Blocking 5 Press X to select On and press 6 Press T to highlight Edit Rating Limits and press The Edit Rating Limits screen appears 7 Highlight Alt RS and press The E...

Page 51: ...n Independent rating system for movies Ratings Description and Content themes X X rated For adults only NC 17 Not intended for anyone 17 and under R Restricted Under 17 requires accompanying parent or adult PG 13 Parents Strongly Cautioned Some material may be inappropriate for children under 13 PG Parental Guidance Suggested Some material may not be suitable for children G General Audience Approp...

Page 52: ...deo if you play video tapes via an ANT CABLE input Off Unlocks all video inputs and channels 3 and 4 4 Press Using the Network lock feature You can use the Network Lock feature to prevent the Web browser from launching When this feature is set to On PIN input will be necessary to use Widgets VUDU or Netflix To Lock the Network 1 From the Locks menu press T to display the PIN code entering screen 2...

Page 53: ...adjust the Horizontal Position and Vertical Position If the picture is affected by interference readjust the Clock Phase and Sampling Clock To adjust the PC settings 1 Repeatedly press to select PC input mode Selecting the video input source to view page 38 2 Press and open the Setup menu 3 Highlight PC Settings and press Note If a PC is not connected or there is no pc input signal this feature wi...

Page 54: ...2 kHz 44 1 kHz 48 kHz Bit rate from 8 to 320 kbps Maximum number of files 500 folder Supported file system FAT16 and FAT32 Note U Gently insert the USB device into the port and do not remove while viewing Media Player U USB device USB Mass Storage Class device MSC U Connectivity is not guaranteed for all devices U Connect the USB device to the TV directly U Do not use a USB Hub U You must obtain a...

Page 55: ...o the previous layer 3 Press to view the selected photo in Single View mode Single View In this view mode only files located in the selected directory shall be displayed This view allows you to change the photo content manually When moving from Multi View to the Single View the currently selected photo shall be displayed 1 Press X to view the next photo Press W to view the previous photo 2 Press S...

Page 56: ...ckground Using a networked server PC This TV is a DLNA CERTIFIED Player This TV can play digital content stored on a DLNA CERTIFIED product with server function To play the files from your DLNA server on the TV you have to first complete the following s Home network connection page 22 s DLNA server installation refer to the owner s manual of the DLNA recognition server s Setting up the Network see...

Page 57: ...playback Note U Depending on the file size it may take some time for playback to begin U Dual Band WLAN Adapter WLM 10U1 is not support movie in DLNA The playing time may not be displayed while a movie is playing During playback s Press to pause s To resume normal playback press s To locate a specific file press or repeatedly To close the Movie Player 1 Press Contents Description Description Photo...

Page 58: ...remote control Press on the remote control to set the length of time until the TV turns off Repeatedly press to increase the time in 10 minute increments or press S or T to increase or decrease the time in 10 minute increments to a maximum of 180 minutes To set the sleep timer using the on screen menus 1 Press and open the Application menu 2 Highlight Sleep Timer and press 3 Press the Number butto...

Page 59: ...rol or using the REGZA LINK Player Control menu you can control the connected REGZA LINK playback device you are watching Available remote control key functions Before using the following key functions first set the MODE SELECT switch on the remote control to TV Button Description Begins playback Stops playback Pauses the picture during play or record mode Skips forward Button Description Skips ba...

Page 60: ...ns will be enabled Item Description TV Auto Input Switch If a connected HDMI device starts playing video or audio the TV will automatically switch to the appropriate HDMI input TV Auto Power If a REGZA LINK device is turned on the TV turns on automatically Device Auto Standby If the TV is turned off the TV will send a message to turn off all of the REGZA LINK devices connected to the TV Speaker Pr...

Page 61: ...ut s Title s Duration s Detailed description To display next program information for ANT CABLE input press again Pressing a third time will remove the entire banner Note The location of the banner can be moved to the top or bottom of the screen by pressing S or T while the INFO display is on screen Understanding the auto power off feature The TV will automatically turn itself off after approximate...

Page 62: ...select one of the factory set picture modes Sports Standard Movie or PC and then change the static gamma setting the picture mode automatically changes to Preference Chapter 7 Using the TV s advanced features Selecting the color temperature You can change the quality of the picture by selecting from three preset color temperatures Cool Medium and Warm as described below Mode Picture Quality Cool b...

Page 63: ...eo shaking To turn on Film Stabilization 1 Press and open the Picture menu highlight Picture Settings and press 2 Highlight Advanced Picture Settings and press 3 In the Film Stabilization field select Smooth 4 To save the new settings highlight Done and press To revert to the factory defaults highlight Reset and press Note U If you select one of the factory set picture modes Sports Standard Movie ...

Page 64: ...ut must be Video ColorStream HD HDMI 1 HDMI 2 HDMI 3 or HDMI 4 The Game Mode cannot be turned on when any other video input is selected To turn on Game Mode 1 Press and open the Picture menu highlight the Game Mode 2 Press W or X to select On To turn off Game Mode Select Off in step 2 above change the video input or turn the TV off and then on again Note You can change the video input by pressing ...

Page 65: ...ed in accordance with whatever terms and conditions are established between such third party providers and you U TOSHIBA MAKES NO REPRESENTATIONS OR WARRANTIES ABOUT THE CONTENT Chapter 8 Using the TV s network features AVAILABILITY OR FUNCTIONALITY OF THE VUDU SERVICE OR OTHER INTERNET DELIVERED THIRD PARTY SERVICES AND DOES NOT WARRANT THAT ANY OF THEM WILL BE UNINTERRUPTED ERROR FREE OR SATISFA...

Page 66: ...o streaming U It is recommended to use IEEE 802 11n on 5 GHz for HD video streaming U It is recommended that the encoding rate of content of Video streaming is 20 Mps or less U It is not recommended to use 2 4 GHz for audio and video streaming U Content playback may be interrupted by surrounding various interference Setting up the Network You can select the Network Type 1 From the Setup menu highl...

Page 67: ...g for the AP A message will appear Then press W or X to select Yes and press Assisted Setup 1 From the Setup menu highlight Network Setup and press 2 Press S or T to highlight Wireless Setup and press 3 Press S or T to highlight Assisted Setup and press 4 Press S or T to select the desired AP and press Note If a Check the MAC address on label of the AP or the manual of it and select an AP 5 Highli...

Page 68: ...gs are not saved if is pressed before Done is selected Wireless Information The settings configured in Wireless Setup can be confirmed 1 Press and open the Quick menu 2 Press S or T to select Wireless Information and press 3 When the AP connection succeeds a Wireless Information window will appear Note Press the RED button if you confirm the situation of surrounding APs Item Description Status Con...

Page 69: ...ame as IP Address Note If you manually set the IP address you must not use the same IP address for any other device The IP address you use should be a private address If you do not know the correct values to use please contact your network administrator or internet service provider DNS Setup Note When the DHCP function of the router connected to this TV is Off set Auto Setup to Off and manually se...

Page 70: ...ftware Keyboard The Software Keyboard window will appear when you press on a field that accepts character input To enter text using the software keyboard 1 Highlight the desired character on the on screen software keyboard 2 Press 3 Repeat steps 1 and 2 until you have entered all desired text 4 Press the BLUE button to close the software keyboard and return to the previous screen Note If is presse...

Page 71: ...der to access network features 1 From the Applications menu or press on the remote control highlight Widgets and press The Widgets display will appear 2 Press S T W or X to select the widget you want to access and press To close the Widgets display Press VUDU VUDU is an on demand service that offers high definition movies on the Web You can access the VUDU service by the following methods From the...

Page 72: ...ion window does not appear when you press on the remote control or TV press a second time which will change to the next video input source and display the Input Selection window Cannot view external signals or channel 3 or 4 s If you cannot view signals from external devices connected to VIDEO ColorStream HD HDMI 1 HDMI 2 HDMI 3 HDMI 4 PC or from channels 3 or 4 make sure the Input Lock is set to ...

Page 73: ...unable to tune digital channels clear all channels from the channel list and reprogram channels into the channel memory page 34 If you are still unable to tune digital channels use the Reset Factory Defaults procedure page 37 Also see TV stops responding to controls and Other problems page 72 Closed caption problems s If the program or video you selected is not closed captioned no captions will di...

Page 74: ... problems s Make sure the Dual Band WLAN Adapter connection page 23 s Check that the power of AP is On s After starting wireless network setup confirm that the window that the wireless constitution was completed successfully appears s Check the AP s connection status page 68 s If the AP does not correspond to the PBC of WPS Easy Setup PBC cannot set even if its push button is pressed s If AP list ...

Page 75: ...m PB 0 7 V p p 75 ohm Suggested formats 1080i 720p 480p 480i AUDIO 200 mV rms 47 k ohm or greater Chapter 10 Appendix HDMI INPUT HDMI compliant type A connector HDCP compliant Suggested formats See table on the next page HDMI Audio 2 channel Linear PCM 32 44 1 48 kHz sampling frequency 16 20 24 bits per sample DIGITAL AUDIO OUTPUT Optical type PC INPUT 15 Pin D sub Analog RGB Dimensions 40UL605U W...

Page 76: ...776kHz 79 500MHz 1360 768 60 015Hz 47 712kHz 85 500MHz SXGA 1280 1024 60 020Hz 63 981kHz 108 000MHz HDMI signal formats Format Resolution V Frequency H Frequency Pixel Clock Frequency VGA 640 480 59 940Hz 31 469kHz 25 175MHz SVGA 800 600 60 317Hz 37 879kHz 40 000MHz XGA 1024 768 60 004Hz 48 363kHz 65 000MHz WXGA 1280 768 59 870Hz 47 776kHz 79 500MHz 1360 768 60 015Hz 47 712kHz 85 500MHz SXGA 1280 ...

Page 77: ...s new 1 A purchase receipt or other proof of the original purchase date is required for Warranty service 2 All warranty servicing of this LCD Television must be performed by an Authorized TACP Service Station 3 The warranties from TACP are effective only if this LCD Television is purchased and operated in the U S A or Puerto Rico 4 Removal and reinstallation of product that is mounted in such a ma...

Page 78: ...efore operating this LCD Television Complete and mail the enclosed product registration card or register your LCD Television online at http support toshiba ca warranty Registration of your LCD Television will enable TCL to contact you in the unlikely event of a product safety notice Failure to complete the product registration does not diminish your warranty rights THE ABOVE WARRANTIES ARE SUBJECT...

Page 79: ... PARTY No person agent distributor dealer or company is authorized to change modify or extend the terms of these warranties in any manner whatsoever Arbitration and Dispute Resolution To the extent not precluded by law any claim dispute controversy or disagreement whether for breach of warranty breach of contract tort including negligence under a statute or under any other law or form of action ag...

Page 80: ...re is any inconsistency between this limited warranty on the one hand and any statement in the packaging of the Television or in any other document enclosed with or used in the context of the promotion or sale of the Television on the other hand the provisions of this limited warranty shall prevail How to Obtain Warranty Services If after following all of the operating instructions in this manual ...

Page 81: ...REET MARKHAM ONTARIO L3R 8H2 CANADA TEL 905 470 5400 MONTREAL 18050 TRANS CANADA KIRKLAND QUEBEC H9J 4A1 CANADA TEL 514 390 7766 VANCOUVER 6932 GREENWOOD STREET BURNABY B C V5A 1X8 CANADA TEL 604 303 2500 CableClear ColorStream GameTimer and TheaterWide are registered trademarks of Toshiba America Consumer Products L L C Channel Browser DynaLight ClearFrame and SurfLock are trademarks of Toshiba A...

Page 82: ...tand to avoid damage to the LCD panel 111111111111111111111111111111111111111111111111111111111I11I1111 HF6TP400001 AVERTISSEMENT Pour eviter tout risque de choc electrique empecher Ie cordon electrique d etre coince en fixant Ie piedestal ATIENTION Avant de commencer I assemblage du support de table placer avec soin I avant du panneau ACL face vers Ie bas sur une surface plane matelassee comme su...

Page 83: ... votre television et de votre AP pour plus de details Remarque Importante Veuillez lire I etudier la Declaration reglementaire WLU5022 RoHS pour eviter tout risque d utilisation illegale de ce produit Consignes de securite Ne pas laisser les enfants avaler Ie produit ou jouer avec Ie sac plastique Gardez Ie produit et Ie sac plastique hors de portee des enfants Ne pas laisser de I eau ou d autres ...

Page 84: ...as destine a interdire la transmission de commandes ni Ie signalement d informations ni I usage de codes repetes quand cela est requis par la technologie SI cet appareil doit etre fonctionner sur une gamme de frequence comprise entre 5 15 et 5 25GHz alors il sera restreint a un usage interieur uniquement Important Toutes modifications ou tous Changements effectues sans I accord expres de la partie...

Page 85: ... or HD Satellite Receiver may have a DVI connection This will be connected to the HDMlo jack on the TV using an HDMlo cable and an HDMIO to DVI converter DVI carries digital video only Therefore this will require a separate analog audio connection as well use the red and white audio connections 3 HDMIO is the best connection for HDTV This is a digital connection that carries both digital video and...

Page 86: ...Customers THANK YOU Si vous eprouvez des difficultes techniques ou si vous avez des questions concernant Ie fonctionnement du produit les centres de service autorises la garantie ou les pieces veuillez appeler notre departement du service ala clientele au 1 800 631 3811 Etats Unis seulement 1 800 268 3404 Canada seulement VOUS trouverez egalement des reponses ade nombreuses questions sur les piece...

Page 87: ...here was this product purchased 1 Yes from my retail dealer 01 Received as a Gift 2 No but contract was offered by my retail dealer 02 Department Store 3 No contract was not offered 03 Discount Store a If you answered yes to 6 how long does your service contract or extended warranty last 04 TV Appliance Store B B 05 Specialty Electronics Store 1 1 Year 3 3 Years 06 Warehouse Membership Club 2 2 Ye...

Page 88: ...e valuable Toshiba information Failure to complete and return this card does not diminish your warranty rights See details inside If you have comments or suggestions about our product please write to Toshiba America Consumer Products L L C 82 Totowa Road Wayne NJ 07470 Copyright 2004 All Rights Reserved Please seal with tape Do not staple ...

Page 89: ...pondence to Toshiba America Consumer Products L L C 82 Totowa Road Wayne NJ 07470 First Class Postage Required Post Office will not deliver without proper postage Toshiba America Consumer Products L L C P O Box 174007 Denver CO 80217 4007 ...

Reviews: