


14
Getting started
Programming channels into the
TV’s channel memory
Auto scan
- digital only -
As new services are broadcast, it will be necessary to re-tune
the TV in order to view them.
Auto scan will completely re-tune the TV and can be used to
update the channel list. It is recommended that Auto scan is run
periodically to ensure that all new services are added. All
stored programmes and settings, including Timer entries,
favorites and locked programmes, will be lost.
1
Press
M
and
or
to select the
SCAN
menu.
2
Use
to select
Auto Scan
.
3
Press
Q
. If
Password Status
(
-
page 29) is
Enabled
,
Password
menu will be displayed. Enter
your password using the
number
buttons or press 0000
(which is the default password).
4
The
Select Location
will appear. Current location will
be highlighted. Press
or
to select a state in which
you live.
5
Press
Q
, a confirmation screen will appear indicating
that
All existin
g
channels will be deleted.
Continue?
select
Yes
.
6
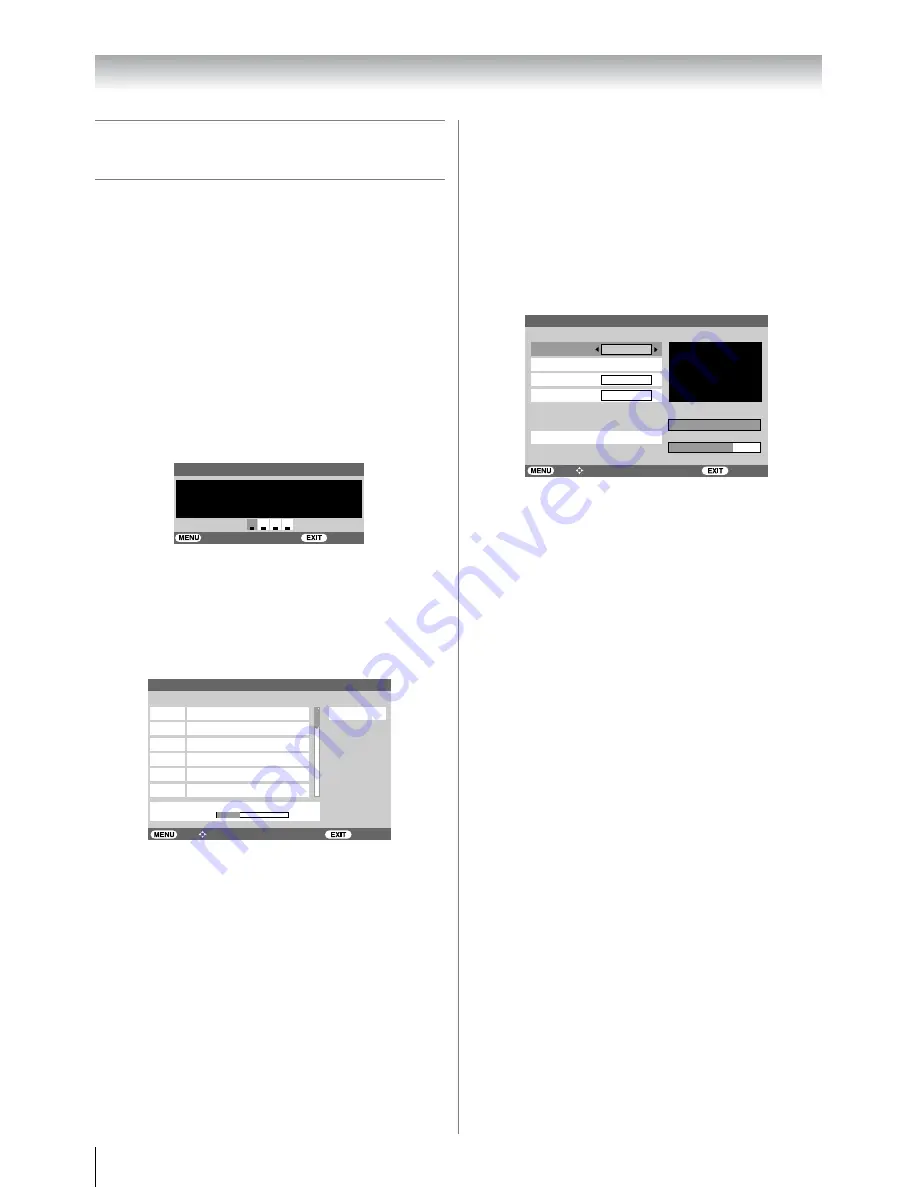
Press
Q
to start Auto tuning.
The above sample display shows
Auto Scan
in progress.
The channel number is shown as “06-0007” etc., where
“06” is the physical channel number and “0007” is the
logical channel number (which is the 4-digit number you
enter when changing channels).
7
When the search is complete, the TV will automatically
tune to the lowest logical channel number.
Note:
After the
Auto scan
, the TV may have scanned identical
channels being broadcast from different transmitters. You can
verify this by
previewing
those channels in the
Channel List
with identical logical numbers and check on their physical
channel numbers (
-
page 30). If you do find channels with
the same logical channel numbers but different physical
channel numbers, it is recommended that you skip these
duplicate channels and keep only one channel with the best
signal strength as indicated by the SNR indicator in the I-Plate
(
-
page 16) display.
Manual scan
- digital only -
If there were any missing channel after
Auto Scan
, these
channels might be found by using
Manual Scan
described in
this section. Also, if you do not live in Australia, you must use
Manual Scan
to scan those channels in your country.
1
From the
SCAN
menu, press
or
to select
Manual
Scan
, then press
Q
.
2
Enter password using the
Number
buttons or press 0000
(which is the default password), then
Manual Scan
will
appear.
3
Press
or
to select the item you wish to adjust. For
Australia, to adjust
Frequency
, you may refer to the
latest channel table from local dealer. And the
Bandwidth
is 7MHz and
Priority
should be set to
HIGH
. Then press
or
to select
Start Scan
and
press
Q
to start scanning.
4
If scanning was successful,
Get Channel Success
appeared for 2 seconds. Repeat to scan other channels as
necessary.
5
If scanning was unsuccessful,
Timeout Error
appeared.
At this point you can rescan the signal or refer to the
Si
g
nal Level
bar and
Quality
for aligning the direction
of the aerial to get the signal. Refer to your aerial installer
if problem persists.
Notes:
•
Signal level
refers to the input Radio Frequency (RF) signal
strength as perceived by the TV. Note that too strong signal
may cause erroneous readings. If you use an aerial booster
and find that you still get a low signal level, your booster gain
may be set too high. In this case, adjust the gain
accordingly. You may also see the
No Signal
on the screen
when the signal level is low.
•
Quality
refers to the quality of the received digital signal. A
high value of quality means that there are few errors in the
signal. In the same way, a low value of quality implies that
there are a large number of errors in the signal, which may
cause distortions in video and audio.
Password
Watch TV
Blocking acti
v
e
Enter PI
N
code
To temporarily unblock
Back
Auto S
c
an
7 Di
g
ital
7 Di
g
ital HD
7 Di
g
ital 1
7 Di
g
ital 2
Channel 6 found...
06-0007
06-0070
06-0071
06-0072
7 Di
g
ital 3
06-0073
7 Di
g
ital Guide
06-0077
Scan Status
6/69
Scan Percenta
g
e
Ba
c
k Wat
c
h TV
Sele
c
t Fun
c
tion
NT
Channel No.
Band
w
idth
Priority
Signal Le
v
el
Quality
100%
70%
Fre
q
uency
Start Scan
S
N
R: 20dB
Scanning...
6
1775000 KHz
HIGH
7 MHz
Manual Scan
Back Watch
TV
Select Function
Summary of Contents for 37XV500A
Page 44: ...YC J ...


