background image

4

En

g

lis

h

INSTALLING YOUR TV

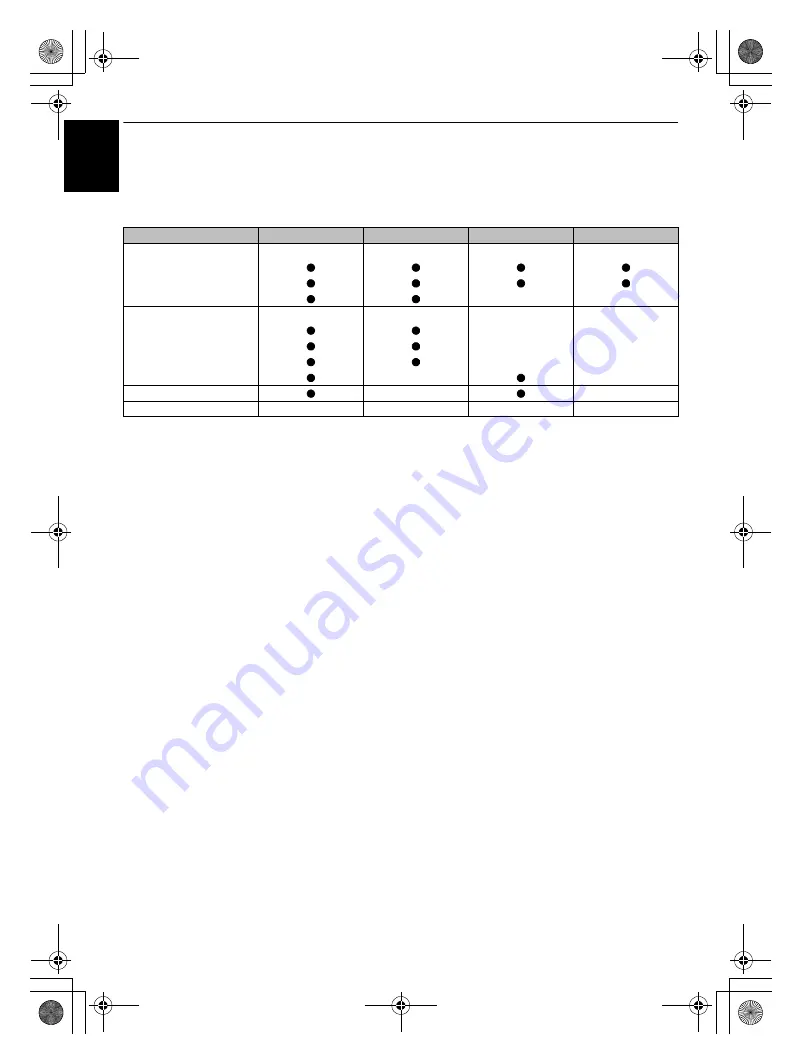
Difference List between LV and RV Series

Please confirm your TV's specifications in the following table.

NOTE: 

The model number is on the back of your TV.

NOTE: 

The illustrations of the menu display in this manual show the LV685D as an example.

Item

RV685D/RV675D

LV685D/LV675D

RV665D

LV665D

Receiving signal

DVB-T

DVB-C

H.264

Sound

HE-AAC

Dolby Digital

Dolby Digital Plus

Dolby Volume

TOSHIBA LOGO Illumination

Remote control

CT-90327

CT-90326

CT-90327

CT-90326

00GB_RV-LV685D_Euro.book  Page 4  Tuesday, September 1, 2009  10:15 AM

Summary of Contents for 32LV665D

Page 1: ...RV6 D Digital Series LV6 D Digital Series 00GB_RV LV685D_Euro book Page 1 Tuesday September 1 2009 10 15 AM ...

Page 2: ...neral controls 20 Selecting positions 20 The Time Display analogue only 20 Stereo and Bilingual transmissions 20 Quick Menu 20 Sound controls 21 Volume controls and mute sound 21 Dual 21 Bass Treble and Balance 21 Advanced Sound Settings 21 Stable Sound LV series only 21 Dolby Volume RV series only 21 Dynamic Range Control 21 Audio Level Offset 22 Headphone Settings 22 Audio description 22 Widescr...

Page 3: ...e Licenses 38 System Information and Reset TV 39 System Information 39 Automatic Power Down 39 Reset TV 39 PC Settings 39 Horizontal and Vertical Position 39 Clock Phase 39 Sampling Clock 40 Reset 40 Input selection and AV connections 40 Input selection 40 External input skip 40 Input signal selection 41 PC Audio 41 HDMI 1 Audio 41 HDMI Settings 41 Digital Audio Output 42 TEXT SERVICES Text servic...

Page 4: ...ur TV NOTE The illustrations of the menu display in this manual show the LV685D as an example Item RV685D RV675D LV685D LV675D RV665D LV665D Receiving signal DVB T DVB C H 264 Sound HE AAC Dolby Digital Dolby Digital Plus Dolby Volume TOSHIBA LOGO Illumination Remote control CT 90327 CT 90326 CT 90327 CT 90326 00GB_RV LV685D_Euro book Page 4 Tuesday September 1 2009 10 15 AM ...

Page 5: ...t the installation operation or safety of your equipment DO be careful with glass panels or doors on equipment DO NOT obstruct the ventilation openings of the equipment with items such as newspapers tablecloths curtains etc Overheating will cause damage and shorten the life of the equipment DO NOT allow electrical equipment to be exposed to dripping or splashing or objects filled with liquids such...

Page 6: ... images generated by 4 3 broadcasts text services channel identification logos computer displays video games on screen menus etc are left on the television screen for any length of time they could become conspicuous It is always advisable to reduce both the brightness and contrast settings Very long continuous use of the 4 3 picture on a 16 9 screen may result in some retention of the image at the...

Page 7: ...this model 16 s Stereo bilingual transmissions T AUDIO To Access Audio menu D 17 SUBTITLE Digital Subtitles or Analogue TEXT Subtitle pages if available T SET UP To access Setup menu D 18 Widescreen viewing T D 19 To call up text services T 20 When in TV mode MENU On screen menus ATV DTV To switch between ATV analogue television and DTV digital television LIST To switch between TV and Radio progra...

Page 8: ...de A To reveal concealed text B To hold a wanted page C To enlarge text display size D To select a page whilst viewing a normal picture When in TV mode D Analogue time display Remove the back cover to reveal the battery compartment and make sure the batteries are inserted the proper way Suitable battery types for this remote are AAA IEC R03 1 5V Do not combine a used old battery with a new one or ...

Page 9: ...de variety of external equipment can be connected to the back of the television therefore the relevant owner s manuals for all additional equipment must be referred to for exact instructions We recommend SCART 1 for a decoder and SCART 2 for a media recorder If connecting S Video equipment set EXT 2 Input mode to S VIDEO See page 41 If the television automatically switches over to monitor external...

Page 10: ...ee HDMI 1 Audio on page 41 The HDMI 4 terminal is located on the side of the television To view the HDMI device video press the o button to select HDMI 1 HDMI 2 HDMI 3 or HDMI 4 mode Connect an HDMI to DVI adapter cable HDMI type A connector to the HDMI 1 terminal and audio cables to the PC HDMI1 AUDIO socket see illustration The recommended HDMI to DVI adapter cable length is 6 6 ft 2m An HDMI to...

Page 11: ...e edges of the screen or parts of the picture may be obscured This is due to scaling of the picture by the set it is not a malfunction When PC input mode is selected some of the television s features will be unavailable e g Manual Settings in the SETUP menu Colour Tint Sharpness and Black White Level in the PICTURE menu If connecting a certain PC model with a unique PC signal the PC signal may not...

Page 12: ...tting Follow the on screen instructions The functions of each menu are described in detail throughout the manual To alter the volume press 2 To alter the programme position press b p B Press MENU and I i U or u to control the sound and picture options Press MENU to finish An S Video cable provides better picture performance than a composite video cable If you connect an S Video cable to EXT 3 be s...

Page 13: ...able In section on the next page The television will start to search for available DTV and or ATV channels The progress bar will indicate the scan status You must allow the television to complete the search When the search is complete the television will automatically select position one The Auto Tuning screen will display the total number of services found i Press C or c to view the DTV digital c...

Page 14: ...n will be executed The Quick Scan is a simplified version of the Full Scan that is designed to complete in less time DTV Start Frequency This sets the frequency from which the scan will begin DTV End Frequency This sets the frequency at which the scan will end Valid entry range for frequency items is 113 000 858 00 for C Book Other and 114 000 858 00 for Nordig C If numbers outside of this range a...

Page 15: ...ure if the television cannot be connected to a media recorder decoder with a SCART lead or when you want to tune in a station on another System Use C and c to move across the screen and select any of the ATV Manual Tuning options Then use B or b to adjust the settings 1 Position The number to be pressed on the remote control to tune the channel 2 System Specific to certain areas 3 Colour System Fa...

Page 16: ...nnels and select the next number to tune k Press EXIT when you have finished l To name external equipment e g DVD on EXT 2 press o to select o2 then select Manual Settings from the SETUP menu m Press c to select Label then using B b C and c put in the required characters and then press Q Different Channel numbers may be displayed SETUP Menu Language English Country Ant Cable In Auto Tuning ATV Man...

Page 17: ...n still be accessed by the number buttons on the remote control Channels may be moved and saved to the position of your choice a Select ATV Manual Tuning from the SETUP menu b With the list of channels showing use B or b to highlight the channel you want to move and press c c Use B or b to move through the list to your preferred position As you do so the other channels will move to make room d Pre...

Page 18: ... be used for the manual scan DTV Settings The channel order may be changed to suit your personal preference a Select DTV Settings from the SETUP menu and press Q b Select Channels and press Q c With the list of channels showing use b or B to highlight the channel you want to move and press c d Use b or B to move through the list to your preferred position As you do so the other channels will move ...

Page 19: ...DTV Settings from the SETUP menu and press Q b Press b to select Dynamic Scan and use C or c to select On You can select either Home or Store mode Home is recommended for normal home use Select Store when diaplaying the television in a shop etc a Select Location from the SETUP menu b Press C or c to select Home or Store This is a digital television which is integrated to allow the use of both digi...

Page 20: ...broadcasts press s and use C or c to select settings For multi audio track broadcasts press s repeatedly to change the audio language see Audio language on page 37 Quick Menu helps you access some options quickly such as Picture Mode Picture Size More Information Sleep Timer etc Press QUICK to display the Quick Menu and use B or b to select the option NOTE Quick Menu items are different depending ...

Page 21: ...lume that can occur when channels are changed or a programme switches to a commercial a Select the SOUND menu b Use b to highlight Stable Sound and then press C or c to select On or Off This feature provides a consistent sound volume regardless of programmes channels or input sources a In the SOUND menu press b to highlight Dolby Volume b Press C or c to select Low High or Off NOTE The Dolby Volum...

Page 22: ...djust the headphone sound Audio description is an additional narrative sound track for visually impaired individuals that allows the story line to be understood and enjoed more fully If this function has been activated by pressing the AD key the letters AD will be displayed in the channel banner when programmes contain AD content You can choose to hear sound from the TV speakers and the headphone ...

Page 23: ... the picture to ensure that all of the text is displayed CINEMA When watching all sides panel format films video tapes this setting will eliminate or reduce the black bars at all sides of the screen by zooming in and selecting the image without distortion WIDE Use this setting when watching a widescreen DVD widescreen video tape or a 16 9 broadcast when available Due to the range of widescreen for...

Page 24: ... when watching a PC signal source via HDMI or PC terminal PC WIDE This setting will show the picture without over scan and side panels This option is only available when watching a PC signal source via HDMI or PC terminal Dot by Dot is a non scaling display Depending on the input signal format the picture is displayed with side panels and or bars at the top and bottom e g VGA input source NATIVE T...

Page 25: ...re mode is only available when Location is set to Store Game mode is available in external input mode other than aerial input When you select Game mode suitable widescreen formats will be selected PC mode is available in RGB PC input mode or HDMI input mode a In the PICTURE menu press b to select Picture Mode b Press C or c to select the picture mode you prefer and press Q NOTE The picture mode yo...

Page 26: ...u To return to the factory settings select Reset and press Q Colour Temperature increases the warmth or coolness of the picture by increasing the red or blue tint a In the Advanced Picture Settings menu press b to select Colour Temperature and press Q b Press C or c to select the Colour Temperature setting 0 warm 10 cool c Press B or b to select the option you want to adjust and then press C or c ...

Page 27: ... depends on the broadcast and is most noticeable on dark colours The static gamma feature allows you to adjust the levels of black in the picture a In the Advanced Picture Settings menu press b to select Static Gamma b Press C or c to adjust the level When watching a DVD the compression may cause some words or picture elements to become distorted or pixelated Using the MPEG NR feature reduces this...

Page 28: ... b Press C or c to select On or Off NOTE When a DVD with subtitles is being played this mode may not work correctly This feature allows you to turn the colours red green and blue On Off individually in order to adjust each colour more accurately NOTE This feature is not available when Picture Mode is set to AutoView a In the Advanced Picture Settings menu press b to select Expert Mode and press Q ...

Page 29: ...e Side Panel feature lightens or darkens the band on each side of the screen when in 4 3 or 14 9 format This helps prevent image retention of the band and can also make viewing in bright or dark conditions more comfortable a In the PREFERENCES menu press b to select Side Panel b Press C or c to adjust 1 3 This feature is used to hold a still image on the screen Press r to hold an image on the scre...

Page 30: ...s then press Q The Media Player menu will appear When you select No nothing happens NOTE The prompt will disappear after about 6 sec Manually open a Press MENU and C or c to select the APPLICATIONS menu b Press b to select Media Player and then press Q c Press b or B to select Photo then press Q d Press b or B to select a device if the selection window appears and then press Q The Photo Viewer wil...

Page 31: ...rently selected photo shall be displayed a Press c to view the next photo Press C to view the previous photo b Press B to rotate the image 90 clockwise Press b to rotate the image 90 counterclockwise c Press to display file status information file number photo title date and time taken resolution etc The information display will time out after about 6 seconds or you can close by pressing again Sli...

Page 32: ...n press Q The Edit Timer menu will now appear on screen d Press B and b to go through the list adding the details of the programme by using the number buttons and C and c to make selections e When all the details have been entered press Q to save the timer The ORANGE RED programme timer indicator on the front of the television will be lit see page 47 for details PLEASE NOTE When a timed programme ...

Page 33: ... Channel Set the channel that will be tuned when the television turns on NOTE When an external input is selected in the Input field a channel cannot be selected Volume Set the volume that will be applied when the television turns on Time until Power On only for DTV Clock Off mode Set the amount of time from now until the TV turns on using the number buttons maximum of 12 hours and 50 minutes To ca...

Page 34: ...ill appear if the timer is a Reminder Timer e Press b to select Also Details of programmes that have started on other channels will be provided Use C or c to change the display contents On screen Information icons Information 10 34 Tue 26 Apr 4 CANAL English Now City Hospital 15 min left News 10 49 11 49 10 00 10 49 Next Also SD 16 9 50 OK RETURN Edit Timer 10 50 Tue 26 Apr Tue 26 Apr 11 00 30 CAB...

Page 35: ...available to set Press RETURN to go back to the guide screen d Press the YELLOW button to access the Genre Search screen e Press C or c to select a genre Programmes listed will change for the new genre Press B or b to highlight a particular programme f When a current programme is selected pressing Q will tune to that programme When a future programme is selected pressing Q will open the Edit Timer...

Page 36: ... allows you to block programmes according to their rating levels If a PIN has been set you will need to enter it before adjusting the level a In the DTV Settings menu press b to select Parental Control and then press Q b Use C or c to choose an option None or an age setting 4 17 To view blocked programmes enter the PIN To reactivate the Parental Control turn the TV off and then on again Setting th...

Page 37: ...ttings In digital mode this feature will show subtitles on the screen in the selected language provided they are being broadcast a In the DTV Settings menu press b to select Subtitle and Audio and press Q b Press b to select Subtitle Type and use C or c to select Normal or For Hard of Hearing c Press b to select Primary Subtitle Language or Secondary Subtitle Language and use C or c to select an o...

Page 38: ...ct Software Upgrade and press Q b Press b to select Auto Upgrade c Use C or c to select On or Off If preferred software upgrades can be searched for manually using Search for New Software a In the Software Upgrade menu press B or b to select Search for New Software b Press Q The television will automatically start searching for a software upgrade the progress bar will move along the line If an upg...

Page 39: ...to continue When the set powers back on the Quick Setup screen will appear Press Q to advance the setup and perform an auto tune See Quick Setup section on page 13 PC Settings Connect the PC as shown in the Connecting a PC section and ensure that a picture is showing on the television screen The picture position may now be adjusted to suit personal preference a Press o to select PC then select PC ...

Page 40: ...lternatively press the external source selection button o until the picture from connected equipment is shown This button must be used to view equipment connected using the COMPONENT VIDEO INPUT EXT 3C An S in the display e g o2S EXT 2S indicates the input is set for an S Video signal Use the Input Selection window if the television does not switch over automatically a By pressing o on the remote ...

Page 41: ... then use the HDMI 1 Audio setting a In the AV Connection menu press b to highlight PC HDMI 1 Audio and using c select HDMI 1 b Then highlight HDMI 1 Audio and using C or c select Auto or Analogue If the sound is absent try selecting a different setting NOTE HDMI 1 supports digital and analogue sound HDMI 2 HDMI 3 and HDMI 4 are digital sound only Certain DVD disk formats may not output from this ...

Page 42: ...tegory 2 cable Conventional HDMI DVI cables may not work properly with this mode All of the above HDMI settings need proper HDMI source devices If the HDMI source products do not support these features the television may not work properly by activating these features When connecting a surround sound amplifier to the digital audio output Sony Philips Digital Interface Format S PDIF the following op...

Page 43: ...hange indicating that these pages have been loaded These sub pages will remain available to view until another page is chosen or in normal TV mode the channel is changed If Fastext is available four coloured titles will appear at the base of the screen To access one of the four given subjects press the relevant coloured button on the remote control For further information on your particular text s...

Page 44: ...he screen The page will be held on screen until the button is pressed again C To enlarge the text display size Press C once to enlarge the top half of the page press again to enlarge the bottom half of the page Press again to revert to normal size D To select a page whilst viewing normal picture Enter the page number then press D normal picture will be displayed The television will indicate when t...

Page 45: ...rrect input by pressing o Q Why is there a picture but no sound A Check all lead connections No sound or unacceptable format sound may be received Check the volume has not been turned down or that sound mute has not been selected Q Why is the VCR DVD picture in black and white A Check that the correct setting has been chosen for EXT 2 Input S VIDEO or AV See AV Connection on page 41 Manual Setting...

Page 46: ...SETUP menu highlight Clock Phase and adjust until the picture clears Q Why when digital subtitles have been selected are they not showing on screen A Subtitles are not currently being transmitted by the broadcaster Q Why are there problems with analogue text A Good performance of text depends on a strong broadcast signal This normally requires a roof or loft aerial If the text is unreadable or gar...

Page 47: ...Orange Solid Green Solid Red Solid Power OFF Standby On Timer is set Programme Timer is set Red Solid Green Solid Red Solid Power ON Standby On Timer is set Programme Timer is active OFF Green Solid Red Solid Power OFF Standby On Timer is set Programme Timer is NOT set Orange Solid OFF Red Solid Power OFF Standby On Timer is NOT set Programme Timer is set Red Solid OFF Red Solid Power ON Standby O...

Page 48: ...ced on the market after August 13 2005 By participating in separate collection of products and batteries you will help to assure the proper disposal of products and batteries and thus help to prevent potential negative consequences for the environment and human health For more detailed information about the collection and recycling programmes available in your country please contact your local cit...

Page 49: ...49 INFORMATION English For your own records 00GB_RV LV685D_Euro book Page 49 Tuesday September 1 2009 10 15 AM ...

Page 50: ...o conform to a signal in the table below Pin No Signal name Pin No Signal name Pin No Signal name 1 R 6 Ground 11 NC 2 G 7 Ground 12 NC 3 B 8 Ground 13 H sync 4 NC 9 NC 14 V sync 5 NC 10 Ground 15 NC Format Resolution V Frequency H Frequency Pixel Clock Frequency VESA Standard DMT VGA 640 480 59 940Hz 31 469kHz 25 175MHz 72 809Hz 37 861kHz 31 500MHz 75 000Hz 37 500kHz 31 500MHz SVGA 800 600 56 250...

Page 51: ... 027MHz 576p 720 576p 50 000Hz 31 250kHz 27 000MHz 1080i 1920 1080i 59 940 60 000Hz 33 716 33 750kHz 74 176 74 250MHz 1080i 1920 1080i 50 000Hz 28 125kHz 74 250MHz 720p 1280 720p 59 940 60 000Hz 44 955 45 000kHz 74 176 74 250MHz 720p 1280 720p 50 000Hz 37 500kHz 74 250MHz 1080p 1920 1080p 59 940 60 000Hz 67 500kHz 148 500MHz 1080p 1920 1080p 50 000Hz 56 250kHz 148 500MHz 1080p 1920 1080p 24 000Hz ...

Page 52: ... FAT12 16 32 Stereo Nicam 2 carrier system Visible Screen Size approx Model 32 37 40 42 80cm 94cm 102cm 107cm Display 16 9 Sound output at 10 distortion Main 10W 10W Power consumption approx Model 32 LV 40 LV 32 RV 37 RV 42 RV 91 W 183 W 91 W 119 W 136 W Standby Model 32 LV 40 LV 32 RV 37 RV 42 RV 0 3 W 0 3 W 0 3 W 0 3 W 0 3 W Dimensions approx Model 32 LV 57cm H 79cm W 29cm D 40 LV 66cm H 98cm W ...

Reviews: