background image

7

HLV66 (E/F) Web 213:276

Chapter 1: Introduction

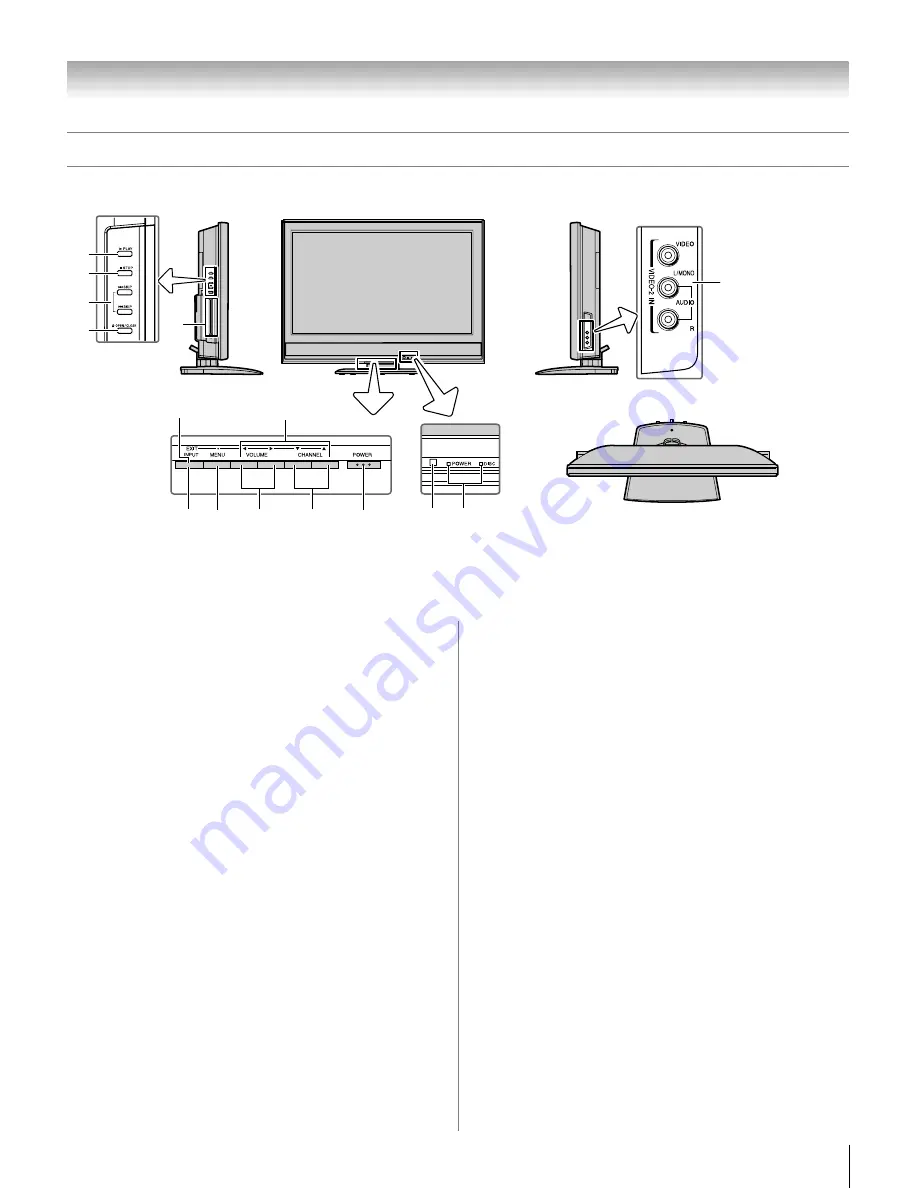
TV front and side panel controls and connections

3

6*

5

4

7

8

14

10
11

12

13

9

2

1

15

TV top

TV front

Control panel

Left side panel

Right side panel

1

Remote sensor

 — Point the remote control toward this 

remote sensor (

-

 “Remote control effective range” on 

page 9).

2

Blue and Yellow LEDs

Blue = Power indicator
Yellow = Disc indicator
See “LED indications” on page 64 for additional 
information.

3

POWER

 — Press to turn the TV on and off.

If the TV stops responding to the controls on the remote 
control or TV control panel and you cannot turn off the 
TV, press and hold the 

POWER

 button on the TV control 

panel for 5 or more seconds to reset the TV.

4

CHANNEL


Bb

 — When no menu is on-screen, these 

buttons change the channel (programmed channels only; 

-

 page 19). When a menu is on-screen, these buttons 

function as up/down menu navigation buttons.

5

VOLUME 

C c

 — When no menu is on-screen, these 

buttons adjust the volume level. When a menu is on-
screen, these buttons function as left/right menu 
navigation buttons.

6

*MENU (ENTER)

 — Press to access the menu system 

(

-

 pages 16–17). When a menu is on-screen, the 

MENU


button on the TV’s control panel functions as the 

ENTER


button.

7

INPUT

 — Repeatedly press to change the source you are 

viewing (

ANT 1, Built-In DVD, VIDEO 1, VIDEO 2, 

ColorStream HD-1, ColorStream HD-2, HDMI, 
PC

).

8

EXIT

 — Press to instantly close an on-screen menu.

9

ARROWS


BbC


c

 — When a menu is on-screen, these 

buttons function as up/down/left/right menu navigation 
buttons. 

10

PLAY

 — Press to play a DVD video disc, or other 

playable disc.

11

STOP

 — Press to stop a DVD video disc, or other 

playable disc.

12

SKIP

 — Press to skip DVD chapter, or CD track.

13

OPEN/CLOSE

 — Press to eject a disc.

14

DVD disc slot

 — Insert a playable disc to play.

15

VIDEO-2 IN

 — The side panel A/V connections are 

referred to as “

VIDEO 2

” and include standard A/V 

connections.

263237HLV66_EN.book  Page 7  Thursday, June 22, 2006  1:32 PM

Summary of Contents for 26HLV66 - 26" LCD TV

Page 1: ...r Serial number For an overview of steps for setting up your new TV see page 6 Note To display a High Definition picture the TV must be receiving a High Definition signal such as an over the air High Definition TV broadcast a High Definition digital cable program or a High Definition digital satellite program For details please contact your TV antenna installer cable provider or satellite provider...

Page 2: ...nical limitations of LCD Display technology and are not an indication of malfunction therefore Toshiba is not responsible for perceived issues resulting from these symptoms 1 An afterimage ghost may appear on the screen if a fixed non moving image is displayed for a long period of time The afterimage is not permanent and will disappear in a short period of time 2 The LCD panel contained in this TV...

Page 3: ...e sound 32 Using the digital audio selector 32 Selecting stereo SAP broadcasts 33 Adjusting the audio quality 33 Using the StableSound feature 34 Selecting the optical audio output format 34 Using the Locks menu 34 Entering the PIN code 34 If you cannot remember your PIN code 35 Changing your PIN code 35 Blocking TV programs and movies by rating V Chip 35 Blocking TV programs and movies by additio...

Page 4: ... 9 Troubleshooting 60 General troubleshooting 60 Home network troubleshooting 62 DVD Troubleshooting 63 LED indications 64 Chapter 10 Appendix 65 Specifications 65 Limited United States Warranty for LCD TV DVD Combinations 26 and Larger 66 Limited Canada Warranty for LCD TV DVD Combination 67 Index 69 ...

Page 5: ... your new TV 1 The Installation Guide explains how to connect your TV to your antenna and equipment 2 The Operating Guide this Guide provides step by step instructions for using your TV s many features Features of your new TV The following are just a few of the many exciting features of your new Toshiba widescreen integrated HD LCD TV Integrated digital tuning 8VSB ATSC and QAM eliminates the need...

Page 6: ...e functions of the TV s connections and controls pages 7 8 5 Connect your other electronic device s to the TV Installation Guide 6 Install the batteries in the remote control page 9 7 See Learning about the remote control page 10 for an overview of the buttons on the remote control 8 Program the remote control to operate your other device s pages 11 15 9 AFTER connecting all cables and devices plu...

Page 7: ...s up down menu navigation buttons 5 VOLUME C c When no menu is on screen these buttons adjust the volume level When a menu is on screen these buttons function as left right menu navigation buttons 6 MENU ENTER Press to access the menu system pages 16 17 When a menu is on screen the MENU button on the TV s control panel functions as the ENTER button 7 INPUT Repeatedly press to change the source you...

Page 8: ... Antenna input that supports analog NTSC and digital ATSC off air antenna signals and analog and digital Cable TV QAM signals 7 HDMI IN High Definition Multimedia Interface input receives digital audio and uncompressed digital video from an HDMI device or uncompressed digital video from a DVI device Also see item 3 8 Digital Audio OUT Optical audio output in Dolby Digital or PCM pulse code modulat...

Page 9: ...he tab snaps Caution Never throw batteries into a fire Note Be sure to use AAA size batteries Dispose of batteries in a designated disposal area Batteries should always be disposed of with the environment in mind Always dispose of batteries in accordance with applicable laws and regulations If the remote control does not operate correctly or if the operating range becomes reduced replace batteries...

Page 10: ... 10 RECALL displays TV setting information on screen page 40 11 CH RTN returns to the last viewed channel page 26 or stops the Picture Viewer slide show page 52 Also can be used to go between the song select and file select view in the Audio Player page 53 12 MUTE reduces or turns off the sound page 32 13 3 C c While watching TV these buttons open the Channel Browser banner and tune to the previou...

Page 11: ...l 6 GUIDE Displays the channel guide in the CABLE SAT mode SET UP Accesses a DVD s setup menu in the AUX mode 7 INFO Displays TV status information on screen 8 BbC c Press to navigate DVD menus may not work on some DVD players 9 ENTER Required by some satellite receivers and DVD players to activate certain functions 10 DVD CLEAR Press to reset the title and chapter number 11 PLAY Begins playback o...

Page 12: ...nd mute s TV s TV s TV s TV SET UP GUIDE DVD setup SAT Guide DVD Setup VOL Volume up down s TV s TV s TV s TV CHBb Channel up down Channel up down Channel up down Channel up down RECALL RECALL s TV s TV s TV s TV CH RTN DVD RTN Previous channel DVD previous menu INFO Info Display ENTER Enter Select Enter Enter Bb FAVBb Menu select FAV up down Menu up down Menu up down C 3 Menu select Channel Brows...

Page 13: ...ice point the remote control at it and press p See notes below If the correct code was entered the device will turn off If the device does not respond repeat steps 1 4 using another code If the device does not respond to another code you will need to use the remote control that came with the device 5 Remember to set the MODE SELECT switch back to TV to control the TV 6 For future reference write d...

Page 14: ...Kenwood 029 Magnavox 060 Optimus 058 Pansat 036 052 Primestar 015 042 Proscan 008 009 013 Radio Shack 022 023 030 RCA 008 009 013 016 Realistic 030 Samsung 059 Sony 014 055 Star Choice 057 Star Trak 025 026 037 054 STS 024 Toshiba 000 001 002 003 004 005 006 007 020 031 056 Uniden 021 028 030 032 035 039 043 045 047 058 Zenith 027 TV VCR Combo Action 078 GE 059 062 Goldstar 065 Panasonic 065 Preci...

Page 15: ...062 065 068 072 Panasonic 036 045 046 057 061 072 079 Pentax 012 024 025 035 042 053 063 Pentex Research 014 Philco 026 027 063 Philips 026 031 044 057 Pioneer 006 024 043 055 Portland 012 013 015 Proscan 001 002 048 Proton 061 Quasar 045 Radio Shack 010 031 065 Radio Shack Realistic 007 009 010 016 018 020 021 022 031 049 Radix 010 RCA 001 002 003 009 024 025 029 035 040 042 045 048 055 056 063 0...

Page 16: ...ings menu Advanced Audio Settings S Opens Advanced Audio Settings menu Audio Setup S Opens Audio Setup menu Favorite Channels S Opens Favorite Channels menu Closed Caption Mode S Off CC1 CC2 CC3 CC4 T1 T2 T3 T4 Closed Caption Advanced S Opens Closed Caption Advanced menu Input Labeling S Opens Input Labeling menu Menu Language S English Français Español Channel Browser Setup S Opens Channel Browse...

Page 17: ...he remote control It will contain a list of special features offered by the TV Picture Viewer Audio Player and Channel Browser Navigating the menu system You can use the buttons on the remote control or TV control panel to access and navigate your TV s on screen menu system Press Y to open the menu system When a menu is open use the up down left right arrow buttons BbC c on the remote control or T...

Page 18: ...een as shown below Open the Terrestrial menu highlight Input Configuration and press T 4 Press C or c to select the input source Cable or Antenna for the ANT input on the TV 5 To save your new settings highlight Done and press T To revert to your original settings highlight Cancel and press T CH RTN ENTER EXIT Navigate Select Back Exit Channel Browser Setup English Français Español Favorite Channe...

Page 19: ...your Cable TV service lineup changes significantly To program channels automatically 1 Make sure you have configured the antenna input source page 18 2 Press Y and open the Setup menu 3 Highlight Installation and press T 4 A new set of Installation menu icons will appear on screen as shown below Open the Terrestrial menu highlight Channel Program and press T 5 Highlight ANT 1 and then press T to s...

Page 20: ...Y and open the Preferences menu 2 Highlight Favorite Channels and press T see illustration below left 3 Use Bb to select ANT 1 and press T see illustration below right 4 Highlight Edit and press T 5a To add a channel Use Bb to highlight an unchecked box next to a channel you want to set as a favorite and then press T to check the box Note You must first use Channel Program or Channel Add Delete to...

Page 21: ... the Installation Guide Note The PC Audio switch setting influences the HDMI Audio setting If PC Audio is set to No the HDMI Audio setting changes to Auto If PC Audio is set to Yes the HDMI Audio setting changes to Digital and will be grayed out Viewing the digital signal meter You can view the digital signal meter in the ANT 1 digital TV input source only To view the digital signal meter 1 Press ...

Page 22: ...ne and press T To return to normal viewing Press O Reset Factory Defaults To reset all settings and channels to their factory default values 1 Follow steps 1 3 under Viewing the system status 2 Press C c to scroll through the menu bar to select Factory Defaults 3 Enter your PIN code or 0000 if no PIN code has been set 4 Highlight Yes and press T The TV will turn off automatically after a few secon...

Page 23: ... DTV Satellite DSS VCR Laser Disk DVD HD DVD Audio Receiver Compact Disc Video Recorder Game Console Hide to hide an unused input in the Input Selection screen Note If you select PC in the Input Selection screen you can choose only Hide or Game Console as the label To label the video input sources 1 Press Y and open the Preferences menu 2 Highlight Input Labeling and press T 3 Press B or b to high...

Page 24: ... tune Quickly change inputs from the Inputs List Set a HOME source for an ANT1 channel or TV input To set up the Channel Browser 1 Press Y and open the Preferences menu 2 Highlight Channel Browser Setup and press T 3 Press B to highlight Navigation and then press C or c to select either Browse Mode or Select Mode 4 Press b to highlight History List and then press C or c to select the setting you p...

Page 25: ...atching TV press 3 C or c to open the Channel Browser banner and surf back to a previous item or surf forward to the next item in the list In Select mode when you stop on an item in the browser banner it will be highlighted but the TV will not automatically tune to the channel or input 2 Press T to tune the TV to the highlighted item 3 Press O to close the Channel Browser banner Adding and clearin...

Page 26: ...sh button and then the sub channel number For example to select digital channel 125 1 press 1 2 5 1 Note If a digital channel is not programmed either through the automatic channel scan page 19 or the channel add delete function page 19 you will have to tune the RF channel using the Channel Number and dash buttons on the remote control Switching between two channels using Channel Return The Channe...

Page 27: ...ettings highlight Done and press T Natural picture size The image is displayed close to its originally formatted proportion Some program formats will display with sidebars and or bars at the top and bottom TheaterWide 1 picture size for 4 3 format programs The center of the picture remains close to its original proportion but the left and right edges are stretched wider to fill the screen TheaterW...

Page 28: ...nly The format of the image in any of the pictures sizes will vary depending on the format of the signal you are currently watching Scrolling the TheaterWide picture TheaterWide 2 and 3 only You can set separate scroll settings for the TheaterWide 2 and TheaterWide 3 modes for each input To set the scroll settings 1 Press Y and open the Video menu 2 Highlight Theater Settings and press T 3 In the ...

Page 29: ...processed from a DVD player connected to the VIDEO 1 VIDEO 2 ColorStream HD 1 ColorStream HD 2 component video or HDMI inputs on the TV smoother motion can be obtained by setting the Cinema Mode to Film To set the Cinema Mode to Film 1 Press Y and open the Video menu 2 Highlight Theater Settings and press T 3 In the Cinema Mode field select Film 4 To save the new settings highlight Done and press ...

Page 30: ...s Y and open the Video menu 2 Highlight Picture Settings and press T 3 Press B or b to select the picture quality you want to adjust Contrast Back Light Brightness Color Tint or Sharpness and then press C or c to adjust the setting as described in the table above 4 To save the new settings highlight Done and press T To revert to the factory defaults highlight Reset and press T The picture qualitie...

Page 31: ...lay characteristics by changing the background color text size type edge and color Note This feature is available for digital channels only You cannot set the Caption Text and Background as the same color To customize the closed captions 1 Press Y and open the Preferences menu 2 Highlight Closed Caption Advanced and press T 3 Press B or b to highlight the characteristic you want to change and then...

Page 32: ...feature is automatically activated To mute the audio without automatically activating the closed caption feature use Z to set the volume to 0 See Using the closed caption mode page 31 for more information on closed caption modes Using the digital audio selector You can use the Digital Audio Selector to conveniently switch between audio tracks on a digital channel for those channels that have multi...

Page 33: ...ram SAP can be heard only on those TV stations that offer it For example a station might broadcast another language as a second audio program If you have SAP on you will see the current program on the screen but hear the other language instead of the program s normal audio If you have SAP on and the station you are watching is not broadcasting a second audio program the station s normal audio will...

Page 34: ...ound or PCM depending on your device 4 To save the new settings highlight Done and press T To revert to the factory defaults highlight Reset and press T Using the Locks menu The Locks menu includes the Enable Rating Blocking Edit Rating Limits Channels Block Input Lock Front control Panel Lock and New PIN Code features You can use these features after entering the correct PIN code Entering the PIN...

Page 35: ...s Y and highlight the Locks menu icon 2 Press b to display the PIN code entering screen 3 Enter your four digit PIN code and press T 4 Press b to highlight Enable Rating Blocking 5 Press c and b to select On and then press T 6 Press b to highlight Edit Rating Limits and press T The Edit Rating Limits screen below appears 7 Press BbC c and then press T to select the level of blocking you prefer A b...

Page 36: ...ocked however programs that do not provide any rating information will not be blocked To display the rating of the program you are watching press E on the remote control If it is rated None the word NONE appears in the RECALL screen as shown below right If rating information is not provided no rating will appear in the RECALL screen Edit Alternate Ratings Humor Level DH MH H VH EH Intelligence lev...

Page 37: ...at once Highlight Block All in step 6 at left and then highlight Done and press T To unblock all locked channels at once Highlight Allow All in step 6 at left and then highlight Done and press T Unlocking programs temporarily If you try to tune the TV to a program that exceeds the rating limits you set the TV will enter program lock mode and the following message will appear on screen You can eith...

Page 38: ...ure You can lock the control panel to prevent your settings from being changed accidentally by children for example When the control panel lock is On none of the controls on the TV control panel will operate except POWER To lock the control panel 1 Press Y and highlight the Locks menu icon 2 Press b to display the PIN code entering screen 3 Enter your four digit PIN code and press T 4 Press b to h...

Page 39: ...nt range is within 5 from center Vertical Height Adjusts the height of the picture The adjustment range is within 5 from center Clock Phase Helps to reduce noise and sharpen the picture The adjustment range is within 2 from center Sampling Clock Helps to reduce noise and minimize periodic vertical stripes on the screen The adjustment range is within 15 from center The range of adjustment may vary ...

Page 40: ...el the sleep timer Press until it is set to 0 minute Displaying TV setting information on screen using RECALL To display TV setting information on screen Press E on the remote control The following information will display on screen if applicable Current input ANT 1 VIDEO 1 etc If ANT 1 is the current input either CABLE for cable TV OR TV for over the air broadcasts Channel number if in ANT 1 mode...

Page 41: ...etes its broadcast for the day This feature functions in ANT 1 mode only Understanding the last mode memory feature If the power is cut off while you are viewing the TV the Last Mode Memory feature automatically turns on the TV when the power is resupplied Note You should unplug the TV s power cord if it is possible that you will be away from the TV for an extended period of time after the power i...

Page 42: ...DEO 2 the menu will display the text CableClear The available selections are Off Auto Low Middle and High If the current input is Built In DVD ColorStream HD1 ColorStream HD2 or HDMI the menu will display the text DNR The available selections are Off Auto Low Middle and High Auto will react proportionally to the strength of the noise Low Middle and High will reduce the noise in varying degrees fro...

Page 43: ...screen display and input from the controller such as music creation and high action games Note To use the Game Mode feature the current video input must be Video 1 Video 2 ColorStream HD1 ColorStream HD2 or HDMI The Game Mode cannot be turned on when any other video input is selected To turn on Game Mode 1 Press Y and open the Video menu 2 Highlight Advanced picture settings and press T 3 Press B ...

Page 44: ...ght Advanced Audio Settings and press T 4 Press b or B to highlight the WOW feature you want to adjust and then press C or c to adjust the item WOW SRS 3D To turn the surround sound effect On or Off Note If the broadcast is monaural the SRS 3D effect will not work WOW SRS Focus To turn the vocal emphasis effect On or Off WOW SRS TruBass To select the desired bass expansion level Off Low or High 5 ...

Page 45: ...atic setup and must manually set up the network address If you used a hub or switch to connect the TV to your home network you will not be able to use the automatic setup and must manually set up the network address If you used a router with built in DHCP functionality use the automatic setup Manual setup may not work Automatically setting up the network address 1 Press Y and open the Setup menu 2...

Page 46: ...d the error message Manually setting up the network address This setup requires the data listed below You can get this data from either your ISP or the configuration utility for your DSL cable modem or router 1 Press Y and open the Setup menu 2 Highlight Installation and press T The Installation menu appears 3 Open the Network menu 4 Highlight Basic Network Setup and press T 5 The message Obtain n...

Page 47: ... See setup details on page 48 No other operating systems are compatible with the TV Note The name of any directory folder on your PC that you are setting up for file sharing with the TV can have a maximum of 12 characters and cannot contain any special characters See Media specifications page 50 for details on compatible JPEG and MP3 files The network NETBIOS name of your PC that you are setting u...

Page 48: ...w for the selected folder a Click to display the Sharing tab b Click to select Share this folder on the network c Click OK which will close the Permissions window for the selected folder d Click OK to close the window c Click Apply a Click Add and then select the user to be given sharing privileges This user must match the user stored in the TV s Home File Server Setup menu b Click to check Allow ...

Page 49: ...highlight Done and press T 6 Repeat step 5 for the Password field Note The Password is case sensitive 7 Press Bb to highlight either JPEG Picture Directory or MP3 Music Directory Note The first time you highlight either of these fields the message Please Wait will appear on screen until the field is populated with the files in your PC s shared folder s 8 Press C c to select the shared folder on yo...

Page 50: ...le folder name specifications Maximum file name length 255 characters Maximum shared folder name length 12 characters File names must contain US ASCII characters only File and folder names cannot contain any special characters such as The words folder and directory are used interchangeably Picture Viewer JPEG file specifications Maximum JPEG file size 8 MB JPEG files larger than 8 MB will not disp...

Page 51: ...l mode or as a slide show Note You cannot use the Picture Viewer and Audio Player at the same time You must obtain any required permission from copyright owners to download or use copyrighted content Toshiba cannot and does not grant such permission Accessing JPEG files stored on a networked PC 1 Make sure you have correctly set up your home network and file sharing Installation Guide and pages 45...

Page 52: ... this mode can be displayed by pressing E This help bar will indicate that the user can scroll to the edges of the image by using B b C c In order to exit Native Resolution and return to the normal slideshow press T To return to the thumbnail view press either O or R If an image is too large to display in Native Resolution mode 6MB a warning message will be shown To close the Picture Viewer Press ...

Page 53: ...plied to the location of the focus in the folder tree or playlist 5 Go to Playing MP3 audio files on the TV Playing MP3 audio files on the TV 1 After accessing your MP3 files from your networked PC the Audio Player will begin playing the first MP3 file in the list 2 Press BbC c to navigate to the rewind pause fast forward skip backward skip forward volume and mute buttons or to select another MP3 ...

Page 54: ...ayback commences automatically However loading the disc may take 1 2 seconds About the Parental Lock screen If the Parental Lock YES NO screen appears after loading a disc and you want to temporarily unlock the Parental Lock select YES and then input the PIN CODE following the on screen menu Note Strong static electricity may affect the DVD player s operation and cause it not to work properly If t...

Page 55: ...age the disc If you want to move the TV to other place or room be sure to eject the disc and turn off the power beforehand If the disc is not loaded even if the disc is inserted into the DVD disc slot remove the disc once and try to load the disc again Do not put any objects other than discs in the disc slot Doing so may cause the TV to malfunction When you press a button there may be a slight del...

Page 56: ...ess v or V during playback Each time you press the button the slow motion speed changes DVD 2X 8X VCD 1X 3X To resume normal playback Press S Note The sound is muted during slow motion playback Locating a chapter or track Press F or G repeatedly to select the chapter or track you want Playback starts from beginning of the selected chapter or track Note A Prohibition symbol E may appear at the uppe...

Page 57: ...nd open the Audio menu 3 Highlight Audio Setup and press T 4 Press B or b to highlight DVD Audio and then press C or c to select the desired audio mode Stereo L Mono R Mono or MIX Mono Note This item may not be selectable depending on the disc Note If the desired language is not heard after pressing the button several times the language is not recorded on the disc Changing soundtrack language is c...

Page 58: ...ayback MP3 JPEG CDs must meet ISO9660 standards Files must have one of the following extensions mp3 or jpg MP3 JPEG CDs cannot be used for the purpose of recording If the CD has both audio tracks and MP3 JPEG files only audio tracks are played It may take more than 1 minute for this TV to read MP3 JPEG files depending on its structure Note Some MP3 JPEG CDs cannot be played back depending on the r...

Page 59: ...ing the SMART NAVI use the Natural or Full picture size page 27 JPEG CD playback You can select your desired JPEG file from the file menu The slide show enables you to view pictures files one after another automatically 1 Load a disc on which JPEG files have been recorded in the disk slot 2 A file menu screen will appear Press BbC c and then press S to select a folder 3 Press Bb or the Number butt...

Page 60: ... to reduce visible interference in the TV picture page 42 Video Input Selection problems If the Input Selection window does not appear when you press on the remote control or TV press a second time which will change to the next video input source and display the Input Selection window Cannot view external signals or channel 3 or 4 If you cannot view signals from external devices connected to VIDEO...

Page 61: ...appear on screen If this happens turn off the closed caption feature page 31 A closed caption signal may not display correctly in the following situations a when a videotape has been dubbed b when the signal reception is weak or c when the signal reception is nonstandard page 31 Rating blocking V Chip problems If you forget your PIN code While the PIN code entering screen is displayed press E four...

Page 62: ...Confirm your modem s operation with this manual Make sure your network address and is set up correctly Chapter 7 No network connection The Ethernet cables are not connected properly or at all Connect all cables Installation Guide Make sure the modem s power cord is plugged in Make sure your network address is set up correctly Chapter 7 Automatic setup fails The Ethernet cables are not connected pr...

Page 63: ...ase sensitive DVD Troubleshooting Playback doesn t start The disc is reversed Load the disc with the playback side facing backward No disc is loaded Load the playable disc The disc may be dirty Clean the disc The TV cannot play CD ROMs etc Load the playable disc No picture TV selector is not set correctly No sound The analog audio output terminals on the TV do not output the sounds from the disc C...

Page 64: ...TACP Consumer Solutions at 1 800 631 3811 In Canada locate the nearest Toshiba authorized service depot by directing your web browser to www toshiba ca click Home Entertainment and then click Support LED Indication Condition Solution 1 Blue is ON solid The TV is operating properly 2 Yellow is ON solid The disc is in the disc slot 3 Yellow blinks three times The TV is rebooting Wait several seconds...

Page 65: ...k ohm or greater HDMI INPUT HDMI compliant type A connector HDCP compliant E EDID compliant Suggested formats 1080i 480p 480i 720p HDMI Audio 2 channel L PCM 32 44 1 48 kHz sampling frequency 16 20 24 bits per sample VIDEO AUDIO OUTPUT also for recording VIDEO 1 V p p 75 ohm negative sync AUDIO 150 mV rms 30 modulation equivalent 2 2 k ohm or less DIGITAL AUDIO OUTPUT Optical type PC INPUT 15 Pin ...

Page 66: ... the Continental U S A or Puerto Rico 4 Labor service charges for set installation setup adjustment of customer controls and installation or repair of antenna systems are not covered by this warranty Reception problems caused by inadequate antenna systems misaligned satellite dishes cable television distribution VCRs DVD players recorders personal computer level IEEE 1394 devices and any other con...

Page 67: ...purchased in Canada from an authorized TCL dealer and operated in Canada 4 Labor charges for installation setup adjustment of customer controls and installation or repair of antenna systems are not covered by these warranties Reception problems caused by inadequate antenna systems are your responsibility 5 Warranties extend only to defects in materials or workmanship as limited above and do not ex...

Page 68: ...ND ANY EXPRESSED OR IMPLIED WARRANTIES INCLUDING BUT NOT LIMITED TO THE IMPLIED WARRANTIES OF MERCHANTABILITY AND FITNESS FOR A PARTICULAR PURPOSE ARE DISCLAIMED IN NO EVENT SHALL THE OpenSSL PROJECT OR CONTRIBUTORS BE LIABLE FOR ANY DIRECT INDIRECT INCIDENTAL SPECIAL EXEMPLARY OR CONSEQUENTIAL DAMAGES INCLUDING BUT NOT LIMITED TO PROCUREMENT OF SUBSTITUTE GOODS OR SERVICES LOSS OF USE DATA OR PRO...

Page 69: ...deo input 23 Language selection 18 Last mode memory feature 41 LED indications 64 LOCKS menu Channels blocking 37 Enable rating blocking 35 New PIN code 35 Panel lock 38 Unlocking programs temporarily 37 Video inputs locking 38 Locks menu 34 M MP3 51 53 58 MPEG noise reduction 42 MTS feature 33 MUTE button 32 N Network address setup 45 O Optical audio output format 34 P PC setting 39 Picture adjus...

Page 70: ...70 Notes ...

Page 71: ...71 Notes ...

Page 72: ...72 Notes ...

Page 73: ...73 Notes ...

Page 74: ...cts L L C Channel Browser SurfLock THINC and LCDVD logo are trademarks of Toshiba America Consumer Products L L C MANUFACTURED BY HEAD OFFICE 191 McNABB STREET MARKHAM ONTARIO L3R 8H2 CANADA TEL 905 470 5400 SERVICE CENTERS TORONTO 191 McNABB STREET MARKHAM ONTARIO L3R 8H2 CANADA TEL 905 470 5400 MONTREAL 18050 TRANS CANADA KIRKLAND QUEBEC H9J 4A1 CANADA TEL 514 390 7766 VANCOUVER 13551 COMMERCE P...

Reviews: