background image

18

DNR

: selects an option from 

Off

Low

Middle

 and 

High

.

MPEG NR

: selects an option from 

Off

Low

Middle

 and 

High

.

Press 

RETURN

 to go back to the previous menu.

Press 

EXIT

 to exit.

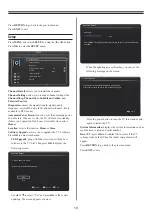
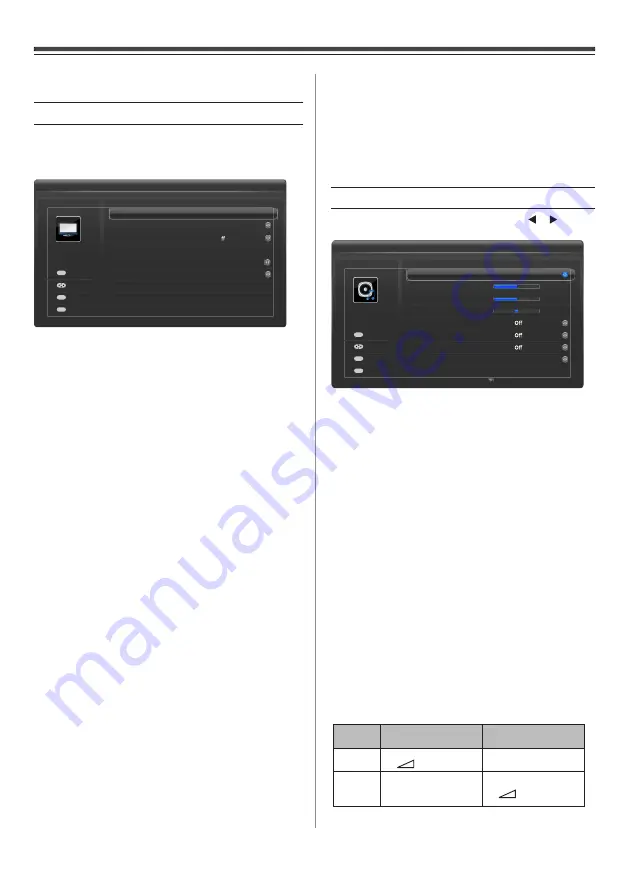
Sound

Press 

MENU

 and select 

SOUND

 by using the   or    button. 

Press 

OK

 to enter the 

SOUND

 menu. 

Dual

: sets Dual1 or Dual2, if available, for an analogue TV.

Base

: sets the base.

Treble

: sets the treble.

Balance

: sets the balance.

Bass Boost

: when turned on, enhances the depth of the sound.

Surround Sound

: turns on or off the surround sound feature.

Stable Sound

: when turned on, reduces the volume level 

differences between channels.

Dynamic Range Control

: enables or disables the dynamic 

range control feature. (Only available in TV and HDMI 
modes)

Digital Audio Output

: press 

OK

 to enter its submenu.


Audio Format

: selects an audio format, 

PCM

 or 

Auto


 Note: When in HDMI mode, the 

Audio Format

 option

           is grayed out and set to 

PCM 

only.


Audio Delay

: sets to 

Auto

 or 

Manual

 for audio delay.


Audio Delay Time (ms)

: sets the audio delay time.

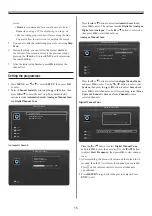
Headphone Setting: 

this setting is used to set the sound    

output when headphones are connected. Options include 

Speaker link

 and 

Headphone level

.

Active Backlight Control

3D Colour Management

Picture Settings

Base Colour Adjustment

DNR

MPEG NR

O

Low

Low

PICTURE

...

...

On

Select

Back

Exit

Enter

OK

RETURN

EXIT

Using the TV’s features (General)

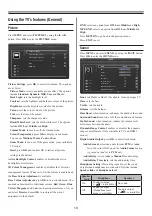
Picture

P

ress 

MENU

 and select 

PICTURE

 by using


the


◄ 

or

 ►

button. Press 

OK

 to enter the 

PICTURE

 menu.

Picture Settings

: press 

OK

 to enter its submenu. The options 

are as below.

   Picture Mode

: selects a suitable picture effect. The options 

   include 

Standard, Dynamic, Mild, User 

and 

Movie

.


Back Light

: sets the backlight level.

   Contrast

: sets the lightness and darkness values of the picture.

   Brightness

: sets the brightness value for the picture.

   Colour

: sets the colour value for the picture.

   Tint

: sets the tint of the colour.

   Sharpness

: sets the sharpness value.

   Black/White Level

: sets the black/white level. The options

   include 

Off

Low

Middle

 and 

High

.

   Cinema Mode

: turns on or off the cinema mode.

   Colour Temperature

: press 

OK

 to display its submenu.

   You can set 

Medium

Warm

Cool

 and 

User

.


Game Mode

: turn on or off the game mode. (not available in 

   TV mode.)

   Reset

: press 

OK

 and confirm OK to restore all picture

   settings to the default.

Active Backlight Control

: enables or disables the active 

backlight control feature.

3D Colour Management

: enables or disables the 3D colour 

management feature. When set to On, the feature is enabled and 
the 

Base Colour Adjustment 

is available.

Base Colour Adjustment

: press 

OK

 to enter its submenu. You  

can make adjustment for individual colours, 

Red

Green

Blue

Yellow

Magenta

 and 

Cyan 

to suit personal preference. Or you 

can select 

Reset

 and press 

OK

 to restore all the colour 

adjustment to the default.

Speaker 

Link

Headphone

Speakers

On

Sound is output  

(– 

 + is available.) No sound

Off

Sound is output 

(Headphone level 

menu is available.)

Sound is output  

(– 

 + is available.)

Bass

Treble

Dual

Balance

Dual1

0

0

0

SOUND

Base Boost

Surround Sound

Stable Sound

Dynamic Range Control

On

Digital Audio Output

...

Select

Back

Exit

RETURN

EXIT

Adjust

OK

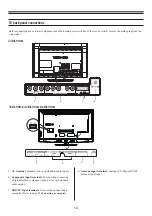
Summary of Contents for 23HL900A

Page 1: ...rated Digital LCD TV Owner s Record You will find the model number and serial number on the back of the TV Record these numbers in the spaces provided below Refer to them whenever you call upon your TOSHIBA dealer regarding this product Model number Serial number ...

Page 2: ...ing the programmes 15 General Control 16 Selecting programme positions 16 Switching between two programme positions 16 Stereo and Bilingual transmissions 16 Time Display 16 Quick Access 16 Information 16 EPG 16 Changing picture format 17 Using the TV s features General 18 Picture 18 Sound 18 Setup 19 Applications 20 Preferences 20 Media Player 20 Start Media Player 20 Viewing Photos 21 Playing Mus...

Page 3: ... this TV will overheat if the ventilation holes are covered blocked or sealed which may result in a fire 5 Never place the TV near a heater or in direct sunlight The surface of the cabinet or power cord may melt and result in a fire or an electric shock 6 Never place the TV in an area exposed to high humidity levels such as in a bathroom or close to a humidifier This may cause a fire or an electri...

Page 4: ...orities 9 Precautions for moving the TV When moving the TV be sure to remove the plug from the wall outlet and disconnect the antenna and audio video cables as well as any steady ties Fire or electric shock may result if the power cord is damaged When carry the TV at least two people are needed Be sure to carry it upright Never carry the TV with the screen facing up or down 10 Precautions for inst...

Page 5: ...on effects of chemical agents and mechanical stress such as weight of TV Failure to follow these instructions could result in serious injury and or permanent damage to TV and TV pedestal 1 Remove the power plug before cleaning Never use solvents such as gasoline or thinner to clean the TV These solvents may distort the cabinet or damage its finish If rubber or vinyl products remain in contact with...

Page 6: ...Project MPEG Layer 3 audio coding technology licensed from Fraunhofer IIS and Thomson THIS PRODUCT IS LICENSED UNDER THE AVC PATENT PORTFOLIO LICENSE FOR THE PERSONAL AND NONCOMMERCIAL USE OF A CONSUMER TO i ENCODE VIDEO IN COMPLIANCE WITH THE AVC STANDARD AVC VIDEO AND OR ii DECODE AVC VIDEO THAT WAS ENCODED BY A CONSUMER ENGAGED IN A PERSONAL AND NONCOMMERCIAL ACTIVITY AND OR WAS OBTAINED FROM A...

Page 7: ... disposal Never mix battery types or combine used batteries with new ones Notes If the remote control does not operate correctly or if the operating range becomes reduced replace both batteries with new ones If the batteries are dead or if you will not use the remote control for a long time remove the batteries to prevent battery acid from leaking into the battery compartment Effective range 23HL9...

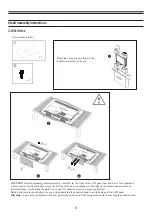
Page 8: ...ed surface such as a quilt or blanket Leave the bottom of the unit protruding over the edge of the surface and assemble as indicated above Avoid using chemicals on or near TV pedestal or serious injury could result Note Extreme care should always be used when attaching the pedestal stand to avoid damage to the LCD panel Warning To prevent possible electric shock protect the power cord from being p...

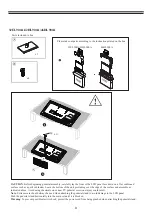
Page 9: ... quilt or blanket Leave the bottom of the unit protruding over the edge of the surface and assemble as indicated above Avoid using chemicals on or near TV pedestal or serious injury could result Note Extreme care should always be used when attaching the pedestal stand to avoid damage to the LCD panel Push the pedestal stand horizontally into the main set until it is blocked Warning To prevent poss...

Page 10: ... 23HL900A 32EL900A 42HL900A 46HL900A TV front and side panel control HDMI 1 3 Digital audio output USB port HDMI 2 4 Headphone jack 1 2 Standby On button Programme Volume AV Function control volume buttons IR Window Power LED Window Timer LED Window Power LED Window IR Window Standby On button control volume buttons Programme Volume AV Function Timer LED Window HDMI 1 3 Digital audio output 2 USB ...

Page 11: ...ace input receives digital audio and uncompressed digital video from an HDMI device or uncompressed digital video from a DVI device Refer to page 22 Connecting an HDMI or a DVI device 2 USB port For use when inserting a USB device 3 Digital audio output terminal For use when connecting an amplifier with coaxial type digital audio input 4 Headphone jack For use with headphones Notes Please always r...

Page 12: ...3HL900A 32EL900A 42HL900A 46HL900A AC IN 5 AV terminal Standard video and standard audio inputs 6 Component input terminals For use when connecting a high definition component video device with standard audio output 7 RGB PC Input terminals For use when connecting a computer Refer to page 24 Connecting a computer 8 Antenna input terminal Analogue TV Digital DVB T antenna signal input ...

Page 13: ...e 11 To change programme 12 In TV mode To display onscreen information In Text mode To access index page 13 To mute the sound 14 To display Quick Access menu 15 To exit menus 16 To display the programme guide 17 To return to the previous level of the on screen menu 18 To display the on screen menu 19 on screen menu OK To confirm the selection 20 Colour buttons Text control buttons up To reveal con...

Page 14: ...V is turned off When the TV will not be used for a long period of time such as during vacation or travel remove the power plug from the wall outlet If power is cut off while you are viewing the TV the Last Mode Memory function turns on the TV automatically when power is applied again If power is going to be off for a long time and you are going to be away from your TV unplug the power cord to prev...

Page 15: ... include Digital Analogue Digital and Analogue Use the or button to select one then press OK to start channel scan Analogue Manual Scan Press the or button to select Analogue Manual Scan and press OK to enter Use the or button to select your System then press the or button to select Search and press OK to start channel scan After scanning select Store Current Channel or Store as New Channel to sto...

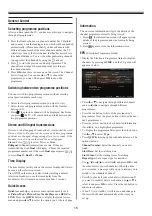
Page 16: ...lay the Quick Access menu and press or to select the option you d like to change Information The on screen information will give the details of the channel programme currently being viewed 1 Press the information screen will appear giving details of the programme and event currently being viewed 2 Press again to close the information screen EPG Electronic Programme Guide Display the Electronic Pro...

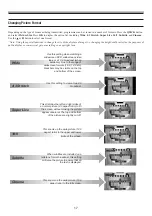
Page 17: ...pe or a 16 9 broadcast when available Due to the range of widescreen formats 16 9 14 9 etc black bars may be visible on the top and bottom of the screen Use this setting to view a true 4 3 broadcast This stretches the left and right sides of a normal picture 4 3 aspect ratio to fill the screen without making the picture appear unnatural The top and bottom of the picture are slightly cut off This z...

Page 18: ...Settings press OK to enter its submenu The options are as below Picture Mode selects a suitable picture effect The options include Standard Dynamic Mild User and Movie Back Light sets the backlight level Contrast sets the lightness and darkness values of the picture Brightness sets the brightness value for the picture Colour sets the colour value for the picture Tint sets the tint of the colour Sh...

Page 19: ...ble in DTV mode Automatic Power Down turns on or off the automatic power down feature When set to On the TV will turn into standby if there is no operation for 4 hours Available when select Home Location selects the location Home or Store Software Upgrade allows you to upgrade the TV s software Press OK to enter its submenu USB Upgrade plug a USB device stored with the new software to the TV first...

Page 20: ...ot use a USB Hub You must obtain any required permission from copyright owners to use copyright content Toshiba cannot and does not grant such permission Applications Press MENU and select APPLICATIONS by using the or button Press OK to display the APPLICATIONS menu EPG goes to electronic programme guide Time Zone selects a time zone Country Region selects a country region Clock allows you set the...

Page 21: ... in Media Player by using the or button then press OK to continue 2 Press MENU to display the music menu The options include Sort Sort folders and music by Name Genre Artist or Album Parser You can select Recursive to display all music stored in the USB device 3 Use the button to select a music 4 Select a music press OK to play and an automatic playback begins from the selected music Press MENU to...

Page 22: ... or DVI device first and then the TV Some early HDMI equipment may not work properly with your latest HDMI TV Supported Audio format Linear PCM sampling rate 32 44 1 48kHz To Connect an HDMI Device Connect an HDMI cable type A connector to the HDMI terminal For proper operation it is recommended that you use an HDMI cable with the HDMI Logo Notes If your HDMI connection is capable of 1080p and or ...

Page 23: ...e The terms HDMI and HDMI High Definition Multimedia Interface and the HDMI logo are trademarks or registered trademarks of HDMI Licensing LLC in the United States and other countries The basic functions of connected audio video equipment can be controlled using the television s remote control if a REGZA LINK compatible device is connected 23HL900A 32EL900A 42HL900A 46HL900A The back of your telev...

Page 24: ...ture may not operate properly After connecting the equipment use the REGZA LINK menu to setup the desired options The connected equipment must also be set For details see the operation manual for each connected device The REGZA LINK feature uses CEC technology as regulated by the HDMI standard This feature is limited to models incorporating Toshiba s REGZA LINK However Toshiba is not liable for th...

Page 25: ...text depends on a strong broadcast signal If the text is unreadable or garbled check the antenna satellite or cable connection Go to the main index page of the text service and look for the User Guide This will explain the basic operation of text in some detail Why are the four coloured text numbers visible but no text Text has been selected while viewing an external source No text will appear on ...

Page 26: ...FFT Mode 2K 8K Constellation QPSK 64 QAM Guard Interval 1 8 1 16 Inner Coding Rate 2 3 3 4 Component video input terminals the signal format 480i 480p 576i 576p 720p 50 60 Hz 1080i 50 60Hz These signal formats are converted to match the number of pixels of the LCD panel Composite colour system analogue TV system PAL SECAM NTSC 3 58 4 43 Aspect ratio 16 9 Visible size diagonal 23HL900A 58 5cm 32EL9...

Page 27: ...ESA 200mm x 100mm M6 42HL900A VESA 400mm x 400mm M8 46HL900A VESA 400mm x 400mm M8 Supplied accessories Owner s manual 1 Remote control 1 Batteries 2 Power cord 1 Only supplied by 32EL900A 42HL900A and 46HL900A Registration card 1 Warranty card 1 Stand installation sheet 1 Pedestal screws 4 For 23HL900A 5 screws are supplied Design and specifications are subject to change without notice Never serv...

Page 28: ...v MPEG1 layer1 2 MP3 AC3 MPEG4 AAC LC 1920x1080 40M bit sec mpg mpeg MPEG1 layer2 AC3 LPCM MPEG1 768x576 1 8M bit sec MPEG2 1920x1080 40M bit sec 1920x1080 40M bit sec Motion JPEG 320X240 30M bit sec mp4 mov m4v MP3 MPEG4 AAC LC 1920x1080 40M bit sec Media File Extension Format avi MPEG1 layer2 MP3 AC3 MPEG4 AAC LC Movie MPEG2 MP HL H 264 BP LV4 H 264 MP LV4 H 264 HP LV4 Motion JPEG H 264 BP LV4 H...

Page 29: ... laws These software components are provided in as is condition without any warranty whether express or implied Warranty here includes but not limited to an implied warranty for marketability or fitness for specific uses All risks associated with the quality or performance of these software components are assumed by the user TOSHIBA shall not be liable whatsoever for any cost of repair or correcti...

Page 30: ...72 MT10AN AUN1C ...

Reviews: