


Note:
If the printer is being mounted on a wall, then the low-paper sensor
should be in the wall position. If it is being mounted on a 45 degree
angle or flat on a table top, then the low-paper sensor should be in the
horizontal position.
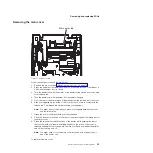
Removing the paper transport frame from the main frame
To remove the paper transport frame from the main frame, complete the following
steps:
1. Remove the logic card (see “Removing the logic card” on page 60 for more
information) to gain access to the paper transport frame.
2. Remove the screw that holds the grounding strap to the main frame.
3. Press down on the paper transport frame release tab and slide the frame to the
left to remove it from the main frame.
Note:
You might have to pivot the metal brake adjuster on the left side of the
paper transport frame to clear its guide slot on the main frame.
4. Remove the grounding strap from the frame.
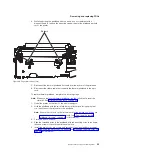
To install the paper transport frame on the main frame, complete the following
steps:
1. Position the transport frame over the main frame.
A
C
B
Figure 28. Removing the grounding strap from the main frame
Removing and replacing FRUs
68
SureMark Hardware Service
Summary of Contents for 1NA
Page 2: ......
Page 8: ...vi SureMark Hardware Service ...
Page 10: ...viii SureMark Hardware Service ...
Page 12: ...x SureMark Hardware Service ...
Page 16: ...xiv SureMark Hardware Service ...
Page 18: ...xvi SureMark Hardware Service ...
Page 46: ...28 SureMark Hardware Service ...
Page 56: ...38 SureMark Hardware Service ...
Page 88: ...70 SureMark Hardware Service ...
Page 90: ...Assembly 1 Models 1NR 1NA and 1ND 1 2 3 4 5 7 6 72 SureMark Hardware Service ...
Page 92: ...Assembly 1 continued 74 SureMark Hardware Service ...
Page 108: ...90 SureMark Hardware Service ...
Page 109: ......
Page 110: ...G362 0565 05 ...


