

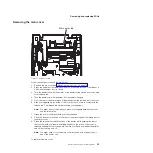


3. Release (but do not remove) the left lift spring to allow the low-paper sensor to
move to the full counterclockwise position (as shown by
C
).
Note:
You must pull the sensor slightly toward you to get it to lift over the
wall-mount detente and move to the full counterclockwise position.
4. Tilt the low-paper sensor off its center post and lift it out of its slot.
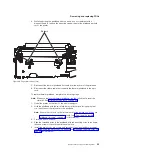
To replace the low-paper sensor, complete the following steps:
1. Insert the bottom of the sensor into the slot on the printer unit and align the hole
in the sensor with the pivot point.
2. Rotate the top of the sensor toward the unit until it clicks into place.
3. Route the cable through the four cable guides along the left side of the unit and
pass the cable under the paper basket and to the right side of the printer unit.
Note:
It might be easier to route the cable through the guides if you press one
wire at time of the low-paper sensor cable into the cable guides.
4. Connect the cable to the logic card; then install the logic card (see “Removing
the logic card” on page 60 for information on installing the logic card).
5. Rotate the sensor clockwise until it stops to the table mount position.
6. Push the leg of the left lift spring back into place. Ensure that the hook on the
end of the spring is inserted into the slot completely.
7. Replace the main cover and top covers (see “Removing the main cover” on
page 55 and “Removing the main cover” on page 55 for more information).
8. Ensure the low-paper sensor is in the correct mounting position.
C
A
B
Figure 27. Low-paper sensor removal
Removing and replacing FRUs
Chapter 5. Removing and replacing FRUs
67
Summary of Contents for 1NA
Page 2: ......
Page 8: ...vi SureMark Hardware Service ...
Page 10: ...viii SureMark Hardware Service ...
Page 12: ...x SureMark Hardware Service ...
Page 16: ...xiv SureMark Hardware Service ...
Page 18: ...xvi SureMark Hardware Service ...
Page 46: ...28 SureMark Hardware Service ...
Page 56: ...38 SureMark Hardware Service ...
Page 88: ...70 SureMark Hardware Service ...
Page 90: ...Assembly 1 Models 1NR 1NA and 1ND 1 2 3 4 5 7 6 72 SureMark Hardware Service ...
Page 92: ...Assembly 1 continued 74 SureMark Hardware Service ...
Page 108: ...90 SureMark Hardware Service ...
Page 109: ......
Page 110: ...G362 0565 05 ...


