


5
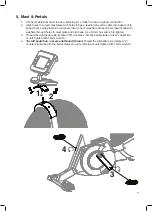
3. Arms & Foot Pegs
Note: Arms are marked: “L” for the user’s left side and “R” for the user’s right side.
1. Use #2 Phillips screwdriver to remove three (3) screws and bottom shroud, retaining screws
and shroud for re-assembly in step 6.
2. Orient and align arm to axle as shown; slide into place over axle.
3. Align arm link with arm axle. Insert bolt in washer, then insert bolt with washer from inside of
frame into arm axle. Tighten with 17mm wrench.
4. Place washer on foot peg; screw foot peg into hub. Insert screwdriver blade into hole in foot
peg and turn foot peg to tighten.
5. Repeat steps 2-4 for second arm and foot peg (not shown).
6. Re-position bottom shroud on frame. Use #2 Phillips screwdriver to secure shroud with three
(3) screws removed in step 1.
7. Tip base forward and upright to rest on stabilizers (not shown).
1
2
3
6
4
5