background image

Note:

If the correct output LEDs do not illuminate,

verify that the required input switches are in the
necessary positions to allow that function to occur.
Verify correct switch function.
If the output LEDs are on as specified, but the
machine does not function properly, this indicates a
non-electrical problem. Repair as necessary.

Note:

If each output switch is in the correct position

and functioning correctly, but the output LEDs are not
correctly illuminated, this indicates an ECM problem.
If this occurs, contact your Toro Distributor for
assistance.

Important:

The Diagnostic ACE display must

not be left connected to the machine. It is not
designed to withstand the environment of the
machine’s every day use. When done using the
Diagnostic ACE, disconnect it from the machine
and connect loop-back connector to harness
connector. The machine will not operate without
loopback connector installed on the harness. Store
the Diagnostic ACE in dry, secure location in the
shop, not on the machine.

Hydraulic Valve Solenoid
Functions

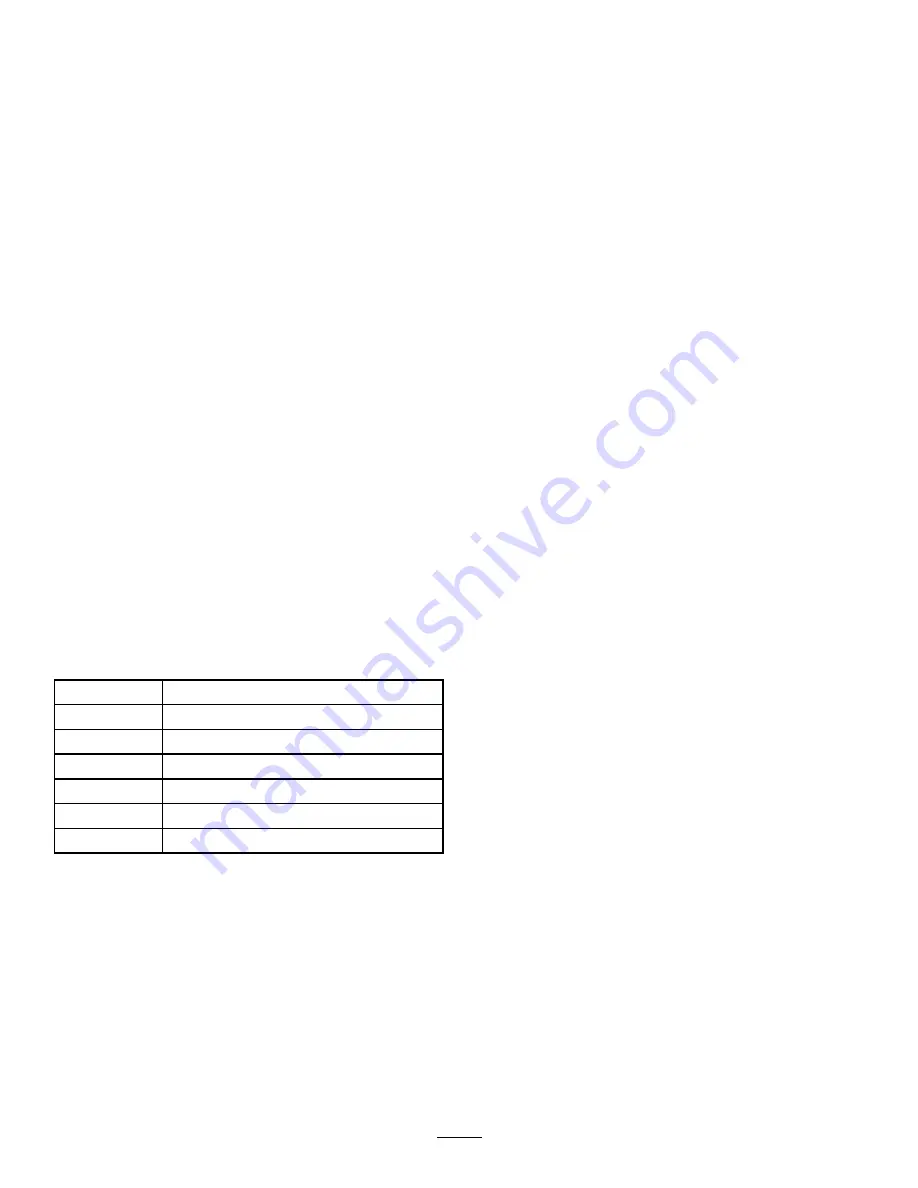
Use the list below to identify and describe the different
functions of the solenoids in the hydraulic manifold.
Each solenoid must be energized to allow function to
occur.

Solenoid

Function

MSV2

Front reel circuit

MSV1

Rear reel circuit

SVRV

Lift/lower cutting units

SV1

Lift/lower front cutting unit

SV3

Lift/lower rear cutting unit

SV2

Raise any cutting units

Operating Tips

Familiarization

Before mowing grass, practice operating the machine
in an open area. Start and stop the engine. Operate in
forward and reverse. Lower and raise the cutting units
and engage and disengage the reels. When you feel
familiar with the machine, practice operating up and
down slopes at different speeds.

Warning System

If a warning light comes on during operation, stop the
machine immediately and correct the problem before
continuing operation. Serious damage could occur if
you operate the machine with a malfunction.

Mowing

Start the engine and move the throttle to the Fast
position. Move the Enable/Disable switch to the
Enable position and use the Lower Mow/Raise lever
to control the cutting units (the front cutting units are
timed to lower before the rear cutting units). To move
forward and cut grass, press the traction pedal forward.

Note:

Allow the engine to idle for 5 minutes before

shutting it off after a full load operation. Failure to do
so may lead to turbo-charger trouble.

Transport

Move the Enable/Disable switch to the Disable
position and raise the cutting units to the transport
position. Move the Mow/Transport lever to the
transport position. Be careful when driving between
objects so you do not accidentally damage the machine
or cutting units. Use extra care when operating the
machine on slopes. Drive slowly and avoid sharp turns
on slopes to prevent roll overs. Lower the cutting units
when going downhill for steering control.

38

Summary of Contents for Reelmaster 5210

Page 1: ...0000001 and Up Model No 03670 Serial No 290000001 and Up Model No 03680 Serial No 290000001 and Up Model No 03690 Serial No 290000001 and Up Model No 03691 Serial No 290000001 and Up To register your product or download an Operator s Manual or Parts Catalog at no charge go to www Toro com Original Instructions EN ...

Page 2: ...ecautions Figure 1 1 Safety alert symbol This manual uses 2 other words to highlight information Important calls attention to special mechanical information and Note emphasizes general information worthy of special attention Contents Introduction 2 Safety 3 Safe Operating Practices 3 Toro Riding Mower Safety 5 Sound Pressure Level 6 Sound Power Level 6 Vibration Level 6 Safety and Instructional De...

Page 3: ...d with rear weight Refer to the section in this manual on Installing Rear Weight Improper use or maintenance by the operator or owner can result in injury To reduce the potential for injury comply with these safety instructions and always pay attention to the safety alert symbol which means Caution Warning or Danger personal safety instruction Failure to comply with the instruction may result in p...

Page 4: ...ight Before attempting to start the engine disengage all blade attachment clutches shift into neutral and engage the parking brake Remember there is no such thing as a safe slope Travel on grass slopes requires particular care To guard against overturning do not stop or start suddenly when going up or downhill machine speeds should be kept low on slopes and during tight turns stay alert for humps ...

Page 5: ...aning or repairing Clean grass and debris from cutting units drives silencers mufflers and engine to help prevent fires Clean up oil or fuel spillage Use jack stands to support components when required Carefully release pressure from components with stored energy Disconnect battery before making any repairs Disconnect the negative terminal first and the positive last Reconnect positive first and n...

Page 6: ...nd cause serious injury Seek immediate medical attention if fluid is injected into skin Before disconnecting or performing any work on the hydraulic system all pressure in the system must be relieved by stopping the engine and lowering the cutting units and attachments to the ground Check all fuel lines for tightness and wear on a regular basis Tighten or repair them as needed If the engine must b...

Page 7: ...d energy hazard read the Operator s Manual 110 0984 1 Read the Operator s Manual 2 Engine Start 3 Engine Preheat 4 Engine Stop 106 6754 1 Warning do not touch the hot surface 2 Cutting dismemberment hazard fan and entanglement hazard belt stay away from moving parts 110 0986 1 Press the brake pedal and parking brake pedal to set the parking brake 2 Press the brake pedal to apply the brake 3 Press ...

Page 8: ...ted for operation of this machine are prescribed by and required by this standard 1 Warning read the Operator s Manual and receive training 2 Thrown object hazard keep bystanders a safe distance from the machine 3 Warning do not park the machine on slopes engage the parking brake lower the cutting units stop the engine and remove the ignition key before leaving the machine 4 Tipping hazard do not ...

Page 9: ... symbols are on your battery 1 Explosion hazard 6 Keep bystanders a safe distance from the battery 2 No fire open flame or smoking 7 Wear eye protection explosive gases can cause blindness and other injuries 3 Caustic liquid chemical burn hazard 8 Battery acid can cause blindness or severe burns 4 Wear eye protection 9 Flush eyes immediately with water and get medical help fast 5 Read the Operator...

Page 10: ...ap 5 Height of cut 2 Rear reels circuit controls 4 Read the Operator s Manual 6 Traction unit speed 114 8890 Use for Models 5210 5410 with 5 inch reel cutting units 1 Front reels circuit controls 3 Mow and backlap 5 Height of cut 2 Rear reels circuit controls 4 Read the Operator s Manual 6 Traction unit speed 10 ...

Page 11: ...114 0429 1 Read the Operator s Manual 11 ...

Page 12: ...to adjust the cutting unit Operator s Manual 1 Engine Operator s Manual 1 Parts Catalog 1 CE certificate 1 10 Operator Training Material 1 Read the Operator s Manual and watch the video before operating the machine Note Determine the left and right sides of the machine from the normal operating position 1 Adjusting the Tire Pressure No Parts Required Procedure The tires are over inflated for shipp...

Page 13: ...Figure 3 1 Control arm 3 Bolts 2 2 Retaining brackets 2 Rotate the control arm to the desired position and tighten the 2 bolts 4 Installing the Cutting Units Parts needed for this procedure 1 Front hose guide R H 1 Front hose guide L H Procedure 1 Remove the reel motors from the shipping brackets 2 Remove the shipping brackets and discard 3 Remove the cutting units from the cartons Assemble and ad...

Page 14: ...o be positioned to the outer side of the tab as shown in Figure 6 Figure 6 1 Opposite carrier frame tab 2 Rod bracket D Mount the rod bracket to the cutting unit tabs with the carriage bolts and nuts Figure 6 Also on the 4 cutting unit mount the left hand hose guide to the front of the cutting unit tabs when reinstalling the rod bracket Figure 7 Note On the 5 cutting unit use the rod bracket mount...

Page 15: ... 10 Insert the cap over the carrier frame shaft and lift arm yoke 11 Secure the cap and the carrier frame shaft to the lift arm yoke with the snapper pin Use the slot if a steering cutting unit is desired or use the hole if the cutting unit is to be locked in position Figure 8 12 Secure the lift arm chain to the chain bracket with the snapper pin Figure 11 Use the number of chain links described i...

Page 16: ...ting straight ahead and lowered to the shop floor 1 Make sure the hairpin cotter is installed in the rear hole in the spring rod Figure 13 Figure 13 1 Turf compensation spring 3 Spring rod 2 Hair pin cotter 4 Hex nuts 2 Tighten the hex nuts on the front end of the spring rod until the compressed length of the spring is 5 inches 12 7 cm on Reelmaster 5210 5410 5 inch cutting units or 6 25 inches 15...

Page 17: ...opean standards Fasteners 2 each required for weights Weight Location No 0 0 N A N A 2 Yes 90 lb calcium chloride 7 3231 11 Carriage Bolt 104 8301 Nut Under bumper No 0 0 N A N A RM5210 4 Yes 2 0 3231 6 Carriage Bolt 104 8301 Nut Under bumper No 0 0 N A N A 2 Yes 90 lb calcium chloride 9 3231 34 Carriage Bolt 104 8301 Nut Under bumper No 0 0 N A N A RM5410 4 Yes 2 0 3231 6 Carriage Bolt 104 8301 N...

Page 18: ...8301 Nut 2 on top of bumper and the remaining under bumper No 4 4 3231 7 Carriage Bolt 104 8301 Nut 1 on top of bumper and 3 under bumper RM5410 4 Yes 90 lb calcium chloride 90 lb calcium chloride N A N A No 90 lb calcium chloride 9 3231 34 Carriage Bolt 104 8301 Nut 2 on top of bumper and 7 under bumper 2 Yes 90 lb calcium chloride plus 9 weights 90 lb calcium chloride plus 5 weights 3231 34 Carr...

Page 19: ... N A N A RM5410 4 Yes 4 2 3231 7 Carriage Bolt 104 8301 Nut Under bumper No 6 2 3231 34 Carriage Bolt 104 8301 Nut Under bumper 2 Yes 90 lb calcium chloride 90 lb calcium chloride N A N A No 0 0 N A N A RM5510 4 Yes 6 6 3231 34 Carriage Bolt 104 8301 Nut 3 on top of bumper and 3 under bumper No 0 0 N A N A 2 Yes 90 lb calcium chloride 6 3231 34 Carriage Bolt 104 8301 Nut 2 on top of bumper and 4 u...

Page 20: ...ove the 3 bolts washers and spacers securing the traction manifold to the bottom of the rear bumper Figure 15a Position the appropriate amount of weight on the top and or bottom of the rear bumper Mount the weight s and the traction manifold to the bumper with the 3 bolts washers and spacers previously removed Figure 15b Note Do not use the spacers when installing more than two weights under the b...

Page 21: ...o the outer side of the hood 5 Inside the hood insert the metal washer onto the latch and secure with the nut Make sure the latch engages the frame catch when it is locked Use the enclosed hood latch key to operate the hood latch 8 Using the Cutting Unit Kickstand Parts needed for this procedure 1 Cutting unit kickstand Procedure Whenever the cutting unit has to be tipped to expose the bedknife re...

Page 22: ... 2 Height adjusting screw 5 Hole not used 3 Nut 10 Reading the Manual and Viewing the Safety Video Parts needed for this procedure 1 Operator s Manual 1 Engine Operator s Manual 1 Parts Catalog 1 CE certificate 1 Operator Training Material Procedure Read the Operator s Manual View the Operator Training Material Store all documentation in a safe place for future use Fill out the registration card U...

Page 23: ...ottle is in the Fast position To stop reduce foot pressure on the traction pedal and allow it to return to the center position Figure 23 1 Traction pedal 4 Brake pedal 2 Mow speed limiter 5 Parking brake 3 Spacers 6 Tilt steering pedal Mow Speed Limiter When the mow speed limiter Figure 23 is flipped up it will control the mow speed and allow the cutting units to be engaged Each spacer adjusts the...

Page 24: ...ht It will illuminate should a system fault be recognized Lower Mow Raise Control Lever This lever Figure 24 raises and lowers the cutting units and also starts and stops the reels when the reels are enabled in the mow mode Glow Plug Indicator Light This light Figure 24 illuminates when the glow plugs are preheating Engine Oil Pressure Warning Light This light Figure 24 indicates dangerously low e...

Page 25: ...ature view the indicator Figure 27 it should be in the Green zone When the indicator is in the Red zone change the hydraulic filters Figure 27 1 Hydraulic filter restriction indicator Fuel Gauge The fuel gauge Figure 28 shows the amount of fuel in the tank Figure 28 1 Fuel tank cap 2 Fuel gauge Headlight Switch Pivot the switch downward to turn on the headlights Figure 29 Figure 29 1 Headlight swi...

Page 26: ...160 cm 63 inches 160 cm 63 inches 160 cm Weight 2 396 lb 1 087 kg 2 505 lb 1 136 kg 2 693 lb 1 222 kg 2 813 lb 1 276 kg Engine Kubota 28 hp Kubota 35 5 hp Kubota 35 5 hp Kubota 44 2 hp Turbo Fuel tank capacity 13 5 US gallons 51 l 13 5 US gallons 51 l 13 5 US gallons 51 l 13 5 US gallons 51 l Transport speed 0 10 mph 0 16 kph 0 10 mph 0 16 kph 0 10 mph 0 16 kph 0 10 mph 0 16 kph Mowing speed 0 8 m...

Page 27: ...l with the filter Use high quality engine oil that meets the following specifications API Classification Level Required CH 4 CI 4 or higher Preferred oil SAE 15W 40 above 0 degrees F Alternate oil SAE 10W 30 or 5W 30 all temperatures Toro Premium Engine oil is available from your distributor in either 15W 40 or 10W 30 viscosity 1 Park the machine on a level surface stop the engine set the parking ...

Page 28: ...esh diesel fuel or biodiesel fuels with low 500 ppm or ultra low 15 ppm sulfur content The minimum cetane rating should be 40 Purchase fuel in quantities that can be used within 180 days to ensure fuel freshness Fuel tank capacity 13 5 gallons 51 l Use summer grade diesel fuel No 2 D at temperatures above 20 F 7 C and winter grade No 1 D or No 1 D 2 D blend below that temperature Use of winter gra...

Page 29: ... In certain conditions during fueling static electricity can be released causing a spark which can ignite the fuel vapors A fire or explosion from fuel can burn you and others and can damage property Always place fuel containers on the ground away from your vehicle before filling Do not fill fuel containers inside a vehicle or on a truck or trailer bed because interior carpets or plastic truck bed...

Page 30: ... cSt 100 C 7 9 to 8 5 Viscosity Index ASTM D2270 140 to 160 Pour Point ASTM D97 34 F to 49 F Industry Specifications Vickers I 286 S Quality Level Vickers M 2950 S Quality Level Denison HF 0 Note Many hydraulic fluids are almost colorless making it difficult to spot leaks A red dye additive for the hydraulic system oil is available in 2 3 oz 20 ml bottles One bottle is sufficient for 4 6 gal 15 22...

Page 31: ...situations have occurred Initial start up of a new machine Engine has ceased running due to lack of fuel Maintenance has been performed upon fuel system components i e filter replaced separator serviced etc Under certain conditions diesel fuel and fuel vapors are highly flammable and explosive A fire or explosion from fuel can burn you and others and can cause property damage Use a funnel and fill...

Page 32: ...ating is required turn key to the Off position and then to the On Preheat position Repeat this process as required 4 Run the engine at low idle speed until it warms up Stopping the Engine 1 Move all controls to Neutral set the parking brake move the throttle to the low idle position and allow the engine to reach low idle speed Important Allow the engine to idle for 5 minutes before shutting it off...

Page 33: ...nt turf conditions and to maintain a uniform height of cut in the rough conditions or in areas of thatch build up You can adjust each counterbalance spring to one of four settings Each increment increases or decreases counterbalance on the cutting unit by 5 lb 2 3 kg The springs can be positioned on the back side of the spring actuator to remove all counter balance forth position 1 Position the ma...

Page 34: ...o increase the lift arm turn around height or move the switch up to decrease the lift arm turn around height Tighten the mounting screws Figure 42 1 Switch 2 Lift arm sensing device Pushing or Towing the Machine In an emergency the machine can be moved by actuating the bypass valve in the variable displacement hydraulic pump and pushing or towing the machine Important Do not push or tow the machin...

Page 35: ...t tire Figure 45 Figure 45 1 Front tie down Rear each side of the machine on the rear frame Figure 46 Figure 46 1 Rear tie down Understanding the Diagnostic Light The machine is equipped with a diagnostic light which indicates if the electronic controller senses an electronic malfunction The diagnostic light is located on the control arm Figure 47 When the electronic controller is functioning corr...

Page 36: ...ion is required for various input switches i e seat switch key switch etc and turns on the outputs to actuate solenoids or relays for the requested machine function For the electronic controller to control the machine as desired each of the input switches output solenoids and relays must be connected and functioning properly Use the Diagnostic ACE display to help verify and correct electrical func...

Page 37: ...epair any defective wiring Note The Diagnostic ACE also has the ability to detect which output solenoids or relays are turned on This is a quick way to determine if a machine malfunction is electrical or hydraulic Verifying Output Function 1 Park the machine on a level surface lower the cutting units stop the engine and engage the parking brake 2 Remove the access panel from the side of the contro...

Page 38: ...Lift lower rear cutting unit SV2 Raise any cutting units Operating Tips Familiarization Before mowing grass practice operating the machine in an open area Start and stop the engine Operate in forward and reverse Lower and raise the cutting units and engage and disengage the reels When you feel familiar with the machine practice operating up and down slopes at different speeds Warning System If a w...

Page 39: ...shings Grease them immediately after every washing regardless of the interval listed Check the condition of and clean the battery Check the battery cable connections Every 100 hours Inspect the cooling system hoses Check the condition and tension of the alternator belt Every 150 hours Change the engine oil and filter Every 200 hours Drain moisture from the fuel and hydraulic fluid tanks Check the ...

Page 40: ...dicator 2 Check hydraulic hoses for damage Check for fluid leaks Check the tire pressure Check the instrument operation Check the reel to bedknife adjustment Check the height of cut adjustment Check all grease fittings for lubrication 3 Touch up damaged paint 1 Check the glow plug and injector nozzles if hard starting excess smoke or rough running is noted 2 Check with the engine running and the o...

Page 41: ... Bushings If you operate the machine under normal conditions lubricate all grease fittings for the bearings and bushings after every 50 hours of operation with No 2 General Purpose Lithium Base Grease Lubricate bearings and bushings immediately after every washing regardless of the interval listed The grease fitting locations and quantities are as follows Pump drive shaft U joint 3 Figure 51 Figur...

Page 42: ...ame and pivot 2 each Figure 53 Figure 53 Lift arm pivot shaft 1 each Figure 54 Figure 54 Rear axle tie rod 2 Figure 55 Figure 55 Axle steering pivot 1 Figure 56 Figure 56 Steering cylinder ball joints 2 Figure 57 Figure 57 Brake pedal 1 Figure 58 Figure 58 42 ...

Page 43: ...s debris from migrating into the intake when the filter is removed 3 Remove and replace the filter Figure 60 Cleaning of the used element is not recommended due to the possibility of damage to the filter media Inspect the new filter for shipping damage checking the sealing end of the filter and the body Do not use a damaged element Insert the new filter by applying pressure to the outer rim of the...

Page 44: ...1 8 inch from the front of the control arm slot 2 Loosen the throttle cable connector on the throttle cable next to the injection pump lever Figure 63 Figure 63 1 Throttle cable pivot 3 High idle stop 2 Injection pump lever arm 4 Throttle cable connector 3 Hold the injection pump lever arm against the high idle stop Figure 63 4 While pulling the throttle cable to remove any slack tighten the throt...

Page 45: ...pect them for deterioration damage or loose connections Servicing the Water Separator Service Interval Every 400 hours Drain water or other contaminants from water separator Figure 64 daily Replace filter canister after every 400 hours of operation 1 Place a clean container under the fuel filter 2 Loosen the drain plug on the bottom of the filter canister Figure 64 1 Water separator filter caniste...

Page 46: ...tain lead and lead compounds chemicals known to the State of California to cause cancer and reproductive harm Wash hands after handling Battery electrolyte contains sulfuric acid which is a deadly poison and causes severe burns Do not drink electrolyte and avoid contact with skin eyes or clothing Wear safety glasses to shield your eyes and rubber gloves to protect your hands Fill the battery where...

Page 47: ...level surface stop the engine and lower the cutting units to the floor 2 Disconnect the left brake cable from the brake pedal Figure 68 and set the parking brake Figure 68 1 Left brake cable 2 Brake pedal 3 Jack up the left side of the machine until the front tire is off the shop floor Support the machine with jack stands to prevent it from falling accidentally Note On 4 wheel drive models the rig...

Page 48: ...d lower the machine to the shop floor 8 Re attach the left brake cable to the brake pedal 9 Test drive the machine to make sure it does not creep Adjusting the Rear Wheel Toe in 1 Rotate the steering wheel so that the rear wheels are straight ahead 2 Loosen the jam nut on each end of the tie rod Figure 70 Note The end of the tie rod with the external groove is a left hand thread Figure 70 1 Jam nu...

Page 49: ...ea 3 Unlatch the clamp and pivot open the rear screen Figure 71 Figure 71 1 Rear screen latch 2 Rear screen 4 Clean the screen thoroughly with compressed air 5 Pivot the latches inward to release the oil cooler Figure 72 Figure 72 1 Oil cooler 2 Oil cooler latches 6 Thoroughly clean both sides of the oil cooler and the radiator Figure 73 with compressed air Figure 73 1 Radiator 7 Pivot the oil coo...

Page 50: ...al travel move the brake cables to the upper set of holes in the brake pedal mechanism Check adjustment and repeat procedure if additional adjustment is required Adjusting the Parking Brake If the parking brake fails to engage an adjustment to the brake pawl is required 1 Remove the cotter pins and clevis pins securing the brake cables to the brake pedal rod Figure 75 Figure 75 1 Brake cables 3 Pa...

Page 51: ...luid Change hydraulic fluid after every 800 operating hours in normal conditions If fluid becomes contaminated contact your local Toro distributor because the system must be flushed Contaminated fluid looks milky or black when compared to clean oil 1 Stop the engine and raise the hood 2 Place a large drain pan under the fitting secured to the bottom of the hydraulic fluid reservoir Figure 77 Figur...

Page 52: ...g area and place a drain pan under filter Figure 79 and Figure 80 Figure 79 1 Hydraulic filter Figure 80 1 Hydraulic filter 3 Remove the filter 4 Lubricate the gasket on the new filter with hydraulic oil 5 Ensure that the filter mounting area is clean 6 Install the filter by hand until the gasket contacts the mounting surface then rotate it an additional 1 2 turn 7 Repeat the procedure on the othe...

Page 53: ...work on the hydraulic system Get immediate medical help if fluid is injected into skin Hydraulic System Test Ports Use the hydraulic system test ports to test the pressure in the hydraulic circuits Contact your local Toro distributor for assistance Use the test ports on the front hydraulic tubes Figure 81 to assist in troubleshooting the traction circuit Figure 81 1 Traction circuit test port Use ...

Page 54: ... determine which units to backlap Figure 84 To avoid personal injury be certain that you are clear of the cutting units before proceeding 7 With the Mow Transport lever in the mow position move the Enable Disable switch to the Enable position Move the Lower Mow Lift control forward to start the backlapping operation on the designated reels 8 Apply lapping compound with a long handle brush Never us...

Page 55: ...2X skin over grease Toro Part No 505 47 or petroleum jelly to prevent corrosion D Slowly recharge the battery every 60 days for 24 hours to prevent lead sulfation of the battery Preparing the Engine 1 Drain the engine oil from the oil pan and replace the drain plug 2 Remove and discard the oil filter Install a new oil filter 3 Refill the oil pan with designated quantity of motor oil 4 Start the en...

Page 56: ...Schematics Hydraulic Schematic Model 5210 5410 Rev A 56 ...

Page 57: ...Hydraulic Schematic Model 5510 5610 Rev A 57 ...

Page 58: ...Electrical Schematic Rev 58 ...

Page 59: ...Notes 59 ...

Page 60: ...t is not limited to dam age to seats due to wear or abrasion worn painted surfaces scratched decals or windows etc Parts Parts scheduled for replacement as required maintenance are war ranted for the period of time up to the scheduled replacement time for that part Parts replaced under this warranty are covered for the duration of the original product warranty and become the property of Toro Toro ...

Reviews: