


While Doing Maintenance, Troubleshooting, Testing, Adjustments or Repairs
25. Before servicing or making any adjustments, stop
engine and remove key from switch.
26. Make sure machine is in safe operating condition by
keeping all nuts, bolts and screws tight.
27. Make sure all hydraulic line connections are tight,
and all hydraulic hoses and lines are in good condition
before applying pressure to the system.
28. Keep body and hands away from pin hole leaks or
nozzles that eject high pressure hydraulic fluid. Use
cardboard or paper to find hydraulic leaks. Hydraulic
fluid escaping under pressure can penetrate skin and
cause injury. Fluid accidentally injected into the skin
must be surgically removed within a few hours by a
doctor familiar with this form of injury or gangrene may
result.
29. Before disconnecting or performing any work on the
hydraulic system, all pressure in system must be re
lieved by lowering cutting units to the ground and stop
ping the engine.
30. To reduce potential fire hazard, keep engine area
free of excessive grease, grass, leaves and dirt.
31. If engine must be running to perform maintenance
or an adjustment, keep hands, feet, clothing and other
parts of the body away from cutting units and other
moving parts. Keep all bystanders away.
32. Do not overspeed engine by changing governor
setting. To assure safety and accuracy, have an Author
ized Toro Distributor check maximum engine speed.
33. Shut engine off before checking or adding oil to
engine crankcase.
34. Disconnect battery before checking or adding oil to
the crankcase.
35. At the time of manufacture, the machine conformed
to the safety standards for riding mowers. To assure
optimum performance and continued safety certification
of the machine, use genuine Toro replacement parts and
accessories. Replacement parts and accessories made
by other manufacturers may result in non-conformance
with the safety standards, and the warranty may be
voided.
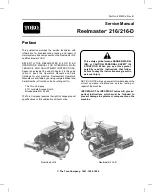
Reelmaster
®
216/216-D
Page 1 - 3
Safety Instructions
Summary of Contents for reelmaster 216
Page 2: ...This page is blank ...
Page 4: ...This page is blank ...
Page 8: ...Safety Instructions Page 1 4 Reelmaster 216 216 D ...
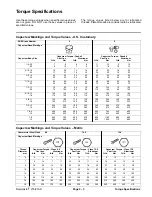
Page 12: ...Torque Specifications Page 2 4 Rev B Reelmaster 216 216 D ...
Page 26: ...Adjustments Page 4 4 Reelmaster 216 216 D ...
Page 40: ...Troubleshooting Page 5 14 Reelmaster 216 216 D ...
Page 42: ...Troubleshooting Page 5 16 Reelmaster 216 216 D ...
Page 72: ...Repairs Page 5 46 Reelmaster 216 216 D ...
Page 75: ...Reelmaster 216 S N 10001 19999 Reelmaster 216 216 D Page 6 3 Wiring Schematics ...
Page 76: ...Reelmaster 216 S N 20001 Up Wiring Schematics Page 6 4 Reelmaster 216 216 D ...
Page 77: ...Reelmaster 216 D Reelmaster 216 216 D Page 6 5 Wiring Schematics ...
Page 114: ...Repairs Page 7 8 Reelmaster 216 216 D ...
Page 124: ...Repairs Page 8 10 Reelmaster 216 216 D ...
Page 143: ...This page is blank ...


