


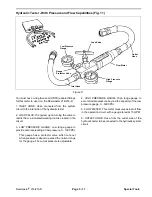


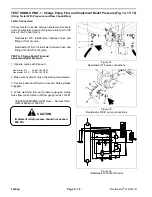
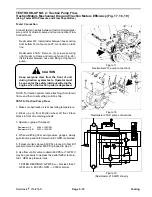


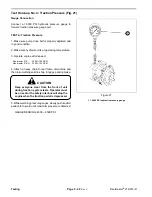


TEST HOOK-UP NO. 2: Traction Pump Flow,
Traction Motors Mechanical Drag and Traction Motors Efficiency (Fig. 17, 18, 19)
(Using Tester With Pressure and Flow Capabilities)
Tester Connection
Connect tester in series between traction forward pres
sure port of hydrostatic pump and tee connection (Flow
Control Open).
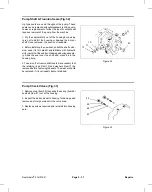
Reelmaster 216: Install tester between hose coming
from bottom front of pump and T-connection on tube
line.
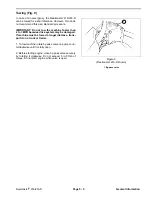
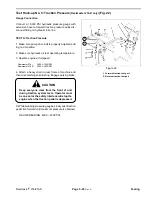
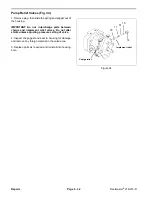
Reelmaster 216-D: Remove (4) screws securing
right fender to frame and remove fender (Fig. 24).
Install tester between hose and fitting at top rear of
pump.
Keep everyone clear from the front of unit
during traction system tests. Operator must
be on seat or the safety interlock will stop the
engine when the traction pedal is depressed.
CAUTION
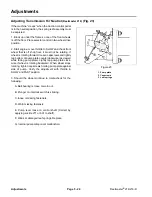
NOTE: For traction system tests, attach log chain to rear
frame and then to something solid in shop.
TEST A: Traction Pump Flow
1. Make sure hydraulic oil is at operating temperature.
2. Block up one front traction wheel off floor. Place
blocks in front of remaining wheels.
3. Operate engine at full speed:
Reelmaster 216:
3600
±
100 RPM
Reelmaster 216-D:
3200
±
100 RPM
4. While watching flow and pressure gauges, slowly
push traction pedal into forward until 7 GPM is obtained.
5. If pressure rises above 600 PSI, proceed to Test B If
pressure remains below 600 PSI proceed to step 5..
6. Use flow control valve to obtain 800 PSI at 7 GPM. It
may be necessary to depress the pedal farther to main
tain 7 GPM as pressure rises.
TESTER READINGS: GPM Flow — Not less than 7
GPM at min. 800 PSI. RPM — 3000 minimum.
Figure 17
Reelmaster 216 pump connections
Figure 18
Reelmaster 216-D pump connections
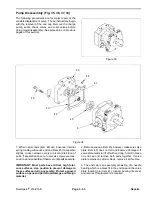
Figure 19
(Reelmaster 216 2WD shown)
Reelmaster
®
216/216-D
Page 5 - 19
Testing
Summary of Contents for reelmaster 216
Page 2: ...This page is blank ...
Page 4: ...This page is blank ...
Page 8: ...Safety Instructions Page 1 4 Reelmaster 216 216 D ...
Page 12: ...Torque Specifications Page 2 4 Rev B Reelmaster 216 216 D ...
Page 26: ...Adjustments Page 4 4 Reelmaster 216 216 D ...
Page 40: ...Troubleshooting Page 5 14 Reelmaster 216 216 D ...
Page 42: ...Troubleshooting Page 5 16 Reelmaster 216 216 D ...
Page 72: ...Repairs Page 5 46 Reelmaster 216 216 D ...
Page 75: ...Reelmaster 216 S N 10001 19999 Reelmaster 216 216 D Page 6 3 Wiring Schematics ...
Page 76: ...Reelmaster 216 S N 20001 Up Wiring Schematics Page 6 4 Reelmaster 216 216 D ...
Page 77: ...Reelmaster 216 D Reelmaster 216 216 D Page 6 5 Wiring Schematics ...
Page 114: ...Repairs Page 7 8 Reelmaster 216 216 D ...
Page 124: ...Repairs Page 8 10 Reelmaster 216 216 D ...
Page 143: ...This page is blank ...


