


Installation Instructions
2
DESCRIPTION
USE
QTY.
Square Key 3/16 x 1.25 (HP Models) or
3/16 x 0.50 (SP Models)
1
Installing the blade assembly
Oil Drain Tube
1
Draining the engine oil
Brake Cable
1
Replacing the brake cable
Blade Retainer
Blade Spacer
Drive Pulley (SP Models only)
1
1
1
Replacing the blade retainer and the drive
pulley
Before Installing
POTENTIAL HAZARD
•
If you leave the wire on the spark plug,
someone could accidentally start the engine.
WHAT CAN HAPPEN
•
Someone accidentally starting the engine can
seriously injure you or other bystanders.
HOW TO AVOID THE HAZARD
•
Disconnect the wire from the spark plug before
you install the kit. Set the wire aside so that it
does not accidentally contact the spark plug.
1. Disconnect the wire from the spark plug.
POTENTIAL HAZARD
•
If gasoline is spilled on a hot engine, it could
ignite.
WHAT CAN HAPPEN
•
Contact with burning gasoline could cause
serious personal injury.
HOW TO AVOID THE HAZARD
•
Drain the gasoline from a cold engine only.
2. Make sure that the engine is cool. Remove the cap
from the fuel tank and use a pump-type syphon to
drain the fuel into a clean, approved gasoline
container.
Note: This is the only procedure that Toro recommends
for draining the fuel.
3. Connect the wire to the spark plug.
4. Start the engine and let it run until it runs out of fuel.
5. Disconnect the wire from the spark plug.
6. Drain the engine oil (Refer to your operator’s manual
for the procedure).
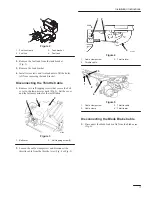
Disassembly
Removing the Starter Rope
Remove the starter rope from the rope guide (Fig. 1).
2
m–2705
1
Figure 1
1.
Rope guide
2.
Starter rope
Removing the Cable Ties
Cut the cable ties that hold the cables to the handle.
Removing the Fuel Tank
1. Disconnect the fuel line from the engine (Fig. 2).


