background image

Servicing the Bedknife

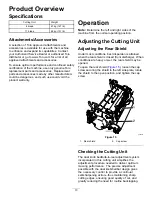
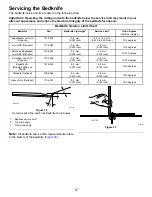
The bedknife service limits are listed in the following chart.

Important:

Operating the cutting unit with the bedknife below the service limit may result in poor

after-cut appearance and reduce the structural integrity of the bedknife for impacts.

Bedknife Service Limit Chart

Bedknife

Part

Bedknife Lip Height*

Service Limit*

Grind Angles

Top/Front Angles

EdgeMax® Low HOC

(Optional)

137-0832

5.6 mm

(0.220 inch)

6.4 to 12.7 mm

(0.250 to 0.500 inch)

10/5 degrees

Low HOC (Optional)

110-4084

5.6 mm

(0.220 inch)

4.8 mm

(0.190 inch)

10/5 degrees

Extended EdgeMax®

Low HOC (Optional)

119-4280

5.6 mm

(0.220 inch)

4.8 mm

(0.190 inch)

10/10 degrees

Extended Low HOC

(Optional)

120-1640

5.6 mm

(0.220 inch)

4.8 mm

(0.190 inch)

10/10 degrees

EdgeMax®

(Models 03698 and

03699)

137-0833

6.9 mm

(0.270 inch)

4.8 mm

(0.190 inch)

10/5 degrees

Standard (Optional)

108-9096

6.9 mm

(0.270 inch)

4.8 mm

(0.190 inch)

10/5 degrees

Heavy Duty (Optional)

110-4074

9.3 mm

(0.370 inch)

4.8 mm

(0.190 inch)

10/5 degrees

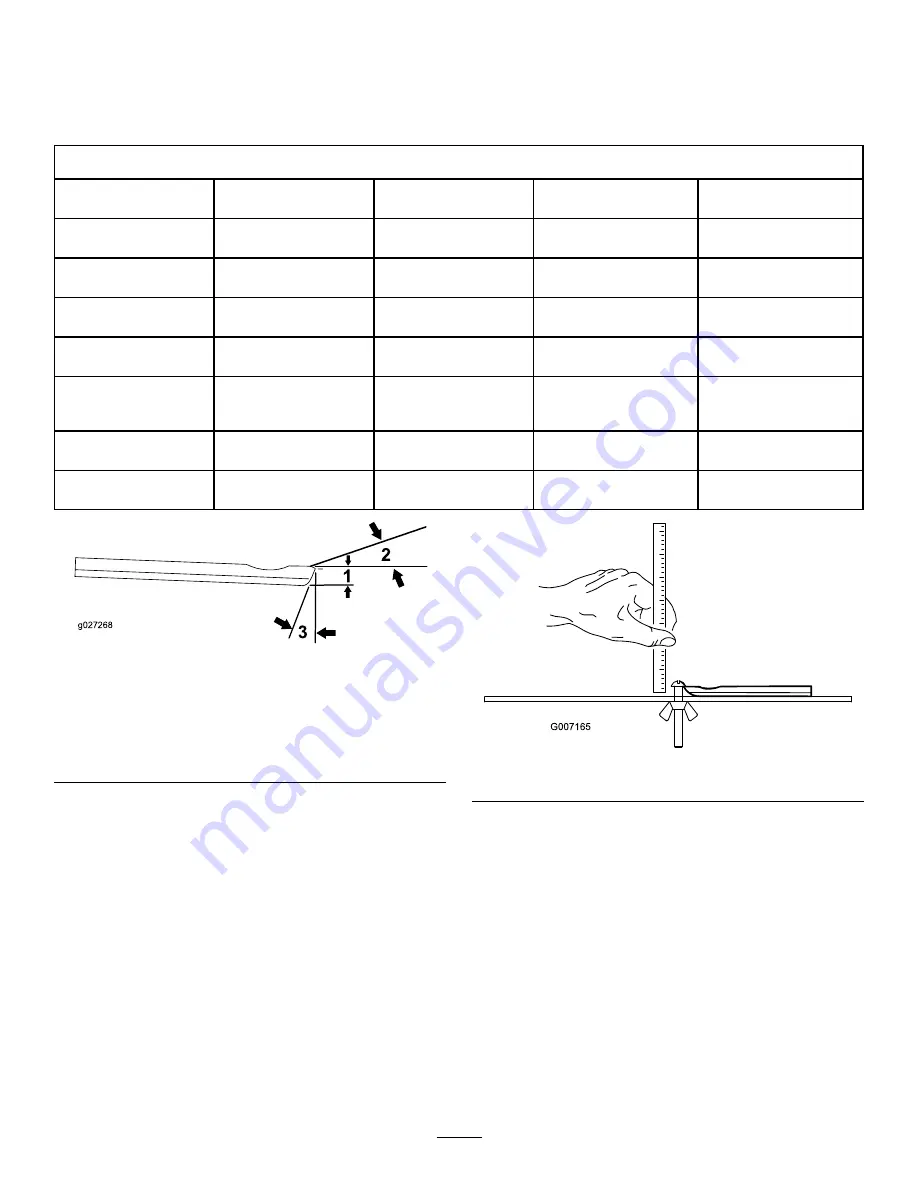
g027268

Figure 32

Recommended Top and Front Bedknife Grind Angles

1.

Bedknife service limit*

2.

Top grind angle

3.

Front grind angle

Note:

All bedknife service limit measurements relate

to the bottom of the bedknife (

Figure 33

).

g007165

Figure 33

20


Summary of Contents for 03698

Page 1: ...A 8 Blade or 11 Blade DPA Cutting Unit Reelmaster 6000 D Series Traction Unit Model No 03698 Serial No 403420001 and Up Model No 03699 Serial No 403420001 and Up Register at www Toro com Original Instructions EN 3428 684 A ...

Page 2: ...rized Service Dealer or Toro Customer Service and have the model and serial numbers of your product ready Figure 1 identifies the location of the model and serial numbers on the product Write the numbers in the space provided Important With your mobile device you can scan the QR code on the serial number plate if equipped to access warranty parts and other product information g277992 Figure 1 1 Lo...

Page 3: ...or feet near moving components of the machine Do not operate the machine without all guards and other safety protective devices in place and functioning properly on the machine Keep clear of any discharge opening Keep bystanders and children out of the operating area Never allow children to operate the machine Before you leave the operator s position do the following Park the machine on a level su...

Page 4: ...blades Wrap the blades or wear gloves and use caution when servicing the blades Only replace or sharpen the blades never straighten or weld them On multi bladed machines take care as rotating 1 blade can cause other blades to rotate Safety and Instructional Decals Safety decals and instructions are easily visible to the operator and are located near any area of potential danger Replace any decal t...

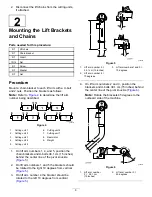
Page 5: ...arts Catalog Review the material and save it in an appropriate place Note Determine the left and right sides of the machine from the normal operating position 1 Removing the Tipper Assemblies No Parts Required Procedure Remove the tipper assemblies if so equipped from the number 1 number 2 and number 3 lift arms to avoid interference with the carrier frames of the cutting units 1 Remove the locknu...

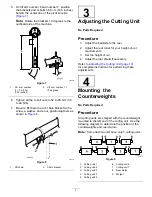
Page 6: ...lift arm numbers 1 4 and 5 position the chain brackets and U bolts 38 1 cm 15 inches behind the center line of the pivot knuckle Figure 5 2 On lift arm numbers 1 and 5 the brackets should be rotated to the right 10 degrees from vertical Figure 5 3 On lift arm number 4 the bracket should be rotated to the left 10 degrees from vertical Figure 5 g020546 Figure 5 1 Lift arm number 5 38 1 cm 15 inches ...

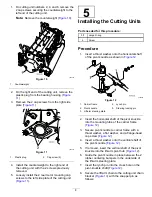
Page 7: ...Unit No Parts Required Procedure 1 Adjust the bedknife to the reel 2 Adjust the rear roller for your height of cut requirements 3 Set the height of cut 4 Adjust the rear shield if necessary Refer to Adjusting the Cutting Unit page 10 for complete instructions for performing these adjustments 4 Mounting the Counterweights No Parts Required Procedure All cutting units are shipped with the counterwei...

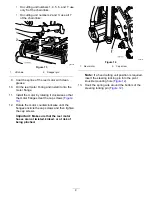
Page 8: ...re 1 Insert a thrust washer onto the horizontal shaft of the pivot knuckle as shown in Figure 12 g006532 Figure 12 1 Carrier frame 4 Lynch pin 2 Pivot knuckle 5 Steering locking pin 3 Lift arm steering plate 2 Insert the horizontal shaft of the pivot knuckle into the mounting tube of the carrier frame Figure 12 3 Secure pivot knuckle to carrier frame with a thrust washer a flat washer and a flange...

Page 9: ...t clockwise so that the motor flanges clear the cap screws Figure 14 12 Rotate the motor counterclockwise until the flanges encircle the cap screws and then tighten the cap screws Important Make sure that the reel motor hoses are not twisted kinked or at risk of being pinched g004127 Figure 14 1 Reel motor 2 Cap screw Note If a fixed cutting unit position is required insert the steering locking pi...

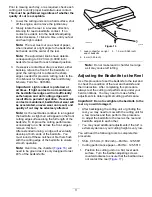
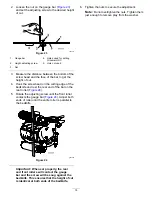
Page 10: ...he machine from the normal operating position Adjusting the Cutting Unit Adjusting the Rear Shield Under most conditions best dispersion is attained when the rear shield is closed front discharge When conditions are heavy or wet the rear shield may be opened To open the rear shield Figure 15 loosen the cap screw securing the shield to the left side plate rotate the shield to the open position and ...

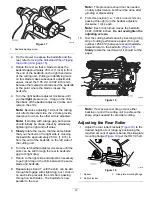
Page 11: ...ll length of the bedknife To improve the cutting performance occasionally run a file across the front edge to remove this burr After extended running a ridge will eventually develop at both ends of the bedknife You must round off these notches or file them flush with the cutting edge of the bedknife to ensure smooth operation Note Over time the chamfer Figure 16 will need to be ground as it is onl...

Page 12: ...until the shim can be slid through the reel to bedknife gap with light drag 7 Return to the right side and adjust as necessary to get light drag on the shim between the same blade and bedknife 8 Repeat steps 6 and 7 until the shim can be slid through both gaps with slight drag but 1 click in on each side prevents the shim from passing through on both sides The bedknife is now parallel to the reel ...

Page 13: ... Adjusting the Turf Compensation Settings The turf compensation spring transfers the weight from the front to the rear roller This helps to reduce a wave pattern in the turf also known as marcelling or bobbing Important Make spring adjustments with the cutting unit mounted to the traction unit pointing straight ahead and lowered to the shop floor 1 Make sure that the hairpin cotter is installed in...

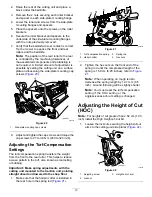
Page 14: ...d rest the rear end of the bar on the rear roller Figure 24 5 Rotate the adjusting screw until the front roller contacts the gauge bar Figure 24 Adjust both ends of roller until the entire roller is parallel to the bedknife g003328 Figure 24 Important When set properly the rear and front rollers will contact the gauge bar and the screw will be snug against the bedknife This ensures that the height...

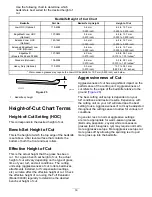
Page 15: ...Normal 5 3 18 cm 1 250 inches More 6 Less 4 Normal 5 3 49 cm 1 375 inches More 6 Less 5 Normal 6 3 81 cm 1 500 inches More 7 Less 6 Normal 7 4 13 cm 1 625 inches More 8 Less 6 Normal 7 4 44 cm 1 750 inches More 8 Less 7 Normal 8 4 76 cm 1 875 inches More 9 Less 7 Normal 8 5 08 cm 2 000 inches More 9 The High HOC Kit Part No 110 9600 must be installed Front HOC bracket must be positioned in the top...

Page 16: ...bottom of both the front and rear rollers Effective Height of Cut This is the actual height that the grass has been cut For a given bench set height of cut the actual height of cut will vary depending on the type of grass time of year turf and soil conditions The cutting unit setup aggressiveness of cut rollers bedknives attachments installed turf compensation settings etc will also affect the eff...

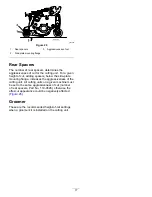
Page 17: ... adding spacers below the side plate mounting flange increases the aggressiveness of the cutting unit All cutting units on a given machine must be set to the same aggressiveness of cut number of rear spacers Part No 119 0626 otherwise the after cut appearance could be negatively affected Figure 26 Groomer These are the recommended height of cut settings when a groomer kit is installed on the cutti...

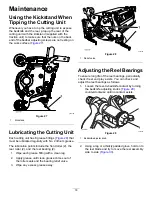
Page 18: ...ints include the front roller 2 the rear roller 2 and the reel bearing 2 1 Wipe each grease fitting with a clean rag 2 Apply grease until clean grease comes out of the roller seals and the bearing relief valve 3 Wipe any excess grease away g034188 Figure 28 1 Relief valve Adjusting the Reel Bearings To ensure long life of the reel bearings periodically check if reel end play exists You can check a...

Page 19: ...ng a 1 3 8 inch socket wrench slowly tighten the reel bearing adjustment nut until no end play of the reel exists If adjusting the nut does not eliminate reel end play replace the reel bearings Note The reel bearings do not require preload Overtightening the reel bearing adjuster nut will damage the reel bearings 4 Tighten the setscrew securing the bearing adjuster nut to the bearing housing Note ...

Page 20: ...mm 0 220 inch 4 8 mm 0 190 inch 10 5 degrees Extended EdgeMax Low HOC Optional 119 4280 5 6 mm 0 220 inch 4 8 mm 0 190 inch 10 10 degrees Extended Low HOC Optional 120 1640 5 6 mm 0 220 inch 4 8 mm 0 190 inch 10 10 degrees EdgeMax Models 03698 and 03699 137 0833 6 9 mm 0 270 inch 4 8 mm 0 190 inch 10 5 degrees Standard Optional 108 9096 6 9 mm 0 270 inch 4 8 mm 0 190 inch 10 5 degrees Heavy Duty O...

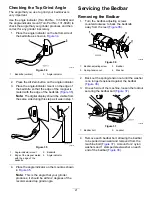
Page 21: ...e indicator mount 3 Bedknife 2 Edge of the magnet mated with the edge of the bedknife 4 Angle indicator 4 Place the angle indicator on the mount as shown in Figure 35 Note This is the angle that your grinder produces it should be within 2 degrees of the recommended top grind angle Servicing the Bedbar Removing the Bedbar 1 Turn the bedbar adjusting screws counterclockwise to back the bedknife away...

Page 22: ...lay is removed but do not overtighten or deflect the side plates The washers on the inside may have a gap 4 Tighten the spring tension nut until the spring is collapsed then back off 1 2 turn Figure 39 g006505 Figure 39 1 Spring tension nut 2 Spring Installing the Bedknife 1 Remove the rust scale and corrosion from the bedbar surface and apply a thin layer of oil to the bedbar surface 2 Clean the ...

Page 23: ...g279162 Figure 41 1 Bedknife screw tool 3 Torque to 23 to 28 N m 200 to 250 in lb 2 Install and torque these first to 1 N m 10 in lb 4 Grind the bedknife 23 ...

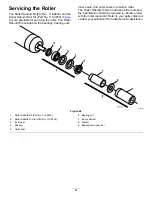
Page 24: ...o rebuild a roller The Roller Rebuild Tool Kit includes all the tools and the installation instructions required to rebuild a roller with the roller rebuild kit Refer to your parts catalog or contact your authorized Toro distributor for assistance g007790 Figure 42 1 Roller Rebuild Kit Part No 114 5430 6 Bearing nut 2 Roller Rebuild Tool kit Part No 115 0803 7 Inner seal tool 3 Inner seal 8 Washer...

Page 25: ...Notes ...
Page 26: ...DE DPA RADIAL CU RM6500 6700 Cutting Unit 2006 42 EC Relevant technical documentation has been compiled as required per Part B of Annex VII of 2006 42 EC We will undertake to transmit in response to requests by national authorities relevant information on this partly completed machinery The method of transmission shall be electronic transmittal This machinery shall not be put into service until in...

Page 27: ... for marketing purposes Retention of your Personal Information Toro will keep your personal information as long as it is relevant for the above purposes and in accordance with legal requirements For more information about applicable retention periods please contact legal toro com Toro s Commitment to Security Your personal information may be processed in the US or another country which may have le...

Page 28: ...tion of the original product warranty and become the property of Toro Toro will make the final decision whether to repair any existing part or assembly or replace it Toro may use remanufactured parts for warranty repairs Deep Cycle and Lithium Ion Battery Warranty Deep cycle and Lithium Ion batteries have a specified total number of kilowatt hours they can deliver during their lifetime Operating r...

Reviews: