


39
d) Take Photo
• Adjust the microscope so that the camera lens (A3) is close to and pointing at the object.
• Make sure the object to be examined is centered under the lens.
• While observing the image preview area (B4), bring the image into focus.
• To capture the image select the camera shortcut icon
, or press the image capture button (A7).
• Photos will be stored in File > Photos Folder.
Captured images show as thumbnails in the saved images window (B7). If you hover the mouse over a
thumbnail, the image will show in the preview area (B4). Images are stored in the JPG format.
e) Record Videos
• Adjust the microscope so that the camera lens (A3) is close to and pointing at the object.
• Make sure the object to be examined is centered under the lens.
• While observing the image preview area (B4), bring the image into focus.
• To start recording select the Video shortcut icon
.The icon will flash to indicate recording has started.
• Click the flashing icon to stop recording.
• Videos will be stored in File > Videos Folder.
Captured videos show as thumbnails in the saved images window (B7). If you hover the mouse over a
thumbnail, the image will show in the preview area (B4). Videos are stored in the AVI format.
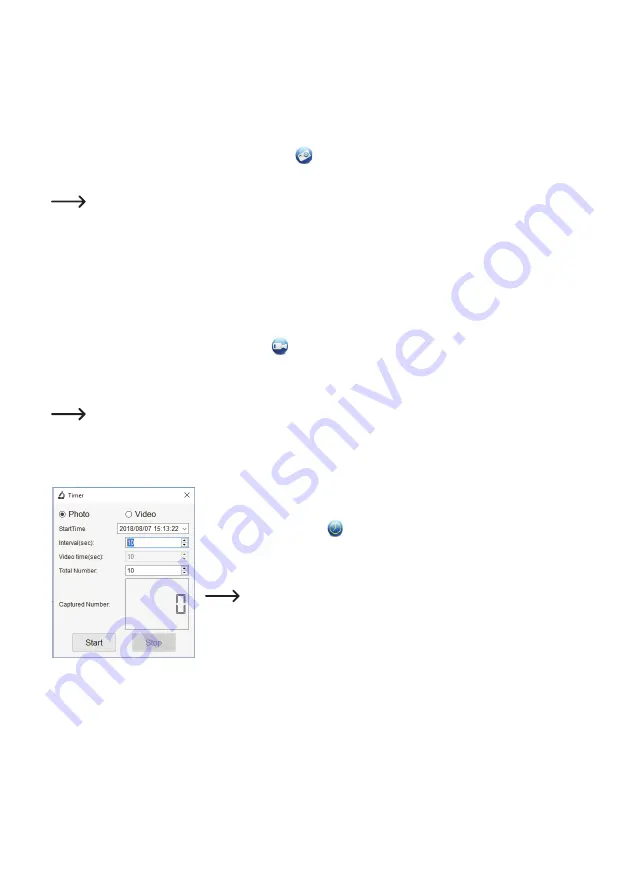
f) Photo and Video Timer
.
• You can set a custom start and stop timer for capturing photos or recording
video.
• Select the Timer shortcut , then choose Photo or Video.
• Set your desired parameters.
• Select Start, to begin recording.
Recording will stop after the program has run through the parameters,
or if you select Stop to end the timer. Make sure you have enough
memory space on your hard disc before recording.


