background image

14

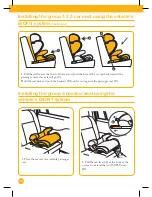
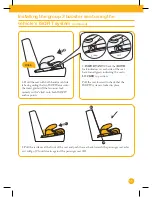
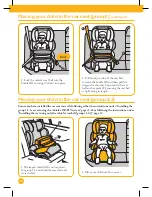
1. To ensure a correct fit whilst only using 

the vehicle’s 3-point seatbelt it is important 

that the ISOFIT arms are 

NOT

 extended 

and that they have been retracted into the 

car seat. This will allow the car seat to rest as 

flush as possible against the vehicle’s seat.

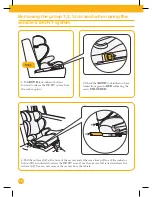
See “Removing the group 1,2,3 car seat 

when using the vehicle’s ISOFIT system” 

page 12 for guidance on retracting the 

ISOFIT arms

IMPORTANT: If your vehicle has an 

ISOFIT system with ISOFIT anchor 

points then we strongly urge you to use it.

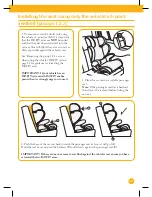
2. Place the car seat on a suitable passenger 

seat.

Installing the group 3 booster seat using only the 
vehicle’s 3-point seatbelt

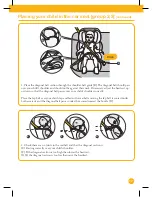
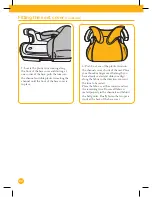
3. Push the base of the car seat back towards the passenger seat as far as it will go (A), until it rests 

against the passenger seat (B).

IMPORTANT! If the seat does not seem to rest flush against the vehicle’s seat ensure you have 

retracted the two ISOFIT arms.

A

B

B

Summary of Contents for grow-fix

Page 1: ...hild car seat Suitable for children from 9kg to 36kg approx 9 months to 12 years old ISOFIT CAR SEAT INSTRUCTIONS PLEASEREADCAREFULLYAND KEEPFORFUTUREREFERENCE YOURCHILD S SAFETYMAYBEAFFECTEDIFYOUDONO...

Page 2: ...ter within 28 days of the date of purchase to receive the full 3 years guarantee To receive your full guarantee you can register your product by visiting www tocobaby co uk warranty html and complete...

Page 3: ...ints consult the vehicle handbook depending upon the category of the child seat and of the ISOFIT fixture position NOTICES Read carefully before attempting to fit the child car seat WARNING NEVER leav...

Page 4: ...s the lighter occupants should be in the rear and the heavier occupants in the front WARNING If you have no option other than to put your child car seat on a rear passenger seat next to side airbags C...

Page 5: ...erous for your child the metal and plastic fittings could become hot and may cause the fabric to fade You can reduce this problem by covering the child car seat with a sheet when not in use WARNING En...

Page 6: ...Red ISOFIT adjust lever 2 Impact shield 8 Headrest adjust lever 3 Seatbelt guide 9 Shoulder belt guides 4 ISOFIT arms 10 Instruction manual pocket 5 Lap belt guide 11 ISOFIT guides 6 ISOFIT release b...

Page 7: ...lding the car seat base with one hand push the backrest away from you until it is flat on the floor The backrest can now be removed from the base Store the backrest safely in case it is required again...

Page 8: ...ger seat WARNING Never attempt to use a 2 point seatbelt to secure the seat WARNING Never use on a seat with an active airbag WARNING Never use on rearward or side facing vehicle seats USING ISOFIT SY...

Page 9: ...moved before fitting the car seat B A ISOFIT system 3 Hold the seat with both hands and slide the seat back guiding the two ISOFIT arms into the insert guides till the two arms lock securely with a cl...

Page 10: ...push the backrest D until it rests against the passenger seat E C D E E Installing the group 1 2 3 car seat using the vehicle s ISOFIT system continued vehicle s ISOFIT system Installing the group 3...

Page 11: ...click onto both ISOFIT anchor points Click 4 IMPORTANT Check that BOTH lock indicators on each side of the seat have turned green indicating the seat is LOCKED in position Pull the seat forward to che...

Page 12: ...cating the seat is UNLOCKED Click 3 Pull the red lever A at the front of the car seat and at the same time pull one of the indicator buttons B as indicated to retract the ISOFIT arms Once the arms are...

Page 13: ...st as flush as possible against the vehicle s seat See Removing the group 1 2 3 car seat when using the vehicle s ISOFIT system page 12 for guidance on retracting the ISOFIT arms IMPORTANT If your veh...

Page 14: ...age 12 for guidance on retracting the ISOFIT arms IMPORTANT If your vehicle has an ISOFIT system with ISOFIT anchor points then we strongly urge you to use it 2 Place the car seat on a suitable passen...

Page 15: ...tructions under Installing the seat using only the vehicle s seatbelt groups 1 2 3 page 13 A 1 Remove the impact shield A 2 Place your child into the car seat 3 Insert the impact shield B under the ca...

Page 16: ...elt is tight along its length Click D F 1 The impact shield A is not required for group 2 3 and should be removed and stored safely 2 Place your child into the car seat A Placing your child in the car...

Page 17: ...sses over your child s shoulder correctly Place the lap belt over your child s lap and fasten the seatbelt ensuring the lap belt is routed under both armrests and the diagonal belt passes under the ar...

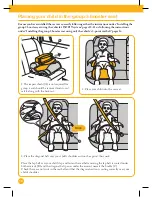
Page 18: ...ructions under Installing the group 3 booster seat using only the vehicle s 3 point seatbelt pages 14 Placing your child in the group 3 booster seat 3 Place the diagonal belt over your child s shoulde...

Page 19: ...oved from the base To reattach the backrest slot the bottom of the backrest into the seat base and then pull the backrest back up into an upright position until it clicks into position Snap 3 Starting...

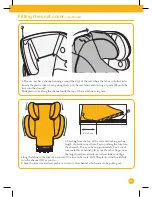
Page 20: ...EFULLY pull the base cover forward and off from the base 4 Unbutton the four press studs B and remove the back fabric B B C 2 Secure the press studs A on the back fabric to the back rest 1 Stretch the...

Page 21: ...is in place B 4 Starting from the top of the seat and working on one length of plastic trim at time begin pushing the trim into the channels Once you have approximately 2 or 3 cm of trim seated in a c...

Page 22: ...in place 6 Push 2 or 3 cm of the plastic trim into the channels on each side of the seat Place your thumb or finger over the length you have already seated and slide your digit along the fabric in th...

Page 23: ...nlight 5 If the seat covers need to be replaced only use parts certified by the manufacturer They are the only ones that are guaranteed to have been safety tested and designed to fit this seat Plastic...

Page 24: ...Discover more products at www toco co uk Discover more products at www tocobaby co uk...

Reviews: