


44
1.12. Optional Modules
The following modules can be used in the input module slots on the SX-2000AI's and SX-2100AI's rear panels:
SX-200RM Remote Microphone Interface Module
D-921E, D-921F, D-922E and D-922F Microphone/Line Input Modules
D-936R Stereo Input Module
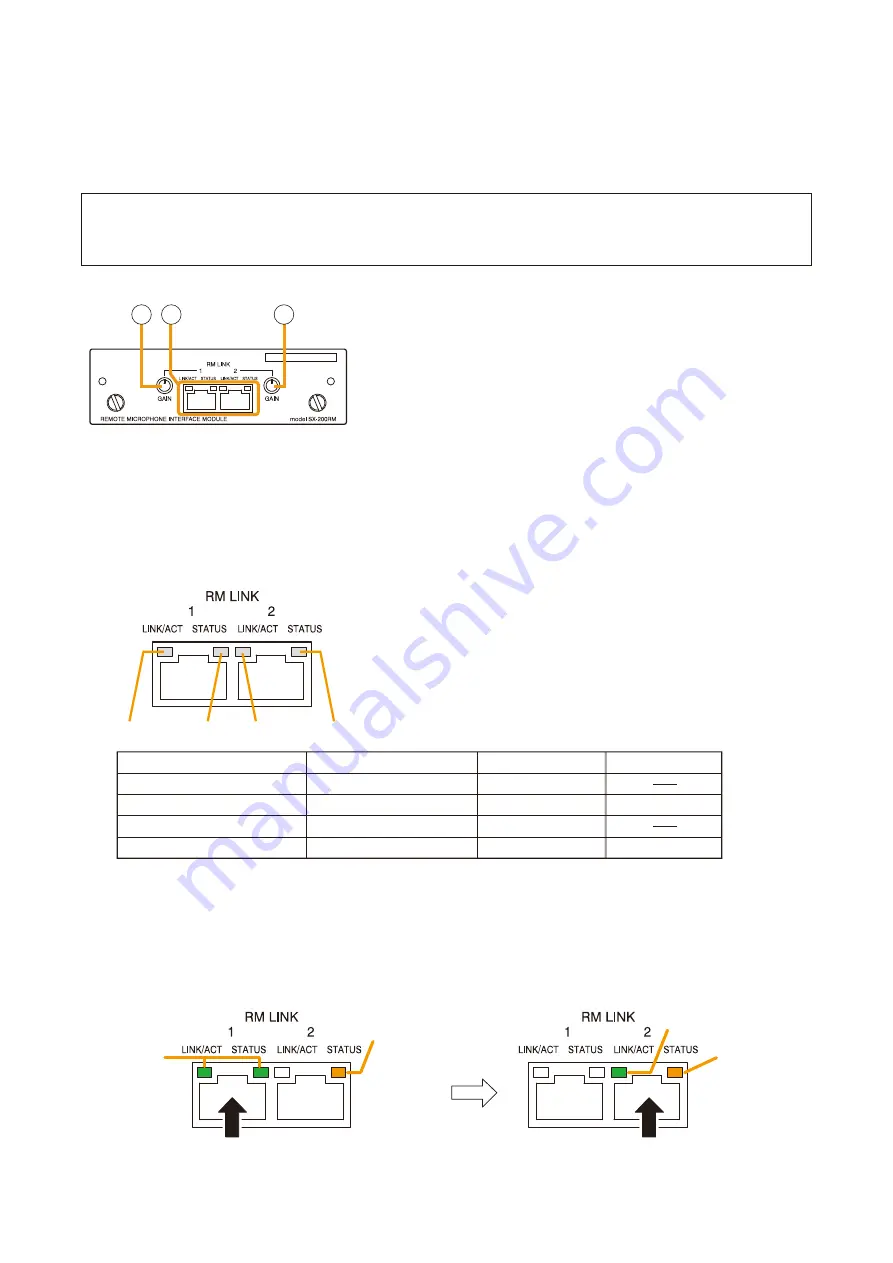
1.12.1. SX-200RM Remote Microphone Interface Module
FOR SX-2000 SERIES ONLY
1
1
2
1. Gain Control Knobs [GAIN]
Increase the audio level of the RM-200SF or RM-200SA Remote Microphone by up to 12 dB.
2. RM Link Terminals [RM LINK 1/2]
Used to connect the RM-200SF or RM-200SA Remote Microphones. Connect the RM-200SF or RM-200SA
with a correct device number (ID number) to the terminal assigned using the SX-2000 Setting Software. (See
.)
Each terminal can supply up to 1 A of power to the connected RM-200SF or RM-200SA/210.
1. RM1 connection confirmation
2. RM1 status
3. RM2 connection confirmation
4. RM2 status
Connected
Communication start
Connected
Communication start
Unconnected
Communication stop
Unconnected
Communication stop
Control start
Control start
Function
LED On or Flashing (Green)
LED Off
LED On (Orange)
1
2
3
4
Note
If the RM-200SF/200SA is connected to a wrong terminal, the terminal’s STATUS LED remains lit green. This
indicates that the device number of the RM Link Terminal does not match with that of the connected RM-
200SF/200SA. In this case, confirm the RM-200SF/200SA’s device number and the module mounting slot
number, then make the correct connection.
(Connection example of RM-200SF/200SA with device No. 2)
Note
All of the inserted modules cannot be recognized correctly when any module other than listed above is
inserted into the SX-2000AI's or SX-2100AI's module slots.
Lit green
RM-200SF/200SA with device No. 2
(Connected to a wrong terminal)
Lit green
Lit orange
RM-200SF/200SA with device No. 2
(Connected to the correct terminal)
LED of the device No.2 terminal
Lit orange


