background image

17

18

GETTING STARTED

Welcome to the user manual for your new XP30 camera! 

Battery charging

To optimise the use of your camera, charge the battery fully before first use.

To do so, connect the camera to a computer or any other USB charging adapter 

using the micro USB cable provided. The micro USB port is located inside the 

camera body. A message appears on the screen to inform you that the camera 

is connected to the computer. A white LED comes on at the back of the camera. 

A message appears on the screen when the battery is fully charged.

The charging time of the camera is about 2 hours. It is normal for the camera to 

heat up slightly while charging.  

Note: You can also charge your camera using a USB compatible T’nB wall 

charger or car charger (sold separately). 

MicroSD card

A microSD card (sold separately) is required to capture videos and photos. Use 

branded memory cards that meet the following specifications:

- MicroSD, microSDHC or microSDXC

- Class 10 or UHS-I

- Minimum capacity of 8 GB, maximum of 64 GB

Note: Handle memory cards with care. Turn off the camera before inserting or 

removing the card. Consult the memory card manufacturer’s instructions for 

more information.

Formatting the microSD card

For best use, format the microSD card before first use. To keep the card in good 

condition, format it regularly. 

Note: formatting erases all the content on the card, so be sure to transfer your 

photos and videos beforehand

Inserting the microSD card
To insert a microSD card, open the camera body 

using the opening system on the edge. Remove 

the battery to access the microSD card slot, which 

is located below the battery. Slide the door up to 

unlock access to the micro SD card slot. Insert your 

micro SD card. Slide the door down to lock. 

FR

EN

1

3

2

4

5

6

7

To format the card, press the 


button four times. Then press once on 


, then 

press 


3 times again to navigate through the settings until you reach the 

general settings. Press «Format» and then «Confirm». To exit this menu, press on    

until you reach 


and then press again on   to confirm. 

Powering on and off

To turn on the camera
Hold down the 


button   for 4 seconds. The opening screen appears and a 

white LED lights up at the back of the camera. 

To turn off the camera
Hold down the 


button 


for 3 seconds. The closing screen appears and the 

white LED at the back of the camera goes off. 

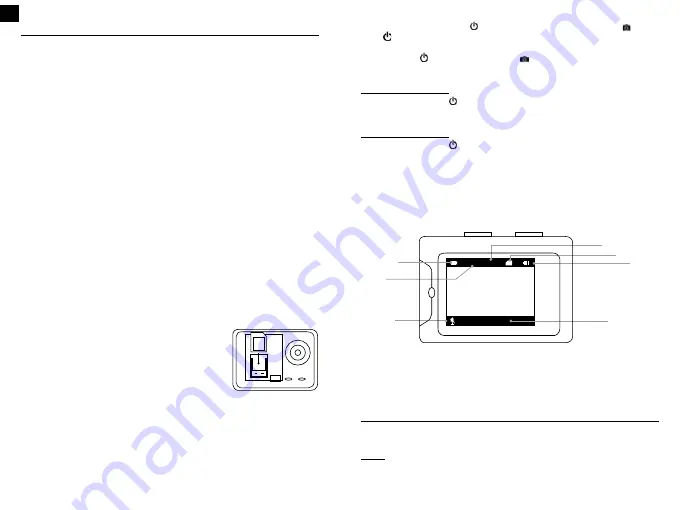
Navigation screen
The display shows the following information about modes and settings. The 
displayed settings vary depending on the mode.

1. Video/Photo/Playback Mode

2. Resolution

3. Microphone on/off

4.  Remaining space on  

the memory card

5. Memory card

6. Battery status

7. Date stamp

NAVIGATION ON YOUR CAMERA

The XP30 camera has three modes: Video, Photo, Slow motion.

Video

Three capture modes are available in Video mode: Video, TimeLapse, Loop 

Recording. These modes will be explained later in this manual.

TF

4K30FPS    14.6G

2017/01/01    00:03:12

Summary of Contents for XTREM XP30

Page 1: ...SPCAMXP30 INSTRUCTIONS MODE D EMPLOI CAMERA SPORT XP30...

Page 2: ...ment pr vues Ne placez pas d objet inflammable de substance explosive ou d objet dange reux proximit de votre appareil Utilisez uniquement les accessoires et connecteurs fournis L utilisation de tout...

Page 3: ...e la totalit du contenu de la carte veillez transf rer vos photos et vos vid os auparavant Insertion de la carte microSD Pour ins rer une carte microSD ouvrez le bo tier de la cam ra l aide du syst me...

Page 4: ...z une fois sur Pour quitter le mode Lecture appuyez une nouvelle fois sur le bouton Suppression de vid os et de photos sur la cam ra 1 Une fois dans le menu s lectionnez la vid o ou photo supprimer pu...

Page 5: ...ur de 2 minutes Ce mode est utile lors de la capture d v nements contenant des p riodes sans action que vous ne souhaitez pas sauvegarder au montage Astuce en mode vid o appuyez sur le bouton Bas pour...

Page 6: ...nB Cam XP30 et le mot de passe est 1234567890 Rotation de l image Ce param tre d termine l orientation de votre vid o ou de vos photos afin de vous viter de capturer des images l envers Si ce mode es...

Page 7: ...une chaleur ou un froid excessif Des temp ratures trop lev es ou trop basses peuvent temporairement diminuer l autonomie ou emp cher son bon fonctionnement vitez les changements brusques de temp ratu...

Page 8: ...device must match the original specifications Do not place flammable objects explosive substances or dangerous objects near your device Use only the accessories and connectors provided The use of any...

Page 9: ...ases all the content on the card so be sure to transfer your photos and videos beforehand Inserting the microSD card To insert a microSD card open the camera body using the opening system on the edge...

Page 10: ...on again FR EN Deleting videos and photos on the camera 1 Once in the menu select the video or photo to be deleted and press the button for 3 seconds A message appears on the screen Select Confirm wit...

Page 11: ...eful when capturing events that contain periods without action that you do not wish to save when editing Tip In video mode press the Down button to turn the microphone on or off FR EN VIDEO MODE SETTI...

Page 12: ...XP30 and the password is 1234567890 Image rotation This setting determines the orientation of your video or photos to prevent you from capturing images upside down If this mode is enabled you can shoo...

Page 13: ...t the camera or insert objects into the battery opening Do not use the camera or battery if they have been damaged for example if they are cracked pierced or wet If you disassemble or pierce the batte...

Page 14: ...origen previstas inicialmente No coloque objetos inflamables sustancias explosivas ni objetos peligrosos cerca del dispositivo Utilice exclusivamente los accesorios y conectores suministrados El uso...

Page 15: ...del contenido de la tarjeta por lo que es necesario transferir las fotos y los v deos antes de realizarlo Inserci n de la tarjeta micro SD Para introducir la tarjeta micro SD abra la c mara por el si...

Page 16: ...ot n Alto Suelte el bot n para volver a reproducci n normal 4 Para salir de reproducci n de v deo y volver al modo de reproducci n general pulse una vez el bot n Para salir del modo reproducci n pulse...

Page 17: ...n intervalo de dos minutos y graba un v deo de m s de dos minutos obtendr varios archivos de v deo cada uno de una longitud de dos minutos Este modo resulta til a la hora de capturar acontecimientos c...

Page 18: ...te modo para compensar la iluminaci n de un gimnasio u otros lugares p blicos WiFi Permite activar o desactivar la funci n WIFI El nombre del WiFi es T nB Cam XP30 y la contrase a 1234567890 FR ES Rot...

Page 19: ...almente la bater a Por ello se reco mienda evitar golpes y no desmontarla abrirla pisarla doblarla deformarla perforarla rayarla exponerla a microondas quemarla ni pintarla Tampoco se deben introducir...

Page 20: ...inflam vel subst ncia explosiva ou objeto perigoso perto do seu dispositivo Utilizar apenas os acess rios e conetores fornecidos A utiliza o de qualquer outro tipo de acess rio n o previsto para esse...

Page 21: ...conseja formatearla regularmente Nota a formata o apaga todo o conte do do cart o Certifique se de transferir as suas fotos e v deos com anteced ncia Inser o do cart o micro SD Para inserir um cart o...

Page 22: ...a reproduzir um v deo pressione o bot o Para realizar uma reprodu o r pida mantenha pressionado o bot o Down Para retroceder e avan ar mais rapidamente mantenha o bot o Up pressionado Solte o bot o pa...

Page 23: ...s para formar uma sequ ncia de v deo coerente Loop de grava o Selecione este modo para gravar um v deo em cont nuo guardando apenas ficheiros pequenos Por exemplo se selecionar um intervalo de 2 minut...

Page 24: ...m Esta configura o determina a orienta o do seu v deo ou fotos para evitar o registo de imagens no sentido inverso Se este modo estiver ativado pode filmar a 180 Assim a sua c mara filma no bom sentid...

Page 25: ...a abertura da bateria N o utilizar a c mara ou a bateria se ela estiver danificada por exemplo se ela estiver com fissuras furada ou se ela tiver entrado em contacto com gua Se desmontar ou perfurar a...

Page 26: ...All brand names and products mentioned are the property of their respective owners Toutes les marques et produits cit s sont des marques d pos es par leurs propri taires respectifs...

Reviews: