


6
7
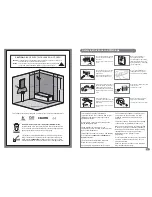
Please note –
All electrical installation should be carried out by a competent person in
accordance with current IEE wiring regulations.
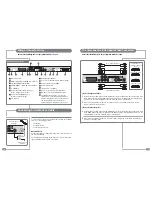
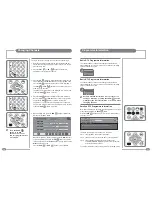
Cabling Overview
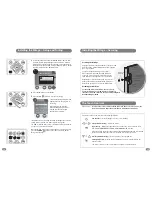
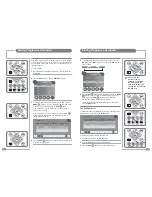
Installing the Wall Frame
Please note –
All required cabling for HDMI, PC RGB, SCART, S-Video, Component
and Composite Video should be installed at this stage.
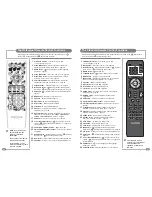
Mirage Power Supply (12 V DC)
The 12 V DC power supply unit is not waterproof and so must be positioned in a dry, well-ventilated
area outside the bathroom. It is fitted with an integral 4 metre lead which must not be cut, shortened or
lengthened – this could potentially damage the power supply unit and the Mirage and have
implications regarding safety.
The mains plug of the Mirage should be connected to a mains socket with a protective earth
connection supplied via a readily operable disconnection device. The disconnect device such as a
circuit breaker or switch should have contact separation of at least 3 mm in each pole and shall
disconnect each pole simultaneously.
Either pierce a grommet in the wall frame and feed the cable from the power supply through the frame
or feed the cable through an aperture as shown on page 6.
Mains plug
Mains power
supply cable
Mains input socket
DC power
supply cable (4 m)
Connector
TV aerial cable
(not supplied)
12 V DC
power
supply
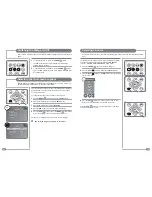
Installation and positioning
The cabling to the Mirage can be routed in two
ways; either through an aperture in the wall,
or vertically from above through the grommets
at the top of the wall frame.
If the cabling is to be routed through an
aperture in the wall.
The positions of the cable aperture and
the inside edge of the wall frame should
be marked, and the cable aperture cut,
before the wall frame is fastened in place.
Cut the aperture 140 mm from the inside
edge of the top of the wall frame and
positioned centrally as shown.
Ensure that 500 mm of each cable
protrudes through the aperture into the
frame as shown.
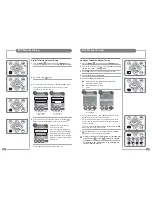
If the cabling is to be routed via the
grommets in the top of the wall frame.
It is essential that 650 mm of each cable
protrudes into the frame.
Fasten the wall frame to the wall using
fixings which are appropriate to ensure
that the wall frame will support the 16 Kg
(35 lb) total weight of the Mirage. The hinges
MUST be on the right hand side with the hinge
pins facing upwards.
Once the wall frame is fastened to the wall, apply
silicone sealant between the wall and the wall frame
on both the inside and outside of the frame.
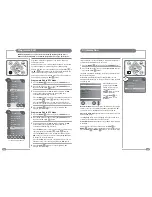
Loudspeaker Connections
If external speakers are being used instead of the internal
speakers the external speakers must have an impedance of 8
Ω
.
Only one pair of speakers may be connected at any one time.
After fixing the frame to the wall,
apply silicone sealant all around
the inside and outside of the frame
to seal the frame to the wall
The hinges must be on the right
with the pins pointing upwards
Three grommets in
top of wall frame
140 mm
TV Aerial Feed
A TV Distribution Amplifier may be required if you are in an area of weak signal or if other televisions
are already being fed from the aerial. If in doubt, consult a qualified aerial technician.
If the Mirage is to be used with a Sky™ box which has two RF outputs, the channel can be changed on
the Sky™ box using the Sky™ remote control via the Mirage. To use this facility install a good quality
coaxial cable that runs directly from the RF2 outlet of the Sky™ box, or from the outlet of a Remote-
Link amp, in a continuous uninterrupted run.
The Mirage will accept additional inputs from many sources and can be integrated with home
automation and interactive hotel TV systems. See pages 10 to 15 for specific information.
☛
The mirror frame weighs 14.5 Kg (32 lb) and when
the unit is open during installation all of the
weight is on the hinged side.


