background image

10

HA0368T Rev C May 2019 

Chapter 3

3.2.2 Mounting Options

The K-Cube Solenoid Controller is shipped with a baseplate, for use when fitting the

unit to a breadboard, optical table or similar surface - see Section 3.2.3. 
For  multiple  cube  systems,  a  3-channel  and  6-channel  K-Cube  Controller  Hub

(KCH301 and KCH601). ) are also available - see Section 2.2. for further details. Full

instructions on the fitting and use of the controller hub are contained in  the handbook

available at www.thorlabs.com.

3.2.3 Using the Baseplate

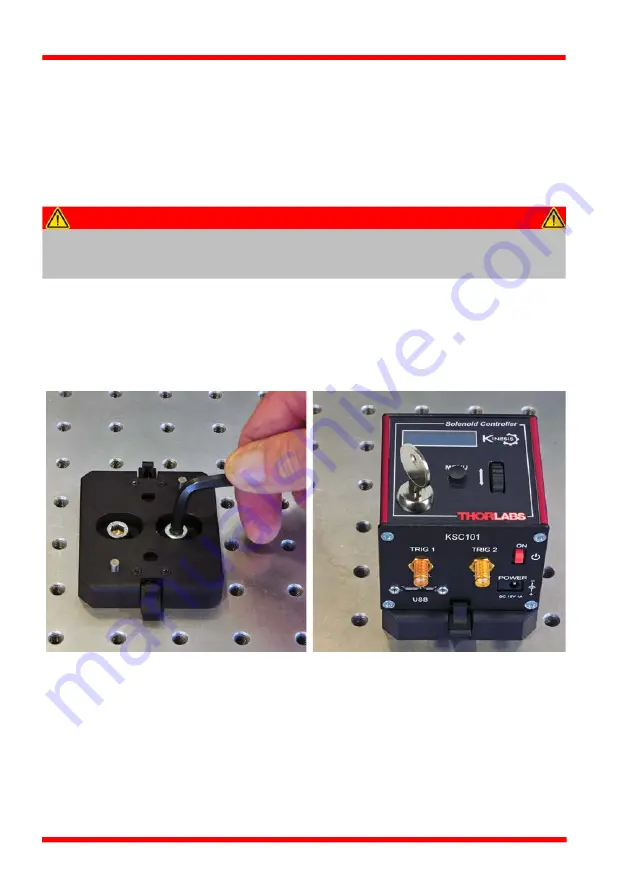
The  baseplate  is  supplied  with  magnets  for  quick  positioning  on  an  optical

worksurface. For more secure positioning, it can be bolted to the worksurface before

the K-Cube is fitted, as shown below. The K-cube is then located on two dowels in the

baseplate and secured by two clips.

Fig. 3.1   Using The Baseplate

Caution

When siting the unit, it should be positioned so as not to impede the 

operation of the control panel. 

Ensure that proper airflow is maintained to the unit.

Summary of Contents for KSC101

Page 1: ...KSC101 K Cube Solenoid Controller KINESIS User Guide Original Instructions ...

Page 2: ...e Operation 17 4 1 Introduction 17 4 2 Control Panel 17 4 3 Operating Modes 18 4 4 Settings Menu 19 4 5 Operation From The Top Panel 24 Chapter 5 PC Operation Tutorial 25 5 1 Preparation 25 5 2 Using the Kinesis Software 25 5 3 Changing and Saving Parameter Settings 27 5 4 Creating a Simulated Configuration 27 Chapter 6 Software Reference 28 6 1 Introduction 28 6 2 GUI Panel 28 6 3 Settings Panel ...

Page 3: ... Warning Given when there is a risk of injury from electrical shock Warning Given when there is a risk of injury to users Caution Given when there is a risk of damage to the product Note Clarification of an instruction or additional information Warnings If this equipment is used in a manner not specified by the manufacturer the protection provided by the equipment may be impaired In particular exc...

Page 4: ...igger signals for operation with third party equipment A trigger out connection allows multiple K Cube controllers to be connected together for multi channel synchronised operation For convenience the footprint of this unit has been kept to a minimum measuring only 60mm x 60mm x 47mm 2 4 x 2 4 x 1 8 and with the facility to directly mount to the optical table The manual controls for this unit are ...

Page 5: ...derstanding on using the unit and reference section Chapter 6 covers all operating modes and parameters in detail 2 2 Power Options For power a single way wall plug supply KPS101 is also available for powering a single K Cube Driver As a further level of convenience when using the new K Cube Controllers Thorlabs also offers the 3 channel and 6 channel K Cube Controller Hubs KCH301 and KCH601 These...

Page 6: ...both for users of the equipment and software programmers aiming to automate its operation The User Interface allows full control of all settings and operating modes enabling complete out of box operation without the need to develop any further custom software It provides all of the necessary system software services such as generation of GUI panels communications handling for multiple USB units an...

Page 7: ...ons A Net Control is a language independent software component Consequently the controls can be incorporated into a wide range of software development environments for use by client application developers Development environments supported include Visual Basic Labview Visual C C Builder HPVEE Matlab VB NET C NET and via VBA Microsoft Office applications such as Excel and Word Consider the Net Cont...

Page 8: ...ibed fully in the handbooks associated with the controllers Fig 2 2 System Architecture Diagram Refer to the main Kinesis Software online help file for a complete programmers guide and reference material on using the Kinesis Controls collection This is available either by pressing the F1 key when running the Kinesis server or via the Start menu Start Programs Thorlabs Kinesis Kinesis Help 2 3 3 So...

Page 9: ...llowed to reach ambient conditions before being powered up Note When operating via a PC direct user interaction with the solenoid controller is accomplished through intuitive graphical user interface panels GUIs which expose all key operating parameters and modes The multitasking software architecture ensures that the graphical control panels always remain live showing all current hardware activit...

Page 10: ...fitting and use of the controller hub are contained in the handbook available at www thorlabs com 3 2 3 Using the Baseplate The baseplate is supplied with magnets for quick positioning on an optical worksurface For more secure positioning it can be bolted to the worksurface before the K Cube is fitted as shown below The K cube is then located on two dowels in the baseplate and secured by two clips...

Page 11: ...ed via the 6 way HiRose connector which is compatible with all Thorlabs solenoid actuated shutters refer to Appendix A for details of pin outs The unit also features an Interlock connector for use in laser safety applications see Section 3 4 2 Caution DO NOT connect disconnect the interlock jackplug with power applied to the unit ...

Page 12: ...rs to non volatile memory before turning off the power For the first few seconds the shutdown can be cancelled by turning the switch on again in which case the unit will save the parameters but will remain powered up In a powered down Standby state the logic circuits are powered off and the unit will draw only a small quiescent current The switch should always be used to power down the unit TRIG 1...

Page 13: ...anel The unit takes about 5 seconds from power application until warm up is finished during which time the following screens are displayed Fig 3 4 KSC101 start up screens Caution During items 3 to 6 the instructions should be followed in the order stated Problems may occur if the process is not performed in the correct sequence Caution During item 5 ensure the power switch on the top panel of the ...

Page 14: ...g the connection and power up process power cycle the unit which should clear the error Warning In external triggering mode the shutter is opened and closed under control of an external logic signal connected to the SMA input marked TRIG IN on the rear panel The TRIG IN SMA defaults to logic LOW when the external input is open circuit disconnected However the way in which the unit responds when th...

Page 15: ...n switch e g an open door indicator which must be closed before the unit can operate See Fig 3 5 for wiring details Fig 3 5 Remote actuated interlock wiring Caution If it is controlled externally the INTERLOCK contact is taking the solenoid drive current This current is dependent upon the solenoid being driven but could as high as 2A peak Caution DO NOT connect disconnect the interlock jackplug wi...

Page 16: ...nterface GUI panel appears and is active Fig 3 6 Solenoid controller GUI panel 4 Click the Identify button The LED display on the control panel of the associated controller flashes This is useful in multi channel systems for identifying which channel is associated with which GUI 5 Click the Mode button until the Manual LED is lit then Click the ON and OFF Output buttons and check that the solenoid...

Page 17: ...eration or via external trigger signals for operation with third party equipment A trigger out connection allows multiple K Cube controllers to be connected together for multi channel synchronised operation The following brief overview explains how the top panel controls can be used 4 2 Control Panel Fig 4 1 Top Panel Controls and Indicators Wheel Used to open and close the solenoid when in manual...

Page 18: ... Settings menu see Section 4 4 Trigger The K Cube solenoid controllers have two bidirectional trigger ports TRIG1 and TRIG2 that can be used to read an external logic signal or output a logic level to control external equipment By default TRIG 1 is configured as an input and TRIG 2 as an output The active logic state can be selected High or Low to suit the requirements of the application In Trigge...

Page 19: ...cycles see Section 4 4 5 Set the display brightness see Section 4 4 6 Set the display timeout period see Section 4 4 7 Select the solenoid type see Section 4 4 8 S o l e n o i d O f f M o d e i s M a n u a l M e n u o p t i o n s U s e w h e e l M e n u o p t i o n s 1 S e t M o d e s M e n u o p t i o n s 2 S e t O n T i m e M e n u o p t i o n s 3 S e t O f f T i m e M e n u o p t i o n s 4 C y ...

Page 20: ...ess the MENU button then use the wheel to scroll through the menu options Press the MENU button to enter the ON Time option Use the wheel to adjust the time which the solenoid is ON activated The range is 100ms to 100s in 1 ms steps Press the MENU button to save the setting and return to the operating display S o l e n o i d O f f M o d e i s M a n u a l S o l e n o i d O f f M o d e i s A u t o M...

Page 21: ...rating in Auto mode Press the MENU button then use the wheel to scroll through the menu options Press the MENU button to enter the Cycle Count option Use the wheel to adjust the number of Open Close cycles 0 to 1 000 000 to perform when the unit is operating in Auto mode If set to 0 the unit cycles indefinitely Press the MENU button to save the setting and return to the operating display M e n u o...

Page 22: ...display is automatically dimmed after a specified time interval Press the MENU button then use the wheel to scroll through the menu options Press the MENU button to enter the Disp Timeout option The time out interval is specified in minutes in the range 1 to 480 The adjustment is done in steps of 1 minute if the timeout is between 1 to 10 minutes 10 minute steps between 10 minutes and 1 hour and 3...

Page 23: ...tart up as default Other solenoid devices will be available in the future Press the MENU button then use the wheel to scroll through the menu options Press the MENU button to enter the Select stage option Use the wheel to scroll to the required option Press MENU to store the selection and return to the main display S o l e n o i d O f f M o d e i s M a n u a l M e n u o p t i o n s U s e w h e e l...

Page 24: ...s The SH05 shutter opens 3 Move the wheel down The SH05 shutter closes 4 5 3 Single Mode 1 Select Single mode see Section 4 4 2 2 Move the wheel upwards The SH05 shutter opens for the time set in the ON time menu option see Section 4 4 3 then closes If the wheel is moved down before the ON time is completed the SH05 shutter closes and the remaining ON time is ignored 4 5 4 Auto Mode 1 Select Auto ...

Page 25: ...he Kinesis Software The Kinesis application allows the user to interact with any number of hardware control units connected to the PC USB Bus This program allows multiple graphical instrument panels to be displayed so that multiple units can be controlled All basic operating parameters can be set through this program and all basic operations such as operating the solenoid shutter can be initiated ...

Page 26: ...e 1 Press the Manual Mode button 2 Press the Open button The SH05 shutter opens and the Open LED is lit 3 Press the OFF button The SH05 shutter closes and the Open LED is extinguished 5 2 2 Setting Auto Mode 1 Press the Auto Mode button 2 Press the Start button The SH05 shutter begins to open and close The Active LED is lit and the Open LED is lit while the shutter is open Unless the default setti...

Page 27: ...equent start up See the Kinesis Helpfile for more details 5 4 Creating a Simulated Configuration The Kinesis Simulator utility can be used to set up simulated hardware configurations In this way it is possible to create any number and type of simulated virtual hardware units in order to emulate a set of real hardware This is a particularly useful feature designed to assist in learning how to use t...

Page 28: ...I Panel The following screen shot shows the graphical user interface GUI displayed when accessing the Solenoid Controller K Cube using the Kinesis software Fig 6 1 Solenoid Controller K Cube Software GUI Note The serial number of the Solenoid Controller K Cube associated with the GUI panel is displayed in the top right hand corner This information should always be provided when requesting customer...

Page 29: ...iggered In Triggered mode a rising edge logic high on rear panel TRIG IN BNC input will open the shutter which will remain open until a falling edge logic low is detected In this way the shutter can be opened and closed in relation to the duty cycle of the trigger input signal The unit must be primed i e the top panel wheel has been moved up before the unit can respond to the external trigger Clos...

Page 30: ... to move Backward4 RightCtrl 4 Hold to move GoTo Enter On target position box 6 3 Settings Panel When the Settings button on the GUI panel is clicked the Settings window is displayed This panel allows operation parameters e g On and OFF times to be modified Note that all of these parameters have programmable equivalents refer to the Kinesis Server helpfile for further details 6 3 1 Persisting Sett...

Page 31: ... ms in 1 ms steps Cycle Count The number of Open Close cycles 0 to 1 000 000 to perform when the unit is operating in Auto mode If set to 0 the unit cycles indefinitely Caution The Persist Settings functionality is provided to simplify use of the unit in the absence of a PC When the unit is connected to a PC and is operated via the Kinesis software the default settings will be loaded at boot up ev...

Page 32: ... 480 The dim level is set in the Dimmed Intensity parameter as a percentage of full brightness from 0 Off to 10 brightest but is also limited by the Display Intensity parameter if this is lower These settings are only visible and active if the Dim device display on inactivity box is checked Triggering Introduction The K Cube solenoid controllers have two trigger ports that can be used to read an e...

Page 33: ... Many of the parameters that can be set for the Solenoid Driver K Cube can be stored persisted within the unit itself such that when the unit is next powered up these settings are applied automatically This is particularly important when the driver is being used manually in the absence of a PC and USB link The trigger parameters described here are good examples of settings that can be altered and ...

Page 34: ... A 1 SOLENOID Connector Pin Identification A 2 TRIG IN and TRIG OUT Connectors The rear panel provides two SMA outputs for use in triggering applications The TRIG IN is a 5V TTL type input The TRIG OUT is an open collector pulled up to 5V Pin Description 1 Opto Anode 12V limited to 20mA 2 Shutter Coil 15V Pulse 10V steady state 0 4A max 3 Shutter Coil Ground When ON Open CCT When OFF 4 Opto Cathod...

Page 35: ... servicable parts There is a risk of electrical shock if the equipment is operated with the covers removed Only personnel authorized by Thorlabs Ltd and trained in the maintenance of this equipment should remove its covers or attempt any repairs or adjustments Maintenance is limited to safety testing and cleaning as described in the following sections Warning Disconnect the power supply before cle...

Page 36: ...Operating Modes Manual User Controlled On Off Single DSP Controlled Single On Off Cycle Auto DSP Controlled Multiple On Off Cycles Triggered ExternallyTriggered On Off TRIG 1 Trigger Input SMA TTL Type 5V TRIG 2 Trigger Output SMA TTL Type 5V Output 6 Way HiRose Solenoid Drive 15V Pulse 10V Hold Position Sensor Feedback Photodiode Input Power Requirements Voltage 15 V Regulated DC Current 1A Peak ...

Page 37: ...ul interference when the equipment is operated in a commercial environment This equipment generates uses and can radiate radio frequency energy and if not installed and used in accordance with the instruction manual may cause harmful interference to radio communications Operation of this equipment in a residential area is likely to cause harmful interference in which case the user will be required...

Page 38: ...38 HA0368T Rev C May 2019 Chapter 6 D 2 CE Certificate ...

Page 39: ...labs for more information Waste treatment is your own responsibility End of life units must be returned to Thorlabs or handed to a company specializing in waste recovery Do not dispose of the unit in a litter bin or at a public waste disposal site For technical support or sales inquiries please visit us at www thorlabs com contact for our most up to date contact information USA Canada and South Am...

Page 40: ...40 www thorlabs com ...

Reviews: