background image


2


Video Disc

Th

omson Digital

Precautions


P R E C A U T I O N S


Ensure that the mains supply in your
house complies with that indicated
on the identification sticker located
at the back of your set.
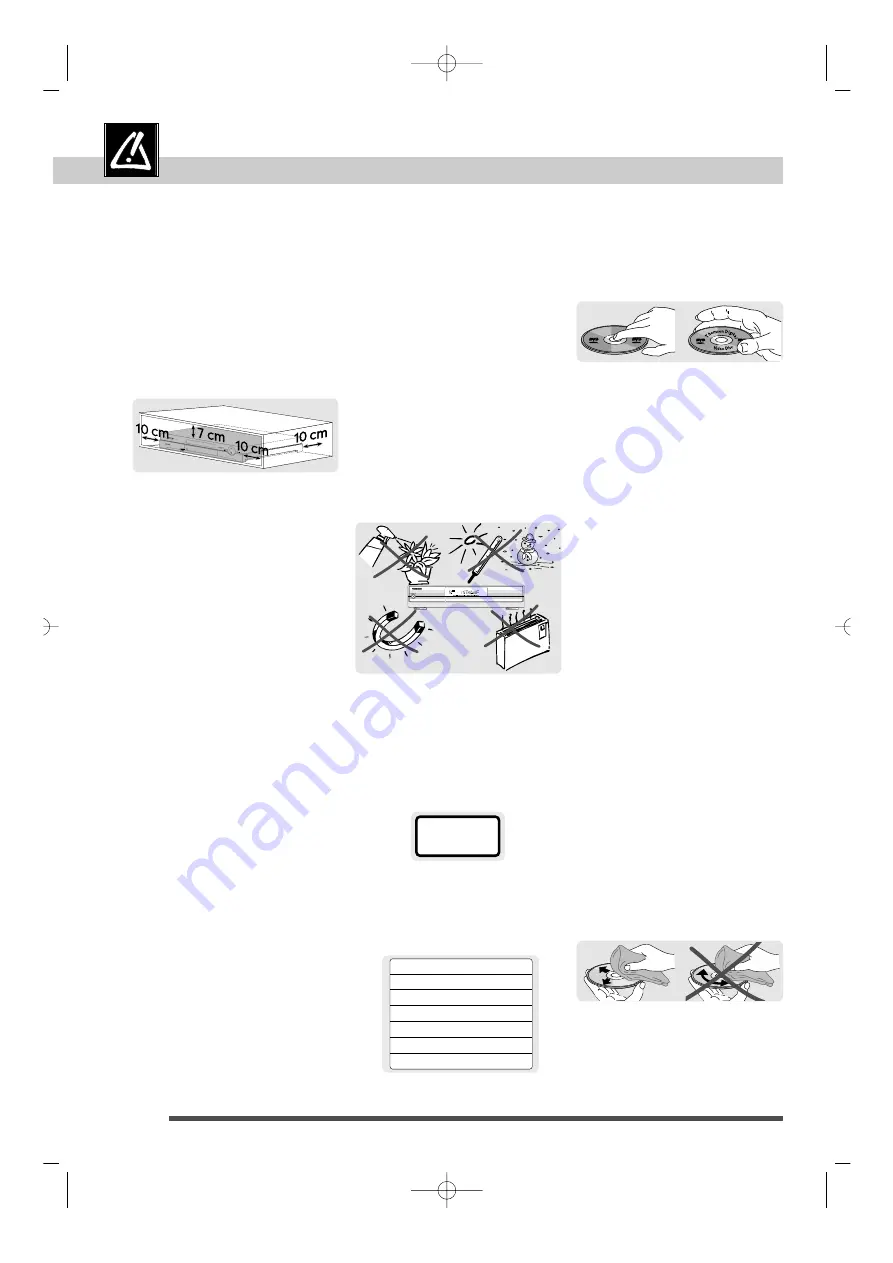
Place the DVD player on a suitable
base (furniture). Make sure the
ventilation slots are not covered.
Leave a 7 - 10 cm gap all around the
unit, as shown below.


CLASS 1
LASER PRODUCT

CAUTION

-LASER RADIATION WHEN OPEN.

-

DO NOT STARE INTO BEAM.

ATTENTION -RAYONNEMENT LASER EN CAS D'OUVERTURE.

-

NE PAS REGARDER DANS LE FAISCEAU.

VORSICHT

-LASERSTRAHLUNG, WENN ABDECKUNG GEÖFFNET.

-

NICHT IN DEN STRAHL BLICKEN.

ADVARSEL

-LASERSTRÅLING VED ÅBNING.

-

SE IKKE IND I STRÅLEN.

ADVARSEL

-LASERSTRÅLING NÅR DEKSEL ÅPNES.

-

STIRR IKKE INN I STRÅLEN.

VARNING

-LASERSTRÅLNING NÅR DENNA DEL ÅR ÖPPNAD.

-

STIRRA EJ IN I STRÅLEN.

VARO!

-AVATTAESSA OLET ALTTIINA LASERSÅTEILYLLE.

-

ÅLÅ TUIJOTA SÅTEESEEN.


Setting up 

Protect the unit from dampness and
excess heat. 
Disconnect the power cable from the
mains electricity supply if the unit
malfunctions. 
In particular, you should make sure
that the motor driven disc drawer is
not prevented from moving properly.
If the disc loading system is hindered,
the loading mechanism may be
damaged.
Install the DVD player horizontally,
away from sources of heat (fireplace)
or equipment creating strong
magnetic or electric fields.

Do not place anything heavy
on it.

Do not stack other devices on it.

Never open the unit or any of its
components. It can be dangerous
for you or for certain fragile
components. You could receive
an eletric shock or touch the
laser beam.

Do not place your eyes close to
the opening of the disc tray or
any other opening to look inside
the player.

Caution 

If your set and / or a disc have been
stored in a cold atmosphere, as for
example during transportation in the
winter, wait for approximately
2 hours until they have reached
room temperature, to prevent serious
damage.

Condensation

This equipment is not intended for
industrial use. It is designed
specifically for domestic purposes.

Use

Use a dry and clean soft cloth. Do
not use any scouring agents, solvents
or abrasive products. If an object or
liquid gets into the set, unplug it
immediately and have it checked by
an authorized technician.

Maintenance

Switching off the DVD player to the
stand-by mode does not disconnect
the electricity supply. In order to
separate the player completely from
the mains, the unit has to be
disconnected by unplugging the
mains plug – especially when left
unused for a long period of time.

This device is intended for
continuous operation.

For your safety : 

Always …

handle your discs with care. 
Hold a disc with fingers on the
border or hole,

place disc with the label facing
upward (in case of a single-sided
disc),

place the disc properly into the
tray using the proper guide area,

use a soft cloth to clean discs if
necessary, wipe from the centre
to the border,

always put discs back into their
cases after playing and store in
a vertical position.

Should you hear a strange noise or
vibrations after starting playback,
quickly press the STOP button on the
remote control or the player. 

For your discs

Never …

never close the tray with two
discs on it or with a disc slipping
out of the guide area,

never play cracked, chipped or
deformed discs nor try to repair
them with adhesive tape or glue,

never write on the disc,

never move the player during
playback,

never scratch discs or store them
in places of direct sunlight, high
humidity or high temperature,

never try to play a Photo CD or
CD-R in this player,

never use record cleaning sprays,
benzine, static electricity liquids
or any other solvent, if the disc
surface is dirty. Wipe gently with
a soft damp (water only) cloth,
never wipe the disc in a circular
motion, since circular scratches
are likely to occur and could
cause noise during playback.

Inside the product

Rear panel


DTH3600-GB-F8-DAE  7/05/99 10:09  Page 2

Summary of Contents for DTH3300

Page 1: ...ve reached room temperature to prevent serious damage Condensation This equipment is not intended for industrial use It is designed specifically for domestic purposes Use Use a dry and clean soft cloth Do not use any scouring agents solvents or abrasive products If an object or liquid gets into the set unplug it immediately and have it checked by an authorized technician Maintenance Switching off ...

Page 2: ...oubleshooting 48 50 Index 51 DVD copy protection 52 Guarantee 52 Technical data 52 Preferred languages Main menu language 20 Set up menus 20 Your preferred languages on discs 21 Picture sound output 4 x 3 16 x 9 TV screen 22 SCART output 23 Digital audio output 23 Playback DVD audio CD video CD Set up the player to play discs the way you want Program play Random Play Programme play DVD CD 31 Rando...

Page 3: ...e please contact your dealer Please follow all steps of this chapter Fit the batteries Protect your environment Batteries contain toxic substances which pollute the environment Batteries require special disposal Your specialized dealer will accept used batteries MIGNON R6 AA UM 3 1 5 V MIGNON R6 AA UM 3 1 5 V Before you start DVD player Remote control unit Two AA size R 6 batteries for remote cont...

Page 4: ...he menus dialogues and subtitles of DVDs will now be in English if available If you want to change the language see pages 20 21 This choice applies to all DVDs To temporarily change the language of the dialogues and subtitles see page 29 3 You can now play discs However we recommend you proceed with the set up 4x3 or 16x9 TV set page 22 Displays and more pages 22 23 Picture sound output optimizati...

Page 5: ...lected area of a scene page 28 open close to open or close the disc tray page 24 surround to enjoy virtual surround sound if you only use a stereo TV or 2 speakers pages 10 14 15 28 marker to memorize scenes for replay page 26 prog random for random play and programme play page 31 repeat to repeat titles chapters tracks or the disc page 27 Press button again to remove display B to switch your play...

Page 6: ...contents on screen page 8 introscan for CD Audio CD Video page 32 camera angle displays on and off the camera point of view number on screen page 30 if available menu displays on and off the disc s menu if available during playback page 8 the player s set up menu after having stopped a disc with the STOP button page 8 pages 20 21 arrows move to items ok confirms a selection return to go back in me...

Page 7: ...y a disc 2 Press blue title key if the DVD disc contains 2 or more titles 1 Press PLAY to play a disc 2 Press menu To select dialogue subtitle and menu language to have access to camera angles etc Level 2 Move to the items using the arrow buttons Press ok to confirm a selection or use number buttons to select without confirmation Use return key to go back to previous menu Press info title and menu...

Page 8: ..._ Arabic CHI ________ Chinese CZK________ Czech DAN _______ Danish DEU _______ German ENG _______ English ESP ________ Spanish FRA ________ French FIN ________ Finnish GRE________ Greek HUN_______ Hungarian IND________ Hindi ITA_________ Italian JPN ________ Japanese NLD _______ Dutch NOR _______ Norwegian POL________ Polish POR _______ Portuguese RUS________ Russian SVE ________ Swedish TUR______...

Page 9: ...icates various messages concerning operations such as PLAY STOP LOAD RANDOM Some DVDs may not display chapter numbers and or elapsed time Some Video CDs may not display track numbers and or elapsed time 1 23 45 Interactive disc PLAY DVD title number Video Audio CD Track number DVD chapter number SHUTTLE For visual search forward reverse Accelerated during playback slow motion during pause Speed in...

Page 10: ... DVD titles chapters time info sound track languages subtitles ratings age limit camera angles and more may differ from disc to disc Refer to the instructions accompanying the disc Some discs may have been designed to prevent operations such as Chapter skip picture scan and repeat play When appears on screen it indicates that you have pressed the wrong button or that the requested function is not ...

Page 11: ...equired when using the SCART connection Manually select the correct AV input and the TV screen aspect on your TV set 4 x 3 or 16 x 9 see your TV user s manual In this case do not connect any device to the AV2 socket of the DVD player because the picture of this other device will not appear on your TV screen Video connections Connections to a TV OR OR Audio Input Jacks Video Input Jacks S Video Jac...

Page 12: ...ack electronic devices or other objects on the DVD player Do not block ventilation holes of any of the devices Set devices so that air can circulate freely Also consult the user s manual of additional devices for further information See page 23 SCART Output selection for AV1 Video S Video RGB TV DECODER VIDEO AV2 DECODER AV1 TV AV2 EXT AV1 TV DVD TV VIDEO AV2 DECODER AV1 TV SAT DECODER 2 DVD AV2 E...

Page 13: ...er Surround sound Dolby Digital AC 3 Dolby Digital are digital sound compression techniques developed by the Dolby Laboratories for digital multi channel audio signals The Dolby Digital system supports any audio channel configuration from stereo 2 channel sound up to 5 1 digital surround Manufactured under license from Dolby Laboratories Licensing Corporation Dolby Dolby Pro Logic Dolby Digital AC...

Page 14: ...y y yy yy yy y y y y y y DIGITAL AUDIO OUT PCM BITSTREAM DIGITAL AUDIO OUT PCM BITSTREAM Basic connection to an Audio System 2 ch Amplifier Audio Input Jacks Digital Audio Input Jack Coaxial Optical Coaxial cable Optical cable Dolby Digital Decoder Method 1 Method 2 OR AUDIO System DVD not included DIGITAL AUDIO OUT PCM BISTREAM DIGITAL AUDIO OUT PCM BISTREAM DTH3600 GB F8 DAE 7 05 99 10 10 Page 1...

Page 15: ...ting a standard Dolby Pro Logic Amplifier Dolby Decoder Advanced or standard amplifier see page 14 Analog connection Activate the Dolby ProLogic decoding mode on your amplifier DTH 3600 Then configure the speakers on your amplifier do not use the Speakers menu in page 37 Analog connection Reading a DVD disc whose selected track is in Dolby Surround Dolby Digital or multichannel MPEG Cinch Audio ca...

Page 16: ...digital the Dolby Digital AC 3 as a digital data BITSTREAM in digital for the DTS Digital Theater Sound Systems signal select DTS ON in analog the multichannel MPEG 2 audio signals as an analog PCM stream Configure the speakers on your amplifier DTH 3600 Do not use the Speakers menu on the DVD player p 37 39 Your amplifier will decode the Dolby Digital 5 1 channels you cannot obtain the MPEG 2 mul...

Page 17: ... up menu see page 23 to deliver the Dolby Digital AC 3 as a digital data BITSTREAM the audio MPEG 2 5 1 channel as a digital data BITSTREAM in digital for the DTS Digital Theater Sound systems signal select DTS ON Then configure the speakers on your Amplifier Decoder refer to its documentation Then configure the speakers on your DVD player see pages 37 39 for MPEG 2 audio discs on your Amplifier D...

Page 18: ...kers Older digital equipment some of which are not fully compliant with IEC 958 are likely to cause this problem If you encounter this problem use the digital audio output menu see p 23 to convert the Dolby Digital AC 3 digital audio bitstream output to linear PCM The same should be applied with the so called optical or coaxial REC OUT jack of Dolby Digital AC 3 decoders when they are connected to...

Page 19: ...3 LB 16x9 p 22 Still mode Field Frame Auto p 34 On screen message ON OFF p 34 Display brightness Bright Dim Auto Dim p 35 Black level Light Normal p 35 NTSC disc output Pal 60 Hz NTSC p 23 SCART output Video S video RGB p 23 Do this setting if you want to change the language of the player s menus not necessary after initial set up page 5 1 If a disc is playing press STOP 2 Display the main menu wi...

Page 20: ...al is selected the player will choose the language defined as prioritary on the disc 3b For the subtitle language press key number 2 If Automatic is selected the player will choose the same language as under Audio Preference for subtitles That means if your preferred dialogue language Audio is available subtitles are not shown and if your preferred dialogue language is not available on the disc su...

Page 21: ...a You have a classical 4x3 TV screen Press key number 2 if you want to see the total 16x9 screen With a 16 x 9 movie you will see black strips appear at the top and bottom of the screen Press key number 1 if you want to see the central position of the 16x9 screen the sides of the 16x9 movie picture may be cut off With a 4x3 movie you will have the full size picture 5b You have a wide screen 16x9 T...

Page 22: ...al keys and set with the arrows Available Digital Decoder Dolby Digital MPEG2 DTS Connections menu items 1 2 3 dubbing DVDs to DAT or MD PCM PCM OFF Dolby Digital decoder Bitstream PCM OFF MPEG2 decoder PCM Bitstream OFF Dolby Digital MPEG2 decoder Bitstream Bitstream OFF older D A converter PCM PCM OFF nothing connected without importance OFF DTS decoder PCM PCM ON 1 If a disc is playing press ST...

Page 23: ...do not press B Resume memory does not work with interactive discs without elapsed play time info If not used the player will switch off automatically after 30 minutes The screen saver appears automatically 5 minutes after you pause a DVD 1 Open the disc tray with the OPEN CLOSE key on the set or on the Remote Control 2 Place a single sided disc with label facing upwards 3 Press play to start playb...

Page 24: ...pe of DVD audio CD video CD Master volume V 99 max V 95 1 Press PLAY to start playing the disc 2 Press yellow info key once the info strip level 1 do displayed 3 Move to master volume V with the arrow 4 Set the volume level with the arrows 5 Exit the display with the yellow info key Press twice Repeat these steps for each disc category DVD audio CD and video CD 1 Press PLAY to start playing the di...

Page 25: ...3 locations on the disc as long as the disc remains loaded You can immediately return to any of these 3 marker positions This function operates only with discs for which the elapsed time appears on the player s display during playback 1st step 2nd step 4th step 1 During play press marker key on the top left hand side of the remote control The marker display appears on screen 2aPlacing markers 3 ma...

Page 26: ...sting on the disc may then appear on screen 5 Press ok to start playback Repeat play Repeat the current track chapter title a chosen section A B or all the disc only audio video CD TITLE CHAPTER A B OFF 14 OK DVD DISC TRACK A B OFF 14 OK CD 1 Start playback with the PLAY button 2 Press repeat on the top left hand side of the remote control 3 Select TITLE CHAPTER DISC or TRACK using the arrows 4 Pr...

Page 27: ... effects it is recommended that the distance between the TV set and the listening position should be about 3 or 4 times the distance between the left and the right hand front speakers 3 D surround does not work with LPCM or DTS sound tracks of DVD discs or with DTS track of Audio CDs 3 D surround works with Audio CDs 3 D appears also in the front panel display of the player This feature only opera...

Page 28: ...r preferential language Subtitles on off 1 Press PLAY to start playback 2 Press the red button the audio display appears on screen with possibly the abbreviation of the language and the corresponding audio format 3 Select a language with the arrows 4 To exit the Audio display press the red key Languages Subtitles FRA ÃON 1 Press PLAY to start playback 2 Press the green key the subtitle display app...

Page 29: ... four digit code number using the number keys 4 Enter Password 0000 if it is your first time factory default setting 5 Press ok to confirm 1 Press PLAY to start playback 2 Press the violet button the angle display appears on screen 3 Select a camera angle number with the arrows 4 To exit angle display press the violet key Angle 1 3 Angle 2 3 Your selection exceeds the rating limit for this player ...

Page 30: ...is not available see page 33 DVD Title à Chapter RETURN à OK 01 02 03 04 05 06 07 08 09 10 11 12 13 14 15 16 CD Random à Program RETURN à OK 01 02 03 04 05 06 07 08 audioCD videoCD 31 Angle rating 30 40 41 Languages 29 20 21 Program Random play 31 Basic advanced set up 20 23 34 39 Universal remote control 42 46 Troubleshooting Index 48 51 Tracks Program Order Clear last track Clear all tracks Pres...

Page 31: ...urround Zoom 28 Audio CD Video CD special Video CD Track View Video CD Index View Audio CD Introscan Desired music or video display can be accessed directly without using the menu function Index View is used for showing the 9 views of the current Playing tracks 1 Press blue title key during playback 2 Press the arrows to select 2 Index View 3 Press ok to confirm 4 Select the desired view with the ...

Page 32: ...s Some discs displaying a menu at start up will automatically go in to play mode if nothing is changed on the menu after a certain period of time 3 Press PLAY to start playback To return from playback to the menu press return 4 Press STOP to stop playback and remove the menu Complete stop is obtained by pressing STOP key twice Even after the player has finished playing a programme the disc may con...

Page 33: ...N 4 Display Brightness Auto Dim 5 Black Level Normal 6 NTSC disc Output PAL 60 Hz 7 SCART Output Video RETURN OK Special settings On screen messages 1 If a disc is playing press STOP 2 Call the main menu with the menu key 3 Select Display options press key number 7 4 Select On Screen Messages press key number 3 5 Make your selection ON OFF with the arrows 6 To exit main menu press return twice Whe...

Page 34: ... OK Display Brightness When using the arrows for selection press ok button to confirm 1 If a disc is playing press STOP Then call the main menu with the menu key 2 Select Display Options press key number 7 3 Select Display Brightness press key number 4 4a If you want the player s display to be always illuminated brightly select Bright with the arrows 4b If you want the player s display to be alway...

Page 35: ...n using the arrows for selection press ok to confirm 1 If a disc is playing press STOP 2 Call the main menu with the menu key 3 Select Audio options press key number 6 4 Select Audio for 2x playback press key number 5 To hear the sound during visual search scan select ON with the arrows 5 To exit main menu press return twice No sound will be heard on discs with LPCM or DTS during 2x Payback AUDIO ...

Page 36: ...D discs only Adjust the delay between the front and surround speakers and for the central speaker according to its position compared to the front speakers Test the setting by running a test sound pink noise If you do not have the 5 recommended speakers the Subwoofer for multichannel surround sound Click twice on the icon corresponding to your missing speakers subwoofer and or surround speakers the...

Page 37: ...ote The setting speaker icons size large small has no effect on DVD discs in Audio Multichannel MPEG 2 1 If a disc is playing press STOP 2 Call the main menu with the menu key 3 Select Audio Options with key number 6 4 Select speakers menu with key number 6 5 Select a menu item with the arrows and confirm with ok 6 Select the value to be adjusted with the arrows and confirm with ok 7 To save your ...

Page 38: ...ngs allow you to adjust the virtual space between front and rear speakers This means you can reproduce the sound space of a movie in your home If the surround speakers or the central speaker cannot be installed at the same distance from the listening position as the front speakers change the delay time to obtain a better surround effect If the distance D2 from the listening position to the central...

Page 39: ... played whereas 1 will be the most restrictive 7 If you have selected limit 8 or lower choose a personal 4 digit password and enter it with the number keys to lock the limit and keep it from being changed optional page 41 The rating is locked Any disc whose rating is higher than your setting cannot be played unless the correct password is entered The closed padlock icon shows that the setting is l...

Page 40: ...ts the limit to unlock 5b To set another limit 1 Press key number 1 2 See page 40 5c To change the password 1 Press key number 2 2 Enter your new 4 digit password 3 Confirm by re entering your new 4 digit password 6 To exit main menu press return key twice CHANGE PASSWORD Enter new Password RETURN Press 0 9 CHANGE PASSWORD Re enter new Password RETURN clear Press 0 9 SET RATING LIMIT Unlock Lock L...

Page 41: ...Try to operate the device by switching it on off with the Bkey If it does not work repeat from step 2 with another 3 digit code Not all TV or VCR models can be operated with the supplied universal remote control Try out which functions you can control with the remote control Maybe you cannot control all functions of your tv set or video recorder Try to find the most efficient code for your brand f...

Page 42: ...___ 020 027 029 Radiola______________ 019 021 Radiomarelli _________ 019 Rex _______________ 005 Saba _______________ 000 001 005 010 019 020 Salora _______________ 005 Samsung_____________ 020 030 Sanyo _______________ 008 018 Schaub Lorenz _______ 005 016 020 Schneider____________ 019 021 Seleco_______________ 005 Sharp _______________ 018 022 Siemens _____________ 023 Singer _______________ 001...

Page 43: ...uson ________ 357 361 Finlux___________ 362 364 FTE _____________ 365 366 Fuba ____________ 367 369 Galaxis__________ 370 Goldstar_________ 371 Goodmans_______ 372 Grundig _________ 338 374 376 Hanseatic _______ 377 Hirschmann _____ 378 382 Hitachi__________ 383 List of Laser Disc brands Laser Disc Code brand Denon___________ 021 Hitachi __________ 022 Mitsubishi________ 023 Philips___________ 024...

Page 44: ...u 990 DTH 3300 Menu controls or special functions page 46 The Bkey to switch your set on and off stand by Number keys and pr pr buttons to select programmes av key to select the AV input REC vcr key to stop the recording VCR only PLAY key to start playback or recording REV or FWD keys for rewinding or fastforwarding after STOP and visual search while playing in both directions STOP key to stop a t...

Page 45: ...À ÀÀÀ ÀÀÀ ÀÀÀ ÀÀÀ ÀÀÀ ÀÀÀ ÀÀÀ ÀÀÀ ÀÀÀ ÀÀÀ ÀÀÀ ÀÀÀ ÀÀÀ ÀÀÀ ÀÀÀ ÀÀÀ To control other devices according your device HIFI control Video control Satellite control Laserdic player Others TV TV THOMSON ON Standby Source 1 Source 2 Source 3 Source 4 Source 5 Surround function ON OFF Sound volume level setting Sound off Radio channel selection Direct access to radio channels ON Standby Red Green Yellow Blu...

Page 46: ...ina Bulgaria Croatia Cyprus Czech Denmark Egypt Finland France Metropolitan Germany Gibraltar Greece Greenland Hungary Iceland Iran Iraq Ireland Israel Italy Japan Jordan Kuwait Lebanon Liechtenstein Luxembourg Macedonia Malta Monaco Netherlands Norway Oman Poland Portugal Quatar Romania San Marino Saudi Arabia Serbia Slovakia South Africa Spain Sweden Switzerland Syrian Arab Republic Turkey Unite...

Page 47: ...slight distortion but this is not a malfunction Select FIELD or FRAME in still mode selection page 34 Check connections Make the correct audio input selection and volume adjustment on the TV set or hifi system amplifier or AV selector There is no sound during a pause still picture still picture advance or slow playback Check speaker configuration in the set up menu pages 37 39 Turn off DVD player ...

Page 48: ...setting in the set up menu prohibits playing this DVD restriction level was defined in the player pages 30 40 41 Some DVDs have segments where search forward reverse playback functions do not work Only a Video CD with playback control PBC can display a menu Switch off the other video device connected to the AV2 jack of the DVD player Make sure that the input setting for the TV is in audio video AV...

Page 49: ...ic key on the remote control you will need to proceed with the other initial settings as you did when you first installed the unit set up menu pages 21 41 According to your TV make the correct TV Screen setting in the set up menu page 22 Do not use zoom function on your TV as parts of the picture and menu may be lost The setting of On Screen Display is set to Off Set it to On in the set up menu pa...

Page 50: ...l 6 7 Fit the batteries 4 For your disc 2 For your safety 2 Front and display 10 Initial set up 5 Introscan Index View Audio CD video CD 32 Local codes information 47 Main menu language 20 Maintenance 2 Markers 26 Master volume 25 Menus 8 MPEG 2 audio 14 19 23 On screen messages 34 Overriding the rating 30 Package content 4 Picture track scan 26 Playback 6 24 Programme play 31 Random play 31 Ratin...

Page 51: ...ave length 655 nm Laser power CLASS 2 32Ω 10 mW min 8Ω matching impedance stereo jack ø 6 mm THOMSON Multimedia U K Ltd reserves the right to change the specifications without notice Weight and dimensions are approximate For users in the U K see page 53 The guarantee certificate delivered with your DVD player includes the production type and number of your set Keep this certificate with the invoic...

Page 52: ...for a period of one year from the date of purchase 2 Should the equipment fail to operate satisfactorily it should be reported to the dealer from whom it was purchased who will normally be able to provide service and make any claim under the guarantee on your behalf 3 If it proves impossible to contact the dealer you should contact the Thomson Multimedia Sales U K Ltd Service Depot for advice stat...

Reviews: