


17
EN
EN
www.thomsonsecurity.eu
OUTDOOR 1080P IP WIFI CAMERA
D - CONFIGURATION AND USE
and the address which will receive the alerts. The
camera uses the username and password of the
sender address to connect and send the email.
Configuration depends on the chosen email
provider's settings.
Note:
the 2 email addresses can be the same (you
will simply be sending an email to yourself)
In our example, we use
www.gmail.com
:
sends the alerts,
receives the alerts. Both
addresses need to have been created beforehand.
To program email alerts for movement detection,
right click a camera in the list at the top right
of the main screen or on the screen image, then
select "
Paramètres caméra
[Camera settings]
". Then
go to "
Réseau [Network]
", "
Paramètres messagerie
[Message settings]
":
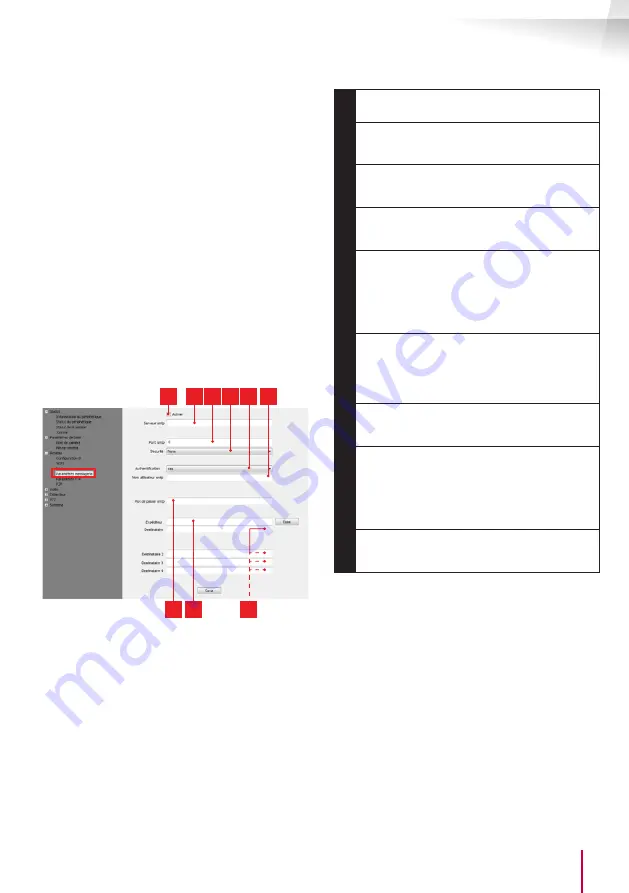
1
2 3 4 5 6
7 8
9
1
Tick the "
Activer
[Activate]" box to activate
email sending
2
SMTP server
: depends on the email provider
of address that sends the alert. In our
example, using Gmail,
smtp.gmail.com
3
SMTP port
: varies with the email provider
of the address sending the alert. In our
example using gmail,
465
4
Security
: security when connected to the
email provider. In our example using Gmail,
TLS
5
Authentication: indicates whether connection
is compulsory (authentication) to send an
email. In our example using Gmail: Yes (in
other words: you cannot send an email
via Gmail if you are not logged into your
account).
6
SMTP user name
: Name that you should
enter to log in to the mailbox that will send
the alerts. In our example using gmail, this is
the sender address:
sender-address@gmail.
com
7
SMTP password
: The password used to log
in to
in our
example
8
Sender: Enter the new address used to send
the alerts:
. Click
"
Test
" to check that your settings are correct
and that the camera is able to connect to
the email account you entered for sending
the alerts.
9
Recipient,
etc.
: Use this space to enter the
address(es) which will receive the alerts. In
our example:
IMPORTANT:
When you have finished configuration,
do not forget to click "
Save
" to save everything you
have entered.


