background image

14 

This warranty only applies to units purchased from an authorized retailer.  Manufacturer warrants to the 

original consumer-purchaser

 only that this 

product shall be free from defects in workmanship and materials after correct assembly and under normal and reasonable home use for the periods 
indicated below beginning on the date of purchase*.  The manufacturer reserves the right to require that defective parts be returned, postage and or 
freight pre-paid by the consumer for review and examination.  

*Note:  A dated sales reciept WILL be required for warranty service.


The original consumer-purchaser will be responsible for all shipping charges for parts replaced under the terms of this limited warranty

.

This limited warranty is applicable in the United States and Canada only, is only available to the original owner of the product and is not transferable. 

Manufacturer requires proof of your date of purchase.  Therefore, you should retain your sales slip or invoice.

  Registering your product is not a 

substitute for proof of purchase and the manufacturer is not responsible for or required to retain proof of purchase records.   

 This limited warranty applies to the functionality of the product ONLY and does not cover cosmetic issues such as scratches, dents, corrosions or 
discoloring by heat, abrasive and chemical cleaners or any tools used in the assembly or installation of the appliance, surface rust, or the 
discoloration of stainless steel surfaces. 

 This limited warranty will not reimburse you for the cost of any inconvenience, food, personal injury or property damage.  

 ITEMS MANUFACTURER WILL NOT PAY FOR:

1. Shipping cost, standard or expedited, for warranty and replacement parts 
2. Service calls to your home.
3. Repairs when your product is used for other than normal, single-family household or residential use.


  acts of God, improper installation or maintenance, installation not in accordance with electrical or plumbing codes, or use 

of products not approved by the manufacturer.

5.


Any food loss due to product failures or operating difficulties.

6

Replacement parts or repair labor costs for units operated outside the United States or Canada.

7

Pickup and delivery of your product.

8

Repairs to parts or systems resulting from unauthorized modifications made to the product.

9

The removal and/or reinstallation of your product. 

DISCLAIMER OF IMPLIED WARRANTIES and LIMITATION OF REMEDIES

Repair or replacement of defective parts is your exclusive remedy under the terms of this limited warranty. In the event of parts availability issues, 

 Manufacturer will not be responsible for any consequential or incidental damages arising from the breach of either this limited warranty or any 
applicable implied warranty, or for failure or damage resulting from acts of God, improper care and maintenance, grease fire, accident, alteration,
 replacement of parts by anyone other than Manufacturer, misuse, transportation, commercial use, abuse, hostile environments (inclement weather,
 acts of nature, animal tampering), improper installation or installation not in accordance with local codes or printed manufacturer instructions. 

THIS LIMITED WARRANTY IS THE SOLE EXPRESS WARRANTY GIVEN BY THE MANUFACTURER.  NO PRODUCT PERFORMANCE 
SPECIFICATION OR DESCRIPTION WHEREVER APPEARING IS WARRANTED BY MANUFACTURER EXCEPT TO THE EXTENT SET 
FORTH IN THIS LIMITED WARRANTY.   ANY IMPLIED WARRANTY PROTECTION ARISING UNDER THE LAWS OF ANY STATE, 
INCLUDING IMPLIED WARRANTY OF MERCHANTABILITY OR FITNESS FOR A PARTICULAR PURPOSE OR USE, IS HEREBY 
LIMITED IN DURATION TO THE DURATION OF THIS LIMITED WARRANTY.

Neither dealers nor the retail establishment selling this product has any authority to make any additional warranties or to promise remedies 
in addition to or inconsistent with those stated above.

  Manufacturer's 

maximum liability

, in any event, shall not exceed the purchase price of the 

product paid by the original consumer.  

NOTE:  Some states do not allow an exclusion or limitation of incidental  or consequential damages, so some of the above limitations or exclusions 
may not apply to you.  This limited warranty gives you specific legal rights as set foth herein.  You may also have other rights which vary from state 
to state.  In the state of California only, if refinishing or replacement of the product is not commercially practicable, the retailer selling this product or 
the Manufacturer will refund the purchase price paid for the product, less the amount directly attributable to use by the original consumer-purchaser 
prior to discovery of the nonconformity.  In addition, in the state of California only, you may take the product to the retail establishment selling this 
product in order to obtain performance under this limited warranty.

If you wish to obtain performance of any obligation under this limited warranty, you should 

write to:

Consumer Relations

P. O. Box 1240

Columbus, GA  31902-1240

Consumer returns will not be accepted unless a valid Return Authorization is first acquired.  Authorized returns are clearly marked on the outside of 
the package with an RA number and the package is shipped freight/postage pre-paid.  Consumer returns that do not meet these standards will be 
refused. 

LIMITED WARRANTY

4. Damage, failures, or operating difficulties  resulting from accident, alteration, careless handling, misuse, abuse, fire, flood,

RUST is not considered a manufacturing or materials defect.

the manufacturer reserves the right to substitute like or similar parts that are equally functional. 

SCOPE OF COVERAGE

PERIOD OF COVERAGE

TYPE OF FAILURE COVERAGE

PERFORATION, MANUFACTURING,
AND MATERIAL DEFECTS ONLY

Stainless Burner

Firebox and Lid
All Other Parts

2 years from date of purchase*
1 year from date of purchase*

5 years from date of purchase*

Summary of Contents for Thermos C-21G0 461611513

Page 1: ... Printed in China Serial Number Date Purchased IMPORTANT Fill out the product record information below See rating label on grill for serial number For support and to register your grill please visit us at www charbroil com If you have questions or need assistance during assembly please call 1 800 241 7548 Thermos C 21G0 ...

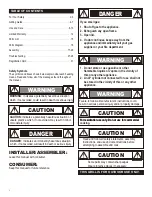
Page 2: ...tuation or unsafe practice which if not avoided may result in minor or moderate injury Safety Symbols The symbols and boxes shown below explain what each heading means Read and follow all of the messages found throughout the manual DANGER If you smell gas 1 Shut off gas to the appliance 2 Extinguish any open flame 3 Open lid 4 If odor continues keep away from the appliance and immediately call you...

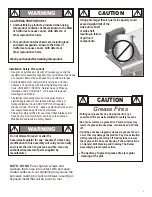
Page 3: ...rger than 6 quarts in capacity could exceed weight limit of the side burner shelf resulting in failure of grill cart components or side shelf NOTE DO NOT over tighten screws and washers that come into contact with porcelain coated surfaces Over tightening may cause the porcelain coating to crack and break resulting in exposed metal that will be prone to rust CAUTION Putting out grease fires by clo...

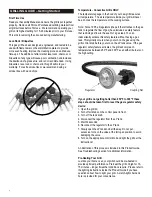
Page 4: ...a gas leak You can inadvertently activate this safety feature without having a gas leak This typically occurs when you turn on the gas using the grill control knob before you turn on the LP tank valve If the gas regulator safety feature activates the grill will only reach temperatures between 250 F and 300 F even with all burners on the high setting If your grill is not getting hotter than 250 F t...

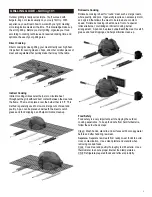
Page 5: ...rneath the meat to catch grease and food drippings and helps minimize clean up Rotisserie Cooking Rotisserie cooking is best for round meat such as large roasts whole poultry and pork It generally requires an accessory motor and spit rod that allows the meat to be turned at a constant speed Rotisserie cooking is best done in front of a special rotisserie burner or utilizing an indirect cooking bur...

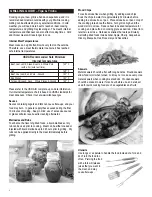
Page 6: ...grilling Dry rubs can be applied directly to the meat immediately before grilling GRILLING GUIDE Tips Tricks Wood Chips For extra smoke flavor when grilling try adding wood chips Soak the chips in water for approximately 30 minutes before adding to a smoke box or pan Place smoke box or pan on top of the cooking grate above the flame Turn grill on high until the wood starts to smoke Reduce heat to ...

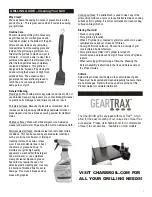
Page 7: ...oper cleaning tools such as wire or steel wool It can also discolor due to heat chemicals or grease build up To maintain your grill s high quality appearance wash with mild detergent and warm water or use a stainless steel grill cleaner Baked on grease deposits may require the use of an abrasive plastic cleaning pad Use only in direction of brushed finish to avoid damage Do not use abrasive pad on...

Page 8: ...der Filling Use only licensed and experienced dealers LP dealer must purge new cylinder before filling Dealer should NEVER fill LP cylinder more than 80 of LP cylinder volume Volume of propane in cylinder will vary by temperature A frosty regulator indicates gas overfill Immediately close LP cylinder valve and call local LP gas dealer for assistance Do not release liquid propane LP gas into the at...

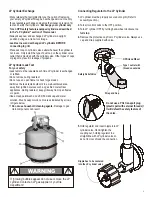
Page 9: ... as described in the LP Cylinder section of this manual Always keep new and exchanged LP cylinders in upright position during use transit or storage Leak test new and exchanged LP cylinders BEFORE connecting to grill LP Cylinder Leak Test For your safety Leak test must be repeated each time LP cylinder is exchanged or refilled Do not smoke during leak test Do not use an open flame to check for gas...

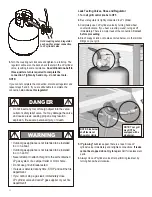
Page 10: ...n LP cylinder valve by turning hand wheel counterclockwise If you hear a rushing sound turn gas off immediately There is a major leak at the connection Correct before proceeding 4 Brush soapy solution onto areas circled below or other similar 5 If growing bubbles appear there is a leak Close LP cylinder valve immediately and retighten connections If leaks cannot be stopped do not try to repair Cal...

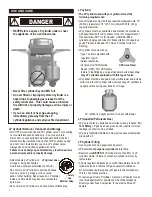
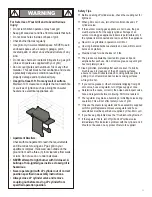
Page 11: ... a grill problem see the Troubleshooting Section If the regulator frosts turn off grill and LP cylinder valve immediately This indicates a problem with the cylinder and it should not be used on any product Return to supplier WARNING For Safe Use of Your Grill and to Avoid Serious Injury Do not let children operate or play near grill Keep grill area clear and free from materials that burn Do not bl...

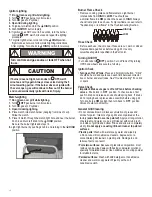
Page 12: ...lector box or burner and electrodes See Troubleshooting if no click or spark Valve Check Important Make sure gas is off at LP tank before checking valves Knobs lock in OFF position To check valves first push in knobs and release knobs should spring back If knobs do not spring back replace valve assembly before using grill Turn knobs to LOW position then turn back to OFF position Valves should turn...

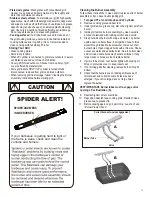
Page 13: ... or if you have trouble igniting grill 1 Turn gas OFF at control knobs and LP cylinder 2 heat tent 3 4 5 6 7 VERY IMPORTANT Burner tubes must re engage valve openings See illustration A 8 electrode 9 heat tent grease cup 10 Remove cooking grate and Under grill remove grease cup disconnect ignitor wire from burner Inside grill remove burner assembly A clean ceramic portion of electrode with rubbing...

Page 14: ...f God improper care and maintenance grease fire accident alteration replacement of parts by anyone other than Manufacturer misuse transportation commercial use abuse hostile environments inclement weather acts of nature animal tampering improper installation or installation not in accordance with local codes or printed manufacturer instructions THIS LIMITED WARRANTY IS THE SOLE EXPRESS WARRANTY GI...

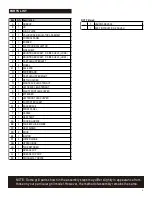
Page 15: ...2 SIDE SHELF I 2 MOUNTING BRACKET F SIDE SHELF LF RB J 2 MOUNTING BRACKET F SIDE SHELF LB RF K 1 CART LEG UPPER LEFT L 2 WHEEL M 1 AXLE ROD N 1 SIDE BRACE O 1 CART LEG UPPER RIGHT P 1 MATCH HOLDER Q 1 RIGHT BACK LEG STRAIGHT R 1 LEFT BACK LEG STRAIGHT S 1 RIGHT FRONT LEG CURVED T 2 EXTENDER U 1 LEFT FRONT LEG CURVED V 2 SUPPORT BRACKET W 2 BACK BRACE X 1 FRONT PANEL Y 1 HANDLE Z 1 HEAT TENT AA 1 C...

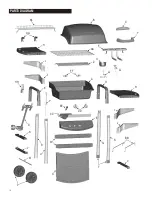
Page 16: ...PARTS DIAGRAM B C Y F II G JJ H I J BB V S Q T X O AA A Z FF GG H J I P HH K D N V M L R U W CC EE E 16 DD KK ...

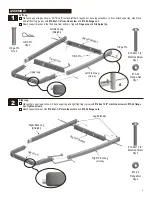
Page 17: ...left front leg curve with 10 24x1 1 4 machine screw and 10 24 flange nut Attach support bracket in the third hole from bottom of leg with hinge pins and hitch pins A 2 10 24x1 1 4 Machine Screw Qty 3 10 24 Flange Nut Qty 3 Upper Leg Right Front Leg Curve Right Back Leg Straight Support Bracket Leg Extender Right Leg Place other upper leg as shown Attach upper leg and right front leg curve with 10 ...

Page 18: ...k braces with 10 24x1 1 4 machine screws and 10 24 flange nuts Wheels Turn assembly upside down Insert axle rod into wheel legs and other wheel Attach with a wheel bushing and hitch pin Attach all in second hole 10 24 Flange Nut Qty 8 Hitch Pin Qty 1 Wheel Bushing Qty 1 10 24x1 1 4 Machine Screw Qty 8 Cone side of wheel against leg Wheel Side Brace Back Brace Hitch Pin Wheel Bushing Back Brace Fro...

Page 19: ...y 4 Valve Hose Regulator and Ignitor Attach valve hose regulator assembly to control panel with 10 24x1 2 machine screws Attach ignitor to control panel using the stamped nut that s provided NOTE if your grill come with Snap in ignitor Space please see Option 10 24x1 2 Machine Screw Qty 2 Option Snap the ignitor into the control panel Ignitor Ignitor Stamped nut Control panel Hose Main burner valv...

Page 20: ... into side brace and secure with 10 24x3 8 wing screw 10 24 Flange Nut Qty 2 10 24x1 2 Machine Screw Qty 2 Hooktankexclusionwiresontofrontpanelbrackets attach otherendtobackbracewith 8x3 8 sheetmetal screws 8x3 8 Sheet Metal Screw Qty 2 Heat Shield Hea Shiel Venturi Tube 10 24x3 8 Wing Screw Qty 1 Tank Retainer 20 Side Brace ...

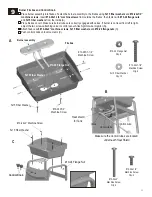
Page 21: ...ttaching valve to control panel Attach ignitor wire to ignitor B Attach firebox with 10 24x2 machine screws 5x15 fiber washers and 10 24 flange nuts C Push control knobs onto valve stems C 10 24x1 1 4 Machine Screw Qty 4 10 24x1 2 Machine Screw Qty 2 5x15 Fiber Washer Qty 10 10 24 Flange Nut Qty 8 10 24X1 2 Machine Screw 5x15 Fiber Washer 10 24 Flange Nut 5x15 Fiber Washer 10 24X1 1 4 Machine Scre...

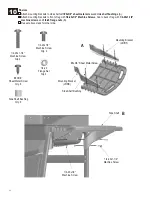
Page 22: ...ith 1 4 20x1 1 4 machine screws and 1 4 20 flange nuts B Repeat above steps for other side 10 Mounting Bracket LB RF 8x3 8 Sheet Metal Screw Side Shelf Bushing Side Shelf 1 4 20x1 1 4 Machine Screw 1 4 20x1 2 Machine Screw 8X3 8 Sheet Metal Screw Qty 8 1 4 20x1 1 4 Machine Screw Qty 4 1 4 20x1 2 Machine Screw Qty 4 1 4 20 Flange Nut Qty 4 Side Shelf Bushing Qty 8 A B 22 Mounting Bracket LF RB ...

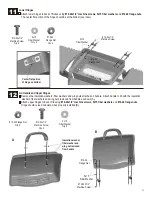
Page 23: ...sulation washers fiber washers and wing nuts removed from handle as shown A Attach upper hinges to back of lid using 10 24x1 2 machine screws 5x15 fiber washers and 10 24 flange nuts Hinge should curve downward when properly installed B 5x15 Fiber Washer Qty 8 10 24x1 2 Machine Screw Qty 4 10 24 Flange Nut Qty 4 10 24 Flange Nut Qty 4 5x15 Fiber Washer Qty 8 10 24x1 2 Machine Screw Qty 4 23 10 24x...

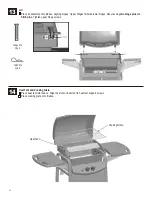
Page 24: ...Upper Hinges fit inside lower hinges Secure using two hinge pins and hitch pins Tighten upper hinge screws 13 Heat Tent and Cooking Grate Place heat tent into firebox Align the slots on heat tent to heat tent support screws Place cooking grate onto firebox 14 Cooking Grate Heat Tent 24 ...

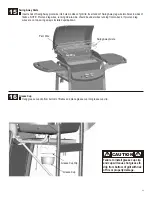
Page 25: ...k of fire or property damage CAUTION Grease Cup Clip Grease Cup Swing Away Grate Insert ends of Swing Away pivot wire into holes in sides of grill lid Insert ends of Swing Away leg wire into holes in sides of firebox NOTE Pivot and leg wires running side to side should be under wires running front to back If pivot and leg wires are on top swing away is installed upside down Leg Wire Pivot Wire Swi...

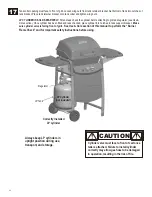
Page 26: ...k checked place cylinder into notches in tank support bracket Make sure cylinder valve is facing front of grill See Use Care section of this manual to perform the Burner Flame Check and for important safety instructions before using Always keep LP cylinders in upright position during use transport and storage CAUTION Cylinder valve must face to front of cart once tank is attached Failure to instal...

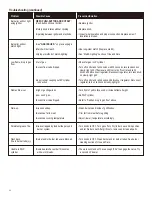
Page 27: ...der Turn off LP cylinder valve Return LP cylinder to gas supplier Turn off LP cylinder valve Remove regulator from cylinder and visually inspect rubber seal for damage See LP Cylinder Leak Test and Connecting Regulator to the LP Cylinder Turn off control knobs and LP cylinder valve Leave lid open to allow flames to die down After fire is out and grill is cold remove burner and inspect for spider n...

Page 28: ...knob Inspect wire insulation and proper connection Replace wires if insulation is broken Use long stem match fireplace match See Match Lighting section of Use and Care Check for gas in LP cylinder Turn off control and tank knobs wait 30 seconds turn tank knob on slowly light grill If flames are still low turn off control and tank knobs and disconnect regulator Reconnect regulator turn tank knob on...

Page 29: ...NOTES 29 ...

Page 30: ...NOTES 30 ...

Page 31: ...N TRANSFERABLE LLENEESTA TARJETAY DEVUELVALADENTRODE LOS 10 DIASDE LA COMPRA PARA EL SERVICIODE GARANTIAES NECESARIOQUE PRESENTESU COMPROBANTEDE COMPRA CONSERVELA FACTURA ESTAGARANTIAES INTRANSFERIBLE VEUILLEZCOMPLETERCETTECARTEET LA RETOURNERDANSLES10 JOURSSUIVANTL ACHAT POUROBTENIRLE SERVICESOUSGARANTIE UNE PREUVED ACHAT DOIT ETREPRESENTEE VEUILLEZCONSERVERVOTREFACTURE LA PRESENTEGARANTIEN EST P...

Page 32: ...TO RECEIVE A SPECIAL OFFER CHARBROIL COM REGISTER CHECK OUT THESE GREAT FEATURES ON OUR WEBSITE Valuable product information Inspiring grilling accessories Reliable customer support Delicious recipes and tips from chefs Exciting events and promotions And much more ...

Reviews: