background image

Menu


39 of 73 


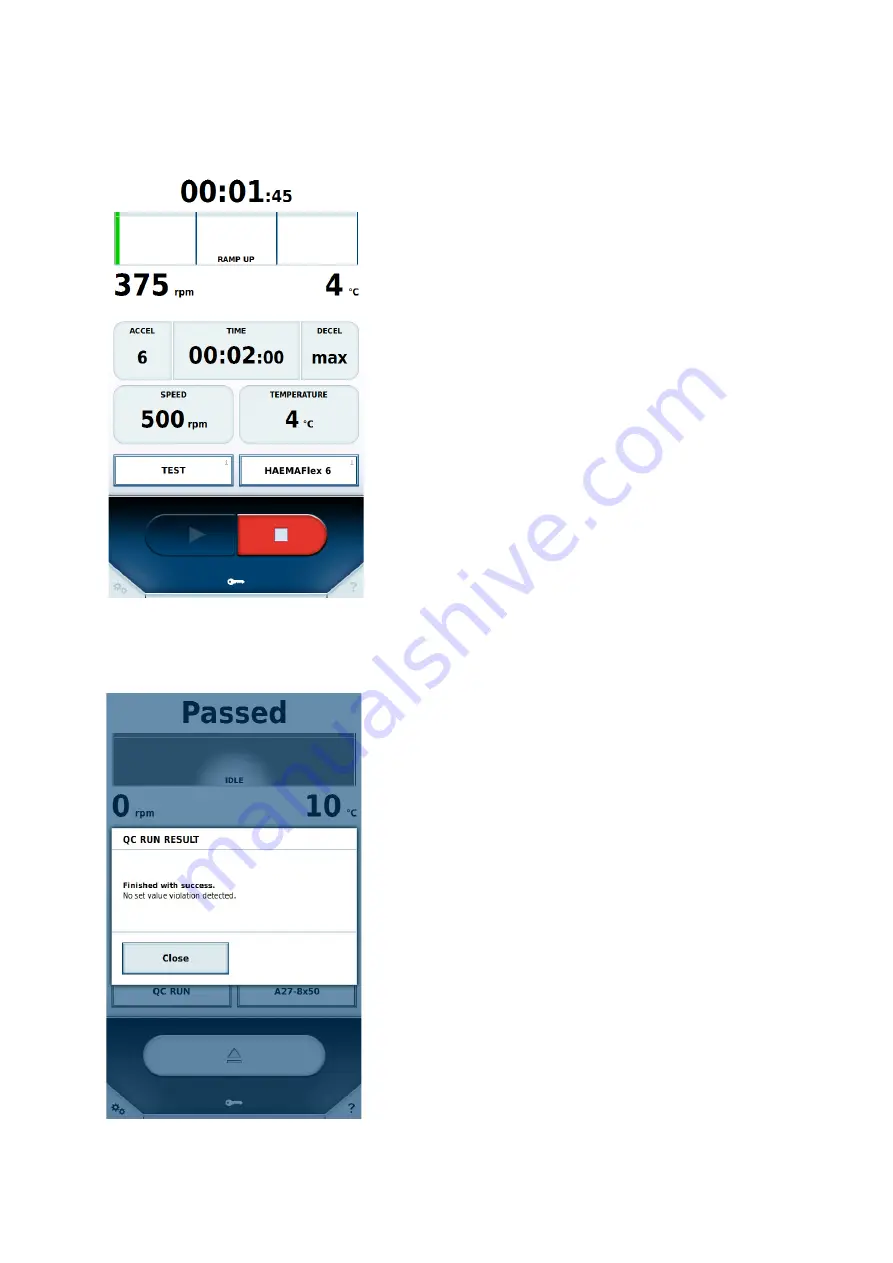
During execution of a QC run, a check is made whether the set values of the individual programs can be achieved. 
The functionality is tested and any potential malfunctions are detected. 


If the temperature is not reached by the end of a program or a step in a steprun, the program or step is repeated. 
If by the end of a program or a step in a steprun the required speed is not achieved, the QC run is abandoned. 


Summary of Contents for Sorvall BIOS 16

Page 1: ...rface for Thermo Scientific Sorvall BP 8 16 Heraeus Cryofuge 8 16 Sorvall BIOS 16 Heavy Duty and Heavy Duty Water Cooled Centrifuges Instruction Manual 50150733 d 2019 10 Visit us online to register your warranty thermofisher com labwarranty ...

Page 2: ...de 18 3 USB Import Export 19 4 Power over Ethernet PoE 20 5 GMP Mode 21 5 1 GMP Workflow 21 5 2 Predefined Barcodes 25 6 Menu 26 6 1 Help 27 6 1 1 Training Videos 27 6 1 2 Instruction Manual 28 6 1 3 Calculator 29 6 2 Runs 30 6 2 1 Programs 30 6 2 2 Run Log 41 6 2 3 Rotor Log 44 6 3 Configuration 45 6 3 1 Users 45 6 3 2 Settings 48 6 3 3 Device 51 6 3 4 Contact 52 7 Thermo Scientific Centri Vue Ap...

Page 3: ... Overview Menu 58 7 4 2 Discovery Menu 59 7 4 3 Detail View 60 7 4 4 Adding a Centrifuge 61 7 4 5 Edit Centrifuge Entry 63 7 4 6 Remote Control 65 8 REST Webserver 68 8 1 Resource Overview 68 8 2 Detailed description of the resources 68 ...

Page 4: ...The Main Screen 4 of 73 1 The Main Screen The main screen is divided into three sections Status current values and progress Set value entry area Centrifuge control menu and help ...

Page 5: ...messages are shown here The statuses that may occur are Status Meaning Ready Centrifugation can be started Door open Door of centrifuge is open Error An error has occurred Interrupted Centrifugation has been manually interrupted Completed Centrifugation has been successfully completed Pre tempering completed Pre tempering has been successfully completed No rotor No rotor has been placed in the cen...

Page 6: ...ovided that the required user authorizations are available Pressing a particular key opens an input window for the relevant quantity The value currently set is displayed on the keys To leave an entry field press either on the button shown or in an area outside the window The window is closed after 20 seconds without response from the user If the values are changed during centrifugation these take ...

Page 7: ...he appropriate change in the settings There are three different modes for the run time 1 Time A time can be entered When this time expires centrifugation stops You can specify whether the set time begins when the centrifuge is first started or once the acceleration phase is completed 2 HOLD Mode In HOLD mode no time is entered Instead centrifugation continues until it is manually stopped ...

Page 8: ... revolutions per minute rpm or as relative centrifugal force RCF Acceleration cannot continue beyond the maximum speed of the rotor currently in use 1 2 3 Temperature The temperature is entered in degrees Celsius C Positive and negative values may be entered within the range from 20 C to 40 C If this value is changed the centrifuge cools the rotor chamber to the specified temperature straight away...

Page 9: ...he available values may be different The smallest value represents the minimum acceleration or deceleration the largest value represents the maximum For certain profile sets a deceleration cutout speed can be set for the deceleration profile When this option is active a speed must be set in rpm Once the centrifuge reaches this speed during the deceleration phase power to the motor is cut off No fu...

Page 10: ...y Thermo Scientific Sorvall RC3 BP Thermo Scientific Sorvall RC 12 BP Thermo Scientific Heraeus Cryofuge 6000i or Thermo Scientific Heraeus Cryofuge 8500i These profiles can be set up in the Settings see section Profile Set For some legacy models an additional option is provided beyond acceleration and deceleration profiles Now the Slow Start option is available in the acceleration profile and the...

Page 11: ...plays the program list see Programs section 1 2 6 Rotor Displays either the name of the rotor currently inserted or the Install Rotor button Pressing the Install Rotor button or inserting a rotor causes the information about the rotor to be displayed If an unknown rotor is to be used the rotor data must first be imported see USB Import Export section ...

Page 12: ...lso be entered in the Rotor window or scanned in with a barcode reader Assigning a serial number enables the cycles to be captured and saved for specific rotors and buckets First select the bucket type used for which the serial numbers are to be entered The Set ID button enables you to enter the serial numbers manually or scan them in with a barcode reader ...

Page 13: ...bers are highlighted in blue Each serial number can only be assigned once If an existing serial number is assigned to a different bucket of the same type the cycles are retained If an existing serial number is assigned to a bucket of a different type the original allocation and cycles are deleted If a different bucket is selected in the Rotor Parameters window all changes made since the window was...

Page 14: ...fo ID button allows you to view and change the serial numbers of the rotor and bucket The number of cycles of the individual elements is displayed Each centrifugation run of the rotor is counted as one cycle If a rotor or bucket is inserted that was last used for this type the serial numbers used are displayed again The serial numbers are stored in the run log ...

Page 15: ...am was selected this button replaces the green Start button see Timed Start section The red Stop button halts the current centrifugation the progress indicator moves to the deceleration phase If a timed start has been planned and the start time has not yet arrived pressing the Stop button cancels the timed start Opens the door of the centrifuge Closes the door of the centrifuge Cannot operate door...

Page 16: ...which the current user level can be changed To do this requires the master passcode see Settings section Logging In If the Protected by User PIN option is enabled in the settings the Log In button appears For this it is necessary that a user be logged in If no user is logged in no centrifugation can take place Pressing the Log In button activates the entry field for the PIN code Registered users c...

Page 17: ...The Main Screen 17 of 73 Example the Temperature button This function can be disabled via the button ...

Page 18: ...d progress display are displayed larger The set value entry fields disappear and the progress display occupies their space The time display is enlarged so that the centrifugation status can be seen clearly from a greater distance It is still possible to stop the centrifuge Pressing on any area of the screen causes it to exit from lighthouse mode Normal Mode Lighthouse Mode ...

Page 19: ...in PDF format The USB stick used for import and export must use the FAT32 file system If the centrifuge is connected to a network run logs can also be downloaded from it as PDF files via http via the centrifuge s IP address and port 801 Thus if for example the IP address assigned to the centrifuge is 192 168 0 1 the address for download is http 192 168 0 1 801 If an unknown rotor has been inserted...

Page 20: ...centrifuge screen is supplied with power via the network connection even if the centrifuge is switched off No centrifugation can be performed in this state When the centrifuge is switched on again however it reaches the ready state faster than would be the case without PoE If the centrifuge is off but connected to a PoE capable device on the network the screen display is as follows ...

Page 21: ...cribed below 1 User Login To log in the barcode assigned to the user must be scanned in Only those users that have already been assigned a barcode in the user management area may log in by means of a barcode see Users section A user with higher rights may use the Admin Login button to log in in order to temporarily interrupt the GMP workflow and make settings When the higher rights user logs out a...

Page 22: ...t have already been assigned a barcode in the program management area can be selected by means of a barcode see Programs section 3 Product Identification Once the program has been selected the serial numbers of the blood bags are entered ...

Page 23: ... END barcode 4 Closing the Door and Starting Centrifugation Once all serial numbers have been scanned in the door can be closed and centrifugation can begin 5 User Identification Once centrifugation is complete and the centrifuge door has been opened a user barcode must again be scanned in with the barcode reader ...

Page 24: ...g this step the workflow recommences from the beginning The workflow sequence is shown in graphical form below Skipping Steps If the Enable Skipping option is active in the settings all further steps can be skipped from any current step Blood bag ID Program ID User ID Centrifugation Run result User ID End barcode ...

Page 25: ... facilitate operation with a barcode reader two predefined barcodes are provided End This barcode must be scanned once scanning of the blood bag serial numbers is completed Cancel Scanning this barcode resets the current step in the GMP workflow ...

Page 26: ...h section contains another level with submenus To quit the menu and return to the main screen either press the Menu button again or click at the top of the screen either on the symbol or in the title area to the left If an item from a submenu has been selected the relevant screen is displayed ...

Page 27: ...7 of 73 6 1 Help 6 1 1 Training Videos The Training Videos submenu contains instructions on various aspects of using the centrifuge Video selection list Video Previous video Play video Pause video Next video ...

Page 28: ...Menu 28 of 73 6 1 2 Instruction Manual The instruction manual submenu contains text articles on the use of the centrifuge Topic selection Topic text ...

Page 29: ...cted rotor The value conversion area contains 4 different values on each side 1 Rotation Speed in RPM This field displays the maximum speed of the currently selected rotor The value can be changed for both rotors 2 Time The run time for rotor 1 can be entered here No time can be entered for rotor 2 since the time for this is calculated from the speeds of rotors 1 and 2 and the run time of rotor 1 ...

Page 30: ...set as the current set values Two predefined programs are always present in this submenu Pre cooling QC Run In addition all programs created by the user are listed here The symbol shows the program currently loaded The symbol activates a timed start With pre defined programs the symbol appears after the name for user defined programs it appears in the detail view ...

Page 31: ... starts for user defined programs Timed Start This mode displays a time at which the centrifuge is due to start with the selected program When a program is activated with the button and then loaded instead of the normal Start button the centrifuge control area shows the Timed Start button Pressing this button displays a window in which the time can be entered Once this time is reached centrifugati...

Page 32: ...grams cannot be edited Loading To load the selected program press the Load button Once it is loaded the main screen appears The values contained in the program are used as the set values Import Export Programs can be imported and exported using a USB stick Program Editor As on the main screen here you can specify the set values to be used later These should be set as per the functions of the main ...

Page 33: ...of 73 In the program editor two buttons appear below the set value entry fields Enter Name and Select Rotor Pressing Enter Name opens a window in which you can enter the program name using an on screen keyboard ...

Page 34: ...lected color appears in the program overview and in the detail view Assigning a color is optional and serves solely to aid recognition of the program The list of available colors is preset and cannot be changed Pressing Select Rotor displays a list of all rotors stored in the system Here a rotor and where applicable a bucket must be chosen that is suitable for the program ...

Page 35: ...on runs that comprise multiple steps Different set values can be given for each step the steps are performed one after another To create a steprun press Create Steprun in the Program Editor Pressing Create Steprun also makes further options available ...

Page 36: ...er speed than the next a deceleration profile can be chosen The following parameters cannot be specified for individual steps they can only be changed while editing the first step Temperature Unit of speed Unit of time Specifying whether the time begins from the start of acceleration or from the point at which the required speed is reached A steprun can contain a maximum of 30 steps ...

Page 37: ...ined by the speeds specified for the individual steps The higher the curve the higher is the speed Previous step Delete current step Current step Total number of steps Add step Next step The current step is highlighted You can select any step by pressing on it directly ...

Page 38: ...emperature parameter can be changed in the set value entry for this All other values are calculated automatically QC Run In this predefined program all the programs created by the user are run in sequence Only those programs to which the appropriate rotor is assigned are included in the run Programs based on HOLD mode are not included The programs are sorted in descending order by temperature and ...

Page 39: ... can be achieved The functionality is tested and any potential malfunctions are detected If the temperature is not reached by the end of a program or a step in a steprun the program or step is repeated If by the end of a program or a step in a steprun the required speed is not achieved the QC run is abandoned ...

Page 40: ...s are achieved by the end of a program the QC run moves on to the next valid program This continues until an error occurs or until all valid programs have been executed On completion of the QC run the user is informed of the result ...

Page 41: ...ists all runs in chronological sequence A maximum of 120 runs can be stored If this number is exceeded the oldest entry is deleted Program name Name of user that performed this run Date and time of completion of run Status of completion of run ...

Page 42: ... Any serial numbers of blood bags recorded for the run are also shown If the set values were changed during the run the symbol appears beside the rotor name The run logs can be exported onto a USB stick connected to the device using the Export List button Valid file formats for export are CSV and PDF ...

Page 43: ...Menu 43 of 73 ...

Page 44: ...ymbol appears beside the rotor currently inserted In addition to the rotor data the number of runs previously performed with this rotor in this centrifuge is displayed Rotor protocols can be exported to a USB stick connected to the device using the Export List button The file format for export is CSV Rotor information ...

Page 45: ...s centrifuge Access level A has the most restricted rights The higher the access level the more rights and functions are available A given access level always has more rights than those of the levels below it Level A This user has the least authorizations He may only start the centrifugation run using the preset program No changes can be made to set value or to the program Level B This user can sw...

Page 46: ...Menu 46 of 73 1 New Creates a new user a Protected by User PIN disabled Only the username can be changed b Protected by User PIN enabled Username PIN code barcode and user level can all be modified ...

Page 47: ...dividual users 3 Log In The selected user is logged in once the PIN code is entered This button is only available where Protected by User PIN is enabled 4 Import Export User data can be exported onto a USB stick and imported from this ...

Page 48: ... the operating controls are disabled Making a change to the set values say or stopping the process are only possible by first unlocking the controls by entering the PIN of the logged in user 4 Logout For this option there are three possibilities a Never The user is never automatically logged out b After Run The user is logged out on completion of the current run c 5 Minutes After Run The user is l...

Page 49: ...his is activated rotors and buckets can be assigned barcodes for identification GMP Tracking Mode The GMP documentation can be activated here see GMP Documentation section If Skipping enabled is active individual steps of the GMP procedure can be skipped Profile Set The profile set can be converted to a different centrifuge type During such conversion all user defined programs and the run log are ...

Page 50: ...ian 29 Serbian When importing data note that only data that has been exported with the same language setting can be imported Date Changes the date The format depends on the language selected Time Changes the time The format depends on the language selected Brightness Control This control adjusts the screen brightness End of run alert Sets the audio signal indicating the end of a run Remote Control...

Page 51: ... and network settings for the centrifuge unit To change network settings the master passcode is required see Settings section Device information Software information User s device name and device location IP address obtained via DHCP or entered manually ...

Page 52: ...section includes fields for the owner s name telephone number and e mail address The master passcode is required to change this information This information is only displayed on this machine Should a fault occur the person named here can be informed Owner Details Contact details of manufacturer ...

Page 53: ...centrifuge with the Centri Vue application 1 Install the touchscreen user interface software on the centrifuge 2 For remote control of the centrifuge you have to make some option changes in the touchscreen user interface To activate the remote control access select Settings Step 1 3 and select the checkbox Remote Control Step 4 3 Download and install the Centri Vue application on your smartphone 4...

Page 54: ...In will be identified automatically in the same LAN Step 3 9 Select the identified centrifuge 10 Select Add Device to add the centrifuge to the device list in the overview menu Optional You can add some additional information about the centrifuge Select the Information field 11 The application switches to the overview menu and shows the formerly added centrifuge entry in an information block name ...

Page 55: ...tri Vue Application 55 of 73 12 Select the added centrifuge entry to switch to detail view 13 For remote control select Request Remote in detail view 14 Generate a new Remote ID Select Generate new ID in the settings screen ...

Page 56: ...creen User Interface 7 3 1 Remote Settings For remote control ability start stop by smartphone application you need to change the settings as described below If you just want to check the status of the centrifuge on your smartphone read only access you do not need to select the checkbox Activate Remote Access in the touchscreen user interface The settings for the remote control feature are located...

Page 57: ...s which influence the behavior of the remote control feature 1 Closed centrifuge If the option Access Control is selected it is not possible to start the centrifuge without login A Remote ID can just be generated if a user is logged in 2 Open centrifuge The option Access Control is not checked It is possible to start the centrifuge without login There are 3 different options for user ID logging a ...

Page 58: ...owing information a Name of the centrifuge if no name is entered for the centrifuge the IP address of the centrifuge is shown instead b Optional information e g for location information c Centrifuge status Select a centrifuge entry to open the detail view for a centrifuge 3 Select Overview to switch to the overview menu 4 Select Discovery to switch to the discovery menu To edit or delete a locally...

Page 59: ... available when the centrifuge is connected to a network with PoE DISCONNECTED Network timeout If a centrifuge error occurred a red cross is displayed 7 4 2 Discovery Menu 1 New discovered devices To start a new discovery open the item list 2 List view all centrifuges found in the network will be displayed For each centrifuge following information is shown a Name of the centrifuge b IP address of ...

Page 60: ...lay shows processing time or remaining time depending on the program selection 4 Status display shows the progress of the centrifuge graphically 5 Current speed shows the current speed of the centrifuge 6 Current temperature shows the current temperature of the centrifuge 7 Acceleration specifies the acceleration of the centrifuge 8 Time specifies the duration of the centrifuge 9 Deceleration spec...

Page 61: ...ovided steps 1 Switch to Discovery menu 2 Open the list New Discovered devices 3 The found centrifuges are displayed in a list of names and IP addresses Note If no name is entered in the centrifuge the name field remains empty 4 Select the desired centrifuge This opens the Add New Device menu 1 Cancel closes the Add New Device menu without saving 2 Name shows the name of the centrifuge The name is...

Page 62: ...centrifuge can be manually saved in the overview menu Select New in the overview menu This opens the Add New Device menu 1 Cancel closes the Add New Device menu without saving 2 IP Address the IP address will be entered automatically if available 3 Information additional information can be entered in order to better identify the centrifuge later 4 Add device selecting this button adds the centrifu...

Page 63: ...ly numbers may be included If an IP address is entered in an invalid format the outline turns red and the add device button will be disabled 7 4 5 Edit Centrifuge Entry The centrifuge entries in the overview menu can be edited or deleted To edit a centrifuge entry select the entry and hold it about 3 seconds The edit menu will open with the following options 1 Select Edit to open the edit menu of ...

Page 64: ... 1 Select Cancel to return to the overview menu 2 Name the name of the centrifuge can only be changed directly at the centrifuge and is therefore not editable 3 IP Address the stored IP address can be changed here 4 Information the information field can be edited here 5 Save changes can be saved ...

Page 65: ...to the overview menu 2 ID the Remote ID from the centrifuge can be entered manually 3 Scan QR Code opens the integrated QR Scanner 4 Verify the entered or scanned code will be verified A new session for this smartphone will be created in case of a successful verification Input by Hand 1 Generate a new ID on the centrifuge 2 Press in the ID field of the Request Remote Access menu The keyboard appea...

Page 66: ...ssage Request Error pops up when selecting Verify no remote connection is established to the centrifuge Possible error sources The remote ID was not transferred correctly from the centrifuge Another user has already built up a remote session with this remote ID The centrifuge and or smartphone are not on the same network QR Code is not Recognized by the Scanner 1 To scan the QR code quickly and co...

Page 67: ... centrifuge Connection to a Network with active PoE The user interface of the centrifuge is a PoE1 enabled device If it is connected to a PoE network port it may remain active after the main power switch of the centrifuge has been turned off While it is in this state the following screens will be displayed at the centrifuge and in the Centri Vue application After turning on the main power switch t...

Page 68: ...lues ace ace value in x xxExx powerDown true orfalse rcf rcf value in xg rpm rotation speed in rpm state state identifier temperature temperature in C time time format hh mm ss error error object name centrifuge name program program name rotorName rotor name setValues accelerationProfile profile number ace ace value in x xxExx decelerationProfile profile number rcf rcf value in xg URL Method allow...

Page 69: ...ion Centrifuge in RPM Mode rpm set rcf contains the value zero Centrifuge in RCF Mode rpm contains the value zero rcf set The distinction of operation mode time hold and ACE is mapped as follows Time Mode time set ace Value is zero ACE Mode time is zero ace is set Hold Mode As in Time Mode but the value for time at setValues is also zero Examples Centrifuge in Time RPM Mode and an error occurred a...

Page 70: ...perature 0 time 00 02 00 user Centrifuge User Centrifuge in Hold RCF Mode actualValues ace null powerDown false rcf 0 rpm null state STOPPED temperature 0 time 00 00 38 error null name My Centrifuge program rotorName F10 4x1000 LEX setValues accelerationProfile 9 ace null decelerationProfile 9 rcf 1000 rpm null temperature 0 time null user ...

Page 71: ...lues ace 0 00E00 powerDown false rcf null rpm 0 state STOPPED temperature 0 time null error null name My Centrifuge program rotorName F10 4x1000 LEX setValues accelerationProfile 9 ace 2 22E02 decelerationProfile 9 rcf null rpm 500 temperature 0 time null user ...

Page 72: ... 73 GET device ip port getstate Query status and name of the centrifuge Request No data Response name centrifuge name powerDown true or false state state identifier Example name My Centrifuge powerDown false state STOPPED ...

Page 73: ...n X 100 is a registered trademark of Sigma Aldrich Co LLC Valox is a registered trademark of General Electric Co Specifications terms and pricing are subject to change Not all products are available in all countries Please consult your local sales representative for details Shown pictures within the manual are examples and may differ considering the set parameters and language Pictures of the Ther...

Reviews: