

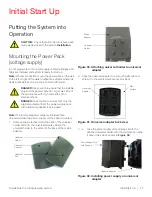


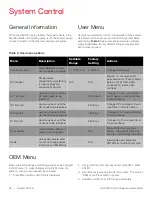
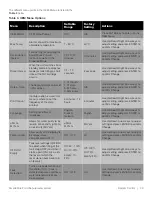


Smart2Pure Pro Ultrapure water system
Maintenance | 39
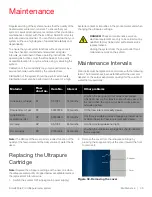
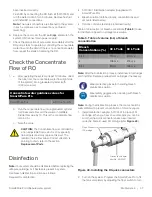
Figure 47. Detaching ultrafilter
Note:
Ensure that the ferrule on the ¼” inch tubes are not
lost in the process. You will need these again for
re-attaching the tube.
3. a
Pull the ultra-filter out of the mounting bracket.
b. Mark the position of the bottom fitting before you
remove them. Use the open-end wrench size 17 mm
/ 0.67 inch to unscrew the bottom fitting on the
ultra-filter.
Note:
When you install a new ultra-filter ensure that the arrow
on the filter corresponds to the direction of flow through the
filter (it must point upward).
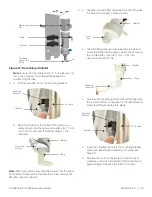
4. a
Take the new ultra-filter and wrap the bottom threads
in Teflon strip (roughly 3 times around).
b. Take the fitting that you unscrewed in step 3b and
screw the fitting into the same position that it was on
the old ultra-filter. Use the 17 mm / 0.67 inch
open-end wrench for this.
c. Screw on the measuring cell and insert the tubes into
the top and bottom connection for the ultra-filter and
screw the fittings securely into place.
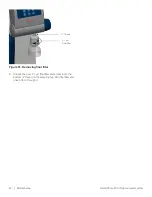
d. Insert the ultra-filter back into the mounting bracket
and screw back the UV assembly into place (see
Step 2c).
e. Replace the cover on the system, open the feed-
water tap and switch the system ON (connect main
power supply). Dispense the first 5 L of water.
Measuring
Cell
Ultrafilter
Threaded
Connection
Fitting
Fitting
Mounting
Bracket
UV Lamp
Ultrafilter
Ultrafilter
Fitting
Open End
Wrench
Teflon
Tape
Ultrafilter
Threaded
Connection
Ultrafilter
Fitting
Mounting
Bracket
UV Lamp
Ultrafilter


