background image

19

20

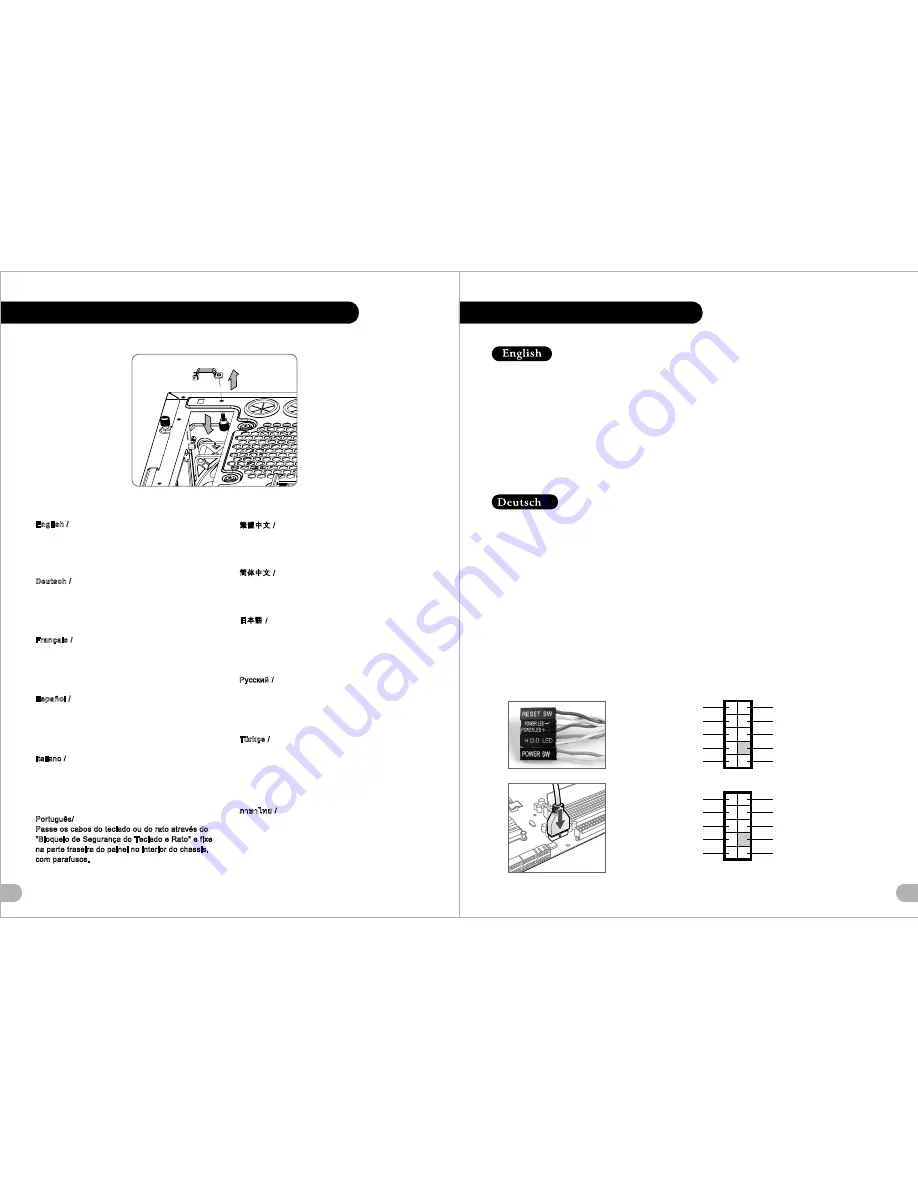
Keyboard & Mouse Security Lock Usage

English /

Deutsch /

Français /

Español /

Italiano /

Português/ 

Passe os cabos do teclado ou do rato através do 

"Bloqueio de Segurança do Teclado e Rato" e fixe 

na parte traseira do painel no interior do chassis, 

com parafusos.

Place the keyboard or mouse cables through the 

Keyboard & Mouse Security Lock  then secure it 

back to the back panel from inside of the chassis 

with screw. 

Führen Sie die Kabel durch die Einheit  Tastatur- & 

Maussperren  und sichern Sie sie dann wieder an 

der Rückwand innerhalb des Gehäuses mit den 

Schrauben.

Mettez les câbles du clavier ou de la souris à 

travers le  verrou de sécurité de clavier & souris  

puis sécurisez-les sur le panneau arrière à l'intérieur 

du châssis avec des vis.

Mettez les câbles du clavier ou de la souris à 

travers le  verrou de sécurité de clavier & souris  

puis sécurisez-les sur le panneau arrière à l'intérieur 

du châssis avec des vis.

Posizionare i cavi della tastiera o del mouse sulla 

tastiera e il blocco di sicurezza del mouse , quindi 

fissarli sul pannello posteriore dall interno dello 

chassis con la relativa vite.

 /

 /

 /

 /

 /

 /

 /

Türkçe


/

 /


  . 


Klavye veya fare kablolar n


Klavye ve Fare 

Güvenlik Kilidi  üzerinden yerle tirin ve daha sonra, 
güvenlik kilidini kasan n iç taraf ndan arka panele 
yeniden vidalay n. 


Leads Installation Guide

Leads Installation Guide

Case LED Connection

 / On the front of the case, you can find some LEDs and switch leads. Please consult your user 

manual of your motherboard manufacturer, then connect these leads to the panel header on the motherboard.

USB 2.0 Connection

 / Please consult your motherboard manual to find out the section of  USB connection .

USB 3.0 connection

 / 

1. 

Make sure your motherboard supports internal  USB 3.0 connection.

2. Connect the USB 3.0 cable to the available USB 3.0 port on your computer.

Audio Connection

 / Please refer to the following illustration of Audio connector and your motherboard user manual. 

Please select the motherboard which used AC 97 or HD Audio(Azalia),(be aware of that your audio supports AC 97 or HD 

Audio (Azalia)) or it will damage your device(s).

Anschlüsse herstellen

Gehäuse-LED-Verbindungen

 / Auf der Gehäusevorderseite finden Sie einige LEDs und Verbindungen. Bitte nehmen 

Sie die Gebrauchsanweisung Ihres Motherboard Herstellers zur Hilfe und schließen Sie diese Verbindungen an die Panel 

Header Belegung des Motherboards an.

USB 2.0 Anschluss

 / Bitte nehmen Sie die Gebrauchsanweisung Ihres Motherboards zur Hilfe und lesen Sie unter dem 

Kapitel  USB Anschlüsse  nach.

USB 3.0 Anschluss

 / 

1. Stellen Sie sicher, dass Ihre Hauptplatine den internen USB 3.0 Anschluss unterstützt.

2. Verbinden Sie das USB 3.0 Kabel mit dem USB 3.0 Port auf Ihrem Computer.

Audio Anschlüsse

 / Bitte beachten Sie die folgende Abbildung der Audio Anschlüsse und die Anweisung in der 

Gebrauchsanweisung Ihres Motherboards. Bitte wählen Sie das Motherboard, das AC 97 oder HD Audio(Azalia) 

verwendet, (achten Sie darauf, dass Ihr Audio AC 97 bzw. HD Audio (Azalia unterstützt)). Andernfalls entstehen schwere 

Schäden an Ihrem(n) Gerät(en)!!!

AUDIO AC'97 Function

GROUND

L-RET

R-RET

NC

BROWN

RED

MIC IN

MIC POWER

KEY
BLUE

NC

BLUE

L-OUT

YELLOW

R-OUT

BLACK

YELLOW

PRESENCE#

BLACK

SENSE1_RETURN

AUD GND

SENSE2_RETURN

YELLOW

BROWN

RED

PORT1 R
PORT2 R

PORT1 L

BLUE

PORT2 L

SENSE_SEND

KEY

PURPLE

GREEN

ORANGE

BLACK

AUDIO AZALIA Function

Summary of Contents for Soprano VO9000 Series

Page 1: ...л чит т нич ю н льт цию гл т чн Б з вы дны www sotmarket ru д бн я инф м ция т в тзывы бз ы и ы Инструкция New Soprano VO900M1N2N Thermaltake Перейти в карточку товара 8 800 775 98 98 ...

Page 2: ...ks belong to their respective companies www thermaltake com User s Manual Benutzerhandbuch Mode d emploi Manual del usuario Manuale dell utente Manual do Utilizador kullan c elkitab EEE Yönetmeli ine Uygundur Tested To Comply With FCC Standards FOR HOME OR OFFICE USE VO9000 Series Just Mute it ...

Page 3: ...icro ATX 12 x 9 6 ATX I O Ports PSU Standard PS2 PSU LCS Upgradable Front intake 200 x 200 x 20 mm Blue LED fan x 1 600rpm 13dBA Rear exhaust 120 x 120 x 25 mm Turbo fan 1000rpm 16dBA Bottom Intake optional 120 x 120 x 25 mm USB 3 0 x 2 USB 2 0 x 2 HD Audio x 1 Supports 1 2 3 8 1 4 water tube 4 x 5 25 1 x 3 5 5 x 3 5 or 2 5 1 x 3 5 or 2 5 Side Panel Disassembly Motherboard Installation PSU Install...

Page 4: ...or de la CPU El límite de altura para el disipador de calor de la CPU es de 175 mm 6 9 pulgadas Límite de longitud para la tarjeta gráfica VGA El límite de longitud para la tarjeta gráfica VGA en de 315 mm 12 4 pulgadas Attenzione Limite di altezza per il dissipatore di calore della CPU Il limite di altezza per il dissipatore di calore della CPU è 175 mm 6 9 Limite di lunghezza per la VGA schede g...

Page 5: ...aneli aç n Motherboard Installation English 1 Lay down the chassis 2 Install the motherboard in proper location and secure it with screws Deutsch 1 Legen Sie das Gehäuse auf die Seite 2 Installieren Sie die Hauptplatine in ihrer vorgesehenen Position und sichern Sie sie mit Schrauben Français 1 Posez à plat le châssis 2 Installez la carte mère dans l endroit approprié et sécurisez la avec des vis ...

Page 6: ... 25 Zoll Einheit in den Laufwerksschacht um die Einheit zu sperren Anmerkung Drücken Sie den 5 25 Zoll werkzeuglosen Mechanismus um die Einheit zu verriegeln Français 1 Enlevez le couvercle de la baie de lecteur de 5 25 2 Faites glisser le périphérique de 5 25 dans la baie de lecteur Remarque Appuyez sur le mécanisme sans outil de 5 25 pour déverrouiller le périphérique Español 1 Extraiga la tapa ...

Page 7: ... External 3 5 Device Installation Italiano 1 Rimuovere il coperchio dell alloggiamento dell unità da 3 5 pollici 2 Inserire il dispositivo nel vano dell unità da 3 5 3 Inserire il dispositivo HDD da 3 5 e fissarlo con le viti Português 1 Remova a cobertura da baía da unidade de 3 5 2 Insira o dispositivo na baía da unidade de 3 5 3 Insira o disco rígido de 3 5 e aparafuse 1 3 5 2 3 5 3 3 5 HDD 1 3...

Page 8: ...e fixe com parafusos 3 Schieben Sie den Schacht wieder in den Festplattenkäfig 3 Deslize a bandeja do disco rígido de volta para a caixa do disco rígido Français 1 Enlevez le boîtier du disque dur 1 2 Placez le disque dur de 2 5 ou de 3 5 dans le boîtier et fixez le avec des vis 2 2 5 3 5 3 Refaites glisser le boîtier du disque dur dans la cage de disques durs 3 Español 1 Extraiga la bandeja del d...

Page 9: ...leur SATA Le mode AHCI permet l échange à chaud des disques durs SATA sans devoir éteindre l ordinateur avant de connecter ou de débrancher le disque dur Veuillez suivre les directives de votre carte mère ou de votre carte contrôleur SATA pour activer la fonction AHCI Si vous utilisez un disque dur neuf il devra être initialisé formaté avant de devenir accessible Pour plus d informations sur comme...

Page 10: ...como iniciar formatar um disco rígido novo consulte o manual de utilizador do disco rígido ou visite Sistema a funcionar no Windows 7 http www thermaltakeusa com Faq aspx ID 1143 Sistema a funcionar no Windows Vista http www thermaltakeusa com Faq aspx ID 1079 Sistema a funcionar no Windows XP http www thermaltakeusa com Faq aspx ID 1073 SATA 6 0Gbps SATA SATA SATA SATA SATA AHCI AHCI SATA SATA AH...

Page 11: ...a a a daki adresleri ziyaret edin Windows 7 üzerinde çal an sistem http www thermaltakeusa com Faq aspx ID 1143 Windows Vista üzerinde çal an sistem http www thermaltakeusa com Faq aspx ID 1079 Windows XP üzerinde çal an sistem http www thermaltakeusa com Faq aspx ID 1073 SATA 6 0 Gbps SATA SATA SATA SATA AHCI Advanced Host Controller Interface SATA AHCI Hotswap SATA SATA AHCI Windows 7 http www t...

Page 12: ... Please consult your motherboard manual to find out the section of USB connection USB 3 0 connection 1 Make sure your motherboard supports internal USB 3 0 connection 2 Connect the USB 3 0 cable to the available USB 3 0 port on your computer Audio Connection Please refer to the following illustration of Audio connector and your motherboard user manual Please select the motherboard which used AC 97...

Page 13: ...LOW BROWN RED PORT1 R PORT2 R PORT1 L BLUE PORT2 L SENSE_SEND KEY PURPLE GREEN ORANGE BLACK AUDIO AZALIA Function Guida di installazione dei contatti Connessione del LED del case Nella parte anteriore del case sono presenti alcuni contatti per interruttori e LED Consultare il manuale utente del produttore della scheda madre quindi connettere i contatti alla parte superiore del pannello sulla sched...

Page 14: ...SB 2 0 LED USB 2 0 USB USB 3 0 1 USB 3 0 2 USB 3 0 USB 3 0 AC 97 HD Azalia AC 97 HD Azalia LED LED USB 2 0 USB 3 0 LED POWER Switch USB 2 0 USB USB 3 0 1 USB 3 0 2 USB 3 0 USB3 0 AC 97 HD Azalia LED AUDIO AC 97 Function GROUND L RET R RET NC BROWN RED MIC IN MIC POWER KEY BLUE NC BLUE L OUT YELLOW R OUT BLACK YELLOW PRESENCE BLACK SENSE1_RETURN AUD GND SENSE2_RETURN YELLOW BROWN RED PORT1 R PORT2 ...

Page 15: ...erformance which also increases loads to power supplies Therefore selecting a suitable and reliable power supply becomes a necessary lesson for all PC users Why Choose Thermaltake Power Supply Quality From Within Every power supply units from Thermaltake should pass a very strict quality control before sent to customers including BIT Burn in test for over 8 continuous hour in a 45 room to test if ...

Page 16: ...л т з з любым д бным б м гл т чн я л жб дд ж и Д т в з з в в ии ф мл ни дит нл н з 2 мин ты м нии Д т в и л т вин и тзывы ции и ид и New Soprano VO900M1N2N Thermaltake Описание Характеристики Отзывы ...

Reviews: