36
5. Insulating the Dome
You’ll now wrap the Oven Dome in Ceramic Fibre Blanket, which is the insulation material to prevent heat
escaping from your brick dome. We provide you with green ‘Vet Exam’ gloves to protect your arms from the
itchy fibres, also remember to wear the appropriate safety equipment. See the instructional videos for more
details on the easiest way to install the Ceramic Fibre Blanket.
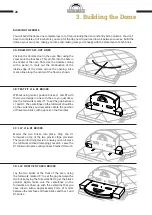
6A: CERAMIC FIBRE BLANKET LAYER 1
Take the full roll of Ceramic Fibre Blanket and wrap it
around the base of the dome, resting it on top of the
heat bank layer. You’ll need to cut ‘V’ sections out of
the top of the blanket as shown to allow the blanket
to wrap tightly against the dome surface.
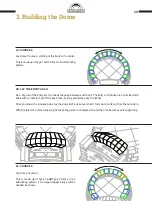
6B: CERAMIC FIBRE BLANKET LAYER 1
Now run a section of blanket from the back of the
PreCast Flue Gallery to the back of the dome, then
trim pieces to fill in the gaps. Providing it’s not too
windy, the blanket should remain in place. Remember
to wear a good quality dust mask and goggles when
working with the Ceramic Fibre Blanket.
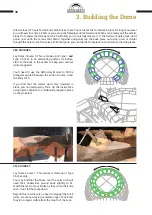
6C: CERAMIC FIBRE BLANKET LAYER 2
Repeat 6A & 6B, but this time the horizontal section
will rest on your concrete benchtop, insulating the
edge of the heat bank layer. Don’t throw any offcuts
away until you have the dome fully covered, there is
just the right amount of blanket in your kit!
OPTIONAL WATER BARRIER SYSTEM
If your oven will never get rained on, you can skip to step 6D. If not, we recommend that you install our water
barrier system. This minimises rain water soaking into the oven base from beneath the render. When rainwater
runs down the oven dome, it pools on the stand surface and can be drawn in by capillary action if the render
isn’t well sealed against the stand, which is difficult to do as the render dome expands and contracts under use.
Run the aluminium flashing around the oven perimeter, including the front, and attach it using the 100mm
screws, pre-drilling holes in the flashing. Don’t over-tighten the screws going through the blanket. Fold down
the high sections around the floor tiles. Once you’ve completed 6E, clean the stand surface with a solvent like
methylated spirits, then seal between the flashing and the stand surface with the high temp silicone. Silicone
around the screw and nail holes as best you can, as well as the overlapping joint at the end of the flashing.
Insulating the Dome
Summary of Contents for D95
Page 1: ...D95 Brick Oven D95 PRECUT BRICK OVEN KIT Instruction Booklet ...
Page 44: ...44 Examples ...
Page 45: ...45 Examples ...


